

In this article, you will learn how to send HTML emails in Rust using the Simple Mail Transfer Protocol (SMTP). We’ll begin by creating HTML templates using the Handlebars templating engine. While there are other template options in Rust, we’ll focus on Handlebars because it’s widely used and reliable.
Next, we’ll cover how to load the SMTP credentials from an environment variables file. This approach allows you to easily use different SMTP credentials without modifying the code. If you already have the credentials, that’s great! But if not, don’t worry. I’ll provide step-by-step instructions on obtaining them later in the article.
Our goal is to build a flexible system for sending various types of HTML emails, such as welcome messages, account verification emails, and password reset instructions. This system will be designed to make it easy to send different types of emails by calling specific methods on the Struct in a sequence.
In a nutshell, we’ll explore how to send HTML emails in Rust using the lettre crate, which is a powerful email client, along with the popular handlebars templating engine. By combining these tools, you’ll be able to create dynamic HTML templates, insert relevant data, and send them to recipients through an SMTP server.
More practice:
- RESTful API in Rust using Axum Framework and MongoDB
- Rust CRUD API Example with Axum Framework and MySQL
- Rust CRUD API Example with Axum and PostgreSQL
- Create a Simple API in Rust using the Axum Framework
- Build a Frontend Web App in Rust using the Yew.rs Framework
- Frontend App with Rust and Yew.rs: User SignUp and Login
- Rust – How to Generate and Verify (JWTs) JSON Web Tokens
- Rust and Actix Web – JWT Access and Refresh Tokens
- Rust and Yew.rs Frontend: JWT Access and Refresh Tokens
- Rust – JWT Authentication with Actix Web
- Build a Simple API with Rust and Rocket
- Build a CRUD API with Rust and MongoDB
- Implement Google and GitHub OAuth2 in Rust Frontend App

Run the Rust Project on your Machine
To quickly set up and run the Rust project for sending SMTP emails without the need to write any code, you can follow these simple steps:
- Download or clone the Rust project from the repository: https://github.com/wpcodevo/rust-send-html-smtp-emails. Open the source code in your preferred code editor.
- Build the project to install all the necessary dependencies by executing the command
cargo build. - Make a copy of the
.env.examplefile and rename the duplicate as.env. Open the newly created .env file and provide your SMTP credentials. If you’re unsure about obtaining these credentials, refer to the instructions provided at the end of this article. - Once you have added your SMTP credentials to the .env file, you are ready to run the project. Simply execute the command
cargo runin your terminal. If everything is configured correctly, you will see two success messages indicating that the password reset and account verification emails have been sent. In case of any errors, double-check the accuracy of your SMTP credentials in the.envfile.
Setup the Rust Project
If you don’t have an existing Rust project, you can generate one using the following commands. This will create a new Rust project called rust-send-html-smtp-emails and automatically open it in Visual Studio Code:
cargo new rust-send-html-smtp-emails
cd rust-send-html-smtp-emails
code .
To install all the necessary crates for this project, open the integrated terminal in your code editor and execute the following commands:
cargo add handlebars
cargo add dotenv
cargo add serde_json
cargo add lettre -F "tokio1, tokio1-native-tls"
cargo add serde -F derive
cargo add tokio -F full
Below is a concise description of each crate and its role in sending HTML emails:
handlebars– A templating engine used to dynamically generate HTML templates for the email content.dotenv– Loads environment variables from a.envfile, ensuring secure storage of sensitive information like SMTP credentials.serde_json– Enables JSON serialization and deserialization, facilitating the insertion of data into email templates.lettre– A feature-rich email client for sending emails via SMTP servers.serde– Enables serialization and deserialization of Rust data structures, aiding in data handling for email generation.tokio– An asynchronous runtime that supports concurrent operations, allowing for efficient handling of email-sending processes.
If you encounter any difficulties with a crate while following this article, it may be due to breaking changes introduced in a newer version. In such situations, you can revert to the specific version recommended below to ensure compatibility and smooth execution.
Cargo.toml
[package]
name = "rust-send-html-smtp-emails"
version = "0.1.0"
edition = "2021"

# See more keys and their definitions at https://doc.rust-lang.org/cargo/reference/manifest.html

[dependencies]
dotenv = "0.15.0"
handlebars = "4.3.7"
lettre = { version = "0.10.4", features = ["tokio1", "tokio1-native-tls"] }
serde = { version = "1.0.163", features = ["derive"] }
serde_json = "1.0.96"
tokio = { version = "1.28.1", features = ["full"] }
Build the HTML Email Templates
Let’s start by building the HTML templates. First, we will create a layout template that can be utilized as the foundation for other templates. Then, we’ll create a partial that will contain the CSS styles and include it in the base template. Lastly, we’ll design various HTML email templates, including those for account verification and password reset purposes.
I’d like to mention that the HTML email template used in this project is not something I created from scratch. Instead, I found it on GitHub and it has been a valuable resource for this project. You can access it at https://github.com/leemunroe/responsive-html-email-template. If you find it beneficial for your project, I encourage you to show your support by giving the repository a star.
Create the Base Template
To create the base layout template for our HTML emails, follow these steps:
- Start by creating a new folder named “templates” in the root directory of your project.
- Inside the “templates” folder, create another folder called “layouts“. This folder will hold our layout template files.
- Within the “layouts” folder, create a file named
base.hbsand add the following code:
templates/layouts/base.hbs
<!DOCTYPE html>
<html>
<head>
<meta name="viewport" content="width=device-width, initial-scale=1.0" />
<meta http-equiv="Content-Type" content="text/html; charset=UTF-8" />
<title>{{subject}}</title>
{{!-- Include Styles --}}
{{> styles}}
</head>
<body>
<table role="presentation" border="0" cellpadding="0" cellspacing="0" class="body">
<tr>
<td> </td>
<td class="container">
<div class="content">
<!-- START CENTERED WHITE CONTAINER -->
{{> @partial-block}}
<!-- END CENTERED WHITE CONTAINER -->
</div>
</td>
<td> </td>
</tr>
</table>
</body>
</html>
This base template serves as the foundation for our other HTML templates. It includes the necessary HTML structure and a placeholder {{> styles}} to include the CSS styles partial. The {{> @partial-block}} expression is used to render the content of each HTML template within the base template during the rendering process.
Create the CSS Styles Partial Template
Now let’s create the partial template that will contain the CSS styles needed to style the HTML email and give it an aesthetically pleasing and responsive appearance. Since we included the {{> styles}} expression in the base template, Handlebars expects us to create a styles.hbs file within a ‘partials‘ directory.
To create the partial, follow these steps:
- Create a ‘partials‘ folder within the ‘templates‘ directory.
- Inside the ‘partials‘ folder, create a
styles.hbsfile and include the CSS code below.
templates/partials/styles.hbs
<style>
    /* -------------------------------------
          GLOBAL RESETS
      ------------------------------------- */

    /*All the styling goes here*/

    img {
        border: none;
        -ms-interpolation-mode: bicubic;
        max-width: 100%;
    }

    body {
        background-color: #f6f6f6;
        font-family: sans-serif;
        -webkit-font-smoothing: antialiased;
        font-size: 14px;
        line-height: 1.4;
        margin: 0;
        padding: 0;
        -ms-text-size-adjust: 100%;
        -webkit-text-size-adjust: 100%;
    }

    table {
        border-collapse: separate;
        mso-table-lspace: 0pt;
        mso-table-rspace: 0pt;
        width: 100%;
    }

    table td {
        font-family: sans-serif;
        font-size: 14px;
        vertical-align: top;
    }

    /* -------------------------------------
          BODY & CONTAINER
      ------------------------------------- */

    .body {
        background-color: #f6f6f6;
        width: 100%;
    }

    /* Set a max-width, and make it display as block so it will automatically stretch to that width, but will also shrink down on a phone or something */
    .container {
        display: block;
        margin: 0 auto !important;
        /* makes it centered */
        max-width: 580px;
        padding: 10px;
        width: 580px;
    }

    /* This should also be a block element, so that it will fill 100% of the .container */
    .content {
        box-sizing: border-box;
        display: block;
        margin: 0 auto;
        max-width: 580px;
        padding: 10px;
    }

    /* -------------------------------------
          HEADER, FOOTER, MAIN
      ------------------------------------- */
    .main {
        background: #ffffff;
        border-radius: 3px;
        width: 100%;
    }

    .wrapper {
        box-sizing: border-box;
        padding: 20px;
    }

    .content-block {
        padding-bottom: 10px;
        padding-top: 10px;
    }

    .footer {
        clear: both;
        margin-top: 10px;
        text-align: center;
        width: 100%;
    }

    .footer td,
    .footer p,
    .footer span,
    .footer a {
        color: #999999;
        font-size: 12px;
        text-align: center;
    }

    /* -------------------------------------
          TYPOGRAPHY
      ------------------------------------- */
    h1,
    h2,
    h3,
    h4 {
        color: #000000;
        font-family: sans-serif;
        font-weight: 400;
        line-height: 1.4;
        margin: 0;
        margin-bottom: 30px;
    }

    h1 {
        font-size: 35px;
        font-weight: 300;
        text-align: center;
        text-transform: capitalize;
    }

    p,
    ul,
    ol {
        font-family: sans-serif;
        font-size: 14px;
        font-weight: normal;
        margin: 0;
        margin-bottom: 15px;
    }

    p li,
    ul li,
    ol li {
        list-style-position: inside;
        margin-left: 5px;
    }

    a {
        color: #3498db;
        text-decoration: underline;
    }

    /* -------------------------------------
          BUTTONS
      ------------------------------------- */
    .btn {
        box-sizing: border-box;
        width: 100%;
    }

    .btn>tbody>tr>td {
        padding-bottom: 15px;
    }

    .btn table {
        width: auto;
    }

    .btn table td {
        background-color: #ffffff;
        border-radius: 5px;
        text-align: center;
    }

    .btn a {
        background-color: #ffffff;
        border: solid 1px #3498db;
        border-radius: 5px;
        box-sizing: border-box;
        color: #3498db;
        cursor: pointer;
        display: inline-block;
        font-size: 14px;
        font-weight: bold;
        margin: 0;
        padding: 12px 25px;
        text-decoration: none;
        text-transform: capitalize;
    }

    .btn-primary table td {
        background-color: #3498db;
    }

    .btn-primary a {
        background-color: #3498db;
        border-color: #3498db;
        color: #ffffff;
    }

    /* -------------------------------------
          OTHER STYLES THAT MIGHT BE USEFUL
      ------------------------------------- */
    .last {
        margin-bottom: 0;
    }

    .first {
        margin-top: 0;
    }

    .align-center {
        text-align: center;
    }

    .align-right {
        text-align: right;
    }

    .align-left {
        text-align: left;
    }

    .clear {
        clear: both;
    }

    .mt0 {
        margin-top: 0;
    }

    .mb0 {
        margin-bottom: 0;
    }

    .preheader {
        color: transparent;
        display: none;
        height: 0;
        max-height: 0;
        max-width: 0;
        opacity: 0;
        overflow: hidden;
        mso-hide: all;
        visibility: hidden;
        width: 0;
    }

    .powered-by a {
        text-decoration: none;
    }

    hr {
        border: 0;
        border-bottom: 1px solid #f6f6f6;
        margin: 20px 0;
    }

    /* -------------------------------------
          RESPONSIVE AND MOBILE FRIENDLY STYLES
      ------------------------------------- */
    @media only screen and (max-width: 620px) {
        table.body h1 {
            font-size: 28px !important;
            margin-bottom: 10px !important;
        }

        table.body p,
        table.body ul,
        table.body ol,
        table.body td,
        table.body span,
        table.body a {
            font-size: 16px !important;
        }

        table.body .wrapper,
        table.body .article {
            padding: 10px !important;
        }

        table.body .content {
            padding: 0 !important;
        }

        table.body .container {
            padding: 0 !important;
            width: 100% !important;
        }

        table.body .main {
            border-left-width: 0 !important;
            border-radius: 0 !important;
            border-right-width: 0 !important;
        }

        table.body .btn table {
            width: 100% !important;
        }

        table.body .btn a {
            width: 100% !important;
        }

        table.body .img-responsive {
            height: auto !important;
            max-width: 100% !important;
            width: auto !important;
        }
    }

    /* -------------------------------------
          PRESERVE THESE STYLES IN THE HEAD
      ------------------------------------- */
    @media all {
        .ExternalClass {
            width: 100%;
        }

        .ExternalClass,
        .ExternalClass p,
        .ExternalClass span,
        .ExternalClass font,
        .ExternalClass td,
        .ExternalClass div {
            line-height: 100%;
        }

        .apple-link a {
            color: inherit !important;
            font-family: inherit !important;
            font-size: inherit !important;
            font-weight: inherit !important;
            line-height: inherit !important;
            text-decoration: none !important;
        }

        #MessageViewBody a {
            color: inherit;
            text-decoration: none;
            font-size: inherit;
            font-family: inherit;
            font-weight: inherit;
            line-height: inherit;
        }

        .btn-primary table td:hover {
            background-color: #34495e !important;
        }

        .btn-primary a:hover {
            background-color: #34495e !important;
            border-color: #34495e !important;
        }
    }
</style>
Create the Email Verification Template
Let’s proceed to create the email verification template that will be rendered within the base layout template. To accomplish this, we will place the content inside the {{#> base}} your content here {{/base}} code. This code enables Handlebars to render the content within the base template.
To create the email template for verifying user accounts, follow these steps:
- Create a new file called
verification_code.hbsin the ‘templates‘ folder. - Open the
verification_code.hbsfile and add the code below to the file:
templates/verification_code.hbs
{{#> base}}
<table role="presentation" class="main">
    <!-- START MAIN CONTENT AREA -->
    <tr>
        <td class="wrapper">
            <table role="presentation" border="0" cellpadding="0" cellspacing="0">
                <tr>
                    <td>
                        <p>Hi {{first_name}},</p>
                        <p>Please verify your account to be able to login</p>
                        <table role="presentation" border="0" cellpadding="0" cellspacing="0" class="btn btn-primary">
                            <tbody>
                                <tr>
                                    <td align="left">
                                        <table role="presentation" border="0" cellpadding="0" cellspacing="0">
                                            <tbody>
                                                <tr>
                                                    <td>
                                                        <a href="{{url}}" target="_blank">Verify your account</a>
                                                    </td>
                                                </tr>
                                            </tbody>
                                        </table>
                                    </td>
                                </tr>
                            </tbody>
                        </table>
                        <p>Good luck! Codevo CEO.</p>
                    </td>
                </tr>
            </table>
        </td>
    </tr>

    <!-- END MAIN CONTENT AREA -->
</table>
{{/base}}
In the code snippets above, we used placeholders to represent the data that will be inserted into the template. The placeholder {{first_name}} will be replaced with the first name of the user to whom the email will be sent. Similarly, the placeholder {{url}} will be substituted with the URL to the frontend application, where users can verify their email.
Create the Password Reset Template
Finally, let’s create the HTML email template for the password reset instructions. It’s similar to the account verification email but with some tweaks in the text. Follow these steps:
- Create a new file called
reset_password.hbsin the ‘templates‘ folder. - Open the
reset_password.hbsfile and add the provided code below:
templates/reset_password.hbs
{{#> base}}
<table role="presentation" border="0" cellpadding="0" cellspacing="0" class="body">
<tr>
<td> </td>
<td class="container">
<div class="content">
<!-- START CENTERED WHITE CONTAINER -->
<table role="presentation" class="main">
<!-- START MAIN CONTENT AREA -->
<tr>
<td class="wrapper">
<table role="presentation" border="0" cellpadding="0" cellspacing="0">
<tr>
<td>
<p>Hi {{first_name}},</p>
<p>
Forgot password? Send a PATCH request to with your
password and passwordConfirm to {{url}}
</p>
<table role="presentation" border="0" cellpadding="0" cellspacing="0"
class="btn btn-primary">
<tbody>
<tr>
<td align="left">
<table role="presentation" border="0" cellpadding="0"
cellspacing="0">
<tbody>
<tr>
<td>
<a href="{{url}}" target="_blank">Reset
password</a>
</td>
</tr>
</tbody>
</table>
</td>
</tr>
</tbody>
</table>
<p>
If you didn't forget your password, please ignore this
email
</p>
<p>Good luck! Codevo CEO.</p>
</td>
</tr>
</table>
</td>
</tr>
<!-- END MAIN CONTENT AREA -->
</table>
<!-- END CENTERED WHITE CONTAINER -->
</div>
</td>
<td> </td>
</tr>
</table>
{{/base}}
Load the Environment Variables
Now that we have completed the setup of the HTML email templates, we can proceed with creating a utility function. This function will read the environment variables, specifically the SMTP credentials, from the Rust runtime and deserialize them into a Config struct. This struct will provide access to the credentials from anywhere within the application. Follow these steps:
- Create a new file called
config.rsin the ‘src‘ directory. - Open the
config.rsfile and add the provided code below:
src/config.rs
#[derive(Debug, Clone)]
pub struct Config {
    pub smtp_host: String,
    pub smtp_port: u16,
    pub smtp_user: String,
    pub smtp_pass: String,
    pub smtp_from: String,
    pub smtp_to: String,
}

impl Config {
    pub fn init() -> Config {
        let smtp_host = std::env::var("SMTP_HOST").expect("SMTP_HOST must be set");
        let smtp_port = std::env::var("SMTP_PORT").expect("SMTP_PORT must be set");
        let smtp_user = std::env::var("SMTP_USER").expect("SMTP_USER must be set");
        let smtp_pass = std::env::var("SMTP_PASS").expect("SMTP_PASS must be set");
        let smtp_from = std::env::var("SMTP_FROM").expect("SMTP_FROM must be set");
        let smtp_to = std::env::var("SMTP_TO").expect("SMTP_TO must be set");

        Config {
            smtp_host,
            smtp_pass,
            smtp_user,
            smtp_port: smtp_port.parse::<u16>().unwrap(),
            smtp_from,
            smtp_to,
        }
    }
}
Create a Struct to Send the HTML Emails
Let’s move forward by setting up the Struct that will handle rendering the HTML email templates and sending them to users. Follow these steps:
- Create a new file named
email.rswithin the ‘src’ directory. - Inside the
email.rsfile, include the following dependencies and define the Struct that will hold the methods:
src/email.rs
use handlebars::Handlebars;
use lettre::{
    message::header::ContentType, transport::smtp::authentication::Credentials, AsyncSmtpTransport,
    AsyncTransport, Message, Tokio1Executor,
};

use crate::{config::Config, User};

pub struct Email {
    user: User,
    url: String,
    from: String,
    config: Config,
}
This will import the necessary dependencies and declare the Email Struct, which will store information about the user, URL, sender, and configuration settings.
Initialize the Email Struct
As usual, we need to implement a new method on the Struct that constructs and returns a new Email instance, initializing its fields (user, url, from, and config) with the corresponding values provided as arguments to the new method. To achieve this, add the following code to the src/email.rs file:
src/email.rs
impl Email {
    pub fn new(user: User, url: String, config: Config) -> Self {
        let from = format!("Codevo <{}>", config.smtp_from.to_owned());

        Email {
            user,
            url,
            from,
            config,
        }
    }
}
Method to Create an SMTP Transport
Now we need to define a new_transport method within the impl Email block that is responsible for creating and configuring an asynchronous SMTP transport object (AsyncSmtpTransport<Tokio1Executor>) that will be used for sending the email.
src/email.rs
impl Email {
    // Other code above

    fn new_transport(
        &self,
    ) -> Result<AsyncSmtpTransport<Tokio1Executor>, lettre::transport::smtp::Error> {
        let creds = Credentials::new(
            self.config.smtp_user.to_owned(),
            self.config.smtp_pass.to_owned(),
        );

        let transport = AsyncSmtpTransport::<Tokio1Executor>::starttls_relay(
            &self.config.smtp_host.to_owned(),
        )?
        .port(self.config.smtp_port)
        .credentials(creds)
        .build();

        Ok(transport)
    }
}
In the code snippets above, we created an asynchronous SMTP transport object with the necessary credentials, host, port, and TLS settings, which can then be used for sending the email through the configured SMTP server.
It is important to note that during my implementation, I encountered an SSL error when using the relay method. However, I found a solution by using the starttls_relay method instead. By making this switch, I was able to establish a secure connection with the SMTP server without any errors.
Method to Render the HTML Templates
Next, let’s implement a method called render_template within the impl Email block. This method will take the name of the template and render it within the base template using Handlebars. Additionally, the method will insert the necessary data into the rendered HTML template and return the final result.
src/email.rs
impl Email {
    // Other code above

    fn render_template(&self, template_name: &str) -> Result<String, handlebars::RenderError> {
        let mut handlebars = Handlebars::new();
        handlebars
            .register_template_file(template_name, &format!("./templates/{}.hbs", template_name))?;
        handlebars.register_template_file("styles", "./templates/partials/styles.hbs")?;
        handlebars.register_template_file("base", "./templates/layouts/base.hbs")?;

        let data = serde_json::json!({
            "first_name": &self.user.name.split_whitespace().next().unwrap(),
            "subject": &template_name,
            "url": &self.url
        });

        let content_template = handlebars.render(template_name, &data)?;

        Ok(content_template)
    }
}
Let’s evaluate the above code:
- First, we instantiated a new Handlebars instance. We then registered the essential template files needed for rendering: the main template, the styles partial template, and the base layout template.
- Next, we created a JSON object to hold the data required by the templates. This includes the user’s first name, the email subject (which corresponds to the template name), and the necessary URL for the template.
- Finally, we utilized Handlebars to render the specified template using the provided data and returned the rendered HTML template from the method.
Method to Send the Emails
We are now ready to implement the method responsible for sending the emails. This method takes the HTML email template name and subject as arguments. Firstly, it calls the self.render_template() method to retrieve the HTML template associated with the provided name.
Using the Message::builder() method, we create an email object and set its properties such as the recipient, reply-to address, sender address, subject, content type, and body. This is achieved through method chaining.
To create an asynchronous SMTP transport, we invoke the self.new_transport() method. Finally, we utilize the send method on the ‘transport‘ object to send the constructed email asynchronously. Add the following code snippet to the src/email.rs file:
src/email.rs
impl Email {
    // Other code above

    async fn send_email(
        &self,
        template_name: &str,
        subject: &str,
    ) -> Result<(), Box<dyn std::error::Error>> {
        let html_template = self.render_template(template_name)?;
        let email = Message::builder()
            .to(
                format!("{} <{}>", self.user.name.as_str(), self.user.email.as_str())
                    .parse()
                    .unwrap(),
            )
            .reply_to(self.from.as_str().parse().unwrap())
            .from(self.from.as_str().parse().unwrap())
            .subject(subject)
            .header(ContentType::TEXT_HTML)
            .body(html_template)?;

        let transport = self.new_transport()?;

        transport.send(email).await?;
        Ok(())
    }
}
Send the Account Verification Email
At this point, we have completed most of the work by abstracting the code responsible for generating templates, creating the transport, and sending emails into separate functions. Now, we can utilize the self.send_email() method to send the desired email. In this case, we will focus on sending an account verification email.
To accomplish this, we will create a method called send_verification_code that simply invokes the self.send_email() method, passing the necessary arguments for the account verification email.
src/email.rs
impl Email {
    // Other code above

    pub async fn send_verification_code(&self) -> Result<(), Box<dyn std::error::Error>> {
        self.send_email("verification_code", "Your account verification code")
            .await
    }
}
Send the Password Reset Email
In a similar fashion to the send_verification_code method, we will now create a method called send_password_reset_token that will be responsible for sending the password reset email to the user. This method will invoke the self.send_email() method, providing the template name for the password reset email and the corresponding subject.
To implement this, add the following code to the src/email.rs file:
src/email.rs
impl Email {
    // Other code above

    pub async fn send_password_reset_token(&self) -> Result<(), Box<dyn std::error::Error>> {
        self.send_email(
            "reset_password",
            "Your password reset token (valid for only 10 minutes)",
        )
        .await
    }
}
The Complete Code of the Email File
src/email.rs
use handlebars::Handlebars;
use lettre::{
    message::header::ContentType, transport::smtp::authentication::Credentials, AsyncSmtpTransport,
    AsyncTransport, Message, Tokio1Executor,
};

use crate::{config::Config, User};

pub struct Email {
    user: User,
    url: String,
    from: String,
    config: Config,
}

impl Email {
    pub fn new(user: User, url: String, config: Config) -> Self {
        let from = format!("Codevo <{}>", config.smtp_from.to_owned());

        Email {
            user,
            url,
            from,
            config,
        }
    }

    fn new_transport(
        &self,
    ) -> Result<AsyncSmtpTransport<Tokio1Executor>, lettre::transport::smtp::Error> {
        let creds = Credentials::new(
            self.config.smtp_user.to_owned(),
            self.config.smtp_pass.to_owned(),
        );

        let transport = AsyncSmtpTransport::<Tokio1Executor>::starttls_relay(
            &self.config.smtp_host.to_owned(),
        )?
        .port(self.config.smtp_port)
        .credentials(creds)
        .build();

        Ok(transport)
    }

    fn render_template(&self, template_name: &str) -> Result<String, handlebars::RenderError> {
        let mut handlebars = Handlebars::new();
        handlebars
            .register_template_file(template_name, &format!("./templates/{}.hbs", template_name))?;
        handlebars.register_template_file("styles", "./templates/partials/styles.hbs")?;
        handlebars.register_template_file("base", "./templates/layouts/base.hbs")?;

        let data = serde_json::json!({
            "first_name": &self.user.name.split_whitespace().next().unwrap(),
            "subject": &template_name,
            "url": &self.url
        });

        let content_template = handlebars.render(template_name, &data)?;

        Ok(content_template)
    }

    async fn send_email(
        &self,
        template_name: &str,
        subject: &str,
    ) -> Result<(), Box<dyn std::error::Error>> {
        let html_template = self.render_template(template_name)?;
        let email = Message::builder()
            .to(
                format!("{} <{}>", self.user.name.as_str(), self.user.email.as_str())
                    .parse()
                    .unwrap(),
            )
            .reply_to(self.from.as_str().parse().unwrap())
            .from(self.from.as_str().parse().unwrap())
            .subject(subject)
            .header(ContentType::TEXT_HTML)
            .body(html_template)?;

        let transport = self.new_transport()?;

        transport.send(email).await?;
        Ok(())
    }

    pub async fn send_verification_code(&self) -> Result<(), Box<dyn std::error::Error>> {
        self.send_email("verification_code", "Your account verification code")
            .await
    }

    pub async fn send_password_reset_token(&self) -> Result<(), Box<dyn std::error::Error>> {
        self.send_email(
            "reset_password",
            "Your password reset token (valid for only 10 minutes)",
        )
        .await
    }
}
Send the Emails from the Main Function
And we are done! Now, let’s bring everything together in the main file by including all the Rust files we created as modules. Open the src/main.rs file and replace its existing code with the following code:
src/main.rs
mod config;
mod email;

use dotenv::dotenv;
use email::Email;
use serde::Serialize;

#[derive(Debug, Serialize)]
pub struct User {
    pub name: String,
    pub email: String,
}

#[tokio::main]
async fn main() {
    // Load Environment Variables
    dotenv().ok();

    let config = config::Config::init();

    // Create a User instance
    let user = User {
        name: String::from("Codevo"),
        email: config.smtp_to.to_owned(),
    };

    let verification_code = "my_ultra_secure_verification_code";
    let verification_url = format!("http://localhost:3000/verifyemail/{}", verification_code);

    //  Create an Email instance
    let email = Email::new(user, verification_url, config);

    // Send a verification code email
    if let Err(err) = email.send_verification_code().await {
        eprintln!("Failed to send verification code email: {:?}", err);
    } else {
        println!("✅Email verification code sent successfully!");
    }

    // Send a password reset token email
    if let Err(err) = email.send_password_reset_token().await {
        eprintln!("Failed to send password reset token email: {:?}", err);
    } else {
        println!("✅Password reset token email sent successfully!");
    }
}
Quite a lot is happening in the above code, let’s break it down:
- First, we imported the
configandemailmodules into the main file to access their functionality. - Next, we created a
Userstruct to store the user’s name and email. - In the main function, we called the
dotenv().ok()method to load the environment variables from the .env file into the Rust runtime, allowing us to access them using thestd::env::var()method. - Then, we invoked the
config::Config::init()method to retrieve values from the environment variables and make them available on theConfigstruct. - After that, we created a
Userinstance. Typically, the user’s information would be retrieved from the database, but for the purpose of this example, we simply created a new instance with the necessary values. - Following that, we instantiated an
Emailobject, passing theUserinstance, verification URL, and configuration. - Next, we called the
send_verification_codemethod of theEmailinstance to send the account verification email. - Lastly, we used the
send_password_reset_tokenmethod of theEmailinstance to send the password reset email.
Now you can run the project by using the cargo run command, and if the SMTP credentials are correct, you should receive two emails: one for the email account verification and the other for the password reset instructions.
SMTP Provider to Send Development Emails
When working in a development environment, it is advisable to utilize a test SMTP provider such as Mailtrap to capture test emails instead of sending them to real users. This approach allows you to preview how the emails will appear when received by actual users and make any necessary adjustments.
To capture all the development emails, follow these steps:
- Begin by creating a new account on https://mailtrap.io/ if you haven’t done so already. Once completed, sign in using your credentials, unless you were automatically signed in.
- On the left sidebar, navigate to the ‘Email Testing‘ menu and click on the ‘Inboxes‘ link.
- Within the inboxes page, create a new inbox by selecting the ‘Add Inbox‘ button. Provide a name for the inbox and click ‘Save‘ to create it.
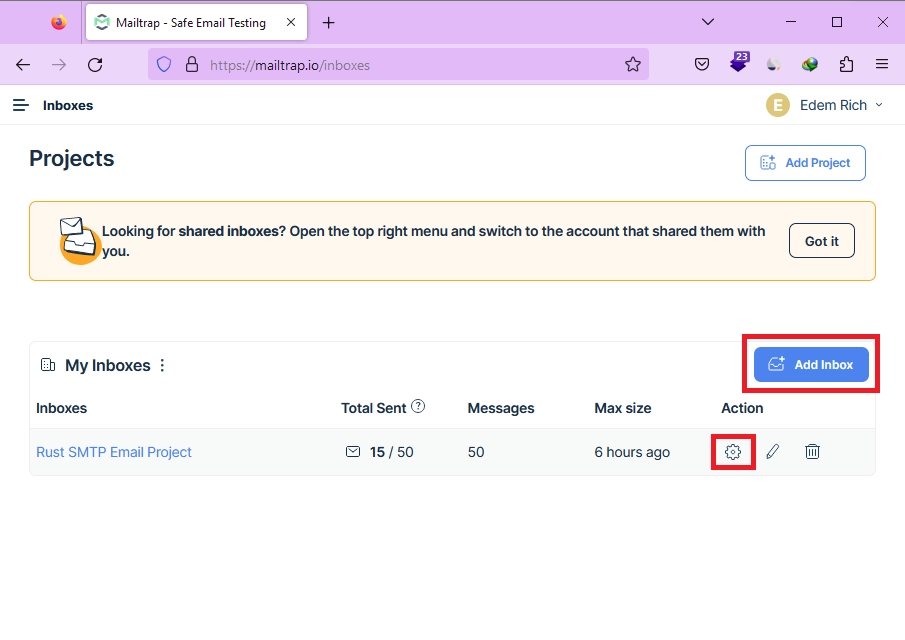
- After the inbox is created, locate the gear icon in the Action section and click on it to access the settings page.
- On the settings page, find the ‘Show Credentials‘ link and click on it to expand the dropdown. You will find the SMTP credentials within. Copy these credentials.

- Finally, add the copied SMTP credentials to your
.envfile.
SMTP Provider to Send Real Emails
If your intention is to send emails to actual users, you will need a reliable SMTP provider suitable for production environments, such as Sendinblue, SendGrid, Mailgun, Postmark, and others. In this example, I will demonstrate how to use Postmark as the chosen SMTP provider. They offer a generous free tier that includes 100 emails per month.
However, there is a restriction: you can only send emails to the same email address used during registration. Both the sender and receiver email addresses must be associated with the registered account. If you wish to send emails to different email addresses, you must obtain approval by submitting a request. This means your account needs to be approved in advance.
To set up your Postmark account, follow these steps:
- Begin by registering a new account at https://postmarkapp.com/. Once the registration process is complete, you will be automatically logged in, and a confirmation email will be sent to you.
- On the ‘My First Server‘ screen, locate and click on the ‘Default Transactional Stream‘ link.
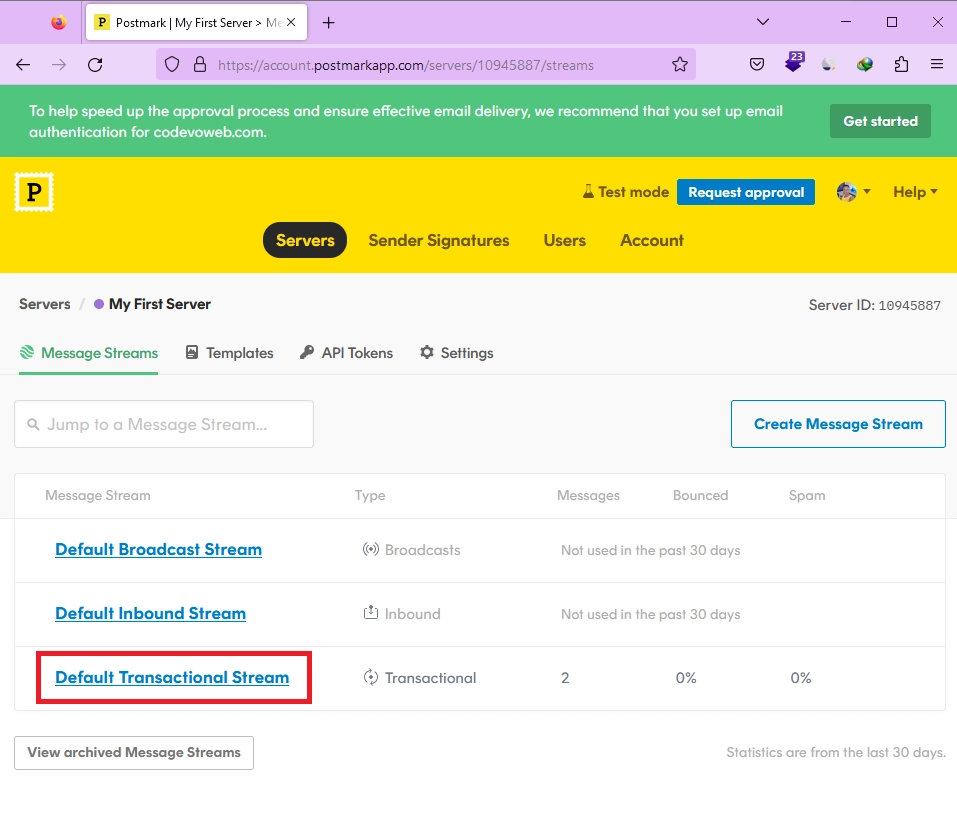
- Within the ‘Default Transactional Stream‘ screen, navigate to the ‘Settings‘ tab.
- On the ‘Settings‘ screen, scroll down to the SMTP section. Here, you will find the SMTP credentials provided by Postmark.
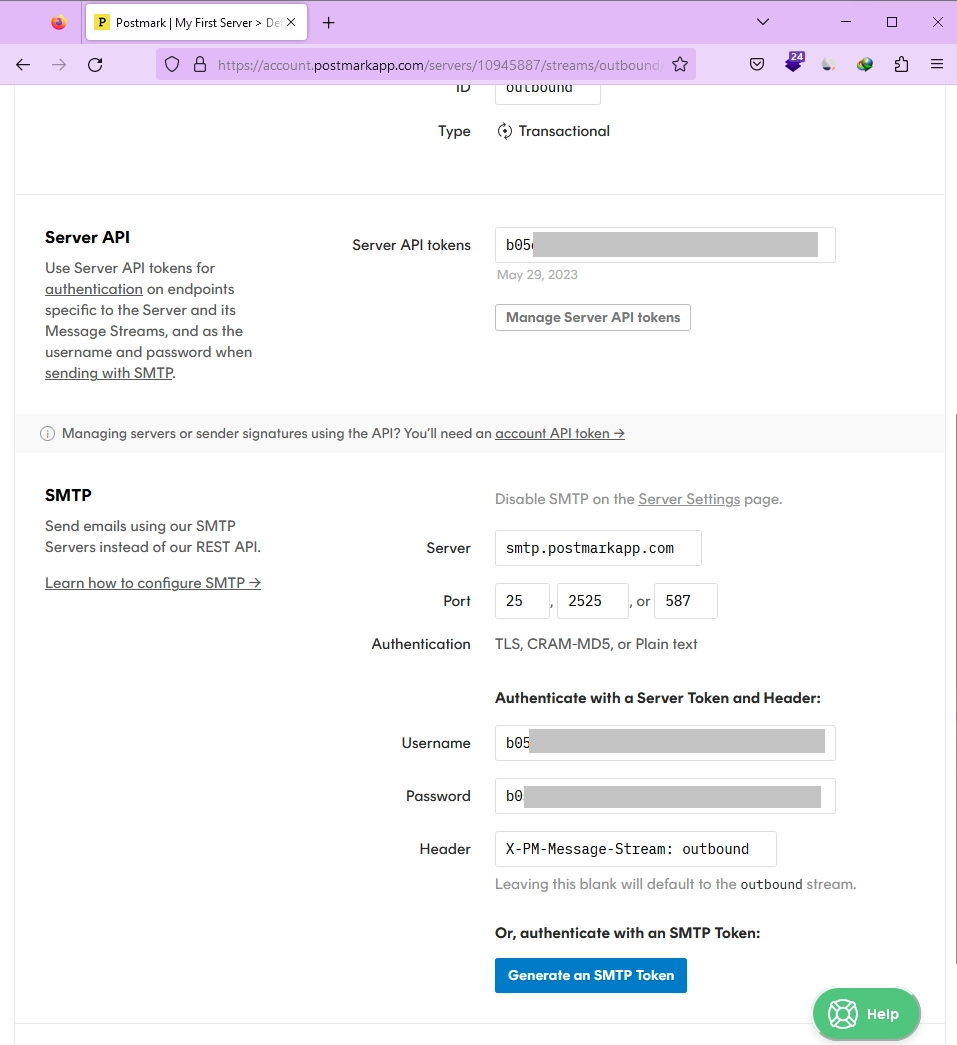
- Copy these SMTP credentials and add them to your
.envfile, ensuring that you configure them correctly.
Conclusion
Congratulations on completing this tutorial! Throughout this tutorial, you have learned how to send emails to users via SMTP in Rust. We have even taken it a step further by building email templates using the Handlebars library.
I hope you have found this article helpful and enjoyable. If you have any questions or feedback, please feel free to leave them in the comment section.