
This article will teach you how to build a GraphQL API with Next.js to implement the basic CRUD operations using apollo-server-micro, TypeGraphQL, MongoDB, Redis, Mongoose, and Typegoose.
Next.js GraphQL API with TypeGraphQL Series:
- GraphQL API with Next.js & MongoDB: Access & Refresh Tokens
- GraphQL CRUD API with Next.js, MongoDB, and TypeGraphQL
- Next.js, GraphQL-CodeGen, & React Query: JWT Authentication
Related Articles:
- GraphQL API with Node.js & MongoDB: JWT Authentication
- Build Golang gRPC Server and Client: Access & Refresh Tokens
- Node.js + Prisma + PostgreSQL: Access & Refresh Tokens
- Golang & MongoDB: JWT Authentication and Authorization
- API with Node.js + PostgreSQL + TypeORM: JWT Authentication
- Node.js + TypeScript + MongoDB: JWT Authentication
- Node.js + TypeScript + MongoDB: JWT Refresh Token
What is TypeGraphQL?
TypeGraphQL is a Node.js framework that follows the object-oriented approach of defining schemas and resolvers using Typescript classes and decorators.
Prerequisites
Before getting started, ensure you have the following:
- Node.js and Docker installed on your machine
- Basic knowledge of JavaScript and TypeScript.
- Should be familiar with GraphQL APIs.
In order to perform the GraphQL CRUD operations, you must first implement the JWT Authentication since the GraphQL server will require the currently logged-in user’s ID to perform the CRUD operations.
Initialize a Typescript Next.js Project
The first step is to initialize a Next.js Typescript boilerplate application using the Next.js project scaffolding tool (next-app):
yarn create next-app nextjs-typegraphql --typescript
# or
npx create-next-app@latest nextjs-typegraphql --typescript
Next, replace the content of the tsconfig.json file with these configurations to inform the TypeScript compiler of the options to use when transpiling the code to JavaScript.
tsconfig.json
{
  "compilerOptions": {
    "target": "es2018",
    "lib": ["dom", "dom.iterable", "esnext", "ESNext.AsyncIterable"],
    "allowJs": true,
    "skipLibCheck": true,
    "strict": true,
    "forceConsistentCasingInFileNames": true,
    "noEmit": true,
    "esModuleInterop": true,
    "module": "esnext",
    "moduleResolution": "node",
    "resolveJsonModule": true,
    "isolatedModules": true,
    "jsx": "preserve",
    "incremental": true,
    "emitDecoratorMetadata": true,
    "experimentalDecorators": true,
    "strictPropertyInitialization": false
  },
  "include": ["next-env.d.ts", "**/*.ts", "**/*.tsx"],
  "exclude": ["node_modules"]
}
emitDecoratorMetadata– Must be set totrueto enable experimental support for emitting type metadata for the decorators we will be writing.experimentalDecorators– Must be set totrueto enable experimental support for decorators.strictPropertyInitialization– Must be set tofalseto prevent Typescript from raising errors when we declare the Typegoose class properties without initializing them in the constructor.target– Must be set toes2018in order for TypeGraphQL to use the features from ES2018.ESNext.AsyncIterable– Must be added to thelibarray since thegraphql-subscriptiondependency depends on anAsyncIterator.
Setup MongoDB and Redis Databases
MongoDB is an open-source NoSQL database that supports rapid iterative development and stores data in BSON (Binary JSON) format.
Redis on the other hand is an open-source, in-memory, key-value pair data store, used as a database, cache, and message broker.
The quickest way to get the Redis and MongoDB databases running on your machine is to use Docker and Docker-compose.
At this point, I assume you already have Docker and Docker-compose installed on your machine.
Now create a docker-compose.yml file in the root directory and add the following configurations to set up the MongoDB and Redis containers.
docker-compose.yml
version: '3.8'
services:
  mongo:
    image: mongo
    container_name: mongodb
    ports:
      - '6000:27017'
    volumes:
      - mongodb:/data/db
    env_file:
      - ./.env
    environment:
      MONGO_INITDB_ROOT_USERNAME: ${MONGO_INITDB_ROOT_USERNAME}
      MONGO_INITDB_ROOT_PASSWORD: ${MONGO_INITDB_ROOT_PASSWORD}
      MONGO_INITDB_DATABASE: ${MONGO_INITDB_DATABASE}
  redis:
    image: redis:latest
    container_name: redis
    ports:
      - '6379:6379'
    volumes:
      - redis:/data
volumes:
  redis:
  mongodb:
Next, create a .env file in the root directory and add the following credentials that will be used by the MongoDB Docker image to configure the MongoDB database.
.env
MONGO_INITDB_ROOT_USERNAME=admin
MONGO_INITDB_ROOT_PASSWORD=password123
MONGO_INITDB_DATABASE=nextjs_typegraphql
Start the Redis and MongoDB Docker containers with this command:
docker-compose up -d
Ensure the containers are running with this command:
docker ps
Stop the containers with this command:
docker-compose down
Setting up Environment Variables
Out of the box, Next.js has built-in support for loading environment variables from the .env.local file.
To load the environment variables into the browser, you will have to prefix them with NEXT_PUBLIC_ whereas the variables without the NEXT_PUBLIC_ prefix will be loaded into the Node.js environment allowing you to use them in the Next.js data fetching methods and API routes.
.env.local
MONGODB_LOCAL_URI=mongodb://admin:password123@localhost:6000/nextjs_typegraphql?authSource=admin
Remember to include both the .env and .env.local files in your .gitignore to avoid pushing them to GitHub.
Connecting to the Redis and MongoDB Databases
Now that we have the Redis and MongoDB servers running smoothly, let’s create some utility functions to connect them to the Next.js application.
Connect to the MongoDB Database
Let’s face it, working directly with the MongoDB driver to implement validations and type casting can be challenging. Due to this reason, the Mongoose library was created to make our lives easier.
By default, Mongoose has built-in features like type casting, validation, query builders, pre/post hooks, and more.
Install Mongoose
yarn add mongoose
# or
npm i mongoose
In the root project, create a server/utils/connectDB.ts file and add the following code:
server/utils/connectDB.ts
import mongoose from 'mongoose';

const localUri = process.env.MONGODB_LOCAL_URI as string;
const connection: any = {};
export async function connectDB() {
  if (connection.isConnected) {
    console.log('DB is already connected');
    return;
  }

  if (mongoose.connections.length > 0) {
    connection.isConnected = mongoose.connections[0].readyState;
    if (connection.isConnected === 1) {
      console.log('use previous connection');
      return;
    }
    await mongoose.disconnect();
  }

  const db = await mongoose.connect(localUri);
  console.log('? MongoDB Database Connected Successfully');
  connection.isConnected = db.connections[0].readyState;
}

export async function disconnectDB() {
  if (connection.isConnected) {
    if (process.env.NODE_ENV === 'production') {
      await mongoose.disconnect();
      connection.isConnected = false;
    } else {
      console.log('not discounted');
    }
  }
}
Connect to the Redis Database
Install the Node.js Redis package:
yarn add redis
# or
npm install redis
To connect to the Redis server, create a server/utils/connectRedis.ts file in the root directory and add the following code:
server/utils/connectRedis.ts
import { createClient } from 'redis';

const redisUrl = 'redis://localhost:6379';

const redisClient = createClient({
  url: redisUrl,
});

const connectRedis = async () => {
  try {
    await redisClient.connect();
  } catch (error: any) {
    setInterval(connectRedis, 5000);
  }
};

connectRedis();

redisClient.on('connect', () =>
  console.log('? Redis client connected successfully')
);

redisClient.on('error', (err) => console.error(err));

export default redisClient;
Setup the GraphQL Apollo Server in Next.js
To configure the Next.js app to run the Apollo server, create a graphql.ts file in the api folder.
Run the following command in the terminal to install the necessary dependencies:
yarn add reflect-metadata apollo-server-micro type-graphql cors micro graphql@15.x
# or
npm install reflect-metadata apollo-server-micro type-graphql cors micro graphql@15.x
apollo-server-micro– is the Micro integration for building production-ready GraphQL APIs.type-graphql– a Node.js framework that uses an object-oriented paradigm to build GraphQL schemas and resolvers using Typescript classes and decorators.cors– configures the Next.js GraphQL API to accept requests from cross-origin domains.
With that out of the way, add the following code to the pages/api/graphql.ts file to enable us to set up and initialize the Apollo GraphQL server.
pages/api/graphql.ts
import 'reflect-metadata';
import { NextApiRequest, NextApiResponse } from 'next';
import { ApolloServer } from 'apollo-server-micro';
import { buildSchema, Query, Resolver } from 'type-graphql';
import Cors from 'cors';
import { connectDB } from '../../server/utils/connectDB';

// Setup cors
const cors = Cors({
  methods: ['GET', 'HEAD', 'POST', 'PUT', 'DELETE', 'PATCH', 'OPTIONS'],
  credentials: true,
  origin: [
    'https://studio.apollographql.com',
    'http://localhost:8000',
    'http://localhost:3000',
  ],
});

// Middleware to run the cors configuration
function runMiddleware(req: NextApiRequest, res: NextApiResponse, fn: any) {
  return new Promise((resolve, reject) => {
    fn(req, res, (result: any) => {
      if (result instanceof Error) {
        return reject(result);
      }

      return resolve(result);
    });
  });
}

@Resolver()
class HelloResolver {
  @Query(() => String)
  hello() {
    return 'Hello World!';
  }
}

const schema = await buildSchema({
  resolvers: [HelloResolver],
});

const server = new ApolloServer({
  schema,
});

export const config = {
  api: {
    bodyParser: false,
  },
};

const startServer = server.start();

export default async function handler(
  req: NextApiRequest,
  res: NextApiResponse
) {
  await runMiddleware(req, res, cors);
  await connectDB();
  await startServer;
  await server.createHandler({ path: '/api/graphql' })(req, res);
}
Before we start the server, there is one Webpack configuration we have to add to the next.config.js file to enable top-level await .
next.config.js
/** @type {import('next').NextConfig} */
const nextConfig = {
  reactStrictMode: true,
  webpack: (config) => {
    config.experiments = config.experiments || {};
    config.experiments.topLevelAwait = true;
    return config;
  },
};

module.exports = nextConfig;
Now we’re ready to start the GraphQL server. Start the Next.js development server with the following command:
yarn dev
# or
npm run dev
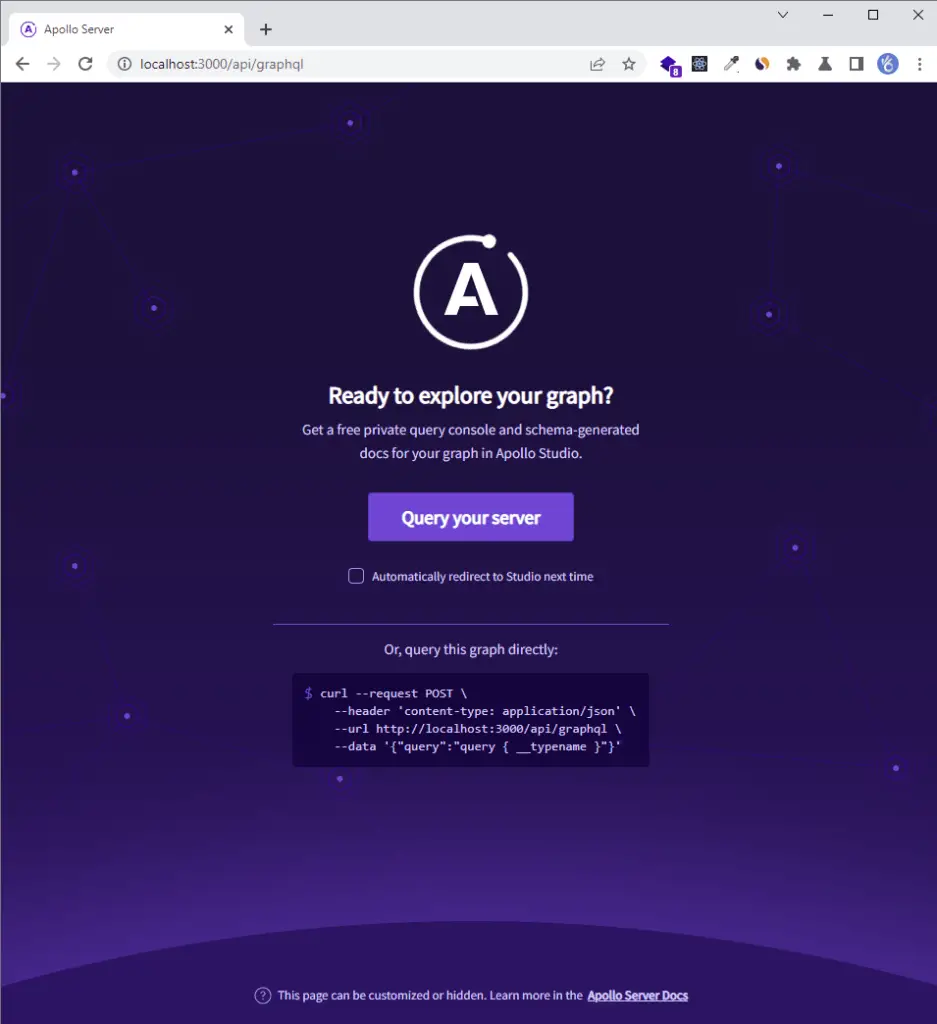
Open http://localhost:3000/api/graphql in your preferred browser and you should see the Apollo Server default landing page:
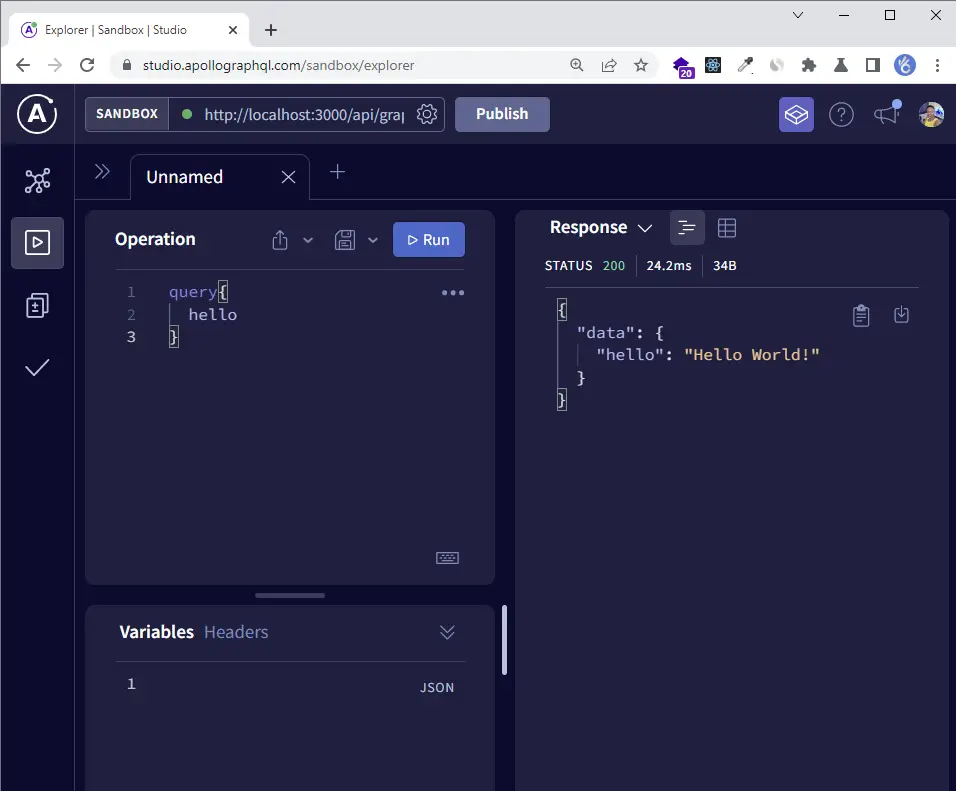
Click the “Query your server” button to open the Apollo Sandbox GUI and execute the hello query in the operation panel. After the query is successful, you will get the “Hello World!” message.
Creating TypeGraphQL and Typegoose Schemas
The GraphQL schema also known as type definitions refers to the data structure of the queries and mutations.
Install the following dependencies:
yarn add @typegoose/typegoose class-validator
# or
npm install @typegoose/typegoose class-validator
@typegoose/typegoose– a library that has tools for writing Mongoose models using Typescript classes and decorators.class-validator– a validation library that supports either decorator or non-decorator-based validation.
Now in the server folder, create a models/post.model.ts file and add the following module imports:
server/models/post.model.ts
import {
  getModelForClass,
  ModelOptions,
  prop,
  Severity,
} from '@typegoose/typegoose';
import type { Ref } from '@typegoose/typegoose';
import { User } from './user.model';
Creating the Typegoose Schema
Typegoose is a Node.js library that allows developers to build Mongoose models using Typescript decorators and classes. The library makes heavy use of Typescript decorators to make the Mongoose models type-rich with Typescript.
server/models/post.model.ts
@ModelOptions({
  schemaOptions: {
    timestamps: true,
  },
  options: {
    allowMixed: Severity.ALLOW,
  },
})
export class Post {
  readonly _id: string;

  @prop({ required: true, unique: true })
  title: string;

  @prop({ required: true })
  content: string;

  @prop({ required: true })
  category: string;

  @prop({ default: 'default.jpeg' })
  image: string;

  @prop({ required: true, ref: () => User })
  user: Ref<User>;
}

const PostModel = getModelForClass<typeof Post>(Post);
export default PostModel;
Creating the TypeGraphQL Schemas
Similar to GraphQL Nexus, TypeGraphQL builds upon the reference implementation for GraphQL but adds built-in TypeScript support making it easier for developers to create type-safe schemas and resolvers.
The schemas are built by defining classes and decorating them and their properties with Typescript decorators.
TypeGraphQL provides us with @InputType() and @ObjectType() decorators that we can use to define the structure of the GraphQL objects and input types.
Create a server/schemas/post.schema.ts file and add the following code:
server/schemas/post.schema.ts
import { MinLength } from 'class-validator';
import { Field, InputType, ObjectType } from 'type-graphql';
import { UserData } from './user.schema';

@InputType()
export class UpdatePostInput {
  @MinLength(10, { message: 'Title must be at least 10 characters long' })
  @Field(() => String, { nullable: true })
  title: string;

  @MinLength(10, { message: 'Content must be at least 10 characters long' })
  @Field(() => String, { nullable: true })
  content: string;

  @Field(() => String, { nullable: true })
  category: string;

  @Field(() => String, { nullable: true })
  image: string;
}

@InputType()
export class PostInput {
  @MinLength(10, { message: 'Title must be at least 10 characters long' })
  @Field(() => String)
  title: string;

  @MinLength(10, { message: 'Content must be at least 10 characters long' })
  @Field(() => String)
  content: string;

  @Field(() => String)
  category: string;

  @Field(() => String)
  image: string;
}

@InputType()
export class PostFilter {
  @Field(() => Number, { nullable: true, defaultValue: 1 })
  page: number;

  @Field(() => Number, { nullable: true, defaultValue: 10 })
  limit: number;
}

@ObjectType()
export class PostDataObj {
  @Field(() => String)
  readonly _id: string;

  @Field(() => String, { nullable: true })
  readonly id: string;

  @Field(() => String)
  title: string;

  @Field(() => String)
  category: string;

  @Field(() => String)
  content: string;

  @Field(() => String)
  image: string;

  @Field(() => Date)
  createdAt: Date;

  @Field(() => Date)
  updatedAt: Date;
}

@ObjectType()
export class PostPopulatedData extends PostDataObj {
  @Field(() => UserData)
  user: UserData;
}

@ObjectType()
export class PostData extends PostDataObj {
  @Field(() => String)
  user: string;
}

@ObjectType()
export class PostResponse {
  @Field(() => String)
  status: string;

  @Field(() => PostData)
  post: PostData;
}

@ObjectType()
export class PostPopulatedResponse {
  @Field(() => String)
  status: string;

  @Field(() => PostPopulatedData)
  post: PostPopulatedData;
}

@ObjectType()
export class PostListResponse {
  @Field(() => String)
  status: string;

  @Field(() => Number)
  results: number;

  @Field(() => [PostPopulatedData])
  posts: PostPopulatedData[];
}
In brief, the classes decorated with @InputType() describes the structure of the incoming GraphQL data whereas the classes decorated with @ObjectType() describes the structure of the outgoing GraphQL data.
In the above, you will notice we excluded the ID field from the input classes because it will be automatically generated by the MongoDB server.
Create a Global Error Handler
Now we are ready to create a global error controller to handle all the possible errors the Next.js application will generate.
Luckily for us, the Apollo server package has built-in error classes that we can use to send appropriate GraphQL errors to the client.
server/controllers/error.controller.ts
import { ValidationError } from 'apollo-server-micro';

const handleCastError = (error: any) => {
  const message = `Invalid ${error.path}: ${error.value}`;
  throw new ValidationError(message);
};

const handleValidationError = (error: any) => {
  const message = Object.values(error.errors).map((el: any) => el.message);
  throw new ValidationError(`Invalid input: ${message.join(', ')}`);
};

const errorHandler = (err: any) => {
  if (err.name === 'CastError') handleCastError(err);
  if (err.name === 'ValidationError') handleValidationError(err);
  throw err;
};

export default errorHandler;
In the above, we handled two possible Mongoose errors to prevent the Next.js application from crashing.
Creating the CRUD Services
Now that we have the Typegoose models, TypeGraphQL schemas, and error handler defined, it’s now time to create the CRUD services.
Before defining the CRUD services, let’s create a custom context type to be used in the CRUD services.
In the server folder, create a types/context.ts file and add the following code:
server/types/context.ts
import { NextApiRequest, NextApiResponse } from 'next';
import { User } from '../models/user.model';

export type Context = {
  req: NextApiRequest;
  res: NextApiResponse;
  deserializeUser: (
    req: NextApiRequest,
    res: NextApiResponse
  ) => Promise<User | undefined>;
};
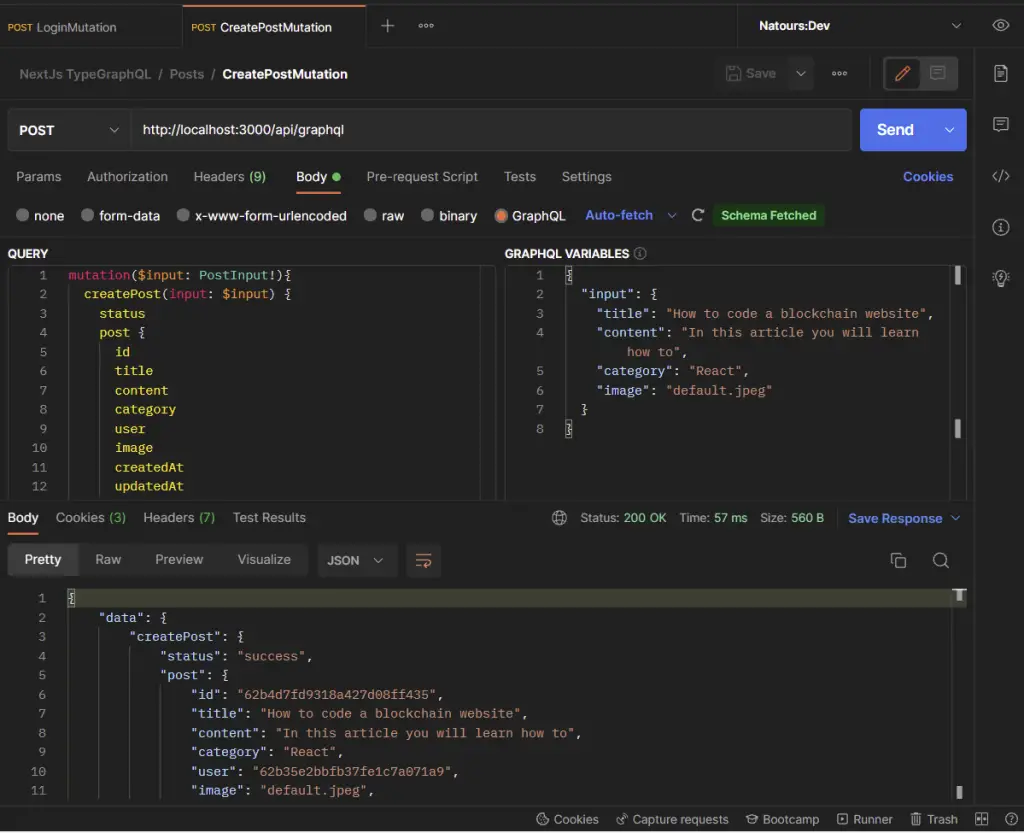
GraphQL Create Post Service
In order to create a post in the database, you must first be authenticated by the GraphQL server since the user ID field required by the post model will be retrieved from the logged-in user’s information.
The title field of the post model has a unique constraint and MongoDB will raise an error with a 11000 code indicating that a unique constraint on the title field has been violated.
server/services/post.service.ts
import { ValidationError } from 'apollo-server-core';
import errorHandler from '../controllers/error.controller';
import deserializeUser from '../middleware/deserializeUser';
import { PostFilter, PostInput } from '../schemas/post.schema';
import PostModel from '../models/post.model';
import { Context } from '../types/context';

export default class PostService {
  // Create a new post
  async createPost(input: Partial<PostInput>, { req, res }: Context) {
    try {
      const user = await deserializeUser(req, res);
      const post = await PostModel.create({ ...input, user: user?._id });
      return {
        status: 'success',
        post: {
          ...post.toJSON(),
          id: post?._id,
        },
      };
    } catch (error: any) {
      if (error.code === 11000)
        throw new ValidationError('Post with that title already exist');
      errorHandler(error);
    }
  }
}
GraphQL Get a Single Post Service
server/services/post.service.ts
export default class PostService {
  // Create a new post

  // Get a single post
  async getPost(id: string, { req, res }: Context) {
    try {
      await deserializeUser(req, res);
      const post = await PostModel.findById(id).populate('user').lean();

      if (!post) return new ValidationError('No post with that id exists');

      return {
        status: 'success',
        post: {
          ...post,
          id: post?._id,
        },
      };
    } catch (error: any) {
      errorHandler(error);
    }
  }
}
GraphQL Update Post Service
server/services/post.service.ts
export default class PostService {
  // Create a new post

  // Get a single post

  // Update a post
  async updatePost(
    id: string,
    input: Partial<PostInput>,
    { req, res }: Context
  ) {
    try {
      const user = await deserializeUser(req, res);
      const post = await PostModel.findByIdAndUpdate(
        id,
        { ...input, user: user?._id },
        {
          new: true,
          runValidators: true,
          lean: true,
        }
      );

      if (!post) return new ValidationError('No post with that id exists');
      return {
        status: 'success',
        post: {
          ...post,
          id: post?._id,
        },
      };
    } catch (error: any) {
      errorHandler(error);
    }
  }
}
GraphQL Get all Posts Service
server/services/post.service.ts
export default class PostService {
  // Create a new post

  // Get a single post

  // Update a post

  // Get all posts
  async getPosts(input: PostFilter, { req, res }: Context) {
    try {
      const user = await deserializeUser(req, res);
      const postsQuery = PostModel.find({ user: user?._id }).populate('user');

      // Pagination
      const page = input.page || 1;
      const limit = input.limit || 10;
      const skip = (page - 1) * limit;

      const posts = await postsQuery
        .sort({ createdAt: -1 })
        .skip(skip)
        .limit(limit)
        .lean();
      return {
        status: 'success',
        results: posts.length,
        posts,
      };
    } catch (error: any) {
      errorHandler(error);
    }
  }
}
GraphQL Delete Post Service
server/services/post.service.ts
export default class PostService {
  // Create a new post

  // Get a single post

  // Update a post

  // Get all posts

  // Delete a post
  async deletePost(id: string, { req, res }: Context) {
    try {
      await deserializeUser(req, res);
      const post = await PostModel.findByIdAndDelete(id);

      if (!post) return new ValidationError('No post with that id exists');

      return true;
    } catch (error: any) {
      errorHandler(error);
    }
  }
}
Complete GraphQL CRUD Services Code
server/services/post.service.ts
export default class PostService {
  // Create a new post
  async createPost(input: Partial<PostInput>, { req, res }: Context) {
    try {
      const user = await deserializeUser(req, res);
      const post = await PostModel.create({ ...input, user: user?._id });
      return {
        status: 'success',
        post: {
          ...post.toJSON(),
          id: post?._id,
        },
      };
    } catch (error: any) {
      if (error.code === 11000)
        throw new ValidationError('Post with that title already exist');
      errorHandler(error);
    }
  }

  // Get a single post
  async getPost(id: string, { req, res }: Context) {
    try {
      await deserializeUser(req, res);
      const post = await PostModel.findById(id).populate('user').lean();

      if (!post) return new ValidationError('No post with that id exists');

      return {
        status: 'success',
        post: {
          ...post,
          id: post?._id,
        },
      };
    } catch (error: any) {
      errorHandler(error);
    }
  }

  // Update a post
  async updatePost(
    id: string,
    input: Partial<PostInput>,
    { req, res }: Context
  ) {
    try {
      const user = await deserializeUser(req, res);
      const post = await PostModel.findByIdAndUpdate(
        id,
        { ...input, user: user?._id },
        {
          new: true,
          runValidators: true,
          lean: true,
        }
      );

      if (!post) return new ValidationError('No post with that id exists');
      return {
        status: 'success',
        post: {
          ...post,
          id: post?._id,
        },
      };
    } catch (error: any) {
      errorHandler(error);
    }
  }

  // Get all posts
  async getPosts(input: PostFilter, { req, res }: Context) {
    try {
      const user = await deserializeUser(req, res);
      const postsQuery = PostModel.find({ user: user?._id }).populate('user');

      // Pagination
      const page = input.page || 1;
      const limit = input.limit || 10;
      const skip = (page - 1) * limit;

      const posts = await postsQuery
        .sort({ createdAt: -1 })
        .skip(skip)
        .limit(limit)
        .lean();
      return {
        status: 'success',
        results: posts.length,
        posts,
      };
    } catch (error: any) {
      errorHandler(error);
    }
  }

  // Delete a post
  async deletePost(id: string, { req, res }: Context) {
    try {
      await deserializeUser(req, res);
      const post = await PostModel.findByIdAndDelete(id);

      if (!post) return new ValidationError('No post with that id exists');

      return true;
    } catch (error: any) {
      errorHandler(error);
    }
  }
}
Creating the CRUD TypeGraphQL Resolvers
Now we are ready to create the queries and mutations with TypeGraphQL to implement the CRUD operations. To create queries and mutations with TypeGraphQL, we need to create a class and decorate the class and its methods with the TypeGraphQL decorators.
server/resolvers/post.resolver.ts
import { Arg, Args, Ctx, Mutation, Query, Resolver } from 'type-graphql';
import {
  PostFilter,
  PostInput,
  PostListResponse,
  PostPopulatedResponse,
  PostResponse,
  UpdatePostInput,
} from '../schemas/post.schema';
import PostService from '../services/post.service';
import type { Context } from '../types/context';

@Resolver()
export default class PostResolver {
  constructor(private postService: PostService) {
    this.postService = new PostService();
  }

  @Mutation(() => PostResponse)
  async createPost(@Arg('input') input: PostInput, @Ctx() ctx: Context) {
    return this.postService.createPost(input, ctx);
  }

  @Query(() => PostPopulatedResponse)
  async getPost(@Arg('id') id: string, @Ctx() ctx: Context) {
    return this.postService.getPost(id, ctx);
  }

  @Mutation(() => PostResponse)
  async updatePost(
    @Arg('id') id: string,
    @Arg('input') input: UpdatePostInput,
    @Ctx() ctx: Context
  ) {
    return this.postService.updatePost(id, input, ctx);
  }

  @Query(() => PostListResponse)
  async getPosts(
    @Arg('input', { nullable: true }) input: PostFilter,
    @Ctx() ctx: Context
  ) {
    return this.postService.getPosts(input, ctx);
  }

  @Mutation(() => Boolean)
  async deletePost(@Arg('id') id: string, @Ctx() ctx: Context) {
    return this.postService.deletePost(id, ctx);
  }
}
In the above, you will notice we leveraged Dependency Injection to decouple the business logic from the services since TypeGraphQL was built with an object-oriented paradigm in mind.
server/resolvers/index.ts
import UserResolver from './user.resolver';
import PostResolver from './post.resolver';

export const resolvers = [UserResolver, PostResolver] as const;
Update the Apollo GraphQL Server
Now let’s bring everything together in the ./pages/api/graphql.ts file. Import the resolver exported in server/resolvers/index.ts file and add it to the schema builder to register the CRUD services.
pages/api/graphql.ts
import 'reflect-metadata';
import { NextApiRequest, NextApiResponse } from 'next';
import { ApolloServer } from 'apollo-server-micro';
import { buildSchema } from 'type-graphql';
import Cors from 'cors';
import { resolvers } from '../../server/resolvers';
import { connectDB } from '../../server/utils/connectDB';
import deserializeUser from '../../server/middleware/deserializeUser';

const cors = Cors({
  methods: ['GET', 'HEAD', 'POST', 'PUT', 'DELETE', 'PATCH', 'OPTIONS'],
  credentials: true,
  origin: [
    'https://studio.apollographql.com',
    'http://localhost:8000',
    'http://localhost:3000',
  ],
});

function runMiddleware(req: NextApiRequest, res: NextApiResponse, fn: any) {
  return new Promise((resolve, reject) => {
    fn(req, res, (result: any) => {
      if (result instanceof Error) {
        return reject(result);
      }

      return resolve(result);
    });
  });
}

const schema = await buildSchema({
  resolvers,
  dateScalarMode: 'isoDate',
});

const server = new ApolloServer({
  schema,
  csrfPrevention: true,
  context: ({ req, res }: { req: NextApiRequest; res: NextApiResponse }) => ({
    req,
    res,
    deserializeUser,
  }),
});

export const config = {
  api: {
    bodyParser: false,
  },
};

const startServer = server.start();

export default async function handler(
  req: NextApiRequest,
  res: NextApiResponse
) {
  await runMiddleware(req, res, cors);
  await connectDB();
  await startServer;
  await server.createHandler({ path: '/api/graphql' })(req, res);
}
Start the MongoDB and Redis containers:
docker-compose up -d
Start the Next.js development server:
yarn dev
# or
npm run dev
Testing the GraphQL CRUD API in Postman
I switched from testing the GraphQL API in the Apollo Sandbox to Postman because there was some issue with the Sandbox not setting the cookies.
You can download and import the collection into your Postman to avoid typing all the queries and mutations from scratch.
-GraphQL Create Post Mutation
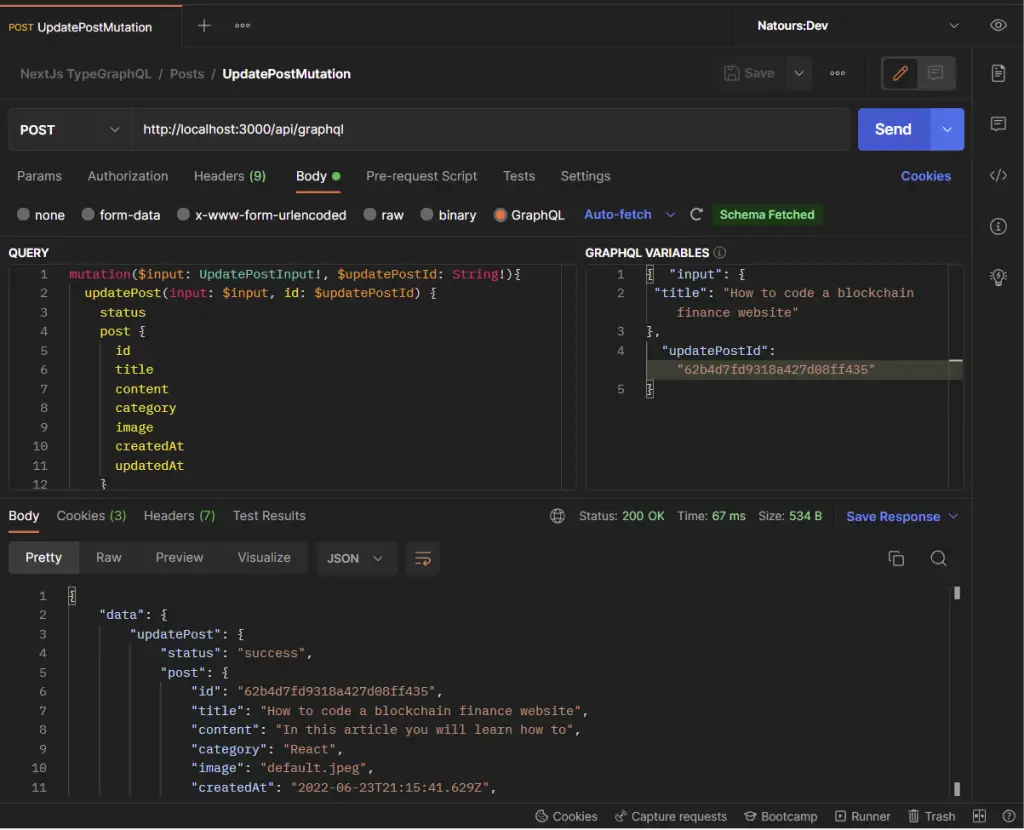
-GraphQL Update Post Mutation
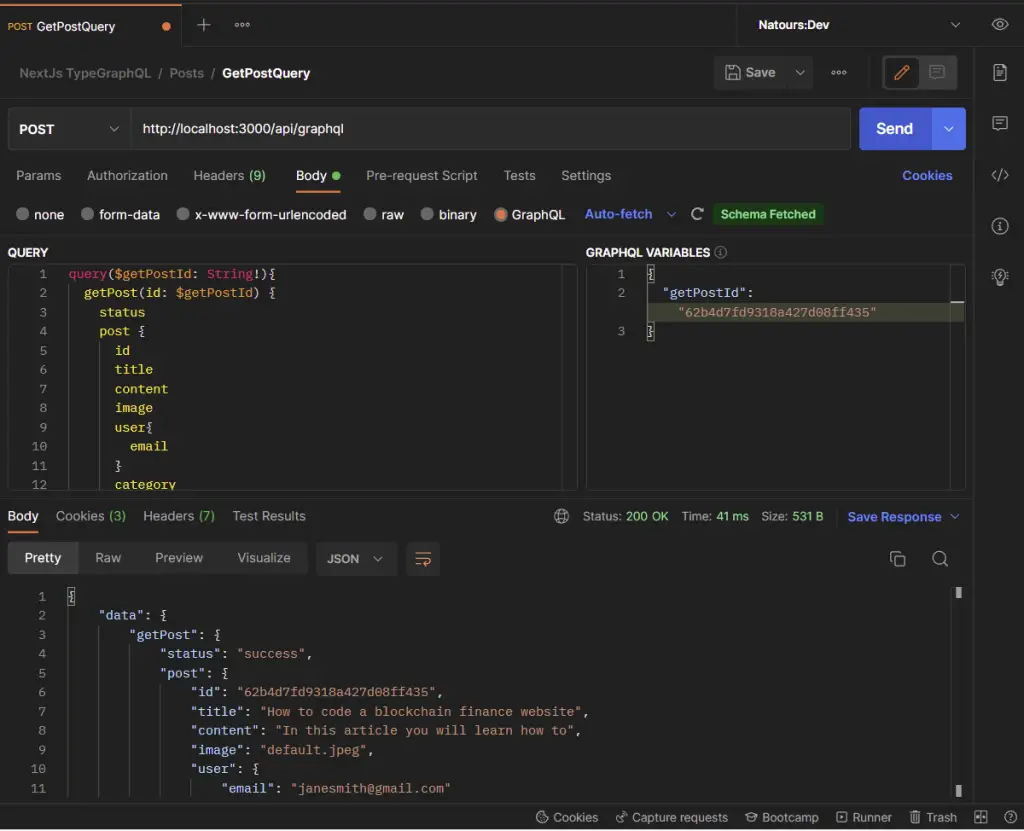
-GraphQL Get a Single Post Query
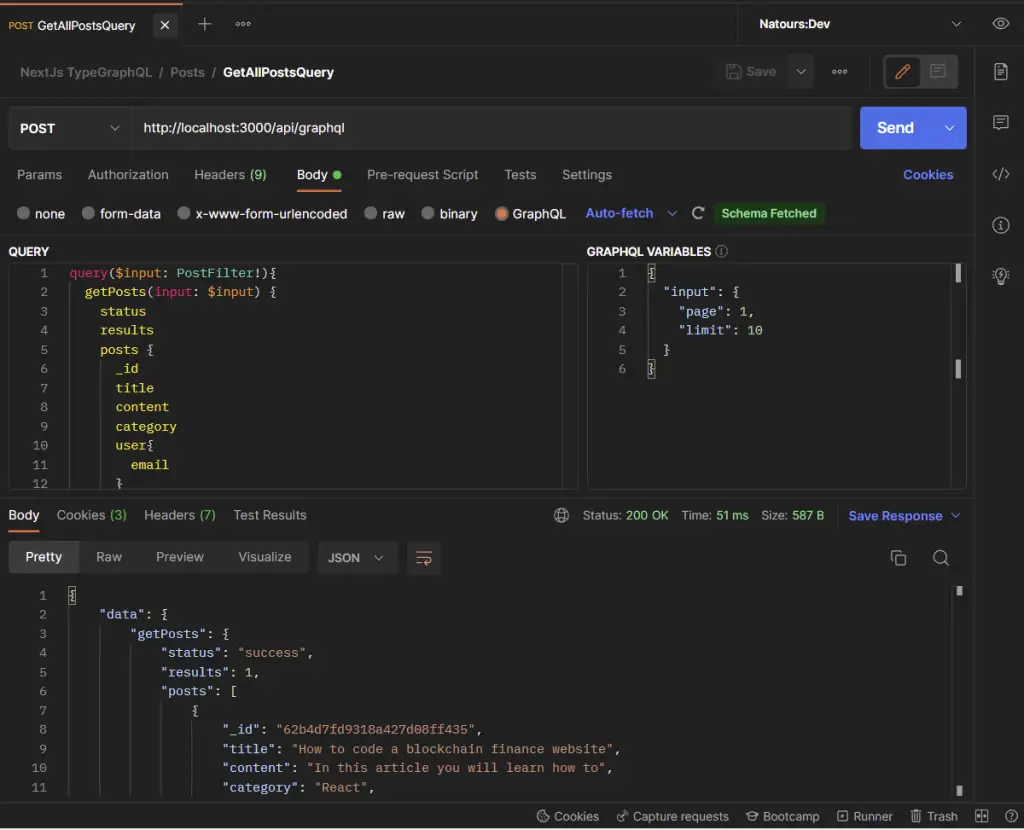
-GraphQL Get All Posts Query
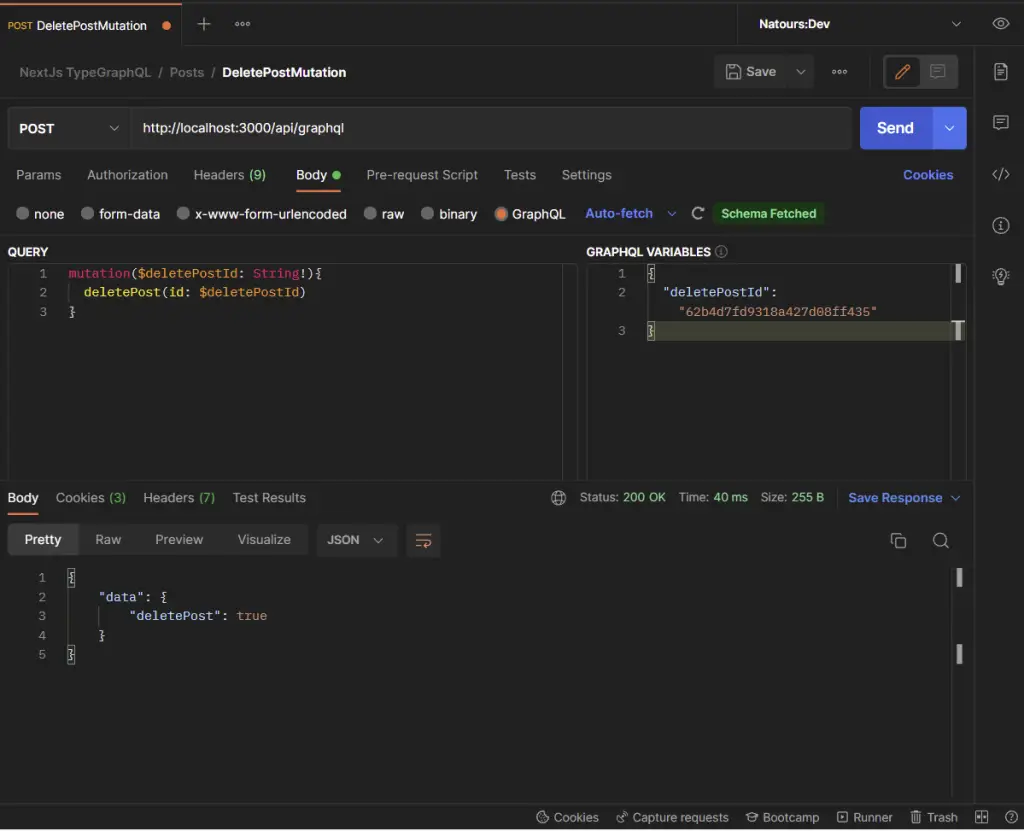
-GraphQL Delete Post Mutation
Conclusion
With this Next.js and Typescript GraphQL CRUD API example with TypeGraphQL, apollo-server-micro, MongoDB, Class Validator, Typegoose, and Mongoose, you’ve learned how to build a GraphQL API with Next.js to implement the basic CRUD (Create/Read/Update/Delete) operations.
Next.js GraphQL CRUD API Source Code
You can find the complete source code on my GitHub page
Thanks for the tutorial, but the video doesn’t work. Can I find it on YouTube or somewhere else.
Sorry for the inconvenience, I checked the video on the article and there is nothing wrong with it.
Nevertheless, the video is hosted on Humix, a video streaming platform similar to YouTube.
You can click on the title below the video to open it on the Humix channel.
Also, you can open the article in a different browser to see if the video will play.
Hello i tried following your tutorial on https://codevoweb.com/graphql-crud-api-nextjs-mongodb-typegraphql/
I really want to learn the stack: Nextjs, Typescript, Apollo, Docker and build a simple crud with it, i cloned your main repo and when i try to register a user, it just says that image is required even tho i have uploaded a image into the form, so i cannot go further with it.
also i copied your env settings, do not know if that is a problem, but i assume not since its local
This article only demonstrates how the GraphQL API can be built with Next.js. Nevertheless, to make the image upload work, follow these steps:
Step 1: Register for an account on Cloudinary
Step 2: Once the account is created, click on the settings icon at the top right corner.
Step 3: On the settings page, click on the Upload tab
Step 4: Scroll down to the Upload presets section and click on the Add upload preset link.
Step 5: Enter the preset name and change the Signing Mode from Signed to Unsigned. You can use nextjs-typegraphql as the preset name.
Also, enter the preset name in the folder name field.
Step 6: Next, click on the Upload Manipulations tab and under the Incoming transformation, click on the Edit link. After that, update the width and height to 1000×1000 and change the image quality type to Automatic – best quality. When you are done, click on the ok button.
Step 7: Click on the Save button to save the settings.
Step 8: Open the client/components/FileUpload.tsx file and add the preset name. Also, replace the Codevo in the Cloudinary URL with your Cloudinary cloud name.