
This article will teach you how to implement JWT Authentication in a GraphQL API using Node.js, MongoDB, Redis, and Apollo Server.
In addition, you’ll learn how to send the access and refresh tokens as HTTPOnly cookies to the user’s browser or client.
Related Articles:
- TypeGraphQL & MongoDB GraphQL API: JWT Authentication
- GraphQL API with Next.js & MongoDB: Access & Refresh Tokens
- Build Golang gRPC Server and Client: Access & Refresh Tokens
- Node.js + Prisma + PostgreSQL: Access & Refresh Tokens
- Golang & MongoDB: JWT Authentication and Authorization
- API with Node.js + PostgreSQL + TypeORM: JWT Authentication
- Node.js + TypeScript + MongoDB: JWT Authentication
- Node.js + TypeScript + MongoDB: JWT Refresh Token
Project Initialization
To initialize a new Node.js project, run the following commands in your terminal:
mkdir node_graphql_api #create project folder
cd node_graphql_api
yarn init -y #initialize a node project
Node.js GraphQL API Overview
Setup MongoDB and Redis with Docker-compose
The most straightforward way to get MongoDB and Redis servers running on your machine is to use Docker and Docker-compose.
I assume you already have Docker and Docker-compose installed on your computer.
In the root directory, create a docker-compose.yml file and add the following code snippets to set up and run the MongoDB and Redis containers on your machine.
docker-compose.yml
version: '3.8'
services:
  mongo:
    image: mongo
    container_name: mongodb
    ports:
      - '6000:27017'
    volumes:
      - mongodb:/data/db
    env_file:
      - ./.env
    environment:
      MONGO_INITDB_ROOT_USERNAME: ${MONGO_INITDB_ROOT_USERNAME}
      MONGO_INITDB_ROOT_PASSWORD: ${MONGO_INITDB_ROOT_PASSWORD}
      MONGO_INITDB_DATABASE: ${MONGO_INITDB_DATABASE}
  redis:
    image: redis:latest
    container_name: redis
    ports:
      - '6379:6379'
    volumes:
      - redis:/data
volumes:
  redis:
  mongodb:
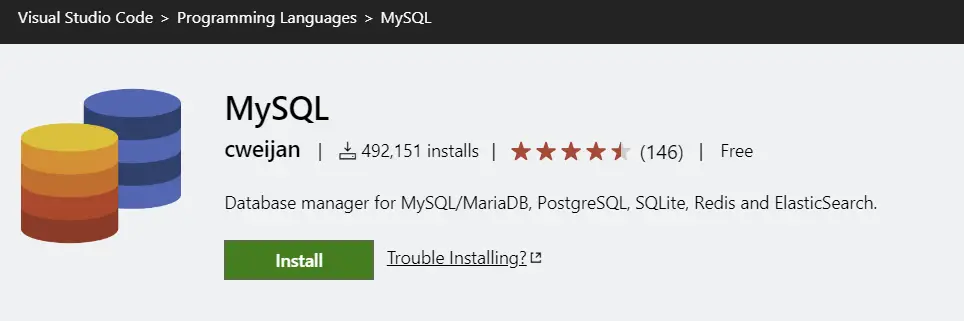
Later, we’ll use the MySQL VS Code extension to view the data stored in either the MongoDB or Redis databases.
To provide the credentials needed by the MongoDB Docker image, we’ll need to set up environment variables.
Setup Environment Variables
The most crucial part of the application is setting up environment variables. Security is always important so we need a way to store sensitive data such as API Keys, passwords, etc.
In this application, we’ll store the sensitive information in a .env file and load them using the dotenv package.
Also, we’ll use the config library to set and retrieve the environment variables.
yarn add config dotenv
.env
NODE_ENV=development
PORT=8000

MONGODB_URI_LOCAL=mongodb://admin:password123@localhost:6000/node_graphql?authSource=admin

MONGO_INITDB_ROOT_USERNAME=admin
MONGO_INITDB_ROOT_PASSWORD=password123
MONGO_INITDB_DATABASE=node_graphql

JWT_ACCESS_PRIVATE_KEY=LS0tLS1CRUdJTiBSU0EgUFJJVkFURSBLRVktLS0tLQpNSUlDV3dJQkFBS0JnR2hDMjI2ZEtBeW5NL0tpV3dKVFcySjRnLzl5QTdNWGtHOGppd1p1WGhyeWMzMURxeEdPClZhL0dIa1dxV1lnTkR5WG1lQ1RzVmsvQWdsS3FrOEJHQU1tYUpYSGM4YjVmd0QrRWFXRTVOUUFEMHQyM0VsZ1MKQkovK3ZkK1FwZTFtbjcrT1dZdmt2ODI3VlBDRXZHT1hKYVpLU0VMVDMyaHdialpUTUdTKzBEK0RBZ01CQUFFQwpnWUE4VDJCTGJoRTZzSVcyTndCYUtnblV2azNzdC9FMzZjdWMzbnlQTGN5MTNjVzhraVlrczZjUlZKTXlUVVlaCkV5VE9FYkV4K3B3NjZlcjVFcjhCRy8xYjVBUDYwL2dOZXlPWXE5d3huSWpLRmFzbFE0dDNsa29EdUNMRS9qT1QKcWw4NmpNbis3VG1CRHI2L1V1WmZmM0t1UXB5K2tPN3pSak9wUzh0bU1NUkNRUUpCQUtkcGVTSHJCUFVaWUFkWgpZei85M2Q3NU5DRHhVeGt2YTFmVUdTaFZEd3NDTEhRaVFDZXluZUc0bEpIUjNCTVRiMXlUbFhoVTUxaTR3WGNBCnhDN1JQVEVDUVFDZmJxSG5LQ2VQa2E4VENYL2FSV3NPMTFqQUZnOEZtUys0cnUvTHVpL01JNFNFSXlXMk52aTMKM0lZdStsZUJJNk9Md1gvbVVLaDNwWlBEeHM5TjgwcnpBa0JTYXRKL3FEd2dqZ1dBbUxrTDMrZEN4bHlyZXlMMQoyeXAxYXEyWDlZZ2FXMCtYUE9Wb3BiNmtTVUtiSnoyNUJuQmtteU9Td2ZuQzYvSVNyQVhwSm9tQkFrRUFuTVZSCnlKWndpRGt0MlY5ZTdBZVVwU3hXSmRQTEE2dEZCS3BvTzRFaVhPNlQ4TWNLM3lrZzJ0S3EwMmp4UUpnRnluZ0UKUnpvSzNsUGZnQVJ2ZG13RXh3SkFBVnNPblZNUk8vUkFac0w3VS9MYlB6NmVDQVdzdkN6azU1QWx4bU4zTndoOApsbEt2aElaeG9uc3dGTnB5U2d4ZmExOTVWdlZFemMxMG9KQlhLaUl6M0E9PQotLS0tLUVORCBSU0EgUFJJVkFURSBLRVktLS0tLQ==
JWT_ACCESS_PUBLIC_KEY=LS0tLS1CRUdJTiBQVUJMSUMgS0VZLS0tLS0KTUlHZU1BMEdDU3FHU0liM0RRRUJBUVVBQTRHTUFEQ0JpQUtCZ0doQzIyNmRLQXluTS9LaVd3SlRXMko0Zy85eQpBN01Ya0c4aml3WnVYaHJ5YzMxRHF4R09WYS9HSGtXcVdZZ05EeVhtZUNUc1ZrL0FnbEtxazhCR0FNbWFKWEhjCjhiNWZ3RCtFYVdFNU5RQUQwdDIzRWxnU0JKLyt2ZCtRcGUxbW43K09XWXZrdjgyN1ZQQ0V2R09YSmFaS1NFTFQKMzJod2JqWlRNR1MrMEQrREFnTUJBQUU9Ci0tLS0tRU5EIFBVQkxJQyBLRVktLS0tLQ==

JWT_REFRESH_PRIVATE_KEY=LS0tLS1CRUdJTiBSU0EgUFJJVkFURSBLRVktLS0tLQpNSUlDWFFJQkFBS0JnUUN6MGhITG9zZXdQcUJTemt6MzdlWHhUb2FPMHB4aDlRb085ME1udU5YNnJwQndNYW9KCng1M1pvYmZiWkFRNktWaXZ3eFd5dkU1ZVdGTlFjRVhkRzlFMlpmQmZ5TTJ3UW9lY1BDVUViaWxjZEFEbGZuR0cKWUdaSTQ2MzBxNGUremRSUHpQdHNNSGpZNk1JSDErSUgxWDlkR3pOVUdXSTllOVRyNmRXRWk2azRZUUlEQVFBQgpBb0dCQUptSGkwQVZURzl6R1FsNk1JY2liRWdhSnBLOHlWNXRpOWY1VHpJVUEwWlVVdWduenlrb2NPS0d5K2FhClAyMjFMWTVyZnhRcTZMSnVzVHVsa0ZEWFZraXF1akVFRHk0cDR6eGJaZFVjc1hZb2dxUHk0T3M0RE43RGt5emYKVGdHZFB3Wm9OeXZlT0lpbzhBV0g5QTJ2aEhkeU5KZ0VIdi8rUHhUbnF2N1dWRXhOQWtFQS83WHB0SUlTNktOcQpUd0NGM1o0bU1IamdwcUZWZHZpM3k0TjVkN3VtTnlqaXVOTlcwd0hGN1VTeFVrV2I0Y2ZRdHZIZ3hMaEhianFtCm00NElqZHMvMXdKQkFMUUdLMEhCM2NxSzJNQUVkalZFa0ZveFYybUNFTzFxeGJFOWRobFJMVlMzY1NCcEgyMjAKZFhrY0ZsL2VTVnRtNG9oLzNQTEZNMmQzYStTek1zUHdJb2NDUVFEVjlpd1FHd3FoV0NOYTZYQVppUHdoY1BOZwoyZnYrS1l6NG9CRWlLNFNnQVBqOGQvSGRhMDFuQkNSdlY4bGdPV2FkdlhRNmhvdFdZNE1IQStpS2NodFBBa0IvCm9Td0R4NjAxam5DUzJkYndkdmFjYXdUYzhYQ00wYmpzcW5WVEI2Rkt3Vzg3bWl2RS9ENllxVmdYaWFHYVludlMKYUV3OTlaODNDSXgrcktrZUR0NTdBa0JGN3hGT0RlVHo1dS9yNE91cHFLeVNJY0gvZWUyckcydkRsVUNZYm1mVgpDeTZXL3lOWDBRTWJYa3kyS3M4d3hZRUlERGlZU1JERk4zaEtPcDlheURiQgotLS0tLUVORCBSU0EgUFJJVkFURSBLRVktLS0tLQ==
JWT_REFRESH_PUBLIC_KEY=LS0tLS1CRUdJTiBQVUJMSUMgS0VZLS0tLS0KTUlHZk1BMEdDU3FHU0liM0RRRUJBUVVBQTRHTkFEQ0JpUUtCZ1FDejBoSExvc2V3UHFCU3prejM3ZVh4VG9hTwowcHhoOVFvTzkwTW51Tlg2cnBCd01hb0p4NTNab2JmYlpBUTZLVml2d3hXeXZFNWVXRk5RY0VYZEc5RTJaZkJmCnlNMndRb2VjUENVRWJpbGNkQURsZm5HR1lHWkk0NjMwcTRlK3pkUlB6UHRzTUhqWTZNSUgxK0lIMVg5ZEd6TlUKR1dJOWU5VHI2ZFdFaTZrNFlRSURBUUFCCi0tLS0tRU5EIFBVQkxJQyBLRVktLS0tLQ==
It is a convention to use uppercase for your environment variables.
You can add the .env file to your .gitignore to exclude it from your Git commits.
Next, create a config/default.json file in the root directory and add the following code.
config/default.json
{
  "port": 8000,
  "nodeEnv": "development",
  "origin": "http://localhost:3000",
  "jwtAccessTokenExpiresIn": 15,
  "jwtRefreshTokenExpiresIn": 60
}
Validating the Environment Variables
Sometimes forgetting to add an environment variable to the .env file can lead to unexpected bugs in your application causing it to malfunction.
To prevent this, we’ll use the envalid package to validate the environment variables.
yarn add envalid
The package will throw an error if a defined variable is not found in the .env file or if it has the wrong type.
In the root directory, create an src folder and create a utils folder in it.
Next, create a validateEnv.js file within the utils folder and add the code snippets below.
src/utils/validateEnv.js
import { cleanEnv, port, str } from 'envalid';

const validateEnv = () => {
  cleanEnv(process.env, {
    NODE_ENV: str(),
    PORT: port(),

    MONGODB_URI_LOCAL: str(),
    MONGO_INITDB_ROOT_USERNAME: str(),
    MONGO_INITDB_ROOT_PASSWORD: str(),
    MONGO_INITDB_DATABASE: str(),

    JWT_ACCESS_PRIVATE_KEY: str(),
    JWT_ACCESS_PUBLIC_KEY: str(),

    JWT_REFRESH_PRIVATE_KEY: str(),
    JWT_REFRESH_PUBLIC_KEY: str(),
  });
};

export default validateEnv;
With the environment variables, and docker-compose configured correctly, let’s start the Redis and MongoDB Docker containers.
Run the command below to spawn the MongoDB and Redis containers:
docker-compose up -d
Create the Database Schema with Mongoose
Now create a models folder in the src folder and create a user.model.js file in it.
Run the following command to install Mongoose, BcryptJs, and Validator:
- Mongoose: Provides a schema-based solution to model application data
- BcryptJs: For hashing a string
- Validator: For validating user inputs
yarn add mongoose validator bcryptjs
Below is a basic Mongoose schema listing the fields needed to create a user.
src/models/user.model.js
import mongoose from 'mongoose';
import validator from 'validator';
import bcrypt from 'bcryptjs';

const userSchema = new mongoose.Schema(
  {
    name: {
      type: String,
      required: true,
    },
    email: {
      type: String,
      required: true,
      unique: true,
      validate: [validator.isEmail, 'Please provide a valid email'],
      lowercase: true,
    },
    password: {
      type: String,
      required: true,
      minlength: [8, 'Password must be more than 8 characters'],
      select: false,
    },
    passwordConfirm: {
      type: String,
      required: [true, 'Please confirm your password'],
      validate: {
        validator: function (val) {
          return val === this.password;
        },
        message: 'Passwords do not match',
      },
    },
    photo: {
      type: String,
      default: 'default.png',
    },
    role: {
      type: String,
      default: 'user',
    },
    verified: {
      type: Boolean,
      default: true,
      select: false,
    },
  },
  { timestamps: true, toJSON: { virtuals: true }, toObject: { virtuals: true } }
);

userSchema.index({ email: 1 });

userSchema.pre('save', async function (next) {
  // Check if the password has been modified
  if (!this.isModified('password')) return next();

  // Hash password with strength of 12
  this.password = await bcrypt.hash(this.password, 12);

  // Remove the password confirm field
  this.passwordConfirm = undefined;
  next();
});

userSchema.methods.comparePasswords = async function (
  candidatePassword,
  hashedPassword
) {
  return await bcrypt.compare(candidatePassword, hashedPassword);
};

const userModel = mongoose.model('User', userSchema);
export default userModel;
Below are some key things to note in the above:
- I used the pre-save hook provided by Mongoose to hash the user’s password before persisting it in the database.
- I also added an instance method which will be available on the model to validate the user’s password against the hashed password stored in the database.
Define the GraphQL Schema
In this article, we will use the Apollo Server library to build the backend server.
Run the command below to install Apollo Server and its dependencies:
yarn add apollo-server-express apollo-server-core express graphql
The GraphQL schema aka type definition is a description of the structure of our queries and mutations.
Create an src/schemas/index.js file and add the code snippets below.
import { gql } from 'apollo-server-express';

const typeDefs = gql`
  scalar DateTime
  type Query {
    # Auth
    refreshAccessToken: TokenResponse!
    logoutUser: Boolean!

    # User
    getMe: UserResponse!
  }

  type Mutation {
    # Auth
    loginUser(input: LoginInput!): TokenResponse!
    signupUser(input: SignUpInput!): UserResponse!
  }

  input SignUpInput {
    name: String!
    email: String!
    password: String!
    passwordConfirm: String!
    photo: String
  }

  input LoginInput {
    email: String!
    password: String!
  }

  type TokenResponse {
    status: String!
    access_token: String!
  }

  type UserResponse {
    status: String!
    user: UserData!
  }

  type UserData {
    id: ID!
    name: String!
    email: String!
    photo: String!
    role: String!
    createdAt: DateTime
    updatedAt: DateTime
  }
`;

export default typeDefs;
Let’s breakdown this code step by step:
- The
typeDefsvariable contains our GraphQL schema - First, we added a scalar type
DateTimeto the schema since we’ll be working with MongoDB timestamps. - Then I defined two queries –
refreshAccessTokento refresh the access token when it expires andgetMeto get the currently logged-in user’s credentials. - Lastly, I defined two mutations –
signupUserto register a new user andloginUserto sign in the registered user.
Connect the Express App to the Redis and MongoDB Servers
Make sure the Redis and MongoDB Docker containers are running.
Connecting to MongoDB Docker Container
In the src folder, create a utils/connectDB.js file and paste the code below into it.
import mongoose from 'mongoose';
import dotenv from 'dotenv';

dotenv.config();

const localUri = process.env.MONGODB_URI_LOCAL;

async function connectDB() {
  try {
    await mongoose.connect(localUri);
    console.log('Database connected successfully');
  } catch (error) {
    console.log(error.message);
    process.exit(1);
  }
}

export default connectDB;
Connecting to Redis Docker Container
To connect to the Redis server, we’ll be using the Redis package so run this command to install it.
yarn add redis
Next, let’s connect the app to the Redis container. Create a src/utils/connectRedis.js file and paste the code below into it.
import { createClient } from 'redis';

const redisUrl = 'redis://localhost:6379';

const redisClient = createClient({
  url: redisUrl,
});

const connectRedis = async () => {
  try {
    await redisClient.connect();
  } catch (error) {
    console.error(error.message);
    setInterval(5000, connectRedis);
  }
};

connectRedis();

redisClient.on('connect', () =>
  console.log('Redis client connected successfully')
);

redisClient.on('error', (err) => console.error(err));

export default redisClient;
Create an Error Handler
When designing an API, it’s recommended to return the right HTTP status code to inform the client of what happened on the server.
Apollo Server provides us with an error class we can leverage to send appropriate errors to the client.
In the code below, we are simply catching all the possible Mongoose errors and returning a well-formatted message to the client.
src/controllers/error.controller.js
import { ApolloError } from 'apollo-server-core';

const handleCastError = (error) => {
  const message = `Invalid ${error.path}: ${error.value}`;
  throw new ApolloError(message, 'GRAPHQL_VALIDATION_FAILED');
};

const handleValidationError = (error) => {
  const message = Object.values(error.errors).map((el) => el.message);
  throw new ApolloError(
    `Invalid input: ${message.join(', ')}`,
    'GRAPHQL_VALIDATION_FAILED'
  );
};

const errorHandler = (err) => {
 if (err.name === 'CastError') handleCastError(err);
  if (err.name === 'ValidationError') handleValidationError(err);
  throw err;
};

export default errorHandler;
Define a Service to Sign and Verify JSON Web Tokens
A JSON Web Token is simply a string of characters consisting of a header, payload, and signature.
We mostly use JWTs to implement stateless authentication on the server even though JWTs have some flaws. For example, a JWT can only be invalidated only when it has expired which becomes an attacking vector for hackers.
To add an additional layer of security to the JWT implementation, we will use Redis to store the user’s session.
To begin, run this command to install the JSON Web Token package:
yarn add jsonwebtoken
We’ll store the generated refresh and access tokens in HTTPOnly cookies to increase the security level.
Doing it that way will prevent attackers from using Javascript to retrieve and manipulate them.
If you want to learn more about JWT Authentication with React, check out React + Redux Toolkit: JWT Authentication and Authorization
If you want to learn more about Refresh Tokens with React, check out React.js + Redux Toolkit: Refresh Tokens Authentication
How to Generate the Private and Public Keys
I already included the private and public keys in the .env file but you can follow these steps to generate them by yourself.
Step 1: Navigate to this website and click on the blue “Generate New Keys” button to generate new private and public keys.
Step 2: Next, visit this website to encode each of the private and public keys into Base64.
You need to encode the keys to avoid getting warnings in the terminal when building the Docker containers.
Step 3: Update the .env file with the private and public keys for the access token.
Repeat the process for the refresh token
Now, let’s create two functions to sign and verify the tokens.
In each of these functions, you’ll notice that we decoded the encoded private and public keys into ASCII strings before passing them to the JSONWebToken methods.
src/utils/jwt.js
import jwt from 'jsonwebtoken';
import errorHandler from '../controllers/error.controller.js';

export const signJwt = (payload, Key, options) => {
  const privateKey = Buffer.from(process.env[Key], 'base64').toString('ascii');
  return jwt.sign(payload, privateKey, {
    ...(options && options),
    algorithm: 'RS256',
  });
};

export const verifyJwt = (token, Key) => {
  try {
    const publicKey = Buffer.from(process.env[Key], 'base64').toString('ascii');
    const decoded = jwt.verify(token, publicKey);
    return decoded;
  } catch (error) {
    errorHandler(error);
  }
};
Create the Authentication Controllers
Now it’s time to create the authentication controllers responsible for registering the new user, refreshing the access token, logging in the registered user, sending the verification email, and logging out the user.
Let’s define some cookie options for the access and refresh tokens:
src/controllers/auth.controller.js
const accessTokenExpireIn = config.get('jwtAccessTokenExpiresIn');
const refreshTokenExpireIn = config.get('jwtRefreshTokenExpiresIn');

const cookieOptions = {
  httpOnly: true,
  // domain: 'localhost',
  sameSite: 'none',
  secure: true,
};

const accessTokenCookieOptions = {
  ...cookieOptions,
  maxAge: accessTokenExpireIn * 60 * 1000,
  expires: new Date(Date.now() + accessTokenExpireIn * 60 * 1000),
};

const refreshTokenCookieOptions = {
  ...cookieOptions,
  maxAge: refreshTokenExpireIn * 60 * 1000,
  expires: new Date(Date.now() + refreshTokenExpireIn * 60 * 1000),
};

if (process.env.NODE_ENV === 'production') cookieOptions.secure = true;
Register User Controller
In the Mongoose schema, remember to add a lowercase of true to the email field since MongoDB is not case-sensitive. When a user tries to log in with either Johndoe@gmail.com and johndoe@gmail.com , MongoDB will recognize these emails to belong to two different users.
Also, we need to check for a special error code 11000 returned by MongoDB indicating that a document has a unique constraint been violated.
In this case, the unique constraint is the email address.
src/controllers/auth.controller.js
import { AuthenticationError, ForbiddenError } from 'apollo-server-core';
import config from 'config';
import userModel from '../models/user.model.js';
import redisClient from '../utils/connectRedis.js';
import { signJwt, verifyJwt } from '../utils/jwt.js';
import errorHandler from './error.controller.js';

// ? Cookie Options

// ? SignUp User
const signup = async (
  parent,
  { input: { name, email, password, passwordConfirm } },
  { req }
) => {
  try {
    const user = await userModel.create({
      name,
      email,
      password,
      passwordConfirm,
    });

    return {
      status: 'success',
      user,
    };
  } catch (error) {
    if (error.code === 11000) {
      throw new ForbiddenError('User already exist');
    }
    errorHandler(error);
  }
};
Login User Controller
Next, let’s create a handler to sign in the registered user by returning access and refresh token cookies to the client.
In an upcoming article, we’ll first verify the user’s email address before allowing them to sign in to their account.
src/controllers/auth.controller.js
// ? Cookie Options

// ? SignUp User

// ? Sign Tokens
async function signTokens(user) {
  // Create a Session
  await redisClient.set(user.id, JSON.stringify(user), {
    EX: 60 * 60,
  });

  // Create access token
  const access_token = signJwt({ user: user.id }, 'JWT_ACCESS_PRIVATE_KEY', {
    expiresIn: `${config.get('jwtAccessTokenExpiresIn')}m`,
  });

  // Create refresh token
  const refresh_token = signJwt({ user: user.id }, 'JWT_REFRESH_PRIVATE_KEY', {
    expiresIn: `${config.get('jwtRefreshTokenExpiresIn')}m`,
  });

  return { access_token, refresh_token };
}

const login = async (parent, { input: { email, password } }, { req, res }) => {
  try {
    // Check if user exist and password is correct
    const user = await userModel
      .findOne({ email })
      .select('+password +verified');

    if (!user || !(await user.comparePasswords(password, user.password))) {
      throw new AuthenticationError('Invalid email or password');
    }

    user.password = undefined;

    // Create a session and tokens
    const { access_token, refresh_token } = await signTokens(user);

    // Add refreshToken to cookie
    res.cookie('refresh_token', refresh_token, refreshTokenCookieOptions);
    res.cookie('access_token', access_token, accessTokenCookieOptions);
    res.cookie('logged_in', true, {
      ...accessTokenCookieOptions,
      httpOnly: false,
    });

    return {
      status: 'success',
      access_token,
    };
  } catch (error) {
    errorHandler(error);
  }
};
Below are some notable things you should consider in the above:
- In the mongoose schema, we explicitly excluded the
passwordandverifiedfields from been included in the returned document so we have to tell mongoose to add them since we want to make use of them. - After making use of the password field, we then need to remove it again from the document that will be returned to the user by setting it to
undefined.
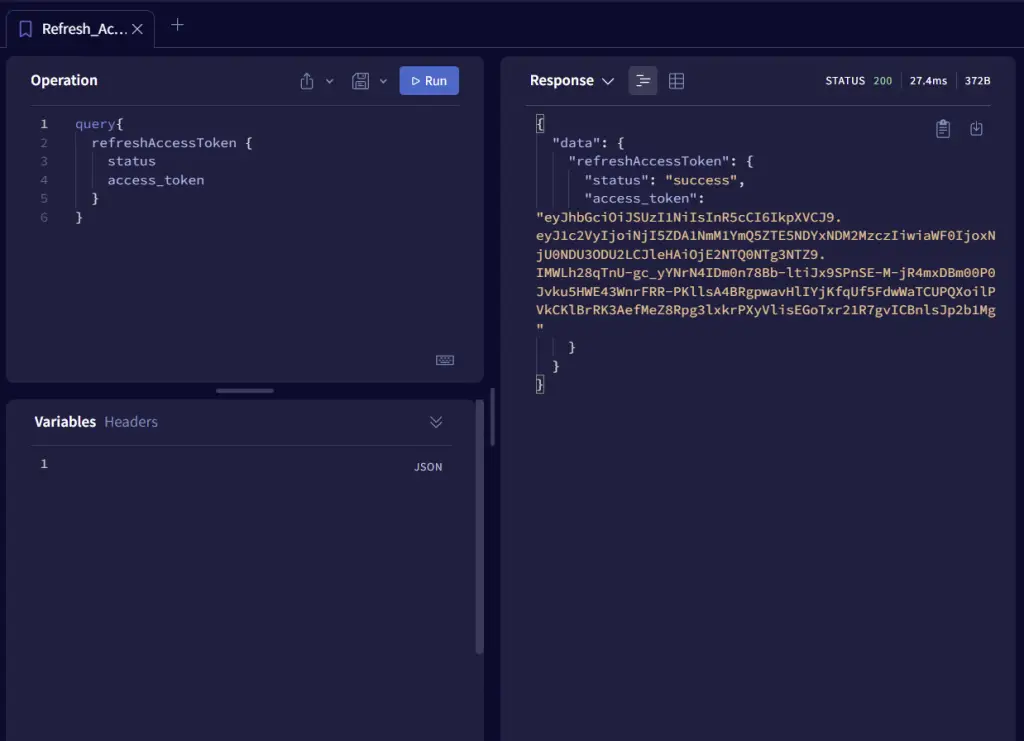
Refresh Access Token Controller
Here, the handler will be called after the access token has expired to return a new access token.
Note: the access token can only be refreshed if the user has a valid session in the Redis database.
src/controllers/auth.controller.js
// ? Cookie Options

// ? SignUp User

// ? Sign Tokens

// ? Login User

// ? Refresh Tokens
const refreshAccessToken = async (parent, args, { req, res }) => {
  try {
    // Get the refresh token
    const { refresh_token } = req.cookies;

    // Validate the RefreshToken
    const decoded = verifyJwt(refresh_token, 'JWT_REFRESH_PUBLIC_KEY');

    if (!decoded) {
      throw new ForbiddenError('Could not refresh access token');
    }

    // Check if user's session is valid
    const session = await redisClient.get(decoded.user);

    if (!session) {
      throw new ForbiddenError('User session has expired');
    }

    // Check if user exist and is verified
    const user = await userModel
      .findById(JSON.parse(session)._id)
      .select('+verified');

    if (!user || !user.verified) {
      throw new ForbiddenError('Could not refresh access token');
    }

    // Sign new access token
    const access_token = signJwt({ user: user._id }, 'JWT_ACCESS_PRIVATE_KEY', {
      expiresIn: config.get('jwtAccessTokenExpiresIn'),
    });

    // Send access token cookie
    res.cookie('access_token', access_token, accessTokenCookieOptions);
    res.cookie('logged_in', 'true', {
      ...accessTokenCookieOptions,
      httpOnly: false,
    });

    return {
      status: 'success',
      access_token,
    };
  } catch (error) {
    errorHandler(error);
  }
};
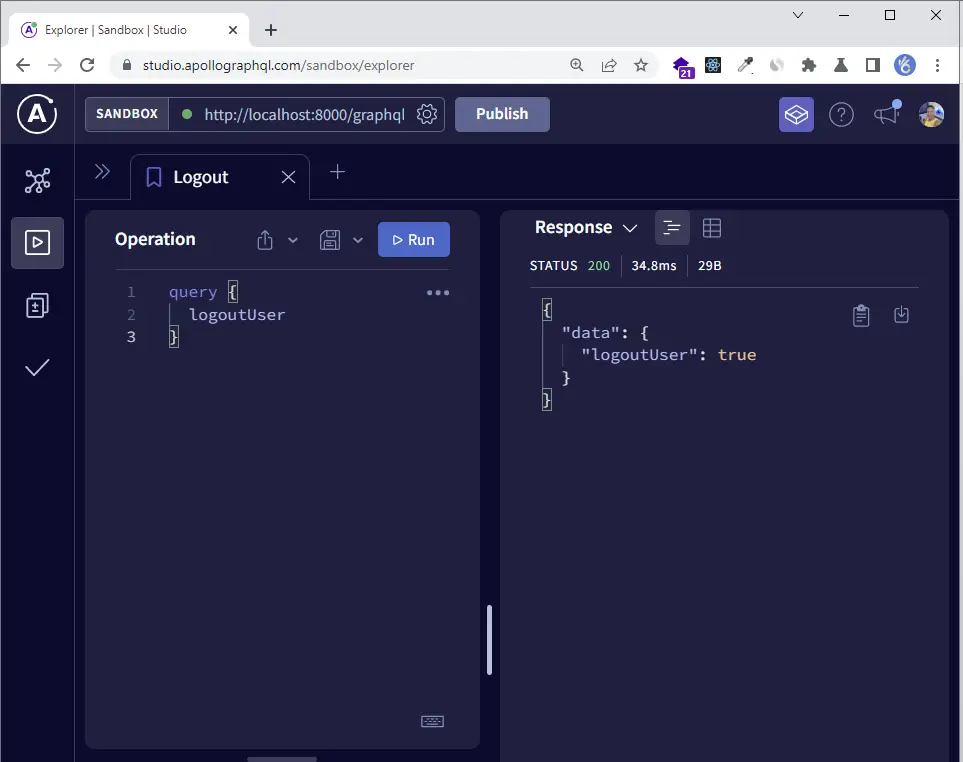
Logout Controller
I believe you’ve seen a log-out functionality in most of the applications you’ve used before. The way we’ll achieve that is to return expired cookies to the client.
In addition, we need to delete the user’s session from the Redis database.
src/controllers/auth.controller.js
// ? Cookie Options

// ? SignUp User

// ? Sign Tokens

// ? Login User

// ? Refresh Tokens

// ? Logout User
const logoutHandler = async (_, args, { req, res, getAuthUser }) => {
  try {
    await checkIsLoggedIn(req, getAuthUser);

    const user = await getAuthUser(req);

    // Delete the user's session
    await redisClient.del(user._id);

    // Logout user
    res.cookie('access_token', '', { maxAge: -1 });
    res.cookie('refresh_token', '', { maxAge: -1 });
    res.cookie('logged_in', '', { maxAge: -1 });

    return true;
  } catch (error) {
    errorHandler(error);
  }
};

export default {
  signup,
  login,
  refreshAccessToken,
  logoutHandler,
};
Create a User Controller
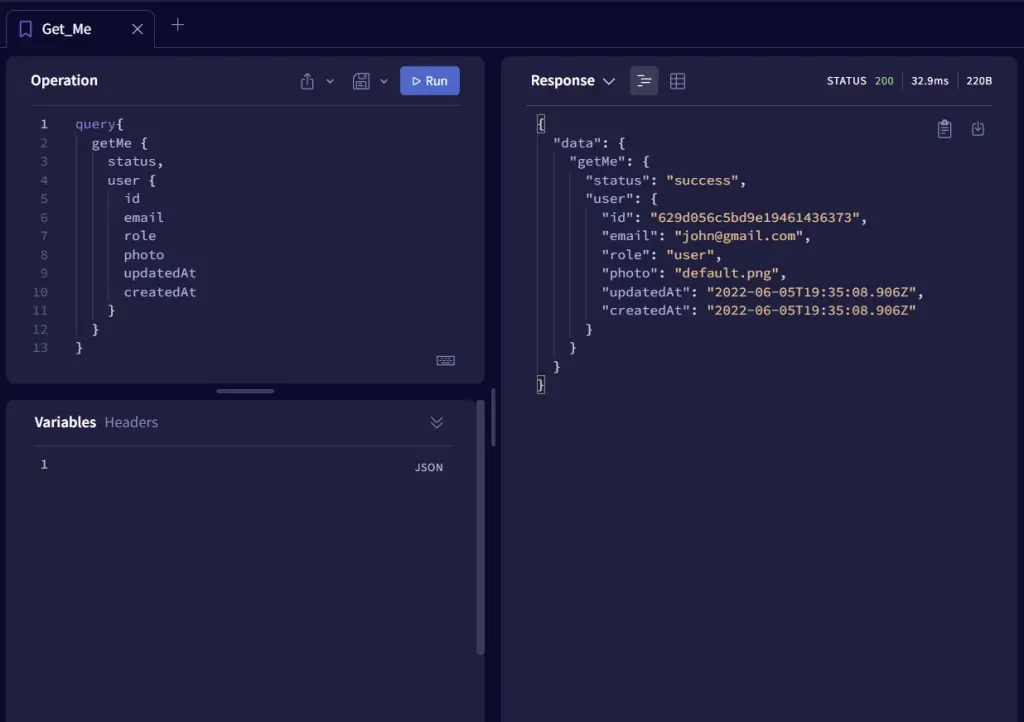
To test the authentication logic, let’s create a getMe handler to return the currently logged-in user’s credentials.
src/controllers/user.controller.js
import errorHandler from './error.controller.js';
import checkIsLoggedIn from '../middleware/checkIsLoggedIn.js';

const getMe = async (_, args, { req, getAuthUser }) => {
  try {
    await checkIsLoggedIn(req, getAuthUser);

    const user = await getAuthUser(req);

    return {
      status: 'success',
      user,
    };
  } catch (error) {
    errorHandler(error);
  }
};

export default {
  getMe,
};
Define Authentication Middleware
To parse the cookies in the request headers, we’ll use cookie-parser package.
yarn add cookie-parser
Deserialize User Middleware
Now let’s create a middleware to serve as a guard for all the protected resources.
src/middleware/authUser.js
import { ForbiddenError } from 'apollo-server-core';
import errorHandler from '../controllers/error.controller.js';
import userModel from '../models/user.model.js';
import redisClient from '../utils/connectRedis.js';
import { verifyJwt } from '../utils/jwt.js';

const authUser = async (req) => {
  try {
    // Get the access token
    let access_token;
    if (
      req.headers.authorization &&
      req.headers.authorization.startsWith('Bearer')
    ) {
      access_token = req.headers.authorization.split(' ')[1];
    } else if (req.cookies.access_token) {
      const { access_token: token } = req.cookies;
      access_token = token;
    }

    if (!access_token) return false;

    // Validate the Access token
    const decoded = verifyJwt(access_token, 'JWT_ACCESS_PUBLIC_KEY');

    if (!decoded) return false;

    // Check if the session is valid
    const session = await redisClient.get(decoded.user);

    if (!session) {
      throw new ForbiddenError('Session has expired');
    }

    // Check if user exist
    const user = await userModel
      .findById(JSON.parse(session).id)
      .select('+verified');

    if (!user || !user.verified) {
      throw new ForbiddenError(
        'The user belonging to this token no logger exist'
      );
    }

    return user;
  } catch (error) {
    errorHandler(error);
  }
};

export default authUser;
Below is a summary of the above code:
- First, we retrieve the access token from either the Authorization header or the
req.cookiesobject. - Next, we validate the access token to extract the payload stored in it.
- Then we check if the user has a valid session and still exists in the MongoDB database.
- Lastly, we return the user to the next middleware if there wasn’t any error.
Require the Authenticated User
Next, let’s create a middleware to return an authentication error to the client.
src/middleware/checkIsLoggedIn.js
import { AuthenticationError } from 'apollo-server-core';
import errorHandler from '../controllers/error.controller.js';

const checkIsLoggedIn = async (req, getAuthUser) => {
  try {
    // Check if user is logged in
    const authUser = await getAuthUser(req);

    if (!authUser) {
      throw new AuthenticationError('You are not logged in');
    }
  } catch (error) {
    errorHandler(error);
  }
};

export default checkIsLoggedIn;
Creating the resolvers
Now that we have implemented 90 percent of the application logic, let’s define the GraphQL resolvers.
Define a scalar DateTime
The following GraphQLScalarType object specifies the interactions for a custom scalar that represents a date. It assumes the backend represents dates with the Date JavaScript object.
import { Kind, GraphQLScalarType } from 'graphql';

export default new GraphQLScalarType({
  name: 'DateTime',
  description: 'DateTime Scaler Type',

  serialize(value) {
    return new Date(value).toISOString();
  },
  parseValue(value) {
    return new Date(value);
  },
  parseLiteral(ast) {
    if (ast.Kind === Kind.INT) {
      return new Date(parseInt(ast.value, 10));
    }
    return null;
  },
});
Create the Query Resolvers
import authController from '../controllers/auth.controller.js';
import userController from '../controllers/user.controller.js';

export default {
  // Users
  getMe: userController.getMe,
  // Auth
  refreshAccessToken: authController.refreshAccessToken,
  logoutUser: authController.logoutHandler,
};
Create the Mutation Resolvers
import authController from '../controllers/auth.controller.js';

export default {
  // Auth
  signupUser: authController.signup,
  loginUser: authController.login,
};
Export the Query and Mutation Resolvers
import Mutation from './mutation.resolver.js';
import Query from './query.resolver.js';

export { Mutation, Query };
Configuring the Apollo Server
So far, we’ve created the schemas and resolvers, the next step is to connect them.
Create an src/app.js file and add the following code:
import express from 'express';
import dotenv from 'dotenv';
import cookieParser from 'cookie-parser';
import validateEnv from './utils/validateEnv.js';
dotenv.config();
validateEnv();

const app = express();

// MIDDLEWARE
app.use(cookieParser());

process.on('uncaughtException', (err) => {
  console.error('UNCAUGHT EXCEPTION ? Shutting down...');
  console.error('Error?', err.message);
  process.exit(1);
});

export default app;
Run the following command to install cors and nodemon.
The cors package will enable us to receive requests from the GraphQL client since it’s running on a different domain.
Also, the nodemon package will be used to hot-reload the server.
yarn add cors && yarn add nodemon --global
Now create a src/server.js file and add the following code:
import http from 'http';
import { ApolloServer } from 'apollo-server-express';
import { ApolloServerPluginDrainHttpServer } from 'apollo-server-core';
import config from 'config';
import cors from 'cors';
import connectDB from './utils/connectDB.js';
import typeDefs from './schemas/index.js';
import app from './app.js';
import { Mutation, Query } from './resolvers/index.js';
import DateTime from './resolvers/datetime.js';
import getAuthUser from './middleware/authUser.js';

const httpServer = http.createServer(app);

const corsOptions = {
  origin: ['https://studio.apollographql.com', 'http://localhost:8000'],
  credentials: true,
};

app.use(cors(corsOptions));

const resolvers = {
  DateTime,
  Query,
  Mutation,
};

(async function () {
  const server = new ApolloServer({
    typeDefs,
    resolvers,
    plugins: [ApolloServerPluginDrainHttpServer({ httpServer })],
    context: async ({ req, res }) => ({ req, res, getAuthUser }),
  });

  // CONNECT DB
  await connectDB();

  // START APOLLO SERVER
  await server.start();

  server.applyMiddleware({ app, cors: corsOptions });

  const port = config.get('port');

  await new Promise((resolve) => httpServer.listen(port, '0.0.0.0', resolve));
  console.log(
    `?Server started at http://localhost:${port}${server.graphqlPath}`
  );
})();

process.on('unhandledRejection', (err) => {
  console.log('UNHANDLED REJECTION ?? Shutting down...');
  console.error('Error?', err.message);

  httpServer.close(async () => {
    process.exit(1);
  });
});
Run this command to start the MongoDB and Redis containers:
docker-compose up -d
Note: make sure you set the
typeproperty tomodulein thepackage.jsonfile.
Run this command to start the Apollo Server:
nodemon ./src/server.js
Once the server is up and running, hold CTRL and click on the Sandbox URL to open it in the browser.
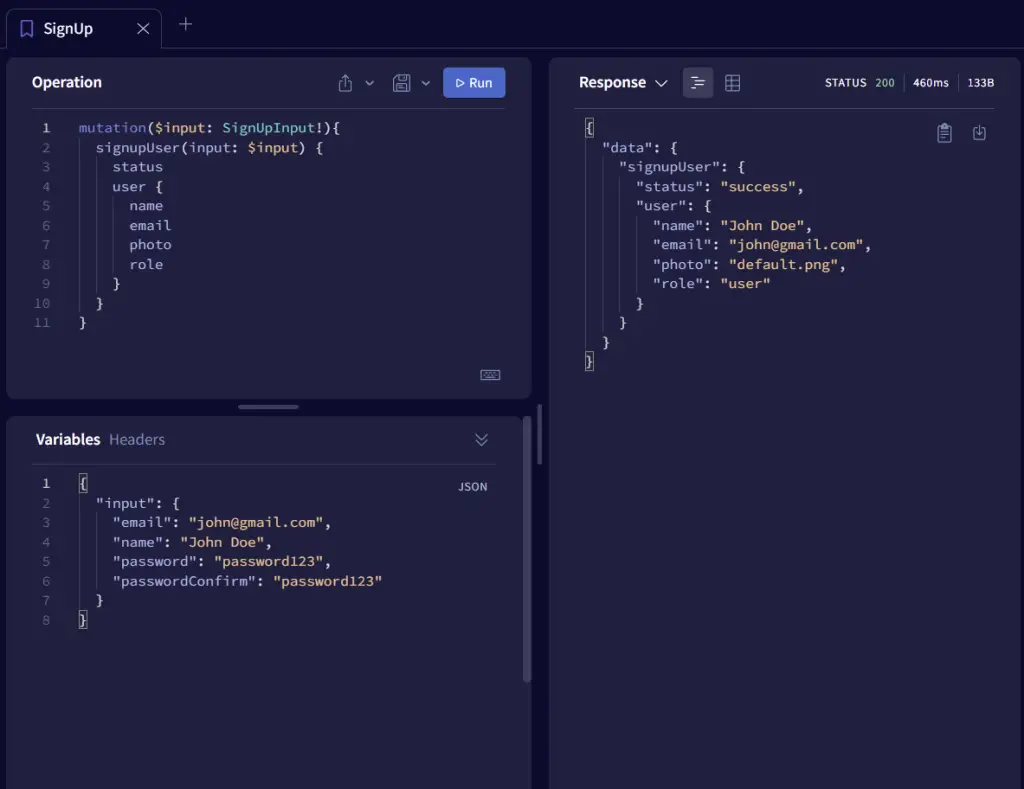
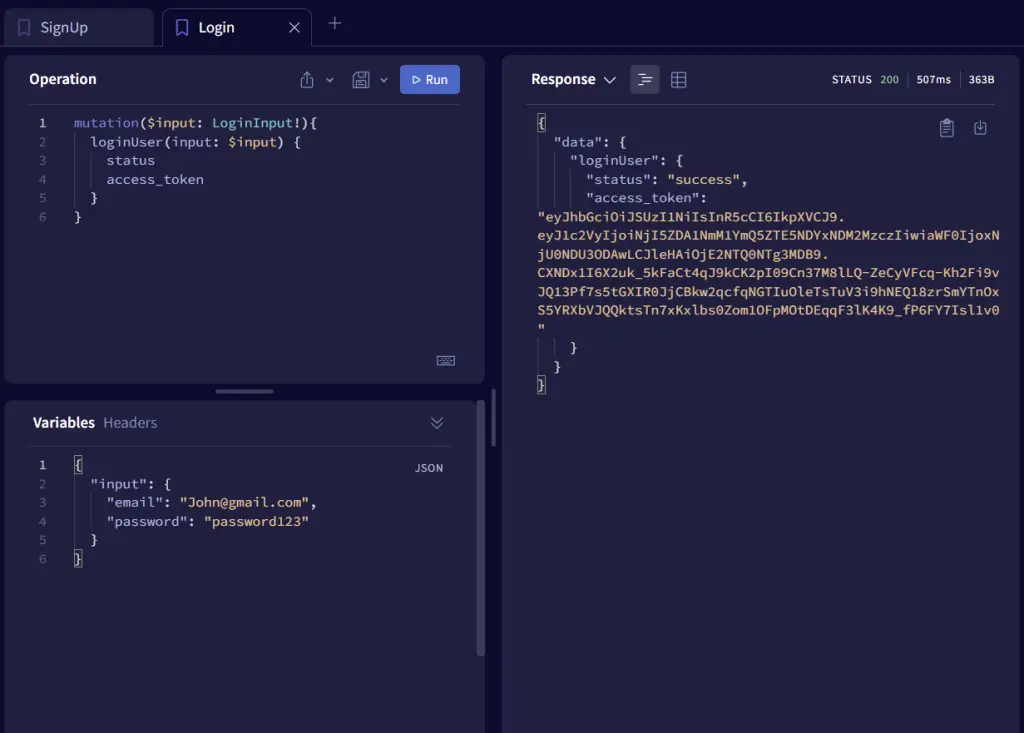
Testing the GraphQL API
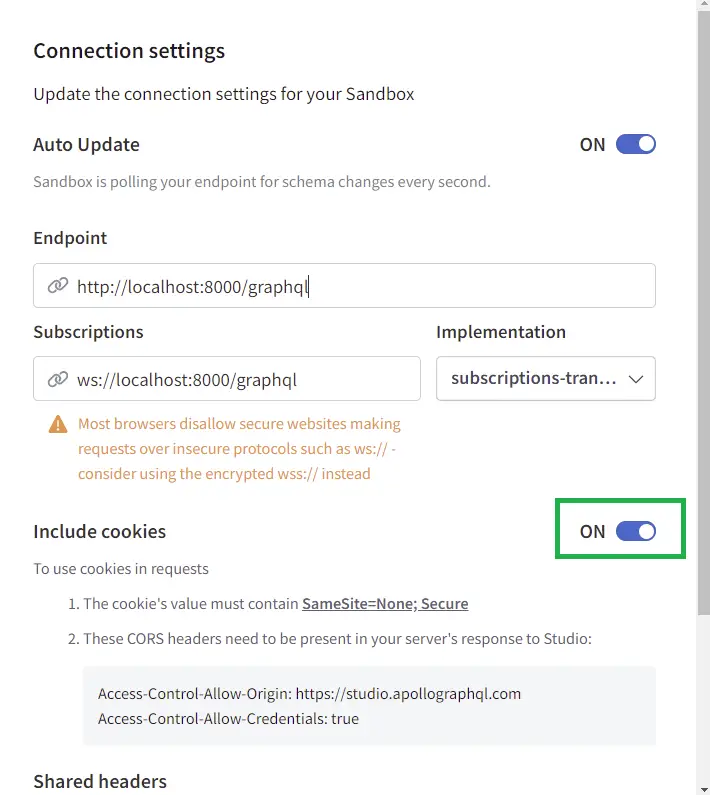
Apart from setting the correct cookie headers, we need to tell the Sandbox to actually set credentials: include as part of the request.
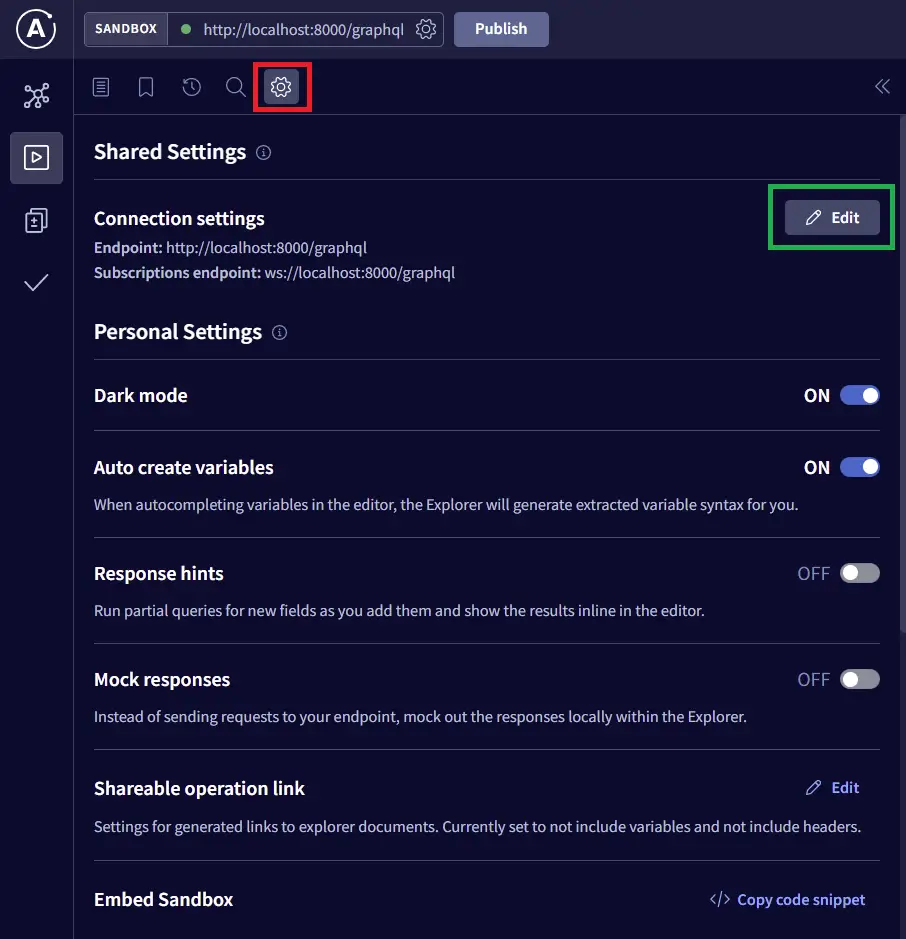
Next, turn on the “Include cookies” radio button
-Register a new user
-Login the registered user
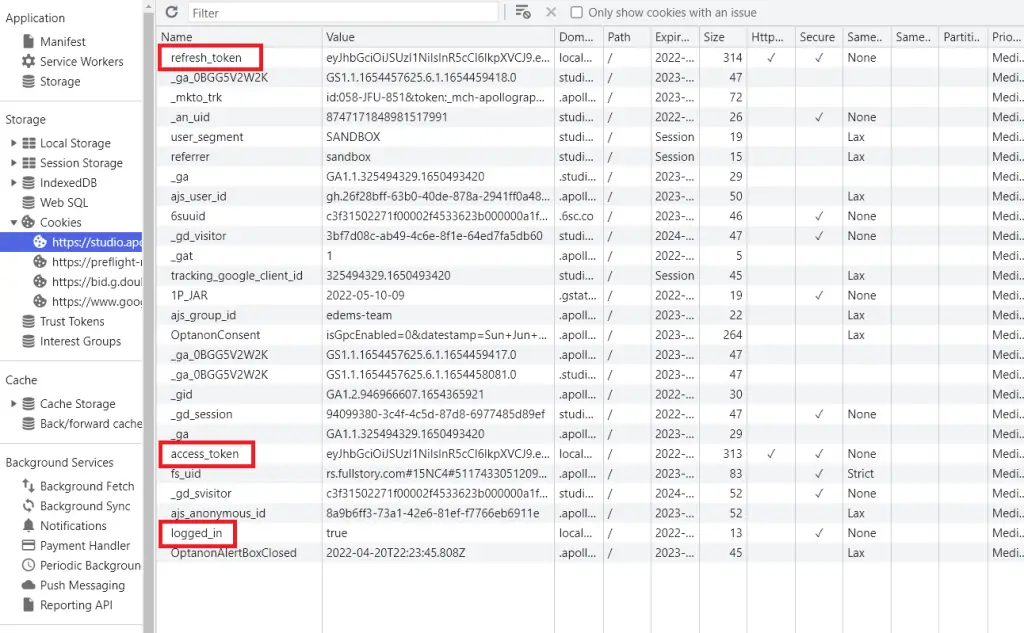
-Use CTRL + i to open the dev-tools and click on the application tab and select the Sandbox URL from the Cookies dropdown.
Take a careful look at the available cookies and you should see the access and refresh token cookies.
-Get the currently logged-in user’s credentials
-Refresh the access token
-Logout the logged-in user
Conclusion
Congrats for reaching the end. In this article, you learned how to implement access and refresh tokens in a GraphQL API using Node.js, MongoDB, Docker, Redis, and Apollo Server.
GraphQL, Node, MongoDB & Apollo Server Source Code
Check out the source code on GitHub
Hi, very useful tutorial, thx
Please tell how to deploy this backend to server like heroku and connect it to react frontend with protected routes
Thank you!
Well, I do not intend to write an article about how the project can be deployed to Heroku. However, I will allocate time to write a detailed article on how the GraphQL project can be deployed on a VPS server.
I can’t connect your backend to react app with apollo graphql
Thanks for your comment. Am working on an article that will demonstrate how Apollo graphQL can be used with the GraphQL API.
Once am done writing the articles in my Todo list, I will work on the Apollo GraphQL one and publish it.