
In this article, you’ll learn how to implement JWT Authentication with Node.js, PostgreSQL, TypeORM, ExpressJs, Redis, Docker, and Docker-compose.
We will implement the JWT authentication manually without using any Node.js authentication library like PassportJs.
Related Post: Backend
- API with Node.js + PostgreSQL + TypeORM: Project Setup
- API with Node.js + PostgreSQL + TypeORM: JWT Authentication
- API with Node.js + PostgreSQL + TypeORM: Send Emails
- Node.js, Express, TypeORM, PostgreSQL: CRUD Rest API
- Node.js and PostgreSQL: Upload and Resize Multiple Images
You can also read:
- Node.js + TypeScript + MongoDB: JWT Authentication
- Node.js + TypeScript + MongoDB: JWT Refresh Token
Introduction
In this course, you’ll learn how to build a JSON Web Token authentication API server with Node.js, TypeScript, TypeORM, PostgreSQL, Docker, and Redis.
The JWT Authentication Architecture is built with:
- Node.js – a JavaScript run-time scripting language
- TypeORM – an ORM(Object Relational Mapping) for popular Database services like PostgreSQL, MySQL, MongoDB, and many more.
- PostgreSQL – an SQL database
- Bcryptjs – a hashing package
- JsonWebToken – generating and verifying JSON Web Tokens
- Redis – as caching storage for storing the user’s session
- Zod – for validating user inputs
What the course will cover
- How to use TypeScript in ExpressJs
- How to model data with TypeORM
- How to validate user inputs against a defined schema
- How to authenticate users with refresh and access tokens
Run the Node.js JWT Project Locally
- Download or clone the Node.js JWT project from https://github.com/wpcodevo/node_typeorm and open the source code in an IDE.
- Open the integrated terminal in your IDE and change the Git branch to
jwt_auth_node_typeorm. - Run
yarnoryarn installin the console of the root directory to install the project’s dependencies. - Duplicate the the
example.envfile and rename the copied one to.env. - Start the Redis and Postgres servers by running
docker-compose up -d. - Run
yarn db:pushto push the TypeORM migration schema to the Postgres database. - Run
yarn startto start the Express HTTP server and open an API testing software to test the endpoints.
Prerequisites
Before proceeding with the tutorial, make sure you have the following prerequisites to make your life easier.
Software
- Node.js – for writing the backend API
- Docker – To handle containers
- pgAdmin(optional) – A GUI for querying, mutating, analyzing, and aggregating PostgreSQL data.
VS Code Extensions
- DotENV – Get syntax highlighting in the environment variables file
- Thunder Client – For making HTTP requests to the server. You can also use Postman or REST Client
- MySQL – Database client for VS Code. Allows us to see what’s in the Redis and PostgreSQL databases.
Assumed Knowledge
The course assumes:
- You have basic knowledge of Node.js and ExpressJs.
- You have basic Javascript and Typescript knowledge.
- You have basic knowledge of SQL and PostgreSQL.
- You have basic knowledge of Docker and TypeORM.
JWT Authentication Example with Node.js, TypeORM, and PostgreSQL
With this JSON Web Token authentication API, the user will be able to do the following:
- Register for a new account
- Login with the registered credentials
- Refresh the access token when it expires
- Get his profile information only if he is logged in.
| RESOURCE | HTTP METHOD | ROUTE | DESCRIPTION |
|---|---|---|---|
| users | GET | /api/users/me | return the logged-in user’s information |
| auth | POST | /api/auth/register | Register new user |
| auth | POST | /api/auth/login | Login registered user |
| auth | GET | /api/auth/refresh | Refresh the expired access token |
| auth | GET | /api/auth/logout | Logout the user |
User Login and Register Flow with JWT Authentication
The diagram below illustrates the user registration flow in our application.
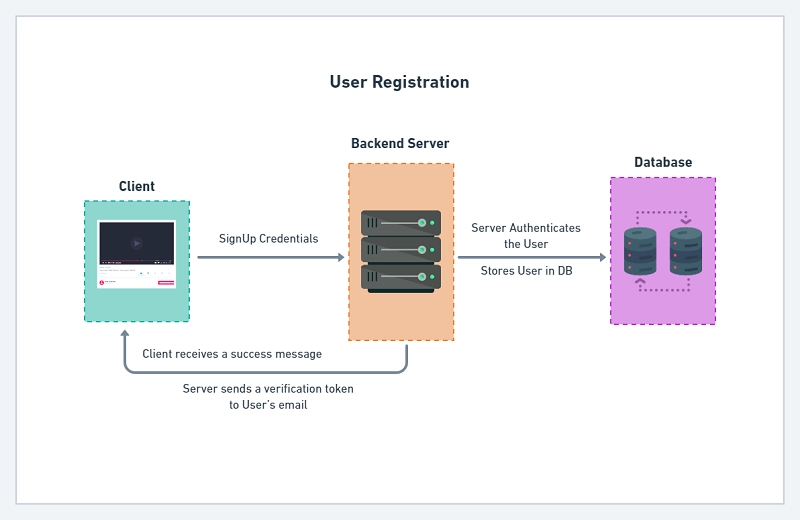
Here, the user will send a POST request with the email and password. The server will check if the user exists in the Database and validate the password.
Assuming all the checks pass then the server will generate the access and refresh tokens and send them as HTTPOnly cookies.
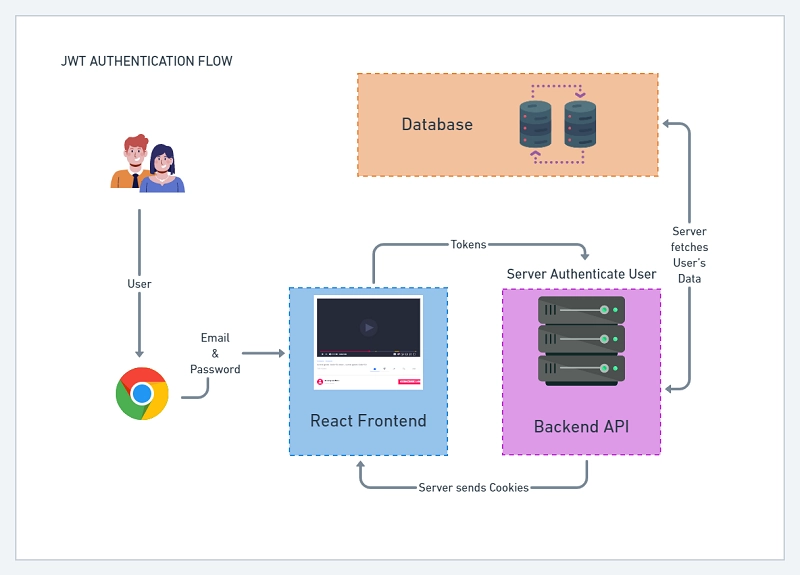
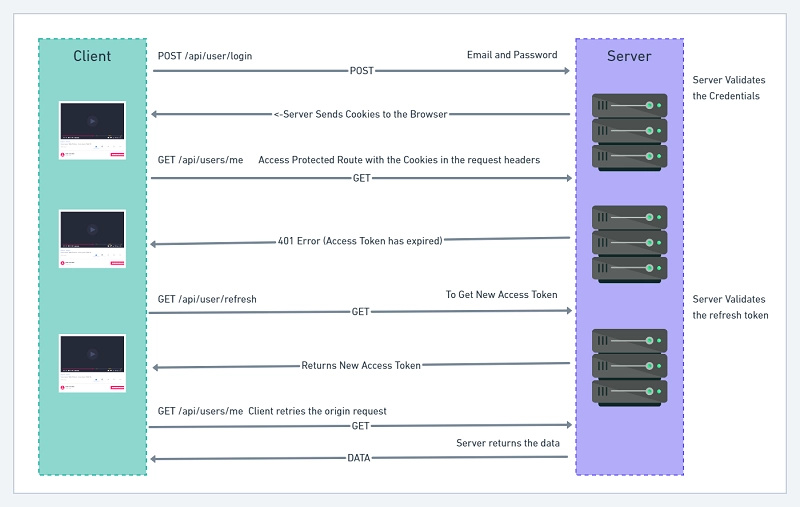
Here is a breakdown of the JSON Web Token refresh flow:
- First, the user sends a POST request with his Email and Password
- The server receives the request and validates the Email and Password
- The server then sends back Access and Refresh Token Cookies assuming the credentials are valid.
- Next, if the user makes a request to a protected route, the server will check if the cookies were included in the request.
- The server then validates the access token and sends a 401 error if the access token has expired or was manipulated.
- The frontend or client application will receive the unauthorized error and use interceptors to refresh the access token.
- Meaning the frontend app will make a GET request to
/api/auth/refreshto get a new cookie. This process happens in the background. - The frontend or client application will re-try the origin request after receiving the new access token.
Defining Base and User Entities
In every JWT authentication flow, we need to start by registering the user. To achieve that let’s define the TypeORM entity for the user.
I designed the database model in such a way that the user entity will inherit the columns of a base entity. This way we won’t repeat columns that are common among the different entities.
Base Entity
Most of the articles I’ve read defined the ID column as a primary incremental number. I’m a big fan of mongoose so I decided to use UUID instead of an incremental number as my ID column.
src/entities/model.entity.ts
import {
  CreateDateColumn,
  UpdateDateColumn,
  PrimaryGeneratedColumn,
  BaseEntity,
} from 'typeorm';

export default abstract class Model extends BaseEntity {
  @PrimaryGeneratedColumn('uuid')
  id: string;

  @CreateDateColumn()
  created_at: Date;

  @UpdateDateColumn()
  updated_at: Date;
}
User Entity
src/entities/user.entity.ts
import { Entity, Column, Index } from 'typeorm';
import Model from './model.entity';

export enum RoleEnumType {
  USER = 'user',
  ADMIN = 'admin',
}

@Entity('users')
export class User extends Model {
  @Column()
  name: string;

  @Index('email_index')
  @Column({
    unique: true,
  })
  email: string;

  @Column()
  password: string;

  @Column({
    type: 'enum',
    enum: RoleEnumType,
    default: RoleEnumType.USER,
  })
  role: RoleEnumType.USER;

  @Column({
    default: 'default.png',
  })
  photo: string;

  @Column({
    default: false,
  })
  verified: boolean;

  toJSON() {
    return { ...this, password: undefined, verified: undefined };
  }
}
Things to note about the user entity:
- I used
usersas the name of my user table by passingusersas an argument to the@Entity('users')decorator. Also, the user entity extends the base model. - The unique constraint on the email column indicates that no two users should have the same email address.
- The
@index('email_index')decorator tells PostgreSQL to assign an index to the email column. Indexes are mostly used for columns that will be frequently queried in the database. This will improve the query performance when we find a user by email. - I used Enum for the user’s role for extra validation. In this application, a user can either be an admin or a user.
- Lastly, I filtered the JSON response returned by TypeORM by setting the fields that shouldn’t be included in the response to
undefined. This way TypeORM will remove them from the JSON response the user will receive.
Defining Zod Schemas to Validate User Input
We need to validate the user’s input. To do so, we’ll use Zod which is a validation package to define the schemas.
You could have used class-validator which is a popular validation package used in conjunction with TypeORM.
With class-validator, we’ll have to do the validation directly on the columns. I decided to separate the validation logic into its own file to avoid polluting the entities with validation decorators.
yarn add zod
src/schemas/user.schema.ts
import { object, string, TypeOf, z } from 'zod';
import { RoleEnumType } from '../entities/user.entity';

export const createUserSchema = object({
  body: object({
    name: string({
      required_error: 'Name is required',
    }),
    email: string({
      required_error: 'Email address is required',
    }).email('Invalid email address'),
    password: string({
      required_error: 'Password is required',
    })
      .min(8, 'Password must be more than 8 characters')
      .max(32, 'Password must be less than 32 characters'),
    passwordConfirm: string({
      required_error: 'Please confirm your password',
    }),
    role: z.optional(z.nativeEnum(RoleEnumType)),
  }).refine((data) => data.password === data.passwordConfirm, {
    path: ['passwordConfirm'],
    message: 'Passwords do not match',
  }),
});

export const loginUserSchema = object({
  body: object({
    email: string({
      required_error: 'Email address is required',
    }).email('Invalid email address'),
    password: string({
      required_error: 'Password is required',
    }).min(8, 'Invalid email or password'),
  }),
});

export type CreateUserInput = Omit<
  TypeOf<typeof createUserSchema>['body'],
  'passwordConfirm'
>;

export type LoginUserInput = TypeOf<typeof loginUserSchema>['body'];
I exported the inferred TypeScript types of the schemas to be used in the application when needed.
Create Middleware to Parse Zod Schema
Defining the schemas alone is not enough. We need a middleware that will parse the schemas and return error messages to the user.
src/middleware/validate.ts
import { Request, Response, NextFunction } from 'express';
import { AnyZodObject, ZodError } from 'zod';

export const validate =
  (schema: AnyZodObject) =>
  (req: Request, res: Response, next: NextFunction) => {
    try {
      schema.parse({
        params: req.params,
        query: req.query,
        body: req.body,
      });

      next();
    } catch (error) {
      if (error instanceof ZodError) {
        return res.status(400).json({
          status: 'fail',
          errors: error.errors,
        });
      }
      next(error);
    }
  };
Password Management with Bcrypt
Another crucial part of authentication is to avoid storing user passwords in plain text.
If at anytime our database gets compromised then the hacker will be able to log into an account with the plain password.
To make the passwords secure we hash them using hashing algorithms. The hashing algorithm will transform the plain password into a hashed form.
Things to note:
- When a password is hashed the process can not be reversed easily to get the original plain text.
- When a single character of the string is changed the entire hashed string will be different.
Since hashing the same string twice gives the same output, we use salt to ensure that users that have the same password do not end up having the same hashed password.
yarn add bcryptjs && yarn add -D @types/bcryptjs
To hash a string with bcrypt, we define salt rounds. The salt rounds known as the Cost Factor is the amount of time needed to calculate a single bcrypt hash.
The higher the Cost Factor the more difficult it is to brute force. Over the years computers are becoming more powerful so using a cost factor of 12 should be fine.
src/entities/user.entity.ts
@Entity('users')
export class User extends Model {
//  (...)

// ? Hash password before saving to database
  @BeforeInsert()
  async hashPassword() {
    this.password = await bcrypt.hash(this.password, 12);
  }

  // ? Validate password
  static async comparePasswords(
    candidatePassword: string,
    hashedPassword: string
  ) {
    return await bcrypt.compare(candidatePassword, hashedPassword);
  }
}
Create Services to Interact with the Database
To start implementing the user login and registration logic, let’s define some services to communicate with our user entity.
src/services/user.service.ts
import { User } from '../entities/user.entity';
import { CreateUserInput } from '../schemas/user.schema';
import { AppDataSource } from '../utils/data-source';

const userRepository = AppDataSource.getRepository(User);

export const createUser = async (input: CreateUserInput) => {
  return (await AppDataSource.manager.save(
    AppDataSource.manager.create(User, input)
  )) as User;
};

export const findUserByEmail = async ({ email }: { email: string }) => {
  return await userRepository.findOneBy({ email });
};

export const findUserById = async (userId: string) => {
  return await userRepository.findOneBy({ id: userId });
};

export const findUser = async (query: Object) => {
  return await userRepository.findOneBy(query);
};

// (...)
TypeORM is dynamic meaning a single task can be done in many different ways. The snippets to create a new user in the database could have been done differently and it will also work.
Below is another way of creating a new user with TypeORM.
export const createUser = async (input: DeepPartial<User>) => {
  return userRepository.save(userRepository.create(input));
};
User Authentication with Json Web Tokens (JWT)
When it comes to authentication, there’re many ways to get it done with each method having its drawback.
Authenticating a user is a complex topic and it can easily get out of hand. There are many libraries (Passport with a lot of strategies) that tend to simplify authentication and authorization.
In this article, we’ll use JSON Web Tokon to persist a user login so that they don’t have to log in anytime they want to make a request to a protected route on the server.
Create Utilities to Sign and Verify Access and Refresh Tokens
JSON Web Token is simply a string of characters that comprises a header, payload, and signature.
JWTs are a good choice to implement stateless authentication on the server but that alone is not enough.
Over the years, it has been discovered that many libraries that implement JWTs have had security issues. Even the spec has security issues. You can read more about the downsides of JSON Web Tokens in this article.
Most of the libraries or frameworks (React, Angular, Vue, Svelte, etc) we use all have their flaws and yet we still use them in projects.
yarn add jsonwebtoken && yarn add @types/jsonwebtoken
We are going to generate both refresh and access tokens and store them in HTTPOnly cookies.
Storing the tokens in HTTPOnly cookies will prevent attackers from using JavaScript to access and manipulate them.
If you want to read more about JWT Authentication with React, check out React + Redux Toolkit: JWT Authentication and Authorization
If you want to read more about Refresh Tokens with React, check out React.js + Redux Toolkit: Refresh Tokens Authentication
How to Generate Private and Public Keys
Step 1: Visit this website and click on the blue Generate New Keys button to generate new Private and Public keys.
An access token should have a Private and Public key. The same applies to a refresh token.
Step 2: Visit this website to encode each of the private and public keys into Base64.
Encoding the keys will prevent us from getting a bunch of warnings in the terminal when building the Docker containers.
Step 3: Update the .env file with the private and public keys. Also, remember to update the custom-environment-variables.ts and validateEnv.ts files.
Sign Access and Refresh Tokens
Next, let’s define a utility function to generate either access or refresh tokens.
src/utils/jwt.ts
import jwt, { SignOptions } from 'jsonwebtoken';
import config from 'config';

// ? Sign Access or Refresh Token
export const signJwt = (
  payload: Object,
  keyName: 'accessTokenPrivateKey' | 'refreshTokenPrivateKey',
  options: SignOptions
) => {
  const privateKey = Buffer.from(
    config.get<string>(keyName),
    'base64'
  ).toString('ascii');
  return jwt.sign(payload, privateKey, {
    ...(options && options),
    algorithm: 'RS256',
  });
};

// ? Verify Access or Refresh Token
Below is what I did above:
- First, I defined a
signJwtfunction that takes three parameters (payload, keyName, and token options). The keyName can either be the private key for the access or refresh token. - Next, I used the
Buffermodule from Node.js to decode the encoded private keys to an ASCII string.
Verify Access or Refresh Tokens
src/utils/jwt.ts
// ? Verify Access or Refresh Token
export const verifyJwt = <T>(
  token: string,
  keyName: 'accessTokenPublicKey' | 'refreshTokenPublicKey'
): T | null => {
  try {
    const publicKey = Buffer.from(
      config.get<string>(keyName),
      'base64'
    ).toString('ascii');
    const decoded = jwt.verify(token, publicKey) as T;

    return decoded;
  } catch (error) {
    return null;
  }
};
Here are some things to note in the above snippets:
- When verifying the JWTs, the
jwt.veriy()method can throw an error so we need to catch that error with atry...catchblock. - I made the
verifyJwtfunction more flexible by returning a generic or null. This way we can explicitly provide a type for theverifyJwtfunction to make TypeScript happy.
Service to Sign Access and Refresh Tokens
With all the above in place, let’s define a service to sign the access and refresh tokens.
Normally, a refresh token has a long life (1 Day, 1 Week, or 1 Year) but I decided to store the user’s session in Redis for extra security.
src/services/user.service.ts
import config from 'config';
import { User } from '../entities/user.entity';
import { CreateUserInput } from '../schemas/user.schema';
import redisClient from '../utils/connectRedis';
import { AppDataSource } from '../utils/data-source';
import { signJwt } from '../utils/jwt';

// (...)

// ? Sign access and Refresh Tokens
export const signTokens = async (user: User) => {
  // 1. Create Session
  redisClient.set(user.id, JSON.stringify(user), {
    EX: config.get<number>('redisCacheExpiresIn') * 60,
  });

  // 2. Create Access and Refresh tokens
  const access_token = signJwt({ sub: user.id }, 'accessTokenPrivateKey', {
    expiresIn: `${config.get<number>('accessTokenExpiresIn')}m`,
  });

  const refresh_token = signJwt({ sub: user.id }, 'refreshTokenPrivateKey', {
    expiresIn: `${config.get<number>('refreshTokenExpiresIn')}m`,
  });

  return { access_token, refresh_token };
};
Simple Error Class
When designing a RESTful API, it’s recommended to return the right HTTP status codes to inform the frontend of what happened on the server.
Later, in this series, we’ll go deeper into error handling with ExpressJs where we’ll send different kinds of errors based on the environment (development or production).
To kick things up, let’s define a custom error class to enable us to generate different errors easily.
src/utils/appError.ts
export default class AppError extends Error {
  status: string;
  isOperational: boolean;
  constructor(public statusCode: number = 500, public message: string) {
    super(message);
    this.status = `${statusCode}`.startsWith('4') ? 'fail' : 'error';
    this.isOperational = true;

    Error.captureStackTrace(this, this.constructor);
  }
}
The error stack trace will only be included in the error if we’re in a development environment.
In production, we’ll send only an error message without the stack trace to avoid giving attackers a clue about what happened.
Authentication Controller
The authentication controller will be responsible for everything relating to user authentication like registering a new user, logging in the registered user, refreshing an access token, email verification, logging out the user, and many more.
Define Access and Refresh Token Cookie Options
Since we’ll be storing the access and refresh tokens in HTTPOnly cookies, let’s define the cookies options for both the access and refresh token.
Setting
secure: truein development environment will prevent the server from sending the cookies to the browser or client.
The expiration time for both the access and refresh cookies depends on the project you are working on. In this tutorial, I made the access token expire after 15 minutes whilst the refresh token expires in 60 minutes.
src/controllers/auth.controller.ts
const cookiesOptions: CookieOptions = {
  httpOnly: true,
  sameSite: 'lax',
};

if (process.env.NODE_ENV === 'production') cookiesOptions.secure = true;

const accessTokenCookieOptions: CookieOptions = {
  ...cookiesOptions,
  expires: new Date(
    Date.now() + config.get<number>('accessTokenExpiresIn') * 60 * 1000
  ),
  maxAge: config.get<number>('accessTokenExpiresIn') * 60 * 1000,
};

const refreshTokenCookieOptions: CookieOptions = {
  ...cookiesOptions,
  expires: new Date(
    Date.now() + config.get<number>('refreshTokenExpiresIn') * 60 * 1000
  ),
  maxAge: config.get<number>('refreshTokenExpiresIn') * 60 * 1000,
};
Register User Controller
Here comes the good part. I think we’re now ready to register a user after all the configurations above.
src/controllers/auth.controller.ts
import { CookieOptions, NextFunction, Request, Response } from 'express';
import config from 'config';
import { CreateUserInput, LoginUserInput } from '../schemas/user.schema';
import {
  createUser,
  findUserByEmail,
  findUserById,
  signTokens,
} from '../services/user.service';
import AppError from '../utils/appError';
import redisClient from '../utils/connectRedis';
import { signJwt, verifyJwt } from '../utils/jwt';
import { User } from '../entities/user.entity';

// ? Cookie Options Here

export const registerUserHandler = async (
  req: Request<{}, {}, CreateUserInput>,
  res: Response,
  next: NextFunction
) => {
  try {
    const { name, password, email } = req.body;

    const user = await createUser({
      name,
      email: email.toLowerCase(),
      password,
    });

    res.status(201).json({
      status: 'success',
      data: {
        user,
      },
    });
  } catch (err: any) {
    if (err.code === '23505') {
      return res.status(409).json({
        status: 'fail',
        message: 'User with that email already exist',
      });
    }
    next(err);
  }
};
Things to note about the above code snippets:
- The
Requestinterface of Express is generic so we need to provide it with the inferred type of thecreateUserSchemaobject. - Next, I called the
createUserservice with the appropriate fields to create a new user in the database.
Also, you need to convert the email to lowercase since PostgreSQL is not case-sensitive. Meaning a user can register with eitherJohndoe@gmail.comandjohndoe@gmail.comand these two emails will be regarded as two different users. - Most ORMs or ODMs provide us with error codes that we can take advantage of. When a user already exists in the database, the error code that will be included in the error will be
23505.
When the error code is23505then it indicates that a user with that email already exists in the database.
Login User Controller
Now let’s define a function to log in the registered user by sending back the refresh and access token cookies.
In one of the upcoming articles in this series, we’ll verify the user’s email before allowing them to log in.
src/controllers/auth.controller.ts
// ? Cookie Options Here

// ? Register User Controller

export const loginUserHandler = async (
  req: Request<{}, {}, LoginUserInput>,
  res: Response,
  next: NextFunction
) => {
  try {
    const { email, password } = req.body;
    const user = await findUserByEmail({ email });

    //1. Check if user exists and password is valid
    if (!user || !(await User.comparePasswords(password, user.password))) {
      return next(new AppError(400, 'Invalid email or password'));
    }

    // 2. Sign Access and Refresh Tokens
    const { access_token, refresh_token } = await signTokens(user);

    // 3. Add Cookies
    res.cookie('access_token', access_token, accessTokenCookieOptions);
    res.cookie('refresh_token', refresh_token, refreshTokenCookieOptions);
    res.cookie('logged_in', true, {
      ...accessTokenCookieOptions,
      httpOnly: false,
    });

    // 4. Send response
    res.status(200).json({
      status: 'success',
      access_token,
    });
  } catch (err: any) {
    next(err);
  }
};
Here are some of the notable things you should be aware of in the above snippets:
- First, we called the
findUserByEmailservice with the user’s email to check if that email exists in the database. - Next, I called the static
comparePasswordsmethod we defined on the User entity to check if the provided password is the same as the hashed one in the database. - If all the above checks pass then I called the
signTokensservice with the user to generate both the access and refresh tokens. - Next, I sent the tokens as HTTPOnly cookies. I also sent a
logged_incookie that is not HTTPOnly to make the frontend aware if the user is logged in. - Another important thing to note is we send a generic message
Invalid email or passwordif either the user doesn’t exist or the password is invalid.
This will prevent attackers from trying different emails to know which emails exist in our database.
Refresh Access Token Controller
In this article, the access token can be refreshed after every 15 minutes when it expires.
Also, the access token can only be refreshed if the user has a valid session in the Redis database.
src/controllers/auth.controller.ts
// ? Cookie Options Here

// ? Register User Controller

// ? Login User Controller

export const refreshAccessTokenHandler = async (
  req: Request,
  res: Response,
  next: NextFunction
) => {
  try {
    const refresh_token = req.cookies.refresh_token;

    const message = 'Could not refresh access token';

    if (!refresh_token) {
      return next(new AppError(403, message));
    }

    // Validate refresh token
    const decoded = verifyJwt<{ sub: string }>(
      refresh_token,
      'refreshTokenPublicKey'
    );

    if (!decoded) {
      return next(new AppError(403, message));
    }

    // Check if user has a valid session
    const session = await redisClient.get(decoded.sub);

    if (!session) {
      return next(new AppError(403, message));
    }

    // Check if user still exist
    const user = await findUserById(JSON.parse(session).id);

    if (!user) {
      return next(new AppError(403, message));
    }

    // Sign new access token
    const access_token = signJwt({ sub: user.id }, 'accessTokenPrivateKey', {
      expiresIn: `${config.get<number>('accessTokenExpiresIn')}m`,
    });

    // 4. Add Cookies
    res.cookie('access_token', access_token, accessTokenCookieOptions);
    res.cookie('logged_in', true, {
      ...accessTokenCookieOptions,
      httpOnly: false,
    });

    // 5. Send response
    res.status(200).json({
      status: 'success',
      access_token,
    });
  } catch (err: any) {
    next(err);
  }
};
Logout User Controller
In most applications, there is always a way for the user to log out from his account. To achieve that we need to send expired cookies to the client or user’s browser.
JSON Web Tokens are stateless and there is no straightforward way to invalidate a token.
We need a way to clear the cookies from the user’s browser if they log out. The best option is to send the same cookies with empty string values and a max-age -1.
Also, we need to delete the user’s session from the Redis database when they log out.
src/controllers/auth.controller.ts
// ? Cookie Options Here

// ? Register User Controller

// ? Login User Controller

// ? Refresh Access Token

const logout = (res: Response) => {
  res.cookie('access_token', '', { maxAge: -1 });
  res.cookie('refresh_token', '', { maxAge: -1 });
  res.cookie('logged_in', '', { maxAge: -1 });
};

export const logoutHandler = async (
  req: Request,
  res: Response,
  next: NextFunction
) => {
  try {
    const user = res.locals.user;

    await redisClient.del(user.id);
    logout(res);

    res.status(200).json({
      status: 'success',
    });
  } catch (err: any) {
    next(err);
  }
};
Create User Controller
To test the authentication logic, let’s define a getMeHandler to get the currently logged-in user’s information.
The getMeHandler controller will just read the user object we stored in res.locals.user and send it back as a response.
src/controllers/user.controller.ts
import { NextFunction, Request, Response } from 'express';

export const getMeHandler = async (
  req: Request,
  res: Response,
  next: NextFunction
) => {
  try {
    const user = res.locals.user;

    res.status(200).status(200).json({
      status: 'success',
      data: {
        user,
      },
    });
  } catch (err: any) {
    next(err);
  }
};
Create Authentication Middleware
To read the cookies, we need the cookie-parser package. cookie-parser will read the cookies in the request headers and attach them to req.cookies object.
yarn add cookie-parser && yarn add -D @types/cookie-parser
Deserialize User Middleware
Now, let’s define a middleware to serve as an authentication guard. In this application, the user can access a protected route with an access token in either the cookie or Authorization header.
src/middleware/deserializeUser.ts
import { NextFunction, Request, Response } from 'express';
import { findUserById } from '../services/user.service';
import AppError from '../utils/appError';
import redisClient from '../utils/connectRedis';
import { verifyJwt } from '../utils/jwt';

export const deserializeUser = async (
  req: Request,
  res: Response,
  next: NextFunction
) => {
  try {
    let access_token;

    if (
      req.headers.authorization &&
      req.headers.authorization.startsWith('Bearer')
    ) {
      access_token = req.headers.authorization.split(' ')[1];
    } else if (req.cookies.access_token) {
      access_token = req.cookies.access_token;
    }

    if (!access_token) {
      return next(new AppError(401, 'You are not logged in'));
    }

    // Validate the access token
    const decoded = verifyJwt<{ sub: string }>(
      access_token,
      'accessTokenPublicKey'
    );

    if (!decoded) {
      return next(new AppError(401, `Invalid token or user doesn't exist`));
    }

    // Check if the user has a valid session
    const session = await redisClient.get(decoded.sub);

    if (!session) {
      return next(new AppError(401, `Invalid token or session has expired`));
    }

    // Check if the user still exist
    const user = await findUserById(JSON.parse(session).id);

    if (!user) {
      return next(new AppError(401, `Invalid token or session has expired`));
    }

    // Add user to res.locals
    res.locals.user = user;

    next();
  } catch (err: any) {
    next(err);
  }
};
Here is a breakdown of what happened in the above snippets:
- First, I checked if the access token was included in the Authorization header or
req.cookiesobject. - Next, I validated the access token and extracted the payload we stored in it.
- Next, I checked if the user still exists in the database and has a valid session in the Redis database.
- If all the above checks pass then I attached the user object to
res.locals.userto be available to other controllers.
Require Authenticated User
Now we can define a middleware to send an error message if the res.locals.user object doesn’t exist.
src/middleware/requireUser.ts
import { NextFunction, Request, Response } from 'express';
import AppError from '../utils/appError';

export const requireUser = (
  req: Request,
  res: Response,
  next: NextFunction
) => {
  try {
    const user = res.locals.user;

    if (!user) {
      return next(
        new AppError(400, `Session has expired or user doesn't exist`)
      );
    }

    next();
  } catch (err: any) {
    next(err);
  }
};
Create Authentication Routes
Now we are ready to define the routes for the application.
This is where we validate the user’s input against our schemas before passing the request to our controllers.
src/routes/auth.routes.ts
import express from 'express';
import {
  loginUserHandler,
  logoutHandler,
  refreshAccessTokenHandler,
  registerUserHandler,
} from '../controllers/auth.controller';
import { deserializeUser } from '../middleware/deserializeUser';
import { requireUser } from '../middleware/requireUser';
import { validate } from '../middleware/validate';
import { createUserSchema, loginUserSchema } from '../schemas/user.schema';

const router = express.Router();

// Register user
router.post('/register', validate(createUserSchema), registerUserHandler);

// Login user
router.post('/login', validate(loginUserSchema), loginUserHandler);

// Logout user
router.get('/logout', deserializeUser, requireUser, logoutHandler);

// Refresh access token
router.get('/refresh', refreshAccessTokenHandler);

export default router;
Create User Routes
Next, let’s define the /api/users/me route to get the currently logged-in user’s information.
You can see the route is protected meaning you need to log in to access this route.
src/routes/user.routes.ts
import express from 'express';
import { getMeHandler } from '../controllers/user.controller';
import { deserializeUser } from '../middleware/deserializeUser';
import { requireUser } from '../middleware/requireUser';

const router = express.Router();

router.use(deserializeUser, requireUser);

// Get currently logged in user
router.get('/me', getMeHandler);

export default router;
Update App.ts
Since the frontend and backend will be running on different domains, we need to install the cors package to tell the server to accept requests from the domain the frontend will be running on.
Also, I installed the morgan package to log the different requests in the terminal.
yarn add cors && yarn add -D morgan @types/morgan @types/cors
src/app.ts
require('dotenv').config();
import express, { NextFunction, Request, Response } from 'express';
import config from 'config';
import morgan from 'morgan';
import cookieParser from 'cookie-parser';
import cors from 'cors';
import { AppDataSource } from './utils/data-source';
import AppError from './utils/appError';
import authRouter from './routes/auth.routes';
import userRouter from './routes/user.routes';
import validateEnv from './utils/validateEnv';
import redisClient from './utils/connectRedis';

AppDataSource.initialize()
  .then(async () => {
    // VALIDATE ENV
    validateEnv();

    const app = express();

    // TEMPLATE ENGINE

    // MIDDLEWARE

    // 1. Body parser
    app.use(express.json({ limit: '10kb' }));

    // 2. Logger
    if (process.env.NODE_ENV === 'development') app.use(morgan('dev'));

    // 3. Cookie Parser
    app.use(cookieParser());

    // 4. Cors
    app.use(
      cors({
        origin: config.get<string>('origin'),
        credentials: true,
      })
    );

    // ROUTES
    app.use('/api/auth', authRouter);
    app.use('/api/users', userRouter);

    // HEALTH CHECKER
    app.get('/api/healthChecker', async (_, res: Response) => {
      const message = await redisClient.get('try');

      res.status(200).json({
        status: 'success',
        message,
      });
    });

    // UNHANDLED ROUTE
    app.all('*', (req: Request, res: Response, next: NextFunction) => {
      next(new AppError(404, `Route ${req.originalUrl} not found`));
    });

    // GLOBAL ERROR HANDLER
    app.use(
      (error: AppError, req: Request, res: Response, next: NextFunction) => {
        error.status = error.status || 'error';
        error.statusCode = error.statusCode || 500;

        res.status(error.statusCode).json({
          status: error.status,
          message: error.message,
        });
      }
    );

    const port = config.get<number>('port');
    app.listen(port);

    console.log(`Server started on port: ${port}`);
  })
  .catch((error) => console.log(error));
A couple of things to note in the above snippets:
- First, I called the
cookie-parsermiddleware to attach the cookie in the headers toreq.cookiesobject. - I used the cors middleware and provided it with the domain the frontend will be running on. Also, I set
credentials: trueto allowcorsto accept cookies from cross-origin requests. - Next, I defined an error controller to handle all the errors in the application. Express will skip all middleware in the middleware stack and call the error middleware whenever we call the
next()function with an error as an argument.
Running TypeORM Migrations
With the above knowledge, let’s define some scripts to run and push the migrations to the PostgreSQL database.
package.json
{
"scripts": {
    "start": "ts-node-dev --respawn --transpile-only --exit-child src/app.ts",
    "build": "tsc -p .",
    "typeorm": "typeorm-ts-node-commonjs",
    "migrate": "rm -rf build && yarn build && yarn typeorm migration:generate ./src/migrations/added-entity -d ./src/utils/data-source.ts",
    "db:push": "rm -rf build && yarn build && yarn typeorm migration:run -d src/utils/data-source.ts"
  }
}
Run this command to create your first migration based on the entities and push the generated SQL to the database.
yarn migrate && yarn db:push
Always remember to change the migration name before running the script to ensure that your migrations have unique names.
This will help you identify the different migrations in the future.
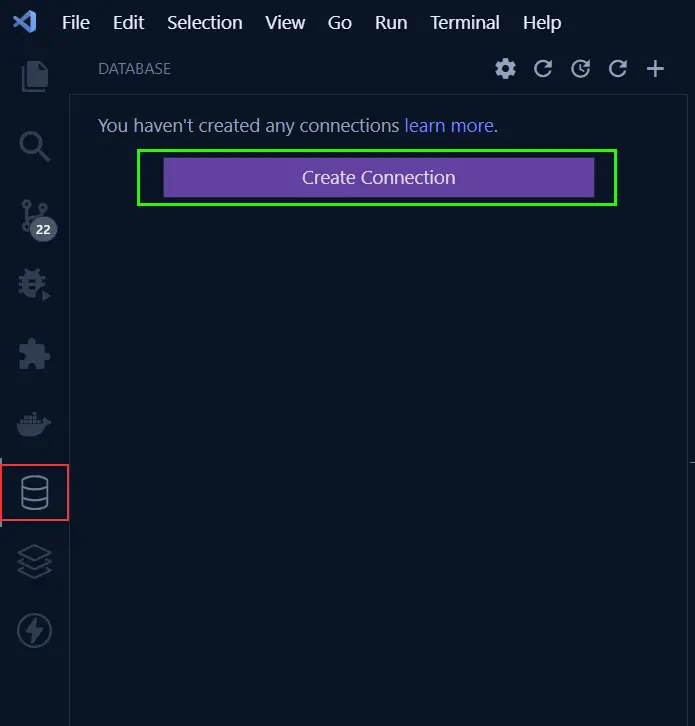
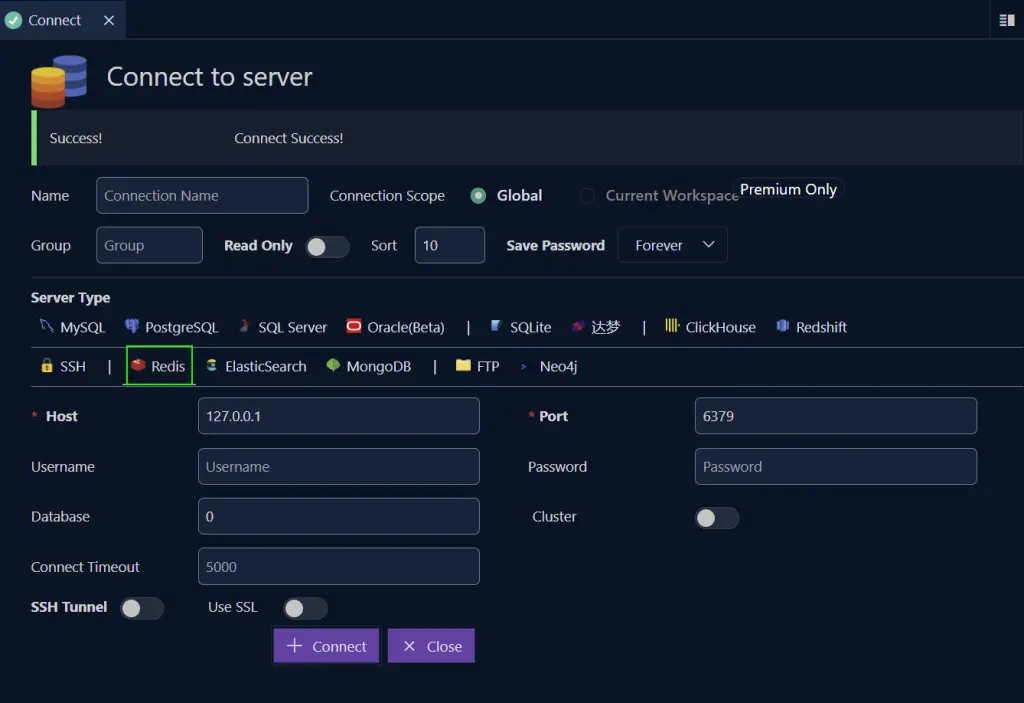
Connecting to PostgreSQL Database with VS Code MySQL Extension
There are many ways to connect to the PostgreSQL database but in this article, we’ll use the MySQL VS Code extension.
The MySQL VS Code extension supports a lot of popular services like Redis, PostgreSQL, MySQL, and more.
To create a new connection, click on the database icon at the left sidebar of VS Code and click on the ‘Create Connection’ button.
Next, select PostgreSQL from the list of servers then provide the PostgreSQL Docker image credentials we provided in the .env file and click on the ‘Connect’ button.
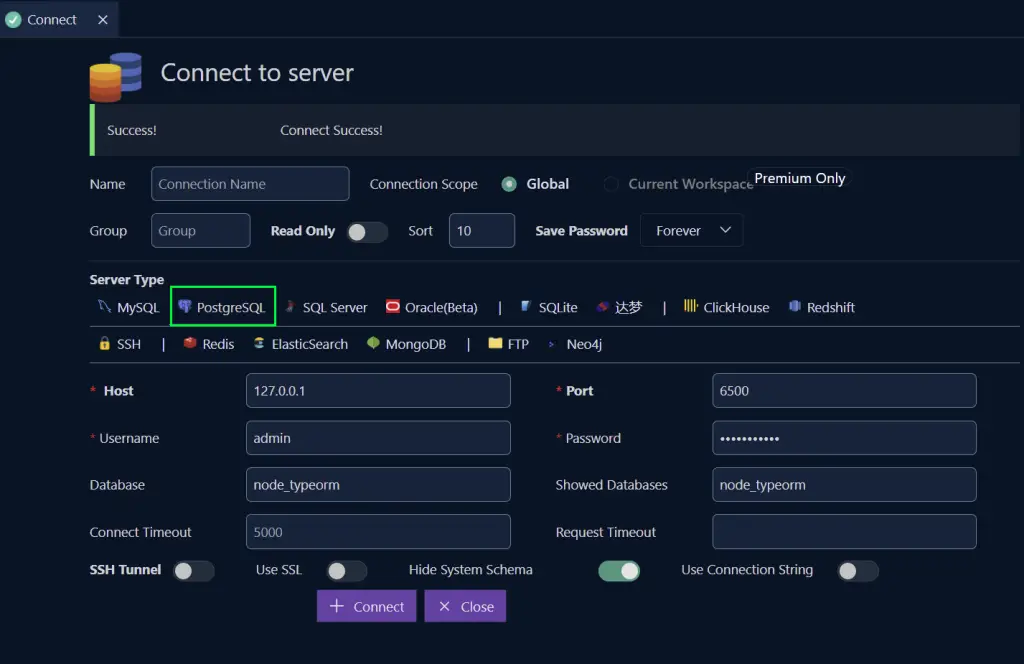
You should see the database name assuming you connected to the PostgreSQL docker server successfully.
Expand the dropdowns to access the tables and click on the users’ table to see all the columns that were defined in the user entity.

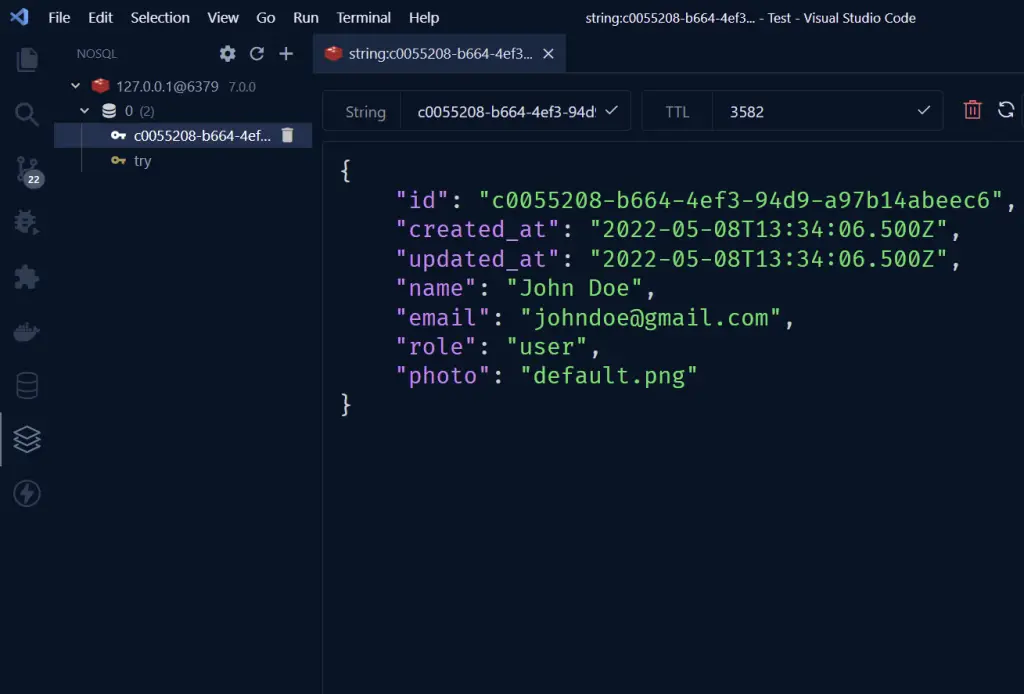
Connecting to Redis Database with VS Code MySQL Extension
Connecting to the Redis server has the same steps we followed in connecting to the PostgreSQL server.
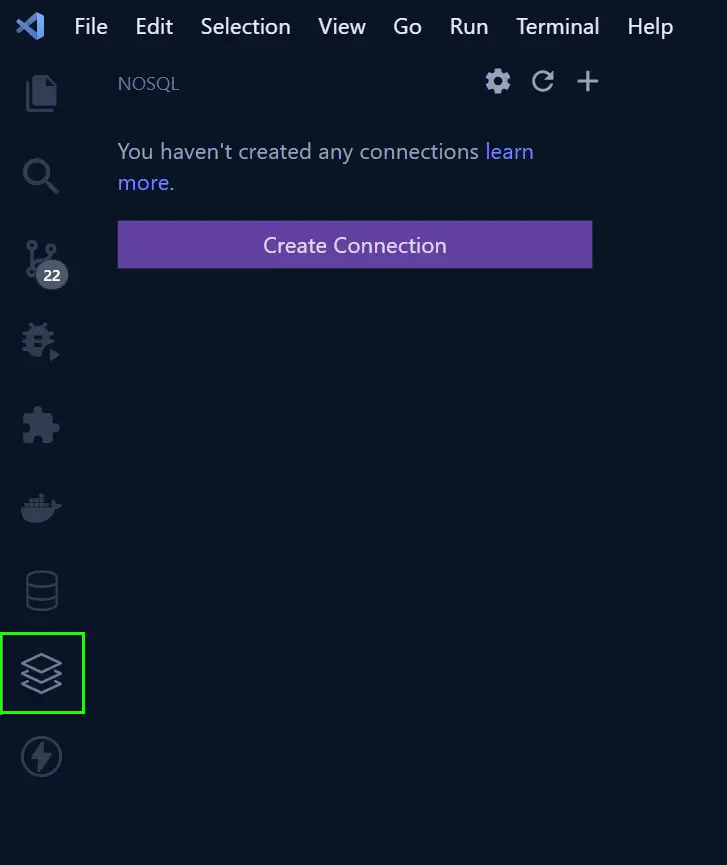
Here select Redis from the servers list and click connect. You don’t need to provide any credentials.
Conclusion
In this article, we covered how to register a new user, log in the registered user, log out a user, refresh an access token, and also run migrations against the PostgreSQL database using TypeORM.
Check out the source code on GitHub
PS E:\git\node_typeorm-jwt_auth_node_typeorm> npm start
npm WARN config global `–global`, `–local` are deprecated. Use `–location=global` instead.
> jwt_auth_node_typeorm@1.0.0 start
> ts-node-dev –respawn –transpile-only –exit-child src/app.ts
[INFO] 11:28:27 ts-node-dev ver. 1.1.8 (using ts-node ver. 9.1.1, typescript ver. 4.5.2)
Error: Configuration property “postgresConfig” is not defined
at Config.get (E:\git\node_typeorm-jwt_auth_node_typeorm\node_modules\config\lib\config.js:179:11)
at Object. (E:\git\node_typeorm-jwt_auth_node_typeorm\src\utils\data-source.ts:6:31)
at Module._compile (node:internal/modules/cjs/loader:1105:14)
at Module._compile (E:\git\node_typeorm-jwt_auth_node_typeorm\node_modules\source-map-support\source-map-support.js:568:25)
at Module.m._compile (C:\Users\JESUS~1.ARA\AppData\Local\Temp\ts-node-dev-hook-4305954957918303.js:69:33)
at Module._extensions..js (node:internal/modules/cjs/loader:1159:10)
at require.extensions. (C:\Users\JESUS~1.ARA\AppData\Local\Temp\ts-node-dev-hook-4305954957918303.js:71:20)
at Object.nodeDevHook [as .ts] (E:\git\node_typeorm-jwt_auth_node_typeorm\node_modules\ts-node-dev\lib\hook.js:63:13)
at Module.load (node:internal/modules/cjs/loader:981:32)
at Function.Module._load (node:internal/modules/cjs/loader:822:12)
[ERROR] 11:28:28 Error: Configuration property “postgresConfig” is not defined
The “postgresConfig” is not defined because the “postgresConfig” object was not populated with the values you defined in the `.env` file.
Possible Solutions:
1. Make sure you are loading the environment variables at the top level of the `src/app.ts` and `src/utils/data-source.ts` files with `require(‘dotenv’).config()`.
2. Make sure you have the correct spelling of `custom-environment-variables.ts`.
3. Make sure the configurations in the `custom-environment-variables.ts` file are also correct.
4. Make sure you have the environment variables in the `.env` file.
I had the same problem.
This didn’t solve
Please follow the instructions in the article and make sure you have the
.envfile in the root directory before running the server.Also, make sure you add the appropriate environment variables to the
.envfile.I put the following variables in the .env file
PORT=8000
NODE_ENV=development
POSTGRES_HOST=localhost
POSTGRES_PORT=5432
POSTGRES_USER=postgres
POSTGRES_PASSWORD=#######
POSTGRES_DB=postgres
Are you still getting that error after adding the environment variables to the
.envfile?I just cloned the project and tested it in both Ubuntu and Windows and I didn’t get any errors.
If you are still getting that same error, you can push the project to GitHub and share the URL with me through the contact form so that I can help you.
Hi, thanks for the article, awesome concepts
i’m getting error when post a register user in api/auth/register
i follow the video to make the request,
here is the error:
{
“status”: “fail”,
“erros”: [
{
“code”: “invalid_type”,
“expected”: “string”,
“received”: “undefined”,
“path”: [
“body”,
“name”
],
“message”: “Name is required”
},
{
“code”: “invalid_type”,
“expected”: “string”,
“received”: “undefined”,
“path”: [
“body”,
“email”
],
“message”: “Email address is required”
},
{
“code”: “invalid_type”,
“expected”: “string”,
“received”: “undefined”,
“path”: [
“body”,
“password”
],
“message”: “Password is required”
},
{
“code”: “invalid_type”,
“expected”: “string”,
“received”: “undefined”,
“path”: [
“body”,
“passwordConfirm”
],
“message”: “Please confirm your password”
}
]
}
You received this error because you didn’t send the request body as JSON. On Postman, select raw for the request body type and choose JSON from the options before making the request to the API. Also, make sure you provide all the required fields.
Hello, I think I may be missing something very obvious but when inputting JWT tokens, I updated custom-environment-variables.ts and .env, but what are we doing to the src/utils/validateEnv.ts? Thank you so much!
In the
src/utils/validateEnv.tsfile, you need to provide all the variables defined in the.envfile and provide the type of each variable.Validating the environment variables is not mandatory but it will ensure that your program only runs when all the environment variables are defined in the
.envfile.You can disable it by commenting out
validateEnv()in the./src/app.tsfile.I have cloned your repo and tried to use localhost:8000/api/auth/register in Postman with this body:
{
“name”: “Jeremy”,
“email”: “scatignaj@gmail.com”,
“password”: “jeremy”,
“passwordConfirm”: “jeremy”,
“role”: “admin”
}
but I receive:
{
“status”: “fail”,
“message”: “Route /api/auth/register not found”
}
any Idea?
I just cloned the project, tested it, and I didn’t find any issues with it. You might be getting the route not found error because you didn’t use the POST HTTP method for the request. In postman, change the HTTP method from GET to POST before making the request.
Hi Edem! My code was return an error message when I login.
The error:
{
“status”: “error”,
“message”: “secretOrPrivateKey must be an asymmetric key when using RS256”
}
I’ve added a Run the Node.js JWT Project Locally section to help you run the project with ease.
Follow the steps listed in the Run the Node.js JWT Project Locally section to avoid errors.
Hello, i`m also stuck here, did you manage to login? cheers
If you are using node v16, make sure you are on a fairly recent build of it. I had this issue on v16.14.0, but it is resolved on v16.19.0.