

In this article, you’ll learn how to implement JWT authentication with access and refresh tokens using Node.js, ExpressJs, Prisma, PostgreSQL, Redis, and Docker-compose.
CRUD API with Node.js and PostgreSQL Series:
- API Node.js, TypeScript, Prisma, PostgreSQL: Project Setup
- Node.js + Prisma + PostgreSQL: Access & Refresh Tokens
- CRUD API with Node.js and PostgreSQL: Send HTML Emails
- API with Node.js, Prisma & PostgreSQL: Forget/Reset Password
Introduction
In this course, you’ll learn how to build a JSON Web Token authentication and authorization API server with Node.js, ExpressJs, Typescript, Prisma, PostgreSQL, Docker-compose, and Redis.
Technologies required to build the API server:
- Node.js – a Javascript run-time language built on Google’s V8 engine
- Prisma – an ORM(Object Relational Mapping) that supports some of the popular databases (PostgreSQL, MySQL, SQLite, etc). Also, at the time of writing this article, it only supports Javascript and Typescript.
- PostgreSQL – an object-relational database system
- Bcryptjs – a hashing package
- JsonWebToken – for generating and verifying JSON Web Tokens
- Redis – an in-memory data structure store used as a database
- Zod – for validating user inputs
What the course will cover
- How to use Typescript in ExpressJs
- How to model data with Prisma
- How to validate the request body against a defined schema
- How to authenticate users with refresh and access tokens
Prerequisites
Software
- Node.js – for writing the backend API
- Docker – To handle containers
- pgAdmin(optional) – A GUI for querying, mutating, analyzing, and aggregating PostgreSQL data.
VS Code Extensions
- Prisma – Adds syntax highlighting, auto-completion, formatting, and linting for
.prismafiles. - DotENV – Adds syntax highlighting to
.envfile - Thunder Client – For making HTTP requests to the server. You can also use Postman or REST Client
- MySQL – for Managing some of the popular databases directly in VS Code.
Assumed Knowledge
The course assumes:
- You have some knowledge of Node.js and ExpressJs.
- You have basic Javascript and Typescript knowledge.
- You have some knowledge of SQL and PostgreSQL.
- You have some knowledge of Docker and Prisma.
JWT Authentication Example with Node.js, Prisma, and PostgreSQL
With this JWT authentication and authorization API, the user will be able to do the following:
- Register a new account
- Login with the registered credentials
- Refresh the access token when expired
- Retrieve his profile information only if logged in.
| RESOURCE | HTTP METHOD | ROUTE | DESCRIPTION |
|---|---|---|---|
| users | GET | /api/users/me | Retrieve user’s information |
| auth | POST | /api/auth/register | Register new user |
| auth | POST | /api/auth/login | Login registered user |
| auth | GET | /api/auth/refresh | Refresh the expired access token |
| auth | GET | /api/auth/logout | Logout the user |
User Login and Register Flow with JWT Authentication
The diagram below illustrates the user registration flow in the Node.js app.
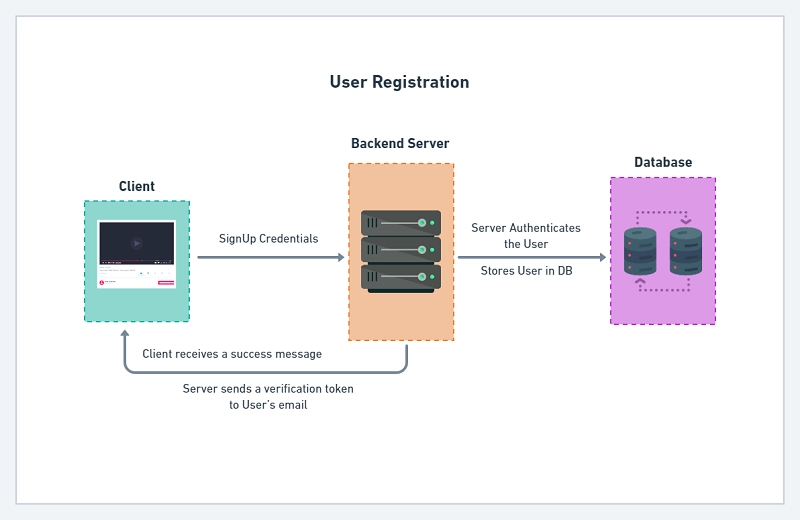
The user will send a POST request with an email and a password to /api/auth/login. The server then checks if the user exists in the database before validating the password.
Assuming there wasn’t any error the server then generates the access and refresh tokens before sending them as HTTPOnly cookies.
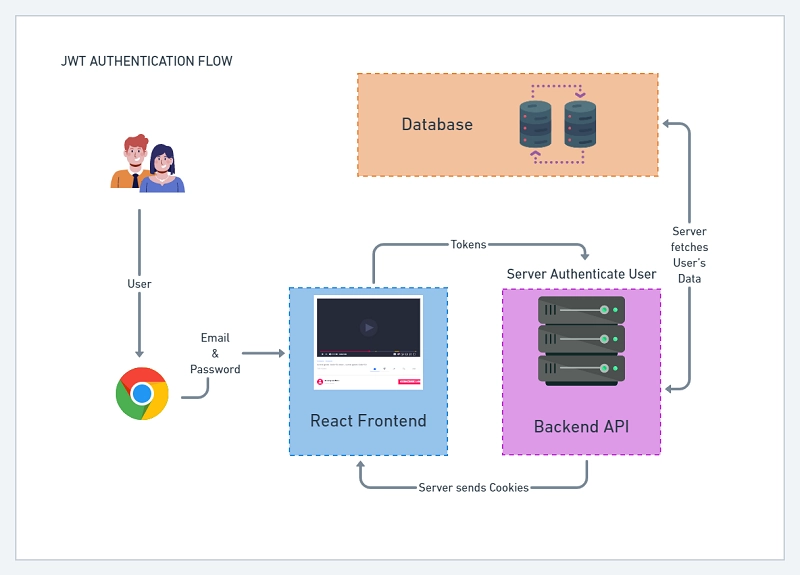
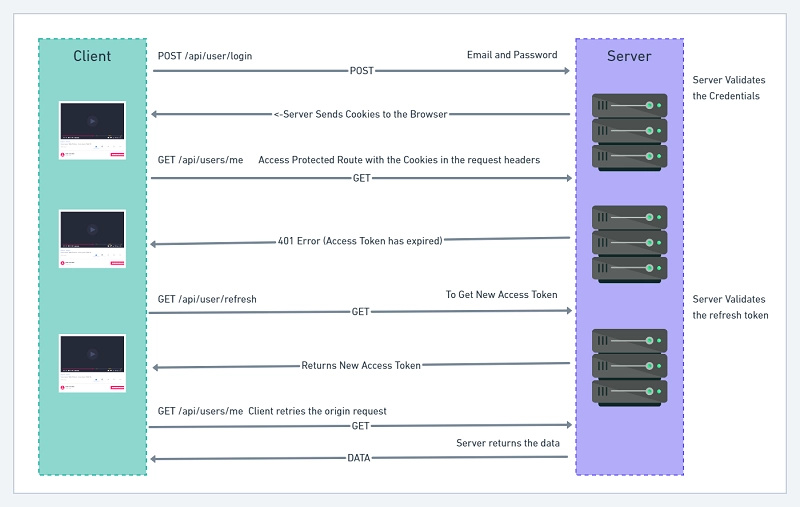
Below is a summary of how the access token will be refreshed:
- First, the browser sends the cookies along with any request to the server
- The server then checks if the access token was included in the request before validating it. An error is sent if the token has expired or was manipulated.
- The frontend application receives the unauthorized error and uses interceptors to refresh the access token.
- In brief, the frontend app will make a GET request to
/api/auth/refreshto get a new access token cookie before re-trying the previous request.
Create the User Model with Prisma
prisma/schema.prisma
model User{
  @@map(name: "users")

  id String  @id @default(uuid())
  name String  @db.VarChar(255)
  email String @unique
  photo String? @default("default.png")
  verified Boolean? @default(false)

  password String
  role RoleEnumType? @default(user)

  verificationCode String? @db.Text @unique

  createdAt DateTime @default(now())
  updatedAt DateTime @updatedAt

  @@unique([email, verificationCode])
  @@index([email, verificationCode])
}

enum RoleEnumType {
  user
  admin
}
In the snippets above, I defined the User model and the @@map(name: "users") informs Prisma to use users as the table name.
Each field in the schema has a name followed by a type and an optional field attribute(s).
The @id attribute on the id field marks it as a primary key of the users table. Also, the @default(uuid()) attribute sets a default UUID (Universally Unique Identifier) on the id field.
By default, all fields are required so adding a question mark ? after the field type specifies that it’s optional.
The RoleEnumType denotes whether the user is an admin or not.
The @@unique([email, verificationCode]) specifies that the email and verificationCode fields should have unique constraints.
Finally, the @@index([email, verificationCode]) defines indexes on both the email and verificationCode fields in the database.
Create Zod Schemas to Validate Request Body
Now we need to validate the request body. To do so, we’ll use a popular validation package named Zod to define the schemas.
We could have used Yup which is also another popular validation library used by many developers but I chose Zod because I mostly use it in most of my projects.
Run the following command to install Zod
yarn add zod
src/schemas/user.schema.ts
import { object, string, TypeOf, z } from 'zod';

enum RoleEnumType {
  ADMIN = 'admin',
  USER = 'user',
}

export const createUserSchema = object({
  body: object({
    name: string({
      required_error: 'Name is required',
    }),
    email: string({
      required_error: 'Email address is required',
    }).email('Invalid email address'),
    password: string({
      required_error: 'Password is required',
    })
      .min(8, 'Password must be more than 8 characters')
      .max(32, 'Password must be less than 32 characters'),
    passwordConfirm: string({
      required_error: 'Please confirm your password',
    }),
    role: z.optional(z.nativeEnum(RoleEnumType)),
  }).refine((data) => data.password === data.passwordConfirm, {
    path: ['passwordConfirm'],
    message: 'Passwords do not match',
  }),
});

export const loginUserSchema = object({
  body: object({
    email: string({
      required_error: 'Email address is required',
    }).email('Invalid email address'),
    password: string({
      required_error: 'Password is required',
    }).min(8, 'Invalid email or password'),
  }),
});

export type CreateUserInput = Omit<
  TypeOf<typeof createUserSchema>['body'],
  'passwordConfirm'
>;

export type LoginUserInput = TypeOf<typeof loginUserSchema>['body'];
I exported the inferred Typescript types of the schemas with the TypeOf<> type that comes with Zod.
Create Middleware to Parse Zod Schema
Creating the schemas alone is not enough. We need to define a middleware that will parse and validate the request body against the defined schemas.
The middleware returns an error if any of the schema rules were not satisfied.
src/middleware/validate.ts
import { Request, Response, NextFunction } from 'express';
import { AnyZodObject, ZodError } from 'zod';

export const validate =
  (schema: AnyZodObject) =>
  (req: Request, res: Response, next: NextFunction) => {
    try {
      schema.parse({
        params: req.params,
        query: req.query,
        body: req.body,
      });

      next();
    } catch (error) {
      if (error instanceof ZodError) {
        return res.status(400).json({
          status: 'fail',
          errors: error.errors,
        });
      }
      next(error);
    }
  };
Password Management with Bcryptjs
Another important aspect of authentication is to hash the user’s password before saving it to the database.
To secure the passwords, we’ll transform them into hashed strings with a hashing algorithm. Once the plain password has been hashed it cannot be easily reversed to obtain the original password.
Hashing the same password twice gives the same output so we use salt to ensure that no two users having the same password end up with the same hashed password.
yarn add bcryptjs && yarn add -D @types/bcryptjs
To hash a password with BcryptJs, we use salt rounds or Cost Factor. The Cost Factor is the amount of time needed to calculate a single bcryptjs hash.
The higher the Cost Factor the more difficult it is to brute force. Over the years computers are becoming more powerful so using a cost factor of 12 should be good.
Below is how we hash and validate passwords with Bcryptjs
// Hash password
await bcrypt.hash(req.body.password, 12);

// Verify password
await bcrypt.compare(password, user.password)
Create Services to Interact with the Database
Next, let’s create some services to query and mutate the database.
yarn add jsonwebtoken && yarn add -D @types/jsonwebtoken
src/services/user.service.ts
import { PrismaClient, Prisma, User } from '@prisma/client';
import config from 'config';
import redisClient from '../utils/connectRedis';
import { signJwt } from '../utils/jwt';

export const excludedFields = ['password', 'verified', 'verificationCode'];

const prisma = new PrismaClient();

export const createUser = async (input: Prisma.UserCreateInput) => {
  return (await prisma.user.create({
    data: input,
  })) as User;
};

export const findUniqueUser = async (
  where: Prisma.UserWhereUniqueInput,
  select?: Prisma.UserSelect
) => {
  return (await prisma.user.findUnique({
    where,
    select,
  })) as User;
};
// (...)
Authentication with JSON Web Tokens (JWT)
There are different strategies used to implement authentication and authorization but each strategy has its security flaw.
Authenticating a user can be complex and can easily get out of hand.
Create Functions to Sign and Verify Access and Refresh Tokens
A JSON Web Token is simply a sequence of characters comprising a header, payload, and signature.
JWT shines when it comes to stateless authentication but that alone isn’t enough so we’ll combine it with Redis to add an extra layer of security.
You can read more about the flaws of JSON Web Tokens in this article.
To make it difficult for hackers to brute force our application, we’ll store both refresh and access tokens in HTTPOnly cookies.
Sending the tokens in HTTPOnly cookies will prevent hackers from using Javascript to access and manipulate them.
To read more about JWT Authentication with React, check out React + Redux Toolkit: JWT Authentication and Authorization
To read more about Refresh Tokens with React, check out React.js + Redux Toolkit: Refresh Tokens Authentication
Sign Access and Refresh Tokens
Next, let’s create two utility functions to generate and verify the access and refresh tokens.
src/utils/jwt.ts
import jwt, { SignOptions } from 'jsonwebtoken';
import config from 'config';

// ? Sign Access or Refresh Token
export const signJwt = (
  payload: Object,
  keyName: 'accessTokenPrivateKey' | 'refreshTokenPrivateKey',
  options: SignOptions
) => {
  const privateKey = Buffer.from(
    config.get<string>(keyName),
    'base64'
  ).toString('ascii');
  return jwt.sign(payload, privateKey, {
    ...(options && options),
    algorithm: 'RS256',
  });
};

// ? Verify Access or Refresh Token
Here is a brief explanation of what I did above:
- First, I created a
signJwtfunction that accepts three parameters (payload, keyName, and token options). The keyName is either access or refresh token private key. - I then used the Buffer module from Node.js to decode the encoded private keys to an ASCII string.
- Finally, I signed the token with an RS256 algorithm and returned it.
Verify Access or Refresh Tokens
The verifyJwt() function is similar to the signJwt() function with some minor changes.
src/utils/jwt.ts
// ? Verify Access or Refresh Token
export const verifyJwt = <T>(
  token: string,
  keyName: 'accessTokenPublicKey' | 'refreshTokenPublicKey'
): T | null => {
  try {
    const publicKey = Buffer.from(
      config.get<string>(keyName),
      'base64'
    ).toString('ascii');
    const decoded = jwt.verify(token, publicKey) as T;

    return decoded;
  } catch (error) {
    return null;
  }
};
Create Authentication Controllers
The authentication controllers will allow us to register a new user, log in the registered user, refresh an access token, send a verification email, log out the user, and many more.
Define Access and Refresh Token Cookie Options
To send the access and refresh tokens in HTTPOnly cookies, let’s customize the cookies options with the required settings.
Setting
secure: truein development mode will prevent the server from sending the cookies to the browser or client.
The fields required in the cookies options depend on the project you are working on but feel free to play around with some of the options.
src/controllers/auth.controller.ts
const cookiesOptions: CookieOptions = {
  httpOnly: true,
  sameSite: 'lax',
};

if (process.env.NODE_ENV === 'production') cookiesOptions.secure = true;

const accessTokenCookieOptions: CookieOptions = {
  ...cookiesOptions,
  expires: new Date(
    Date.now() + config.get<number>('accessTokenExpiresIn') * 60 * 1000
  ),
  maxAge: config.get<number>('accessTokenExpiresIn') * 60 * 1000,
};

const refreshTokenCookieOptions: CookieOptions = {
  ...cookiesOptions,
  expires: new Date(
    Date.now() + config.get<number>('refreshTokenExpiresIn') * 60 * 1000
  ),
  maxAge: config.get<number>('refreshTokenExpiresIn') * 60 * 1000,
};
I made the access token expire after every 15 minutes whilst the refresh token expires in 60 minutes.
Register User Controller
Now it’s time to write the logic to register a new user.
src/controllers/auth.controller.ts
import crypto from 'crypto';
import { CookieOptions, NextFunction, Request, Response } from 'express';
import bcrypt from 'bcryptjs';
import { LoginUserInput, RegisterUserInput } from '../schemas/user.schema';
import {
  createUser,
  findUniqueUser,
  signTokens,
} from '../services/user.service';
import { Prisma } from '@prisma/client';
import config from 'config';
import AppError from '../utils/appError';
import redisClient from '../utils/connectRedis';
import { signJwt, verifyJwt } from '../utils/jwt';

// ? Cookie Options Here

export const registerUserHandler = async (
  req: Request<{}, {}, RegisterUserInput>,
  res: Response,
  next: NextFunction
) => {
  try {
    const hashedPassword = await bcrypt.hash(req.body.password, 12);

    const verifyCode = crypto.randomBytes(32).toString('hex');
    const verificationCode = crypto
      .createHash('sha256')
      .update(verifyCode)
      .digest('hex');

    const user = await createUser({
      name: req.body.name,
      email: req.body.email.toLowerCase(),
      password: hashedPassword,
      verificationCode,
    });

    res.status(201).json({
      status: 'success',
      data: {
        user,
      },
    });
  } catch (err: any) {
    if (err instanceof Prisma.PrismaClientKnownRequestError) {
      if (err.code === 'P2002') {
        return res.status(409).json({
          status: 'fail',
          message: 'Email already exist, please use another email address',
        });
      }
    }
    next(err);
  }
};
Things to note about the above code snippets:
- The
Requestinterface of ExpressJs is generic so I provided it with the inferred type of theregisterUserSchemato assist Typescript to give us better IntelliSense. - Next, I called the
createUserservice to add the new user to the database with the credentials provided.
Also, you need to convert the email to lowercase since PostgreSQL is not case-sensitive. When a user registers with eitherJohndoe@gmail.comandjohndoe@gmail.com, PostgreSQL will consider them to be two different users which violate the unique constraints we used on the email field. - When a user already exists in the database, Prisma returns an error that has a code of
23505which we need to catch with atry(..)catch(..)statement.
Login User Controller
Next, let’s create a controller to log in the registered user by sending back the refresh and access tokens as cookies.
src/controllers/auth.controller.ts
// ? Cookie Options Here

// ? Register User Controller

export const loginUserHandler = async (
  req: Request<{}, {}, LoginUserInput>,
  res: Response,
  next: NextFunction
) => {
  try {
    const { email, password } = req.body;

    const user = await findUniqueUser(
      { email: email.toLowerCase() },
      { id: true, email: true, verified: true, password: true }
    );

    if (!user || !(await bcrypt.compare(password, user.password))) {
      return next(new AppError(400, 'Invalid email or password'));
    }

    // Sign Tokens
    const { access_token, refresh_token } = await signTokens(user);
    res.cookie('access_token', access_token, accessTokenCookieOptions);
    res.cookie('refresh_token', refresh_token, refreshTokenCookieOptions);
    res.cookie('logged_in', true, {
      ...accessTokenCookieOptions,
      httpOnly: false,
    });

    res.status(200).json({
      status: 'success',
      access_token,
    });
  } catch (err: any) {
    next(err);
  }
};
Here are some of the notable things you should be aware of in the above snippets:
- I called the
findUserByEmailservice with the user’s email to check if that user exists in the database before validating the password. - I then called the
signTokensservice with the user document to generate both the access and refresh tokens. - Next, I sent the tokens as HTTPOnly cookies. I also included a
logged_incookie that is not HTTPOnly to make the frontend aware if the user is logged in. - Another crucial thing to note is we send a generic message
Invalid email or passwordif the user doesn’t exist or the password is invalid.
Refresh Access Token Controller
The access token can be refreshed after every 15 minutes when expired as long as the refresh token is valid.
Also, the access token can be refreshed only if the user has a valid session in the Redis database.
src/controllers/auth.controller.ts
// ? Cookie Options Here

// ? Register User Controller

// ? Login User Controller

export const refreshAccessTokenHandler = async (
  req: Request,
  res: Response,
  next: NextFunction
) => {
  try {
    const refresh_token = req.cookies.refresh_token;

    const message = 'Could not refresh access token';

    if (!refresh_token) {
      return next(new AppError(403, message));
    }

    // Validate refresh token
    const decoded = verifyJwt<{ sub: string }>(
      refresh_token,
      'refreshTokenPublicKey'
    );

    if (!decoded) {
      return next(new AppError(403, message));
    }

    // Check if user has a valid session
    const session = await redisClient.get(decoded.sub);

    if (!session) {
      return next(new AppError(403, message));
    }

    // Check if user still exist
    const user = await findUniqueUser({ id: JSON.parse(session).id });

    if (!user) {
      return next(new AppError(403, message));
    }

    // Sign new access token
    const access_token = signJwt({ sub: user.id }, 'accessTokenPrivateKey', {
      expiresIn: `${config.get<number>('accessTokenExpiresIn')}m`,
    });

    // 4. Add Cookies
    res.cookie('access_token', access_token, accessTokenCookieOptions);
    res.cookie('logged_in', true, {
      ...accessTokenCookieOptions,
      httpOnly: false,
    });

    // 5. Send response
    res.status(200).json({
      status: 'success',
      access_token,
    });
  } catch (err: any) {
    next(err);
  }
};
Logout User Controller
JSON Web Tokens are stateless and there is no straightforward way to invalidate a token except when it expires.
To clear the cookies from the user’s browser when they log out, we’ll send expired cookies with the same key names which will immediately remove them from the browser.
Also, remember to delete the user’s session from the Redis database when they log out.
src/controllers/auth.controller.ts
// ? Cookie Options Here

// ? Register User Controller

// ? Login User Controller

// ? Refresh Access Token

function logout(res: Response) {
  res.cookie('access_token', '', { maxAge: -1 });
  res.cookie('refresh_token', '', { maxAge: -1 });
  res.cookie('logged_in', '', { maxAge: -1 });
}

export const logoutUserHandler = async (
  req: Request,
  res: Response,
  next: NextFunction
) => {
  try {
    await redisClient.del(res.locals.user.id);
    logout(res);

    res.status(200).json({
      status: 'success',
    });
  } catch (err: any) {
    next(err);
  }
};
Create User Controller
To test the authentication and authorization flow, let’s define a getMeHandler to return the currently logged-in user’s information.
The getMeHandler controller will just read the user object we stored in res.locals.user and send it back as a response.
The purpose of the getMeHandler controller is to return the user we stored in res.locals.user .
src/controllers/user.controller.ts
import { NextFunction, Request, Response } from 'express';

export const getMeHandler = async (
  req: Request,
  res: Response,
  next: NextFunction
) => {
  try {
    const user = res.locals.user;

    res.status(200).status(200).json({
      status: 'success',
      data: {
        user,
      },
    });
  } catch (err: any) {
    next(err);
  }
};
Create Authentication Middleware
To parse the cookies in the request, we need the cookie-parser package. The Cookie-parser middleware will parse the cookies and attach them to req.cookies .
yarn add cookie-parser && yarn add -D @types/cookie-parser
Deserialize User Middleware
Now, let’s create a middleware to serve as an authentication guard for all the protected routes.
src/middleware/deserializeUser.ts
import { NextFunction, Request, Response } from 'express';
import { omit } from 'lodash';
import { excludedFields, findUniqueUser } from '../services/user.service';
import AppError from '../utils/appError';
import redisClient from '../utils/connectRedis';
import { verifyJwt } from '../utils/jwt';

export const deserializeUser = async (
  req: Request,
  res: Response,
  next: NextFunction
) => {
  try {
    let access_token;

    if (
      req.headers.authorization &&
      req.headers.authorization.startsWith('Bearer')
    ) {
      access_token = req.headers.authorization.split(' ')[1];
    } else if (req.cookies.access_token) {
      access_token = req.cookies.access_token;
    }

    if (!access_token) {
      return next(new AppError(401, 'You are not logged in'));
    }

    // Validate the access token
    const decoded = verifyJwt<{ sub: string }>(
      access_token,
      'accessTokenPublicKey'
    );

    if (!decoded) {
      return next(new AppError(401, `Invalid token or user doesn't exist`));
    }

    // Check if the user has a valid session
    const session = await redisClient.get(decoded.sub);

    if (!session) {
      return next(new AppError(401, `Invalid token or session has expired`));
    }

    // Check if the user still exist
    const user = await findUniqueUser({ id: JSON.parse(session).id });

    if (!user) {
      return next(new AppError(401, `Invalid token or session has expired`));
    }

    // Add user to res.locals
    res.locals.user = omit(user, excludedFields);

    next();
  } catch (err: any) {
    next(err);
  }
};
Here is a breakdown of what happened in the above snippets:
- I first checked if the access token exists in the Authorization header or
req.cookiesobject. - Next, I validated the access token and retrieved the payload we stored in it.
- Then I checked if the user still exists in the database and has a valid session in the Redis database.
- Finally, I attached the user document to
res.locals.userto make it available in the other controllers.
Require Authenticated User
Next, let’s create a middleware to return an error message if the res.locals.user object doesn’t exist.
src/middleware/requireUser.ts
import { NextFunction, Request, Response } from 'express';
import AppError from '../utils/appError';

export const requireUser = (
  req: Request,
  res: Response,
  next: NextFunction
) => {
  try {
    const user = res.locals.user;

    if (!user) {
      return next(
        new AppError(401, `Session has expired or user doesn't exist`)
      );
    }

    next();
  } catch (err: any) {
    next(err);
  }
};
Create Authentication Routes
Now we are ready to define the routes for the authentication controllers.
The validate() middleware will be included in the middleware stack to validate the req.body against the defined schemas before passing the request to our controllers.
src/routes/auth.routes.ts
import express from 'express';
import {
  loginUserHandler,
  logoutUserHandler,
  refreshAccessTokenHandler,
  registerUserHandler,
} from '../controllers/auth.controller';
import { deserializeUser } from '../middleware/deserializeUser';
import { requireUser } from '../middleware/requireUser';
import { validate } from '../middleware/validate';
import { loginUserSchema, registerUserSchema } from '../schemas/user.schema';

const router = express.Router();

router.post('/register', validate(registerUserSchema), registerUserHandler);

router.post('/login', validate(loginUserSchema), loginUserHandler);

router.get('/refresh', refreshAccessTokenHandler);

router.get('/logout', deserializeUser, requireUser, logoutUserHandler);

export default router;
Create User Routes
Next, let’s create a /api/users/me route to get the currently logged-in user’s profile.
src/routes/user.routes.ts
import express from 'express';
import { getMeHandler } from '../controllers/user.controller';
import { deserializeUser } from '../middleware/deserializeUser';
import { requireUser } from '../middleware/requireUser';

const router = express.Router();

router.use(deserializeUser, requireUser);

router.get('/me', getMeHandler);

export default router;
Update App.ts
We need to install the cors package to enable us to run both the frontend and backend on different domains.
Also, installed the morgan package to log the different requests in the terminal.
yarn add cors && yarn add -D morgan @types/morgan @types/cors
src/app.ts
require('dotenv').config();
import express, { NextFunction, Request, Response, response } from 'express';
import config from 'config';
import cors from 'cors';
import morgan from 'morgan';
import cookieParser from 'cookie-parser';
import validateEnv from './utils/validateEnv';
import { PrismaClient } from '@prisma/client';
import authRouter from './routes/auth.routes';
import userRouter from './routes/user.routes';
import AppError from './utils/appError';

validateEnv();

const prisma = new PrismaClient();
const app = express();

async function bootstrap() {
  // TEMPLATE ENGINE
  app.set('view engine', 'pug');
  app.set('views', `${__dirname}/views`);

  // MIDDLEWARE

  // 1.Body Parser
  app.use(express.json({ limit: '10kb' }));

  // 2. Cookie Parser
  app.use(cookieParser());

  // 2. Cors
  app.use(
    cors({
      origin: [config.get<string>('origin')],
      credentials: true,
    })
  );

  // 3. Logger
  if (process.env.NODE_ENV === 'development') app.use(morgan('dev'));

  // ROUTES
  app.use('/api/auth', authRouter);
  app.use('/api/users', userRouter);

  // Testing
  app.get('/api/healthchecker', (_, res: Response) => {
    res.status(200).json({
      status: 'success',
      message: 'Welcome to NodeJs with Prisma and PostgreSQL',
    });
  });

  // UNHANDLED ROUTES
  app.all('*', (req: Request, res: Response, next: NextFunction) => {
    next(new AppError(404, `Route ${req.originalUrl} not found`));
  });

  // GLOBAL ERROR HANDLER
  app.use((err: AppError, req: Request, res: Response, next: NextFunction) => {
    err.status = err.status || 'error';
    err.statusCode = err.statusCode || 500;

    res.status(err.statusCode).json({
      status: err.status,
      message: err.message,
    });
  });

  const port = config.get<number>('port');
  app.listen(port, () => {
    console.log(`Server on port: ${port}`);
  });
}

bootstrap()
  .catch((err) => {
    throw err;
  })
  .finally(async () => {
    await prisma.$disconnect();
  });
A couple of things to note in the above snippets:
- First, I called the
cookie-parsermiddleware to parse the cookie in the request headers. - I used the CORS middleware and provided it with the domain the frontend will be running on. Also, make sure you set
credentials: trueto allow CORS to accept cookies from the cross-origin request.
Database Migration with Prisma
Run the following command to create a new migration.
Make sure the PostgreSQL docker container is running for this to work.
npx prisma migrate dev --name user-entity --create-only
The --name flag specifies the migration name and the --create-only tells Prisma to create the migration without applying it.
Run this command to install the Prisma Client.
yarn add @prisma/client
Run this command to create the users table in the database.
npx prisma db push
Testing the JSON Web Token Authentication REST API
Run this command to start the PostgreSQL and Redis Docker containers:
docker-compose up -d
You should see the following logs:
$ docker-compose up -d
Creating network "node_prisma_default" with the default driver
Creating postgres ... done
Creating redis    ... done
Run yarn start to start the server
$ yarn start
yarn run v1.22.18
$ ts-node-dev --respawn --transpile-only --exit-child src/app.ts
[INFO] 16:16:27 ts-node-dev ver. 1.1.8 (using ts-node ver. 9.1.1, typescript ver. 4.6.4)
Server on port: 8000
Redis client connect successfully
Register users
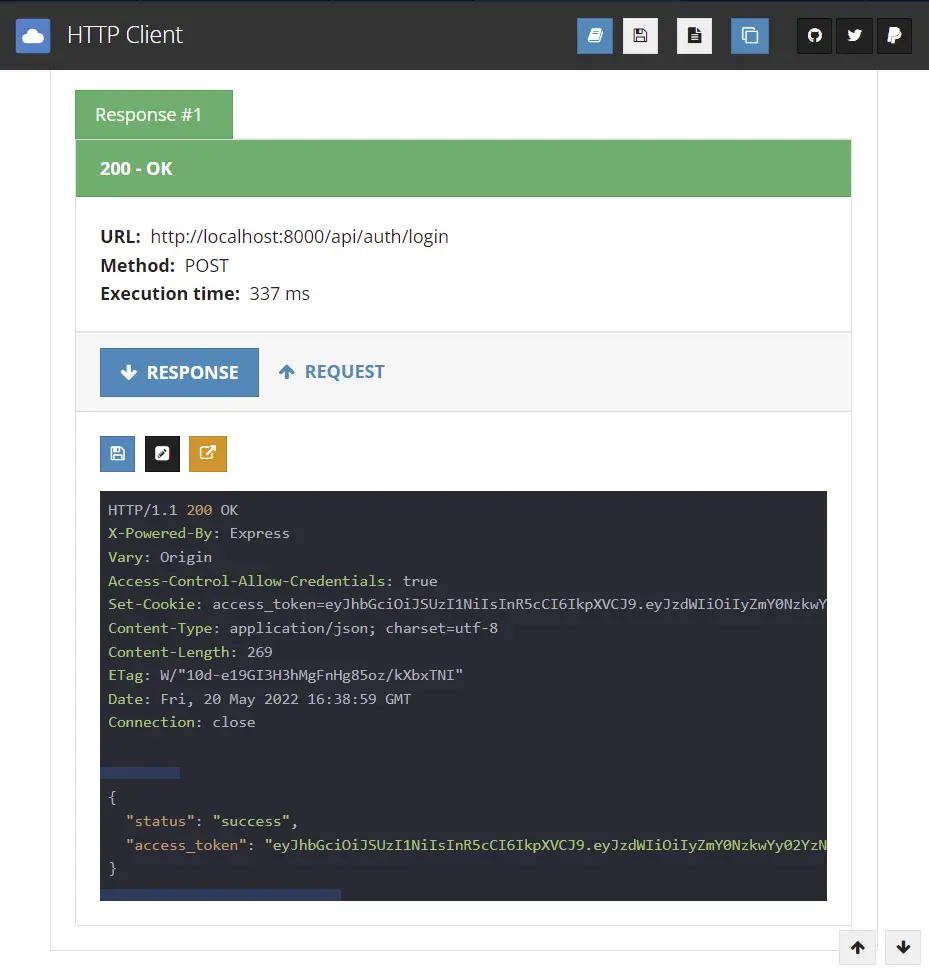
Let’s register some users. I decided to use the HTTP client VS Code extension but you can use any API testing tool you are comfortable with like Postman.
To register a user you need to make a POST request to http://localhost:8000/api/auth/register with the required credentials.
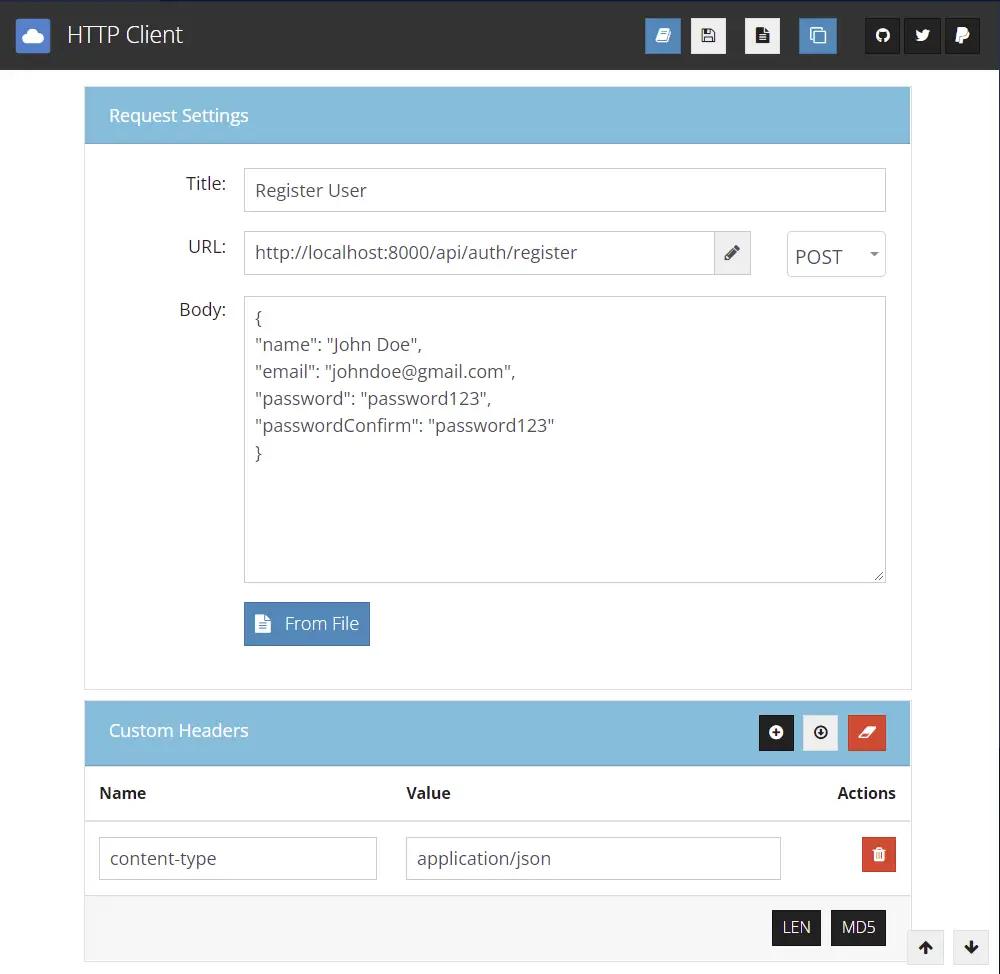
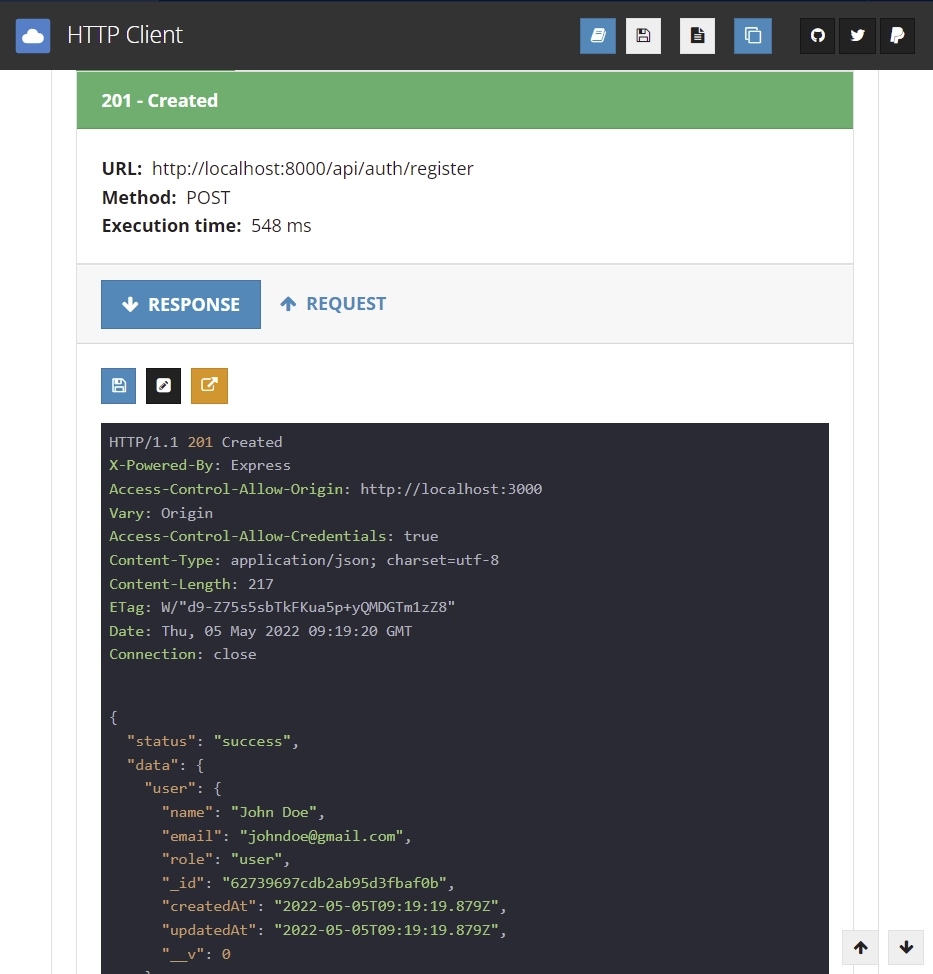
Below is the response you’ll get assuming the registration was successful.
Open the MySQL VS Code extension then click on the users table and you should see the registered users.
Login user
Now login with the credentials of any of the registered users.
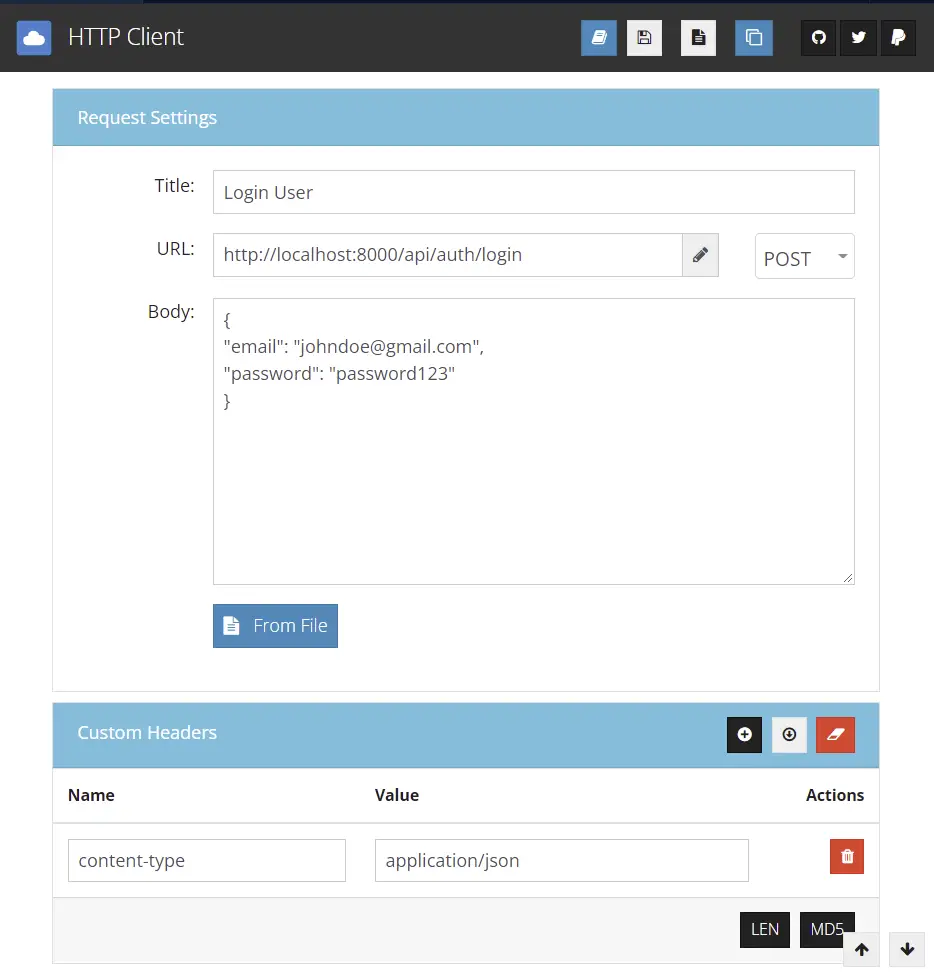
You should get a JSON response with an access token.
Next, connect to the Redis Docker container with the MySQL VS Code extension to see the user’s session.
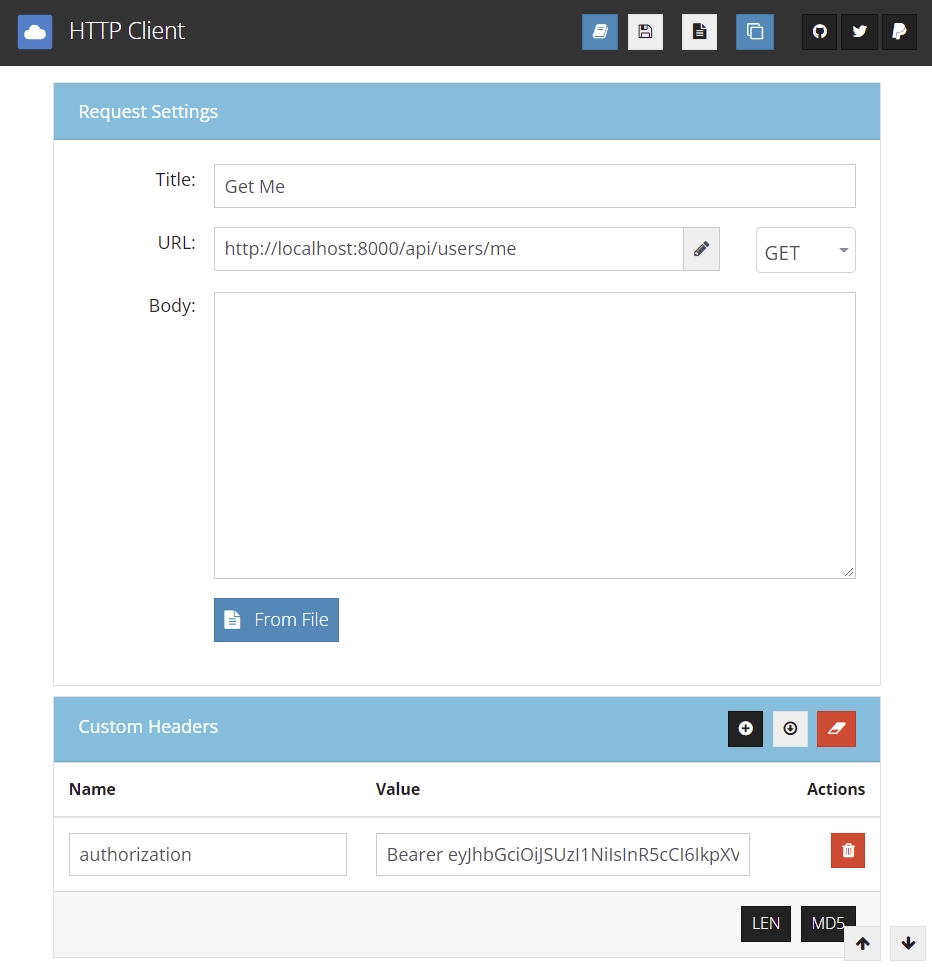
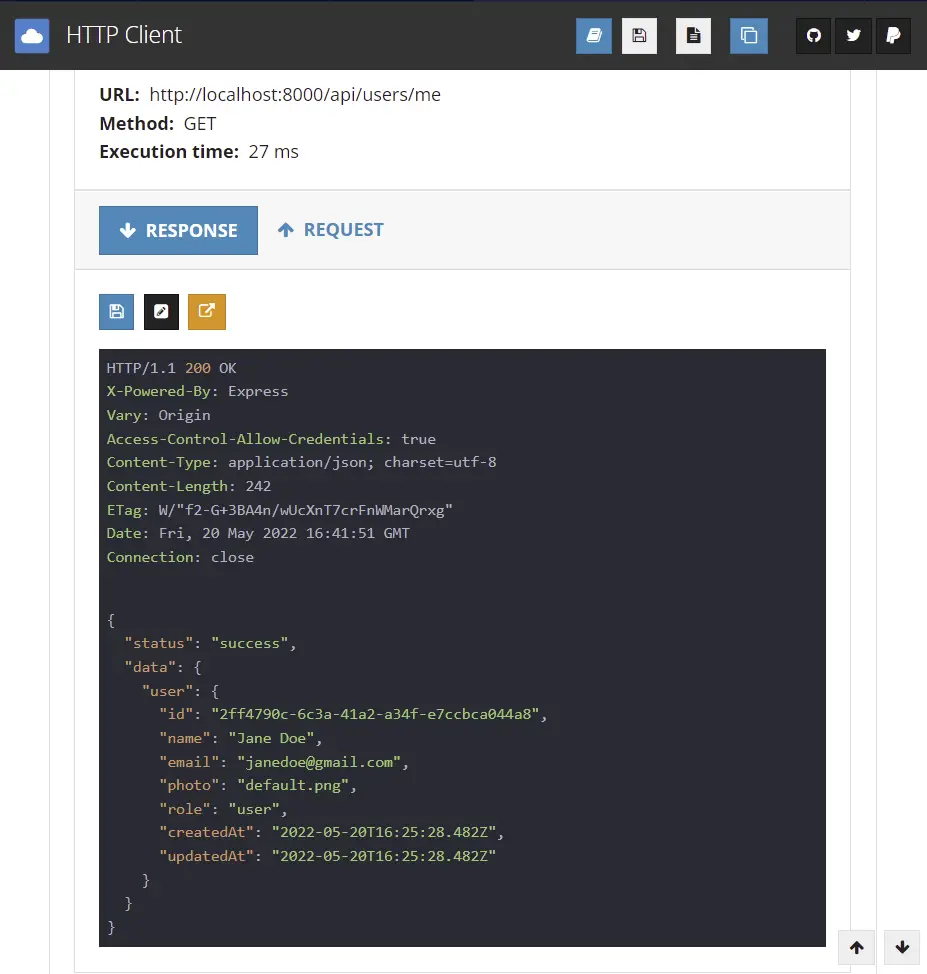
Get Currently Logged in User’s Credentials
Copy the access token and add the authorization header with the token attached to the Bearer string value.
You should get the users’ information as a JSON response assuming the access token is valid
Conclusion
Congrats for reaching the end. In this article, you learned how to implement JSON Web Token authentication with access and refresh tokens using Node.js, Prisma, PostgreSQL, Redis, and Docker-compose.
Check out the source code on Github.
at this step: src/schemas/user.schema.ts
in the file you include a random import:
import { RoleEnumType } from ‘../entities/user.entity’;
but it is not in final file. this results in an error
I fixed with source code, but thought you should know 🙂
thx for the guide
Thanks for letting me know, I’ve removed the unnecessary import from the
src/schemas/user.schema.tsfile in the article. If you find any mistake, don’t hesitate to leave a comment under that article.Amazing Post. Never find anything like this usefull content for begginers like me.
Was wondering if it is more secure when I integrate express-session or the integration doesn’t bring benefit to here?
Thank you for your kind feedback, and I’m happy to hear that the article was helpful for you.
Regarding your question, it depends on the specific needs and requirements of your application.
express-sessionis a middleware module that provides session management features for Express.js applications, including security features such as using a secure cookie by default.If you have already implemented access and refresh token functionality and are satisfied with the level of security it provides, then adding
express-sessionmay not necessarily provide additional benefits, especially if it adds complexity to the codebase.However, you could consider integrating a persistence layer like Redis that stores the token’s metadata. This would provide you with more control over when to revoke the JWTs, and serve as session storage in addition to the statelessness of JWTs.
Thank you for replying !
I am very much satisfied code that you provided on github using Redis!
I’d love to see your work with nextjs 13 beta(if possible haha) and retrieving those data.
I implemented by myself but looking you code and explanation gives me a lot of joy learning more sophisticated code.
Yeah, I’ve been thinking about creating tutorials for Next.js 13, but right now I’m having a great time exploring the Yew.rs framework in Rust. When I feel more motivated to switch back to Next.js, I’ll begin working on those projects.
Hey!
I’m curious why you are turning the JWT in the login response as well as sending cookies to the browser.
Is this to allow the API to also accept a bearer token incase you wanted to hit the api from say a mobile app?
For strictly request from a web app, is it best to not send an authorization header with the returned JWT and rely on the request cookies that get sent from the express server to the FE?
In response to your first question, including the JWT access token in both the JSON object and Cookies provides flexibility for the client to access protected routes in different ways.
However, it’s important to note that including the token in both places can increase the risk of security vulnerabilities like XSS and CSRF attacks.
Despite this, it’s essential to offer clients the ability to authenticate and access protected routes through an Authorization header, especially for scenarios such as mobile app access or third-party client access.
In response to your second question, relying solely on cookies for authentication is a common practice used by many web applications for session management and authentication.
However, it’s crucial to take into account the potential vulnerabilities and limitations that come with using cookies. For instance, cookies cannot authenticate requests from third-party clients and are susceptible to XSS and CSRF attacks.
Ultimately, the choice between using cookies or an Authorization header with the JWT access token will depend on the specific needs and security requirements of your application. It’s crucial to carefully consider the advantages and disadvantages of each approach and choose the one that best meets your requirements.
Regardless of the approach chosen, it’s essential to implement appropriate security measures to ensure the safety and privacy of your users. This includes setting cookies as HTTP-only, encrypting the JWT access token, using CSRF tokens, and regularly monitoring and updating security protocols to stay ahead of potential threats.
By taking these steps, your web application can safeguard user data and prevent security breaches.
Thanks for all the tutorials, I would like to know if can u give me a suggestion about this error:
When Im login I got this message:
{
“status”: “error”,
“message”: “secretOrPrivateKey has a minimum key size of 2048 bits for RS256”
}
and I have the same code as yours
Hey there! If I’m not mistaken, it looks like the latest version of the
jsonwebtokenpackage has included a minimum key size of 2048 bits in order to improve security.You can follow the instructions in the “How to Generate the Private and Public Keys” section, but this time, make sure to adjust the key size to either 2048 or 4096 bits on the https://travistidwell.com/jsencrypt/demo/ website.
I have personally noticed this minimum key size requirement when working on projects in Rust and Golang, but I’m not sure if Node.js imposes the same limit on key size.
Would you mind testing this out by changing the key size to either 2048 or 4096 bits and letting me know how it goes? Once you do, I’ll be more than happy to update the project accordingly.
I solved the problem about minimum key size for RS256 adding the line:
allowInsecureKeySizes: true
Great to hear that you were able to solve the issue with the
allowInsecureKeySizes: trueline! Just a quick note though, allowing insecure key sizes can weaken the security of your system, so it’s important to use caution when doing so.Hi Edem,
Should you edit article, how we generate JWT_(ACCESS-REFRESH)_(PRIVATE-PUBLIC)_TOKEN you give in .env . I read this blog Redis you give but I don’t know security and performance effect system when we must build PostgreSQL and Redis that make more cost for infrastructure.
Apologies for the inconvenience. This article serves as a follow-up to a previous article titled “Setup Node.js API with Prisma, TypeScript, and PostgreSQL“, where we covered the initial project setup, including instructions for generating the private-public key pairs used for access and refresh tokens.
Can you please show us, how to implement forgot password functionality. Both in frontend and backend.
I already have articles covering the forgot/reset password functionality. You can find the backend source code here: https://github.com/wpcodevo/node_prisma_postgresql and the frontend code here: https://github.com/wpcodevo/react-query-axios-tailwindcss.
If you also need the Golang and Rust backends, please let me know, and I’ll provide you with their respective links.