
tRPC aka t3-stack is a light library for building end-to-end typesafe APIs for Next.js and Node apps without writing schemas or installing libraries for code generation. This article will teach you how to set up tRPC with React.js, Express, and Node.js using Yarn Workspaces.
tRPC API with React.js, Express, and Node.js Series:
- Build tRPC API with React.js, Node.js & MongoDB: Project Setup
- Build tRPC API with React.js & Node.js: Access and Refresh Tokens
- Full-Stack App tRPC, React.js, & Node.js: JWT Authentication
Read more articles:
- Golang & MongoDB: JWT Authentication and Authorization
- API with Golang + MongoDB: Send HTML Emails with Gomail
- API with Golang, Gin Gonic & MongoDB: Forget/Reset Password
What is tRPC?
tRPC is a tool that leverages the full power of modern TypeScript to build end-to-end type-safety APIs with Node.js and Next.js without defining schemas. It allows us to share the Typescript types directly between the backend and the frontend without relying on code generation.
Currently, GraphQL is the go-to library for building type-safety APIs to solve some of the downsides of RESTful APIs. However, since GraphQL is a query language, it doesn’t take full advantage of TypeScript to implement type-safety APIs.
This is where tRPC comes in, this tool uses the full power of Typescript to create a type-safe client and server by only using inference
Setup MongoDB and Redis with Docker-compose
MongoDB is an open-source NoSQL database management program that uses JSON-like documents called BSON with optional schemas to store data.
The quickest way to run the MongoDB database server on a machine is to use a Docker container so am going to assume you already have Docker installed on your machine.
By default, Docker-compose is also installed along with Docker to allow you to run multiple containers using a docker-compose.yaml file.
Create a new folder called trpc-node-react with your preferred local terminal and open the folder with your text editor of choice.
mkdir trpc-node-reactIn the root directory, create a docker-compose.yml file and add the following Docker configurations:
docker-compose.yml
version: '3.8'
services:
  mongo:
    image: mongo:latest
    container_name: mongo
    env_file:
      - ./.env
    environment:
      MONGO_INITDB_ROOT_USERNAME: ${MONGO_INITDB_ROOT_USERNAME}
      MONGO_INITDB_ROOT_PASSWORD: ${MONGO_INITDB_ROOT_PASSWORD}
      MONGO_INITDB_DATABASE: ${MONGO_INITDB_DATABASE}
    volumes:
      - mongo:/data/db
    ports:
      - '6000:27017'
  redis:
    image: redis:latest
    container_name: redis
    ports:
      - '6379:6379'
    volumes:
      - redis:/data
volumes:
  mongo:
  redis:
The configurations above will allow us to run both the Redis and MongoDB servers on our machine.
Now create a .env file in the root project to contain the credentials required by the Mongo Docker image to configure the MongoDB server.
.env
MONGO_INITDB_ROOT_USERNAME=admin
MONGO_INITDB_ROOT_PASSWORD=password123
MONGO_INITDB_DATABASE=trpc_mongodb
With those configurations in place, run this command to start the Redis and MongoDB Docker containers:
docker-compose up -dRun this command to stop the containers:
docker-compose downSetup a Monolithic Repository with Yarn Workspaces
To begin, let’s build a monorepo using Yarn. Yarn is a package manager developed and maintained by the folks at Facebook and it comes with a tool called Yarn workspaces for organizing a project codebase using a monolithic repository aka monorepo.
Create a package.json file in the root workspace:
touch package.jsonAdd the following code to the newly-created package.json file:
{
  "name": "trpc-node-react",
  "private": "true",
  "scripts": {},
  "workspaces": [
    "packages/*"
  ]
}
Since workspaces are not meant to be published, you need to make the package.json private to avoid accidentally publishing the root workspace.
Also, we used a wildcard (*) in the “workspaces” property array to tell Yarn to include all the packages inside the “packages” folder.
Add a script to run both the tRPC client and server
Now we need a way to run both packages — the tRPC React client and the Node.js client simultaneously. For this example, we will use the concurrently and wsrun packages to run the start scripts of both packages in parallel.
Add concurrently and wsrun to the root package.json:
yarn add -W -D concurrently wsrun
Add this script to the root workspace package.json to run the start scripts of the tRPC client and server in parallel.
package.json
{
  "name": "trpc-node-react",
  "private": "true",
  "scripts": {
    "start": "concurrently \"wsrun --parallel start\""
  },
  "workspaces": [
    "packages/*"
  ],
  "devDependencies": {
    "concurrently": "^7.2.2",
    "wsrun": "^5.2.4"
  }
}
Create a .gitignore file in the root workspace and add the node_modules to exclude them from your commits.
.gitignore
node_modules
Creating the Node.js tRPC Express Server
Now it’s time to set up the tRPC Express Node.js server. Create a folder named “server” inside the “packages” folder.
Open the built-in terminal in your text editor and change the directory to the packages/server folder:
cd packages/serverRun this command to initialize a Node.js Typescript project with Yarn:
yarn init -y && yarn add -D typescript && npx tsc --init
Now replace the content of the newly-created “tsconfig.json” file with the following configurations:
packages/server/tsconfig.json
{
  "compilerOptions": {
    "target": "es2018",
    "experimentalDecorators": true,
    "emitDecoratorMetadata": true,
    "module": "commonjs",
    "esModuleInterop": true,
    "forceConsistentCasingInFileNames": true,
    "strict": true,
    "strictPropertyInitialization": false,
    "skipLibCheck": true
  }
}
experimentalDecorators– If set to “true“, experimental support for decorators will be enabled.emitDecoratorMetadata– If set to “true” experimental support for emitting type metadata for the decorators will be enabled.strictPropertyInitialization– If set to “false“, Typescript won’t raise errors when we declare the Typegoose class properties without initializing them in a constructor.
Install the dependencies needed to set up the tRPC server with ExpressJs:
yarn add @trpc/server@next cors dotenv express mongoose redis && yarn add -D @types/express @types/node @types/cors morgan @types/morgan ts-node-dev
@trpc/server– for implementing tRPC endpoints and routerscors– to allow the tRPC server to accept requests from cross-origin domains.dotenv– to load the environment variables into the Node.js environment.express– a lightweight Node.js web application framework for building web and mobile applications.mongoose– a library that uses schemas to define MongoDB models.redis– a Node.js library for interacting with a Redis serverts-node-dev– to hot-reload the tRPC Express server.morgan– for logging HTTP requests in the terminal
Since the security of the tRPC application is really important to us, create a .env file in the packages/server folder and add the following data.
NODE_ENV=development

ORIGIN=http://localhost:3000

MONGODB_URI=mongodb://admin:password123@localhost:6000/trpc_mongodb?authSource=admin
Add the start script to the packages/server/package.json file to initialize the tRPC Express server.
packages/server/package.json
{
"scripts": {
    "start": "ts-node-dev --respawn --transpile-only src/app.ts"
  }
}
In the packages/server folder, create an “src” folder, and within the “src” folder create a “config” and “utils” folders.
Now create default.ts file in the “config” folder to import and export the environment variables we stored in the packages/server/.env file.
packages/server/src/config/default.ts
import path from 'path';
require('dotenv').config({ path: path.join(__dirname, '../../.env') });

const customConfig: { port: number; origin: string; dbUri: string } = {
  port: 8000,
  origin: process.env.ORIGIN as unknown as string,

  dbUri: process.env.MONGODB_URI as unknown as string,
};

export default customConfig;
Connect the tRPC Server to Redis and MongoDB
Now that we have the Redis and MongoDB servers running in the Docker containers, let’s create some helper functions to connect them to the tRPC application.
packages/server/src/utils/connectDB.ts
import mongoose from 'mongoose';
import customConfig from '../config/default';

const dbUrl = customConfig.dbUri;

const connectDB = async () => {
  try {
    await mongoose.connect(dbUrl);
    console.log('? Database connected...');
  } catch (error: any) {
    console.log(error);
    process.exit(1);
  }
};

export default connectDB;
packages/server/src/utils/connectRedis.ts
import { createClient } from 'redis';

const redisUrl = `redis://localhost:6379`;
const redisClient = createClient({
  url: redisUrl,
});

const connectRedis = async () => {
  try {
    await redisClient.connect();
    console.log('? Redis client connected...');
    redisClient.set(
      'tRPC',
      '??Welcome to rRPC with React.js, Express and Typescript!'
    );
  } catch (err: any) {
    console.log(err.message);
    process.exit(1);
  }
};

connectRedis();

redisClient.on('error', (err) => console.log(err));

export default redisClient;
In the above code, we evoked the redisClient.set() method available on the Redis client instance to add a message to the Redis database with a “tRPC” key.
Later, we will retrieve that message from the Redis database and return it to the “tRPC” client.
Initialize the tRPC Express Server
Create the tRPC Context
Let’s create an app context that will be generated for every incoming request and the results will be propagated to all the resolvers. This will enable us to pass down contextual data to our resolvers.
packages/server/src/app.ts
import path from "path";
import dotenv from "dotenv";
import express from "express";
import morgan from "morgan";
import cors from "cors";
import * as trpcExpress from "@trpc/server/adapters/express";
import connectDB from "./utils/connectDB";
import redisClient from "./utils/connectRedis";
import customConfig from "./config/default";
import { inferAsyncReturnType, initTRPC } from "@trpc/server";

dotenv.config({ path: path.join(__dirname, "./.env") });

const createContext = ({
  req,
  res,
}: trpcExpress.CreateExpressContextOptions) => ({ req, res });

export type Context = inferAsyncReturnType<typeof createContext>;
// [...]
Create the tRPC Router
Now let’s create a router to enable us to manage the tRPC endpoints. With the router defined, we can add:
- Query routes – for fetching data
- Mutation routes – for modifying data (Create, Update and Delete data)
- Subscription routes – allows us to subscribe to data over WebSockets.
packages/server/src/app.ts
// [...]
const t = initTRPC.context<Context>().create();

const appRouter = t.router({
  sayHello: t.procedure.query(async () => {
    const message = await redisClient.get("tRPC");
    return { message };
  }),
});

export type AppRouter = typeof appRouter;
Here we initialized the tRPC server by calling the .context<Context>() and .create() methods on initTRPC . Then, we create a new tRPC router and added a sayHello query procedure call. The sayHello procedure will be evoked by the tRPC client to return the message we stored in the Redis database.
Lastly, we exposed the AppRouter typescript type to enable the React client to know the different queries, mutations, and subscriptions available on the tRPC server.
AppRouter maintains all the routes, what the routes take as inputs, and what the routes return as outputs.
Start the Express tRPC Server
packages/server/src/app.ts
// [...]
const app = express();
if (process.env.NODE_ENV !== "production") app.use(morgan("dev"));

app.use(
  cors({
    origin: [customConfig.origin, "http://localhost:3000"],
    credentials: true,
  })
);
app.use(
  "/api/trpc",
  trpcExpress.createExpressMiddleware({
    router: appRouter,
    createContext,
  })
);

const port = customConfig.port;
app.listen(port, () => {
  console.log(`🚀 Server listening on port ${port}`);

  // CONNECT DB
  connectDB();
});
Complete Express tRPC Server
packages/server/src/app.ts
import path from "path";
import dotenv from "dotenv";
import express from "express";
import morgan from "morgan";
import cors from "cors";
import * as trpcExpress from "@trpc/server/adapters/express";
import connectDB from "./utils/connectDB";
import redisClient from "./utils/connectRedis";
import customConfig from "./config/default";
import { inferAsyncReturnType, initTRPC } from "@trpc/server";

dotenv.config({ path: path.join(__dirname, "./.env") });

const createContext = ({
  req,
  res,
}: trpcExpress.CreateExpressContextOptions) => ({ req, res });

export type Context = inferAsyncReturnType<typeof createContext>;

const t = initTRPC.context<Context>().create();

const appRouter = t.router({
  sayHello: t.procedure.query(async () => {
    const message = await redisClient.get("tRPC");
    return { message };
  }),
});

export type AppRouter = typeof appRouter;

const app = express();
if (process.env.NODE_ENV !== "production") app.use(morgan("dev"));

app.use(
  cors({
    origin: [customConfig.origin, "http://localhost:3000"],
    credentials: true,
  })
);
app.use(
  "/api/trpc",
  trpcExpress.createExpressMiddleware({
    router: appRouter,
    createContext,
  })
);

const port = customConfig.port;
app.listen(port, () => {
  console.log(`🚀 Server listening on port ${port}`);

  // CONNECT DB
  connectDB();
});
Turn the tRPC Express App into a Library
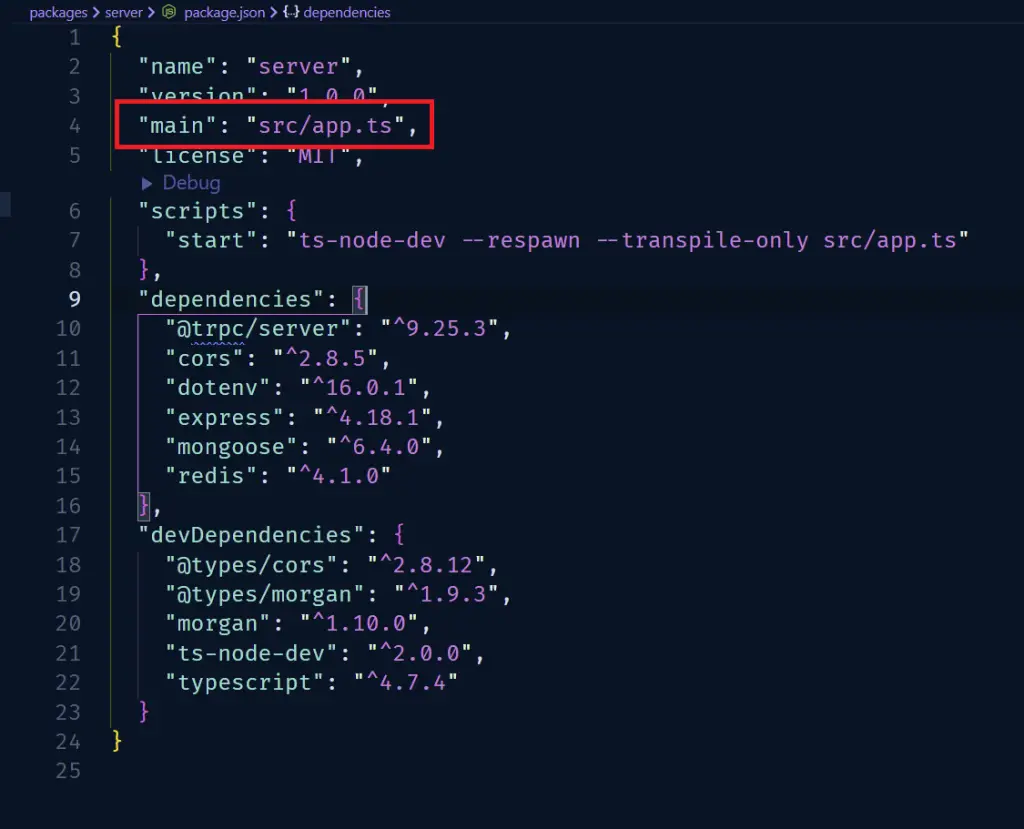
Add a "main": "src/app.ts" to the packages/server/package.json to turn the tRPC server into a library. This will allow us to connect both the tRPC React.js client to the Node.js server.
packages/server/package.json
packages/server/package.json
{
  "name": "server",
  "version": "1.0.0",
  "main": "src/app.ts",
  "license": "MIT",
  "scripts": {
    "start": "ts-node-dev --respawn --transpile-only src/app.ts"
  },
  "dependencies": {
    "@trpc/server": "^10.0.0-proxy-beta.26",
    "cors": "^2.8.5",
    "dotenv": "^16.0.3",
    "express": "^4.18.2",
    "mongoose": "^6.7.0",
    "redis": "^4.3.1"
  },
  "devDependencies": {
    "@types/cors": "^2.8.12",
    "@types/morgan": "^1.9.3",
    "morgan": "^1.10.0",
    "ts-node-dev": "^2.0.0",
    "typescript": "^4.8.4"
  }
}
Creating the React.js tRPC Client
First and foremost, change the directory cd into the “packages” folder to enable us to generate a basic React.js app with “create-react-app“.
Run this command to create a React.js boilerplate app in a packages/client folder.
yarn create react-app client --template typescript
Replace the content of the packages/client/tsconfig.json file with the following:
{
  "compilerOptions": {
    "target": "es5",
    "lib": ["dom", "dom.iterable", "esnext"],
    "allowJs": true,
    "skipLibCheck": true,
    "esModuleInterop": true,
    "allowSyntheticDefaultImports": true,
    "strict": true,
    "forceConsistentCasingInFileNames": true,
    "noFallthroughCasesInSwitch": true,
    "module": "esnext",
    "moduleResolution": "node",
    "resolveJsonModule": true,
    "isolatedModules": true,
    "noEmit": true,
    "jsx": "react-jsx"
  },
  "include": ["src"]
}
Now let’s connect the tRPC server to the React client by installing the API server as a library on the client.
yarn add server@1.0.0
Where “server” is the property name in the packages/server/package.json file and the “@1.0.0” is the version provided in it. This will enable the React.js app to import the AppRouter type we exported from the tRPC server.
Next, install the dependencies required to set up the tRPC Client
yarn add @trpc/client@next @trpc/server@next @trpc/react-query@next @tanstack/react-query
react-query– a library for managing server state@trpc/react– is a thin wrapper around React Query@trpc/client– for creating the tRPC client@trpc/server– It’s a peer dependency of@trpc/client.
Create the tRPC Client
Now let’s create the React Query hooks that are specific to our API server with the createTRPCReact() provided by @trpc/react-query binding.
packages/client/src/trpc.ts
import { createTRPCReact } from "@trpc/react-query";
import type { AppRouter } from "server";

export const trpc = createTRPCReact<AppRouter>();
Calling our tRPC API Endpoint
Now let’s configure the React.js client with tRPC and React Query before making our first tRPC request to our API server.
packages/client/src/App.tsx
import { useState } from "react";
import { QueryClientProvider, QueryClient } from "@tanstack/react-query";
import { ReactQueryDevtools } from "@tanstack/react-query-devtools";
import { getFetch, httpBatchLink, loggerLink } from "@trpc/client";
import { trpc } from "./trpc";

function AppContent() {
  const hello = trpc.sayHello.useQuery();
  return <main className="p-2">{JSON.stringify(hello.data, null, 2)}</main>;
}

function App() {
  const [queryClient] = useState(
    () =>
      new QueryClient({
        defaultOptions: {
          queries: {
            staleTime: 5 * 1000,
          },
        },
      })
  );

  const [trpcClient] = useState(() =>
    trpc.createClient({
      links: [
        loggerLink(),
        httpBatchLink({
          url: "http://localhost:8000/api/trpc",
          fetch: async (input, init?) => {
            const fetch = getFetch();
            return fetch(input, {
              ...init,
              credentials: "include",
            });
          },
        }),
      ],
    })
  );
  return (
    <trpc.Provider client={trpcClient} queryClient={queryClient}>
      <QueryClientProvider client={queryClient}>
        <AppContent />
        <ReactQueryDevtools initialIsOpen={false} />
      </QueryClientProvider>
    </trpc.Provider>
  );
}

export default App;
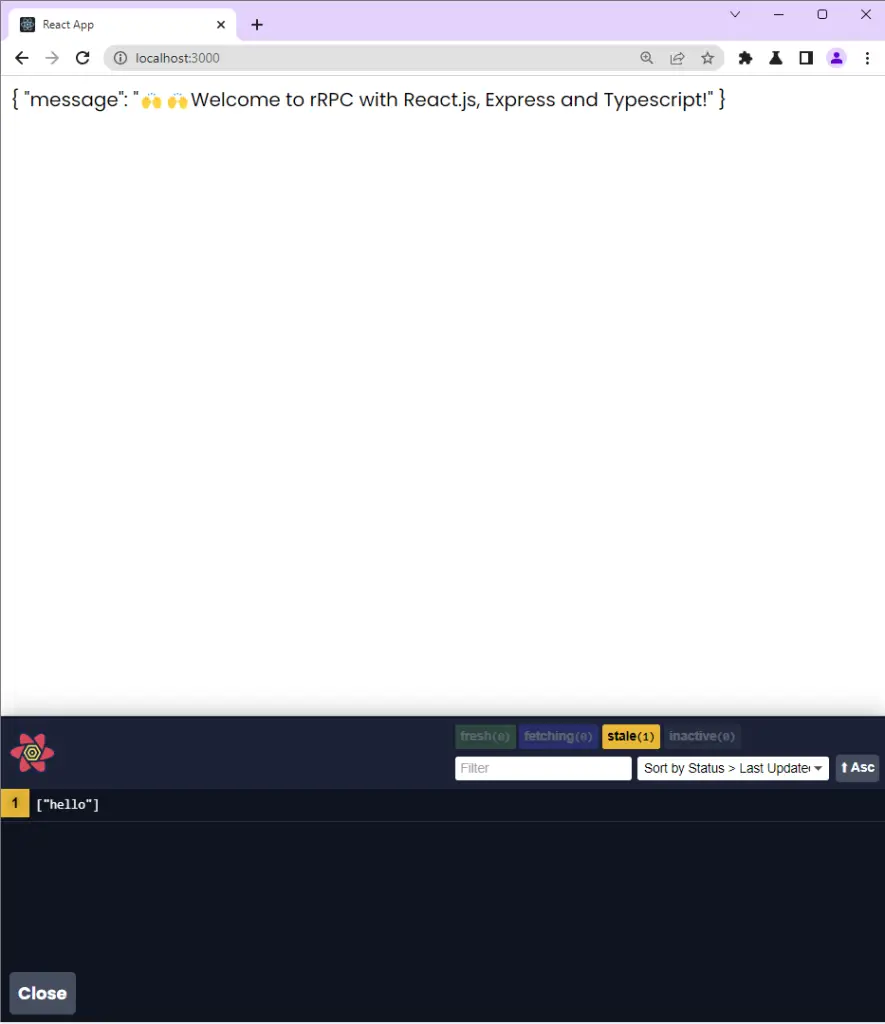
Change directory into the root Yarn workspace and run yarn start to start the tRPC client and server.
You should see the message we stored in the Redis database in the browser.
Setup tailwindCss with the React.js tRPC Client
Install tailwindCss and its dependencies
Now change the directory to the packages/client folder and install tailwindCss and its peer dependencies via Yarn.
yarn add -D tailwindcss postcss autoprefixer
Run the init command to generate the tailwind.config.js and postcss.config.js files in the packages/client folder.
npx tailwindcss init -p
Add the Template Paths to the Configuration File
Next, add the paths to the template files in the tailwind.config.js file, and also, remember to include your custom colors and fonts.
packages/client/tailwind.config.js
/** @type {import('tailwindcss').Config} */
module.exports = {
  content: ['./src/**/*.{js,jsx,ts,tsx}'],
  theme: {
    extend: {
      colors: {
        'ct-dark-600': '#222',
        'ct-dark-200': '#e5e7eb',
        'ct-dark-100': '#f5f6f7',
        'ct-blue-600': '#2363eb',
        'ct-yellow-600': '#f9d13e',
      },
      container: {
        center: true,
        padding: '1rem',
        screens: {
          lg: '1125px',
          xl: '1125px',
          '2xl': '1125px',
        },
      },
    },
  },
  plugins: [],
};
Add the tailwindCss directives to your CSS
Create a ./packages/client/src/global.css file and add the @tailwind directives. You also need to include your custom font to override the default font that comes with TailwindCSS.
packages/client/src/global.css
@import url('https://fonts.googleapis.com/css2?family=Poppins:wght@300;400;500;600;700&display=swap');

@tailwind base;
@tailwind components;
@tailwind utilities;

@layer base {
  html {
    font-family: 'Poppins', sans-serif;
  }
}
Import the CSS file
Now, import the newly-created packages/client/src/global.css file into the packages/client/src/index.tsx file.
packages/client/src/index.tsx
import React from 'react';
import ReactDOM from 'react-dom/client';
import App from './App';
import './global.css';
const root = ReactDOM.createRoot(
  document.getElementById('root') as HTMLElement
);
root.render(
  <react.strictmode>
    <app>
  </react.strictmode>
);
Conclusion
Congrats on reaching the end. In this comprehensive article, you’ve learned how to set up tRPC with React.js, Node.js, Redis, and MongoDB.
tRPC Client and Server Project Setup Source Code
You can find the complete source code on GitHub
Verry, verry nice article. Thanks 🙂
How would one deploy such a config to say, aws for express backend and vercel for react front end?