
FastAPI is a modern, fast and lightweight Python web framework designed to perform at par with NodeJs and Go (thanks to Starlette and Pydantic).
There are a couple of popular Python web frameworks (Django, Flask, and Bottle), however, FastAPI was designed solely to build performant APIs. It wasn’t built to address the Model, View, and Controller scenario.
In this article, you’ll learn how to secure a FastAPI app by implementing access and refresh token functionalities using JSON Web Tokens (JWTs). We’ll use the FastAPI JWT Auth package to sign, encode and decode the access and refresh JWT tokens.
API with Python and FastAPI Series:
- RESTful API with Python & FastAPI: Access and Refresh Tokens
- RESTful API with Python & FastAPI: Send HTML Emails
- CRUD RESTful API Server with Python, FastAPI, and PostgreSQL
Related Articles:
- GraphQL API with Node.js & MongoDB: JWT Authentication
- Build Golang gRPC Server and Client: Access & Refresh Tokens
- Node.js + Prisma + PostgreSQL: Access & Refresh Tokens
- Golang & MongoDB: JWT Authentication and Authorization
- API with Node.js + PostgreSQL + TypeORM: JWT Authentication
- Node.js + TypeScript + MongoDB: JWT Authentication
- Node.js + TypeScript + MongoDB: JWT Refresh Token
What you will learn
- How to use SQLAlchemy ORM to create the database models with Python classes.
- How to use Alembic, a lightweight database migration tool that allows us to make incremental changes to our database schemas. It’s similar to how we use Git to track changes in our source code.
- How to install the
uuid-osspextension in the PostgreSQL database. This will allow us to use UUID (Universally Unique Identifier) for the IDs instead of incremental numbers. - How to use asymmetric (public/private) key signing algorithms to generate the access and refresh tokens.
- How to set up a PostgreSQL database with Docker-compose.
Prerequisites
Before you begin, you should:
- Have basic knowledge of Python
- Have Python version 3.6+ installed
- Have Docker installed on your system
Python FastAPI JWT Authentication Overview
How to Setup FastAPI with PostgreSQL
FastAPI supports both NoSQL and SQL databases, however, we are going to use PostgreSQL for this article.
You can easily adapt the code in this article to any database supported by SQLAlchemy, like:
- PostgreSQL
- MySQL
- SQLite
- Oracle
- Microsoft SQL Server, and many more.
The fastest and easiest way to get the PostgreSQL server running on your system is to use Docker and Docker-compose. At this point, am going to assume you have Docker installed on your machine.
In this tutorial, am going to use VS Code (Visual Studio Code) as my text editor. Feel free to use any IDE you are more comfortable with because the type of IDE you use doesn’t affect the code we’ll write.
Start by creating a new folder called python_fastapi to hold the FastAPI project:
$ mkdir python_fastapi
$ cd python_fastapi
$ code . # opens the project with VS Code
Open the integrated terminal in VS Code or your IDE and run the following commands to create a virtual environment:
Windows Machine:
$ py -3 -m venv venvmacOS Machine:
$ python3 -m venv venvNow in the root directory, create docker-compose.yml file and add the following code to setup PostgreSQL:
docker-compose.yml
version: '3'
services:
  postgres:
    image: postgres
    container_name: postgres
    ports:
      - '6500:5432'
    restart: always
    env_file:
      - ./.env
    volumes:
      - postgres-db:/var/lib/postgresql/data
volumes:
  postgres-db:
Next, create a .env file to hold the credentials needed by the Postgres Docker image.
.env
DATABASE_PORT=6500
POSTGRES_PASSWORD=password123
POSTGRES_USER=postgres
POSTGRES_DB=fastapi
POSTGRES_HOST=postgres
POSTGRES_HOSTNAME=127.0.0.1
Create a .gitignore file and add the following to save you from accidentally pushing the environment variables file to GitHub.
.gitignore
__pycache__
venv/
.env
With that out of the way, run this command to start the PostgreSQL Docker container:
$ docker-compose up -dYou can run this command to stop the container:
$ docker-compose downSetup FastAPI
First and foremost, create a app/main.py file and then close and reopen the integrated terminal to enable VS Code to activate the virtual environment.
Also, create an empty app/__init__.py file to turn the app folder into a Python package.
Now install FastAPI and its peer dependencies:
pip install fastapi[all]
Initialize a Simple FastAPI Server
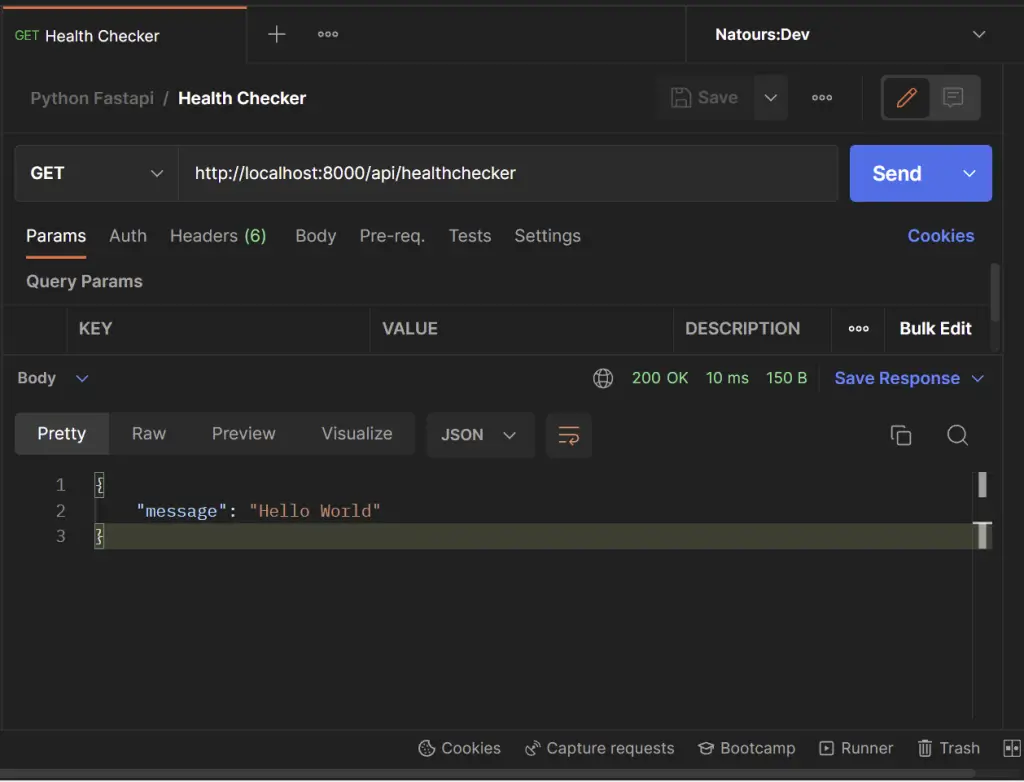
Now add the following code to the app/main.py file to initialize a basic FastAPI server.
from fastapi import FastAPI

app = FastAPI()


@app.get('/api/healthchecker')
def root():
    return {'message': 'Hello World'}
Run this command to start the FastAPI server with Uvicorn:
uvicorn app.main:app --host localhost --port 8000 --reload
The command uvicorn app.main:app refers to:
uvicorn– a high-performance ASGI serverapp.main: theapp/main.pyfileapp: the object created withapp = FASTAPI()--host: the hostname--port: the port the server should run on. Default is8000.--reload: hot-reload the server after every file change
Make a GET request to http://localhost:8000/api/healthchecker in Postman or any API testing tool and you should get the message we sent in the JSON response.
Setting up Environment Variables
Pydantic has built-in support for loading environment variables from a file into the Python environment allowing us to use them anywhere in the project.
When we create a model that inherits from the BaseSettings class, the model initializer will attempt to determine the values of any fields not passed as keyword arguments by reading from an environment variables file (by default) or a custom configuration file.
Replace the content of the .env file with the following:
.env
DATABASE_PORT=6500
POSTGRES_PASSWORD=password123
POSTGRES_USER=postgres
POSTGRES_DB=fastapi
POSTGRES_HOST=postgres
POSTGRES_HOSTNAME=127.0.0.1

ACCESS_TOKEN_EXPIRES_IN=15
REFRESH_TOKEN_EXPIRES_IN=60
JWT_ALGORITHM=RS256

CLIENT_ORIGIN=http://localhost:3000

JWT_PRIVATE_KEY=LS0tLS1CRUdJTiBSU0EgUFJJVkFURSBLRVktLS0tLQpNSUlCT2dJQkFBSkJBSSs3QnZUS0FWdHVQYzEzbEFkVk94TlVmcWxzMm1SVmlQWlJyVFpjd3l4RVhVRGpNaFZuCi9KVHRsd3h2a281T0pBQ1k3dVE0T09wODdiM3NOU3ZNd2xNQ0F3RUFBUUpBYm5LaENOQ0dOSFZGaHJPQ0RCU0IKdmZ2ckRWUzVpZXAwd2h2SGlBUEdjeWV6bjd0U2RweUZ0NEU0QTNXT3VQOXhqenNjTFZyb1pzRmVMUWlqT1JhUwp3UUloQU84MWl2b21iVGhjRkltTFZPbU16Vk52TGxWTW02WE5iS3B4bGh4TlpUTmhBaUVBbWRISlpGM3haWFE0Cm15QnNCeEhLQ3JqOTF6bVFxU0E4bHUvT1ZNTDNSak1DSVFEbDJxOUdtN0lMbS85b0EyaCtXdnZabGxZUlJPR3oKT21lV2lEclR5MUxaUVFJZ2ZGYUlaUWxMU0tkWjJvdXF4MHdwOWVEejBEWklLVzVWaSt6czdMZHRDdUVDSUVGYwo3d21VZ3pPblpzbnU1clBsTDJjZldLTGhFbWwrUVFzOCtkMFBGdXlnCi0tLS0tRU5EIFJTQSBQUklWQVRFIEtFWS0tLS0t
JWT_PUBLIC_KEY=LS0tLS1CRUdJTiBQVUJMSUMgS0VZLS0tLS0KTUZ3d0RRWUpLb1pJaHZjTkFRRUJCUUFEU3dBd1NBSkJBSSs3QnZUS0FWdHVQYzEzbEFkVk94TlVmcWxzMm1SVgppUFpSclRaY3d5eEVYVURqTWhWbi9KVHRsd3h2a281T0pBQ1k3dVE0T09wODdiM3NOU3ZNd2xNQ0F3RUFBUT09Ci0tLS0tRU5EIFBVQkxJQyBLRVktLS0tLQ==
Next, create a app/config.py file and add the following code:
app/config.py
from pydantic import BaseSettings

class Settings(BaseSettings):
    DATABASE_PORT: int
    POSTGRES_PASSWORD: str
    POSTGRES_USER: str
    POSTGRES_DB: str
    POSTGRES_HOST: str
    POSTGRES_HOSTNAME: str

    JWT_PUBLIC_KEY: str
    JWT_PRIVATE_KEY: str
    REFRESH_TOKEN_EXPIRES_IN: int
    ACCESS_TOKEN_EXPIRES_IN: int
    JWT_ALGORITHM: str

    CLIENT_ORIGIN: str

    class Config:
        env_file = './.env'


settings = Settings()
Connect to the PostgreSQL Database
When it comes to working with a PostgreSQL database within a Python application, we use a PostgreSQL driver that has the following features:
- Client-side and server-side cursors support
- Asynchronous communication and notifications support
- Must support many Python types and adapt to matching PostgreSQL data types.
There are a couple of libraries that can be used as a PostgreSQL database adapter but we are going to use Psycopg, a popular PostgreSQL database adapter for Python.
Run this command to install SQLAlchemy and Psycopg
pip install sqlalchemy psycopg2
- SQLAlchemy – a popular Python object-relational mapper (ORM)
- Psycopg – a popular PostgreSQL database driver
Note: SQLAlchemy uses psycopg2 as its underlying driver to communicate with the PostgreSQL database so make sure you install it.
Now create a app/database.py file and add the following event handlers to connect and disconnect from the PostgreSQL database.
app/database.py
from sqlalchemy import create_engine
from sqlalchemy.ext.declarative import declarative_base
from sqlalchemy.orm import sessionmaker
from .config import settings

SQLALCHEMY_DATABASE_URL = f"postgresql://{settings.POSTGRES_USER}:{settings.POSTGRES_PASSWORD}@{settings.POSTGRES_HOSTNAME}:{settings.DATABASE_PORT}/{settings.POSTGRES_DB}"

engine = create_engine(
    SQLALCHEMY_DATABASE_URL
)
SessionLocal = sessionmaker(autocommit=False, autoflush=False, bind=engine)

Base = declarative_base()


def get_db():
    db = SessionLocal()
    try:
        yield db
    finally:
        db.close()
Installing the UUID OSSP PostgreSQL Extension
By default PostgreSQL natively supports the UUID data type and it’s even used and indexed as a primary key.
However, since we want to generate a UUID as a default value for the ID column, we will have to manually install the required Postgres extension to help us achieve that.
Now we need to install the UUID OSSP module plugin in the PostgreSQL database by running CREATE EXTENSION command.
Before that, run this command docker exec -it <container name> bash to access the bash shell of the running Postgres Docker container.
docker exec -it postgres bash
Within the Postgres container, we can execute any SQL or Postgres commands to interact with the PostgreSQL server.
Follow the steps below to install the UUID extension:
Step 1: Access the running Postgres database with this command psql -U admin <database name>:
psql -U admin fastapiStep 2: Execute this command to display all the available extensions
select * from pg_available_extensions;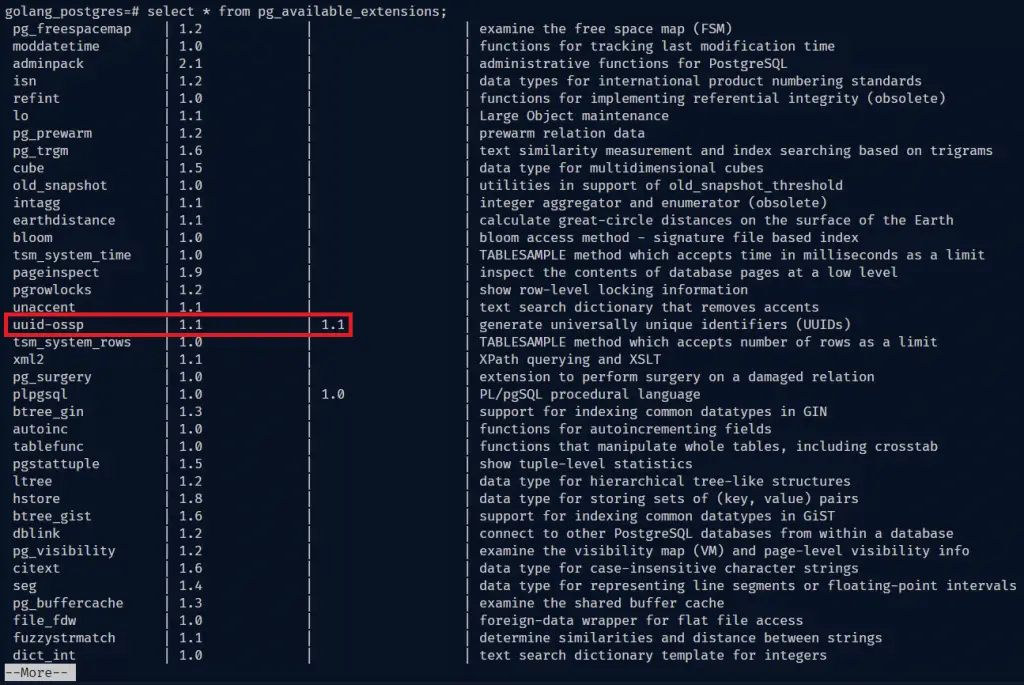
If you glance through the list of extensions, you will notice the uuid-ossp extension is available but not installed.
You can hit the Enter key repeatedly to scroll down the list or press q to exit the list.
Step 3: Execute this command to install the uuid-ossp plugin
CREATE EXTENSION IF NOT EXISTS "uuid-ossp";Once it has been installed, use \q to exit the Postgres server and exit to exit the Docker container.
Create Database Models with SQLAlchemy in FastAPI
With SQLAlchemy, we define module-level constructs that describe the structures of the data we will be querying from the database.
The structure aka Declarative Mapping creates both a Python object model and database metadata to describe the real SQL tables that exist or will exist, in the database.
app/models.py
import uuid
from .database import Base
from sqlalchemy import TIMESTAMP, Column, String, Boolean, text
from sqlalchemy.dialects.postgresql import UUID


class User(Base):
    __tablename__ = 'users'
    id = Column(UUID(as_uuid=True), primary_key=True, nullable=False,
                default=uuid.uuid4)
    name = Column(String,  nullable=False)
    email = Column(String, unique=True, nullable=False)
    password = Column(String, nullable=False)
    photo = Column(String, nullable=True)
    verified = Column(Boolean, nullable=False, server_default='False')
    role = Column(String, server_default='user', nullable=False)
    created_at = Column(TIMESTAMP(timezone=True),
                        nullable=False, server_default=text("now()"))
    updated_at = Column(TIMESTAMP(timezone=True),
                        nullable=False, server_default=text("now()"))
In general, when we create instances of models in ORMs, that translates to creating rows and columns in a SQL table.
In SQLAlchemy, we define models by creating Python classes that extend the declarative_base() provided by SQLAlchemy.
In the above, we extended the Base we exported from app/database.py file to create the users table.
Also, we used uuid.uuid4 function that uses uuid_generate_v4() under the hood to auto-generate a UUID for the ID column.
Creating Schemas with Pydantic in FastAPI
Now that we have the database model defined, let’s create the schemas to validate the requests and responses with Pydantic.
Create a app/schemas.py file and add the following schema definitions:
app/schemas.py
from datetime import datetime
import uuid
from pydantic import BaseModel, EmailStr, constr


class UserBaseSchema(BaseModel):
    name: str
    email: EmailStr
    photo: str

    class Config:
        orm_mode = True


class CreateUserSchema(UserBaseSchema):
    password: constr(min_length=8)
    passwordConfirm: str
    role: str = 'user'
    verified: bool = False


class LoginUserSchema(BaseModel):
    email: EmailStr
    password: constr(min_length=8)


class UserResponse(UserBaseSchema):
    id: uuid.UUID
    created_at: datetime
    updated_at: datetime
Password Management
When working with authentication that requires users to use email and password, it’s always recommended to hash the plain-text password before saving the document to the database.
Hashing the passwords will make it difficult for a hacker to retrieve the original plain-text passwords when the database is compromised.
There are different ways to hash a password but we are going to use the passlib module since it uses different hashing algorithms, including deprecated ones.
Now run this command to install the passlib package:
pip install "passlib[bcrypt]"
Next, let’s create two utility functions in app/utils.py file to hash and verify the passwords.
app/utils.py
from passlib.context import CryptContext

pwd_context = CryptContext(schemes=["bcrypt"], deprecated="auto")


def hash_password(password: str):
    return pwd_context.hash(password)


def verify_password(password: str, hashed_password: str):
    return pwd_context.verify(password, hashed_password)
The hash_password() function takes a plain-text password as a parameter and hashes it with a well-selected algorithm, salt size, and cost factor before returning the hashed string.
The verify_password() function compares the plain-text password against the hashed one stored in the database and returns a boolean.
Configure the FastAPI JWT Auth Extension
Usually, we leverage the python-jose package to generate and verify the JWT tokens in Python but we are going to use the FastAPI JWT Auth extension to implement the access and refresh tokens using public and private keys.
Install the FastAPI JWT Auth extension:
pip install 'fastapi-jwt-auth[asymmetric]'
Optional: How to Generate the Private and Public Keys
This section is optional since I already added the private and public keys to the .env file. However, you can follow the steps below to learn how to generate them.
Step 1: Open this website in your browser, and then click the “Generate New Keys” button to generate the private and public keys.
Step 2: Copy the generated private key and navigate to this website to convert it to Base64.
We need to encode the keys in base64 to avoid getting unnecessary warnings in the terminal when building the Docker images.
Step 3: Copy the encoded key and add it to the .env file as JWT_PRIVATE_KEY .
Step 4: Go back to the public/private keys generation site and copy the corresponding public key.
Step 5: Navigate back to the encoding site to convert the public key to base64 and add it to the .env file as JWT_PUBLIC_KEY .
Now create an app/oauth2.py file and add the following configurations to configure the application to use public and private keys, the RS256 algorithm, and to use the tokens in the cookies.
You can find all the available configurations on the FastAPI JWT Auth package website.
app/oauth2.py
import base64
from typing import List
from fastapi_jwt_auth import AuthJWT
from pydantic import BaseModel

from .config import settings

class Settings(BaseModel):
    authjwt_algorithm: str = settings.JWT_ALGORITHM
    authjwt_decode_algorithms: List[str] = [settings.JWT_ALGORITHM]
    authjwt_token_location: set = {'cookies', 'headers'}
    authjwt_access_cookie_key: str = 'access_token'
    authjwt_refresh_cookie_key: str = 'refresh_token'
    authjwt_cookie_csrf_protect: bool = False
    authjwt_public_key: str = base64.b64decode(
        settings.JWT_PUBLIC_KEY).decode('utf-8')
    authjwt_private_key: str = base64.b64decode(
        settings.JWT_PRIVATE_KEY).decode('utf-8')


@AuthJWT.load_config
def get_config():
    return Settings()
In the above, you will notice we decoded the public and private keys back to “UTF-8” before assigning them to the constants.
Creating the Authentication Controllers
Now let’s create the authentication controllers to:
- Create a new user
- Log in the user
- Refresh the access token
- Log out the user
Create a app/router/auth.py file and add the following imports
app/routers/auth.py
from datetime import timedelta
from fastapi import APIRouter, Request, Response, status, Depends, HTTPException
from pydantic import EmailStr

from app import oauth2
from .. import schemas, models, utils
from sqlalchemy.orm import Session
from ..database import get_db
from app.oauth2 import AuthJWT
from ..config import settings


router = APIRouter()
ACCESS_TOKEN_EXPIRES_IN = settings.ACCESS_TOKEN_EXPIRES_IN
REFRESH_TOKEN_EXPIRES_IN = settings.REFRESH_TOKEN_EXPIRES_IN
# [...]
User Registration Controller
Now let’s create an endpoint in app/routers/auth.py file to register new users.
app/routers/auth.py
# [... Configurations ...]

# Register a new user
@router.post('/register', status_code=status.HTTP_201_CREATED, response_model=schemas.UserResponse)
async def create_user(payload: schemas.CreateUserSchema, db: Session = Depends(get_db)):
    # Check if user already exist
    user = db.query(models.User).filter(
        models.User.email == EmailStr(payload.email.lower())).first()
    if user:
        raise HTTPException(status_code=status.HTTP_409_CONFLICT,
                            detail='Account already exist')
    # Compare password and passwordConfirm
    if payload.password != payload.passwordConfirm:
        raise HTTPException(
            status_code=status.HTTP_400_BAD_REQUEST, detail='Passwords do not match')
    #  Hash the password
    payload.password = utils.hash_password(payload.password)
    del payload.passwordConfirm
    payload.role = 'user'
    payload.verified = True
    payload.email = EmailStr(payload.email.lower())
    new_user = models.User(**payload.dict())
    db.add(new_user)
    db.commit()
    db.refresh(new_user)
    return new_user
In the create_user() path operation function we added the CreateUserSchema we defined with Pydantic to help FastAPI validate the request body against the schema rules.
And then, we used the db parameter which has a type of Session as a dependency in the path operation function.
Adding the get_db() function we created in the app/database.py as a dependency will allow us to interact with the PostgreSQL database.
Lastly, we added the UserResponse schema to the response_model parameter in the decorator method to help FastAPI filter the data returned by Postgres before returning the JSON response to the client.
User Sign-in Controller
Now that we are able to add new users to the database, let’s create an endpoint to sign in the registered user.
app/routers/auth.py
# [... Configurations ...]

# Register a new user

# Login user
@router.post('/login')
def login(payload: schemas.LoginUserSchema, response: Response, db: Session = Depends(get_db), Authorize: AuthJWT = Depends()):
    # Check if the user exist
    user = db.query(models.User).filter(
        models.User.email == EmailStr(payload.email.lower())).first()
    if not user:
        raise HTTPException(status_code=status.HTTP_400_BAD_REQUEST,
                            detail='Incorrect Email or Password')

    # Check if user verified his email
    if not user.verified:
        raise HTTPException(status_code=status.HTTP_401_UNAUTHORIZED,
                            detail='Please verify your email address')

    # Check if the password is valid
    if not utils.verify_password(payload.password, user.password):
        raise HTTPException(status_code=status.HTTP_400_BAD_REQUEST,
                            detail='Incorrect Email or Password')

    # Create access token
    access_token = Authorize.create_access_token(
        subject=str(user.id), expires_time=timedelta(minutes=ACCESS_TOKEN_EXPIRES_IN))

    # Create refresh token
    refresh_token = Authorize.create_refresh_token(
        subject=str(user.id), expires_time=timedelta(minutes=REFRESH_TOKEN_EXPIRES_IN))

    # Store refresh and access tokens in cookie
    response.set_cookie('access_token', access_token, ACCESS_TOKEN_EXPIRES_IN * 60,
                        ACCESS_TOKEN_EXPIRES_IN * 60, '/', None, False, True, 'lax')
    response.set_cookie('refresh_token', refresh_token,
                        REFRESH_TOKEN_EXPIRES_IN * 60, REFRESH_TOKEN_EXPIRES_IN * 60, '/', None, False, True, 'lax')
    response.set_cookie('logged_in', 'True', ACCESS_TOKEN_EXPIRES_IN * 60,
                        ACCESS_TOKEN_EXPIRES_IN * 60, '/', None, False, False, 'lax')

    # Send both access
    return {'status': 'success', 'access_token': access_token}
Let me break down what we did above:
- First and foremost, we validated the request body against the
LoginUserSchemawe defined with Pydantic. - Then we used the
AuthJWTas a dependency in theloginpath operation function. - Next, we queried the database to check if a user with that email exist. Also, we validated the plain-text password with the hashed one stored in the Postgres database.
- Finally, we generated the access and refresh tokens and returned them to the client as HTTPOnly cookies.
Refresh Access Token Controller
app/routers/auth.py
# [... Configurations ...]

# Register a new user

# Login user

# Refresh access token
@router.get('/refresh')
def refresh_token(response: Response, request: Request, Authorize: AuthJWT = Depends(), db: Session = Depends(get_db)):
    try:
        Authorize.jwt_refresh_token_required()

        user_id = Authorize.get_jwt_subject()
        if not user_id:
            raise HTTPException(status_code=status.HTTP_401_UNAUTHORIZED,
                                detail='Could not refresh access token')
        user = db.query(models.User).filter(models.User.id == user_id).first()
        if not user:
            raise HTTPException(status_code=status.HTTP_401_UNAUTHORIZED,
                                detail='The user belonging to this token no logger exist')
        access_token = Authorize.create_access_token(
            subject=str(user.id), expires_time=timedelta(minutes=ACCESS_TOKEN_EXPIRES_IN))
    except Exception as e:
        error = e.__class__.__name__
        if error == 'MissingTokenError':
            raise HTTPException(
                status_code=status.HTTP_400_BAD_REQUEST, detail='Please provide refresh token')
        raise HTTPException(
            status_code=status.HTTP_400_BAD_REQUEST, detail=error)

    response.set_cookie('access_token', access_token, ACCESS_TOKEN_EXPIRES_IN * 60,
                        ACCESS_TOKEN_EXPIRES_IN * 60, '/', None, False, True, 'lax')
    response.set_cookie('logged_in', 'True', ACCESS_TOKEN_EXPIRES_IN * 60,
                        ACCESS_TOKEN_EXPIRES_IN * 60, '/', None, False, False, 'lax')
    return {'access_token': access_token}
In the above code, we used the jwt_refresh_token_required() method provided by the fastapi-jwt-auth extension to validate the incoming JWT refresh token cookie.
After the refresh token has been validated, the get_jwt_subject() function will be called to extract the payload from the token.
Next, we used the user’s ID we stored as the payload to make a query to the database to check if a user with that ID exists.
Lastly, we generated a new access token and returned it to the user as an HTTPOnly cookie assuming there weren’t any errors.
Logout User Controller
app/routers/auth.py
# [... Configurations ...]

# Register a new user

# Login user

# Refresh access token

# Logout user
@router.get('/logout', status_code=status.HTTP_200_OK)
def logout(response: Response, Authorize: AuthJWT = Depends(), user_id: str = Depends(oauth2.require_user)):
    Authorize.unset_jwt_cookies()
    response.set_cookie('logged_in', '', -1)

    return {'status': 'success'}
Complete Code for the Auth Controllers
app/routers/auth.py
from datetime import timedelta
from fastapi import APIRouter, Request, Response, status, Depends, HTTPException
from pydantic import EmailStr

from app import oauth2
from .. import schemas, models, utils
from sqlalchemy.orm import Session
from ..database import get_db
from app.oauth2 import AuthJWT
from ..config import settings


router = APIRouter()
ACCESS_TOKEN_EXPIRES_IN = settings.ACCESS_TOKEN_EXPIRES_IN
REFRESH_TOKEN_EXPIRES_IN = settings.REFRESH_TOKEN_EXPIRES_IN


@router.post('/register', status_code=status.HTTP_201_CREATED, response_model=schemas.UserResponse)
async def create_user(payload: schemas.CreateUserSchema, db: Session = Depends(get_db)):
    # Check if user already exist
    user = db.query(models.User).filter(
        models.User.email == EmailStr(payload.email.lower())).first()
    if user:
        raise HTTPException(status_code=status.HTTP_409_CONFLICT,
                            detail='Account already exist')
    # Compare password and passwordConfirm
    if payload.password != payload.passwordConfirm:
        raise HTTPException(
            status_code=status.HTTP_400_BAD_REQUEST, detail='Passwords do not match')
    #  Hash the password
    payload.password = utils.hash_password(payload.password)
    del payload.passwordConfirm
    payload.role = 'user'
    payload.verified = True
    payload.email = EmailStr(payload.email.lower())
    new_user = models.User(**payload.dict())
    db.add(new_user)
    db.commit()
    db.refresh(new_user)
    return new_user


@router.post('/login')
def login(payload: schemas.LoginUserSchema, response: Response, db: Session = Depends(get_db), Authorize: AuthJWT = Depends()):
    # Check if the user exist
    user = db.query(models.User).filter(
        models.User.email == EmailStr(payload.email.lower())).first()
    if not user:
        raise HTTPException(status_code=status.HTTP_400_BAD_REQUEST,
                            detail='Incorrect Email or Password')

    # Check if user verified his email
    if not user.verified:
        raise HTTPException(status_code=status.HTTP_401_UNAUTHORIZED,
                            detail='Please verify your email address')

    # Check if the password is valid
    if not utils.verify_password(payload.password, user.password):
        raise HTTPException(status_code=status.HTTP_400_BAD_REQUEST,
                            detail='Incorrect Email or Password')

    # Create access token
    access_token = Authorize.create_access_token(
        subject=str(user.id), expires_time=timedelta(minutes=ACCESS_TOKEN_EXPIRES_IN))

    # Create refresh token
    refresh_token = Authorize.create_refresh_token(
        subject=str(user.id), expires_time=timedelta(minutes=REFRESH_TOKEN_EXPIRES_IN))

    # Store refresh and access tokens in cookie
    response.set_cookie('access_token', access_token, ACCESS_TOKEN_EXPIRES_IN * 60,
                        ACCESS_TOKEN_EXPIRES_IN * 60, '/', None, False, True, 'lax')
    response.set_cookie('refresh_token', refresh_token,
                        REFRESH_TOKEN_EXPIRES_IN * 60, REFRESH_TOKEN_EXPIRES_IN * 60, '/', None, False, True, 'lax')
    response.set_cookie('logged_in', 'True', ACCESS_TOKEN_EXPIRES_IN * 60,
                        ACCESS_TOKEN_EXPIRES_IN * 60, '/', None, False, False, 'lax')

    # Send both access
    return {'status': 'success', 'access_token': access_token}


@router.get('/refresh')
def refresh_token(response: Response, request: Request, Authorize: AuthJWT = Depends(), db: Session = Depends(get_db)):
    try:
        print(Authorize._refresh_cookie_key)
        Authorize.jwt_refresh_token_required()

        user_id = Authorize.get_jwt_subject()
        if not user_id:
            raise HTTPException(status_code=status.HTTP_401_UNAUTHORIZED,
                                detail='Could not refresh access token')
        user = db.query(models.User).filter(models.User.id == user_id).first()
        if not user:
            raise HTTPException(status_code=status.HTTP_401_UNAUTHORIZED,
                                detail='The user belonging to this token no logger exist')
        access_token = Authorize.create_access_token(
            subject=str(user.id), expires_time=timedelta(minutes=ACCESS_TOKEN_EXPIRES_IN))
    except Exception as e:
        error = e.__class__.__name__
        if error == 'MissingTokenError':
            raise HTTPException(
                status_code=status.HTTP_400_BAD_REQUEST, detail='Please provide refresh token')
        raise HTTPException(
            status_code=status.HTTP_400_BAD_REQUEST, detail=error)

    response.set_cookie('access_token', access_token, ACCESS_TOKEN_EXPIRES_IN * 60,
                        ACCESS_TOKEN_EXPIRES_IN * 60, '/', None, False, True, 'lax')
    response.set_cookie('logged_in', 'True', ACCESS_TOKEN_EXPIRES_IN * 60,
                        ACCESS_TOKEN_EXPIRES_IN * 60, '/', None, False, False, 'lax')
    return {'access_token': access_token}


@router.get('/logout', status_code=status.HTTP_200_OK)
def logout(response: Response, Authorize: AuthJWT = Depends(), user_id: str = Depends(oauth2.require_user)):
    Authorize.unset_jwt_cookies()
    response.set_cookie('logged_in', '', -1)

    return {'status': 'success'}
How to add Protected Routes
Up until now, the only dependency injection we’ve implemented is for querying the database, but we can also use it for more interesting things, like authentication and authorization.
Let’s create a function that we will inject into other path operation functions to authenticate the user before they are allowed to access protected routes.
Update the app/oauth2.py file to include the require_user() function.
app/oauth2.py
import base64
from typing import List
from fastapi import Depends, HTTPException, status
from fastapi_jwt_auth import AuthJWT
from pydantic import BaseModel

from . import models
from .database import get_db
from sqlalchemy.orm import Session
from .config import settings


class Settings(BaseModel):
    authjwt_algorithm: str = settings.JWT_ALGORITHM
    authjwt_decode_algorithms: List[str] = [settings.JWT_ALGORITHM]
    authjwt_token_location: set = {'cookies', 'headers'}
    authjwt_access_cookie_key: str = 'access_token'
    authjwt_refresh_cookie_key: str = 'refresh_token'
    authjwt_public_key: str = base64.b64decode(
        settings.JWT_PUBLIC_KEY).decode('utf-8')
    authjwt_private_key: str = base64.b64decode(
        settings.JWT_PRIVATE_KEY).decode('utf-8')


@AuthJWT.load_config
def get_config():
    return Settings()


class NotVerified(Exception):
    pass


class UserNotFound(Exception):
    pass


def require_user(db: Session = Depends(get_db), Authorize: AuthJWT = Depends()):
    try:
        Authorize.jwt_required()
        user_id = Authorize.get_jwt_subject()
        user = db.query(models.User).filter(models.User.id == user_id).first()

        if not user:
            raise UserNotFound('User no longer exist')

        if not user.verified:
            raise NotVerified('You are not verified')

    except Exception as e:
        error = e.__class__.__name__
        print(error)
        if error == 'MissingTokenError':
            raise HTTPException(
                status_code=status.HTTP_401_UNAUTHORIZED, detail='You are not logged in')
        if error == 'UserNotFound':
            raise HTTPException(
                status_code=status.HTTP_401_UNAUTHORIZED, detail='User no longer exist')
        if error == 'NotVerified':
            raise HTTPException(
                status_code=status.HTTP_401_UNAUTHORIZED, detail='Please verify your account')
        raise HTTPException(
            status_code=status.HTTP_401_UNAUTHORIZED, detail='Token is invalid or has expired')
    return user_id
Quite a lot is happening above, let’s break it down:
- First and foremost, we added the necessary dependencies to the
require_userfunction. - Then we evoked the
jwt_required()method provided by thefastapi_jwt_authpackage to validate the access token stored in the cookie object. - Next, we retrieved the payload using the
get_jwt_subject()method and queried the database to check if a user with that ID exists. - If the user passes the authentication check, the
require_userfunction returns the user’s ID to the path operation function.
Create a User Controller
app/routers/user.py
from fastapi import APIRouter, Depends
from ..database import get_db
from sqlalchemy.orm import Session
from .. import models, schemas, oauth2

router = APIRouter()


@router.get('/me', response_model=schemas.UserResponse)
def get_me(db: Session = Depends(get_db), user_id: str = Depends(oauth2.require_user)):
    user = db.query(models.User).filter(models.User.id == user_id).first()
    return user
Adding the Routes to the Main File
app/main.py
from fastapi import FastAPI
from fastapi.middleware.cors import CORSMiddleware
from app.config import settings
from app.routers import user, auth

app = FastAPI()

origins = [
    settings.CLIENT_ORIGIN,
]

app.add_middleware(
    CORSMiddleware,
    allow_origins=origins,
    allow_credentials=True,
    allow_methods=["*"],
    allow_headers=["*"],
)


app.include_router(auth.router, tags=['Auth'], prefix='/api/auth')
app.include_router(user.router, tags=['Users'], prefix='/api/users')


@app.get('/api/healthchecker')
def root():
    return {'message': 'Hello World'}
Database Migration with Alembic
Database schema migration allows us to incrementally and reversibly track changes in database schemas and roll back at any point in time.
In this section, you will learn how to handle database migration in FastAPI using Alembic.
Alembic is a lightweight database migration tool designed to work with SQLAlchemy. It can automatically pull the SQLAlchemy models and generate the corresponding tables.
Now run this command to install Alembic:
pip install alembic
Once you have it installed, you will have access to the alembic CLI. Run alembic --help in your terminal and you should see something like this:
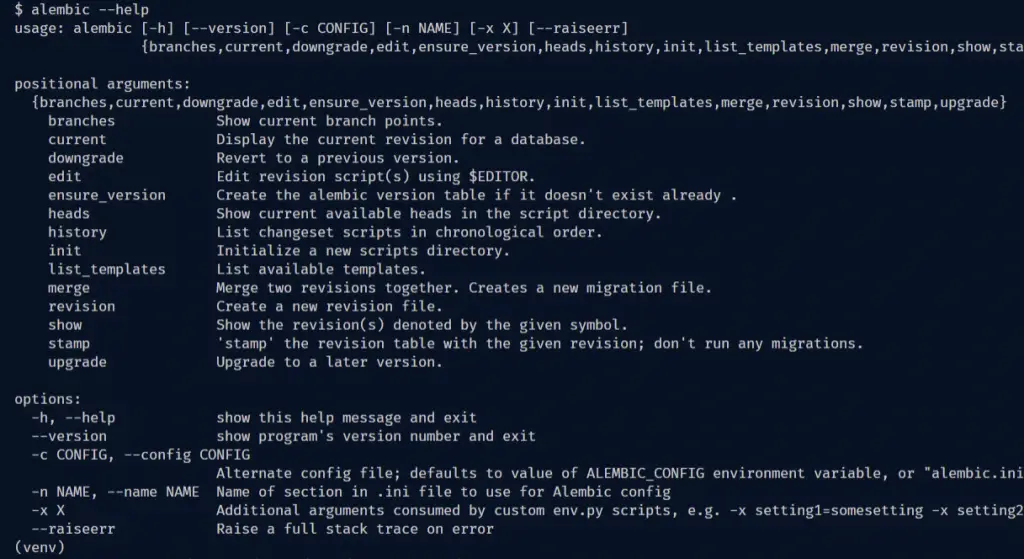
Below are some important Alembic commands you should know:
init– prepares the project to work with alembicupgrade– upgrade the database to a later versiondowngrade– revert to a previous versionrevision– creates a new revision file
Now let’s create a migration environment with the init command of alembic:
alembic init alembic
The above command will create a directory of scripts that is specific to a particular application.
The directory includes these directories/files:
versions/– this folder holds the individual version scriptsenv.py– this Python script runs whenever the alembic migration tool is evoked and can be used to customize the migration environment.
It also contains instructions on how to configure and generate a SQLAlchemy engine. In addition, it can be modified so that multiple engines can be operated upon.script.py.mako– is a Mako template file that is used to generate new migration scripts within the versions folder.
One exciting feature of alembic is the ability to auto-generate migration scripts from the models we created with SQLAlchemy.
Before you can use the auto-generation feature, you need to tell alembic where your model’s metadata is located.
These are the relevant sections I have highlighted with the red border.
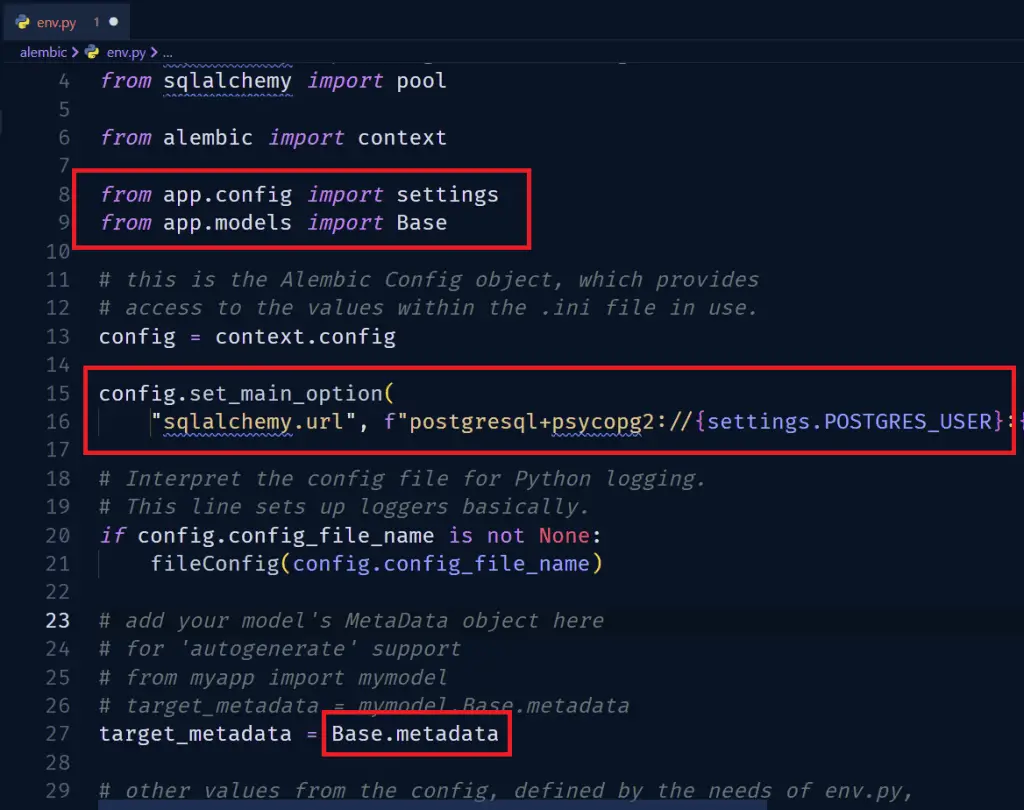
alembic/env.py
from logging.config import fileConfig

from sqlalchemy import engine_from_config
from sqlalchemy import pool

from alembic import context

from app.config import settings
from app.models import Base

# this is the Alembic Config object, which provides
# access to the values within the .ini file in use.
config = context.config

config.set_main_option(
    "sqlalchemy.url", f"postgresql+psycopg2://{settings.POSTGRES_USER}:{settings.POSTGRES_PASSWORD}@{settings.POSTGRES_HOSTNAME}:{settings.DATABASE_PORT}/{settings.POSTGRES_DB}")

# Interpret the config file for Python logging.
# This line sets up loggers basically.
if config.config_file_name is not None:
    fileConfig(config.config_file_name)

# add your model's MetaData object here
# for 'autogenerate' support
# from myapp import mymodel
# target_metadata = mymodel.Base.metadata
target_metadata = Base.metadata
Now let’s create a revision file with this command:
alembic revision --autogenerate -m "creat users table"
Next, run the upgrade command to push the changes to the PostgreSQL database.
alembic upgrade head
The above command will make sure that the database is up to date with the most recent revision.
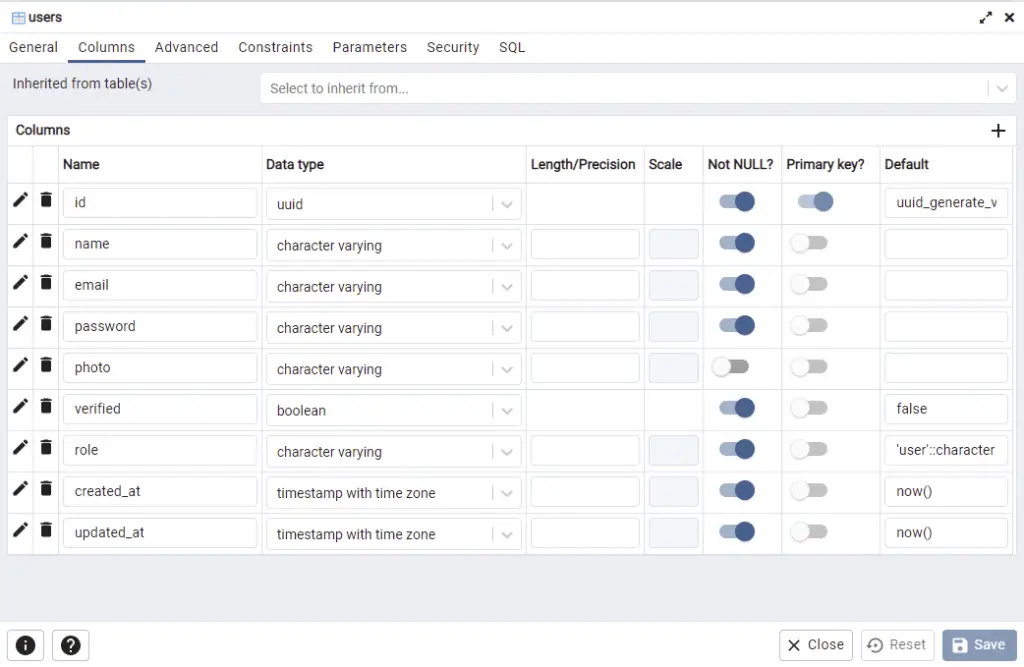
When you log into the Postgres database in pgAdmin using the credentials we defined in the environment variables, you should see the columns we defined in the users table.
Testing the API
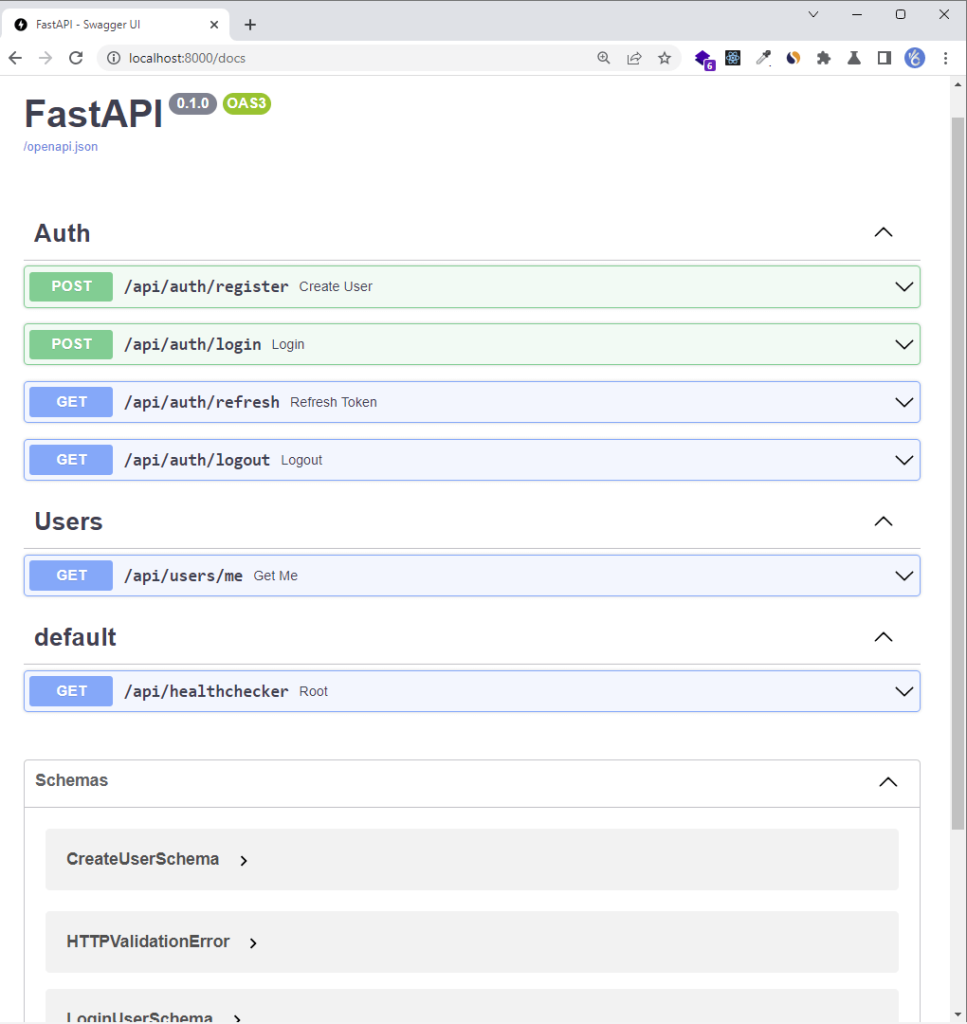
FastAPI has a standard way of automatically generating API docs that comply with OpenAPI standards without any extra configurations.
However, am going to use Postman to test the API endpoints. You can import the Postman collection I used in testing the FastAPI endpoints into your list of collections in Postman.
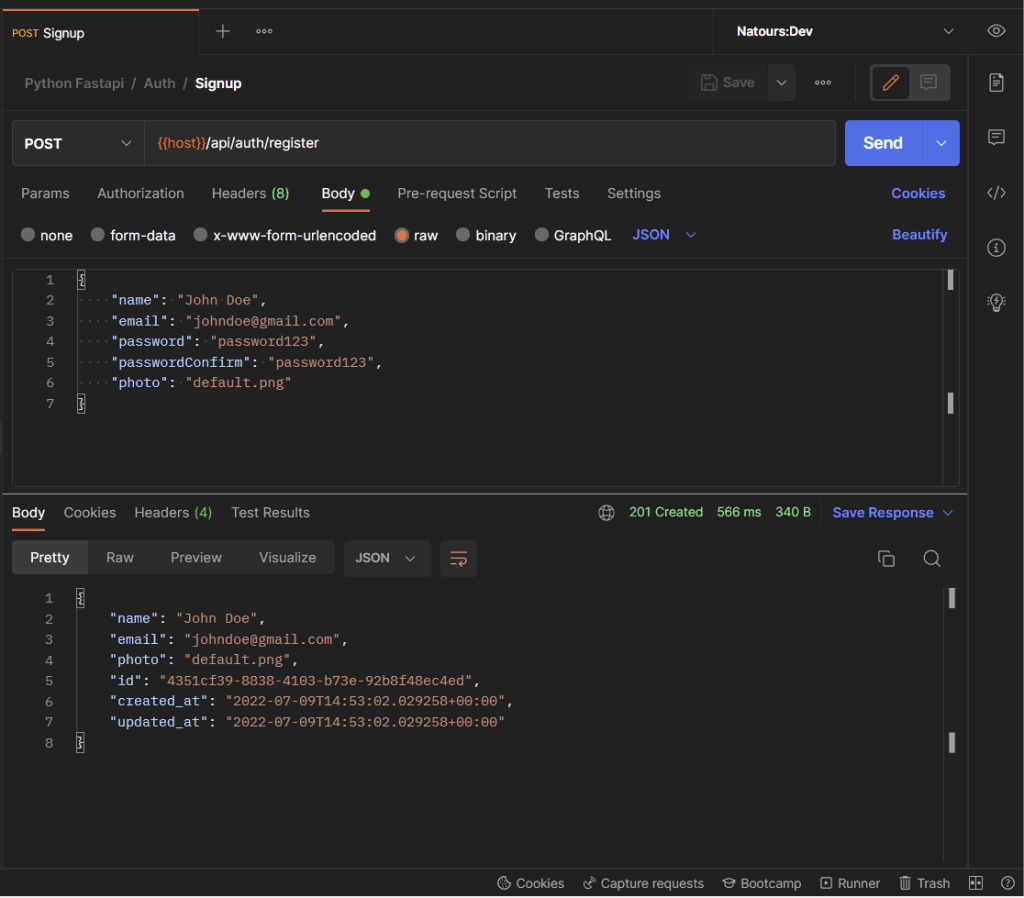
-Register new user
-Login the registered user
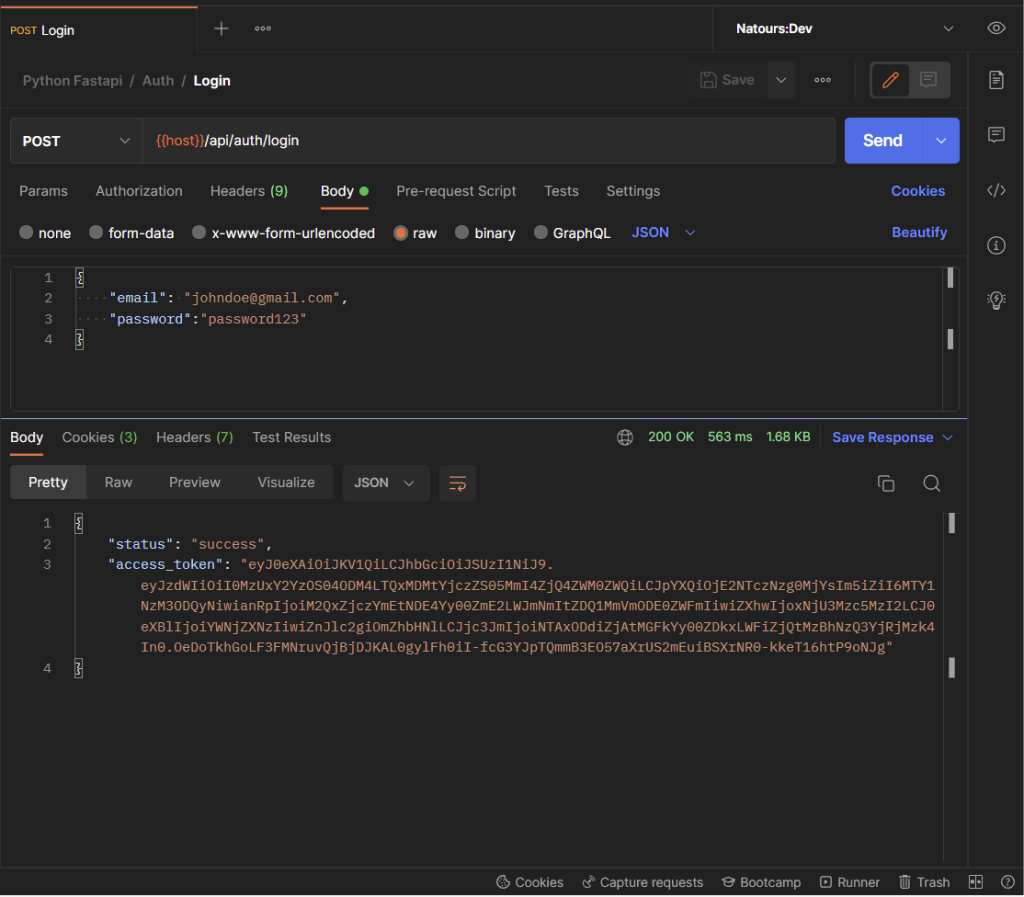
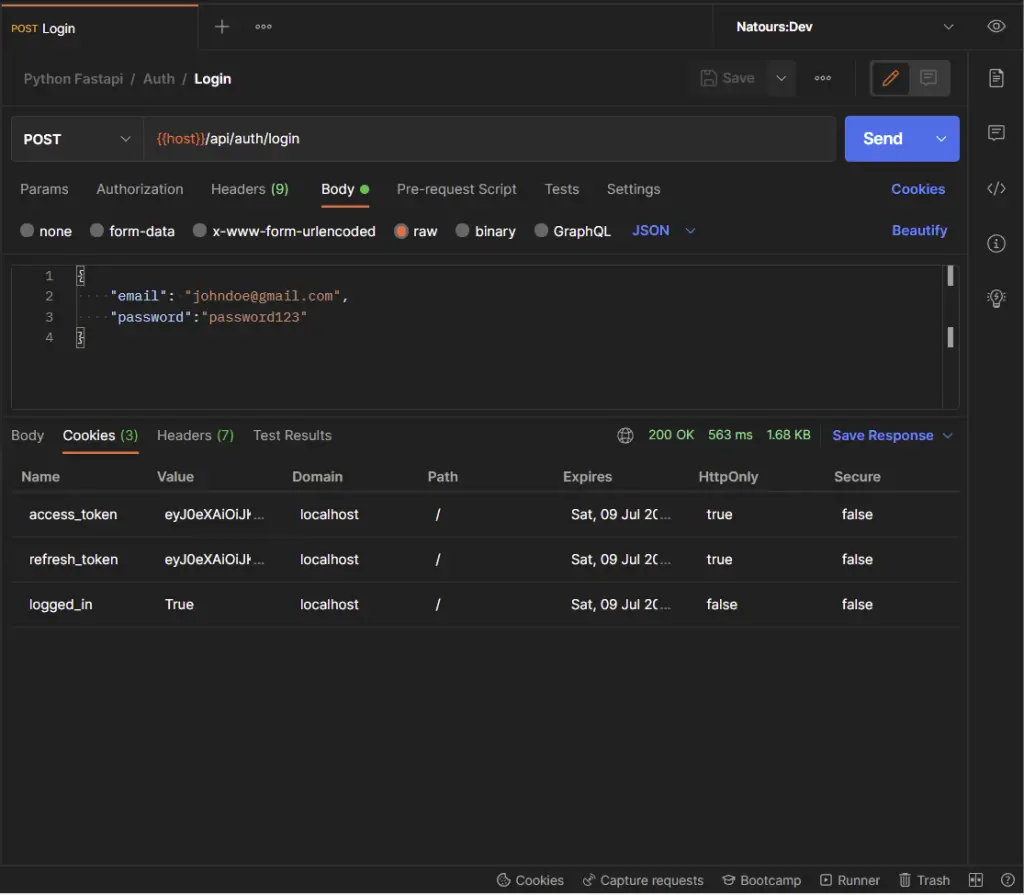
Inspect the Cookies tab to see the list of cookies the FastAPI server returned to the client.
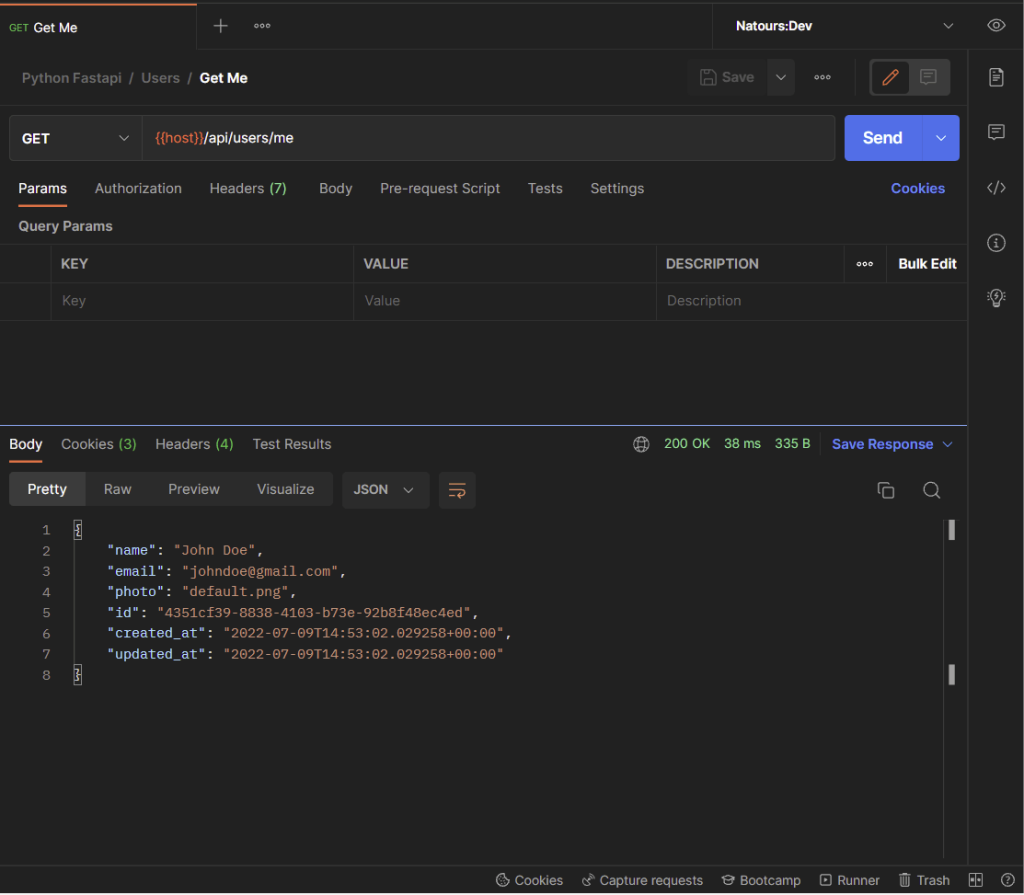
-Get the currently authenticated user’s information
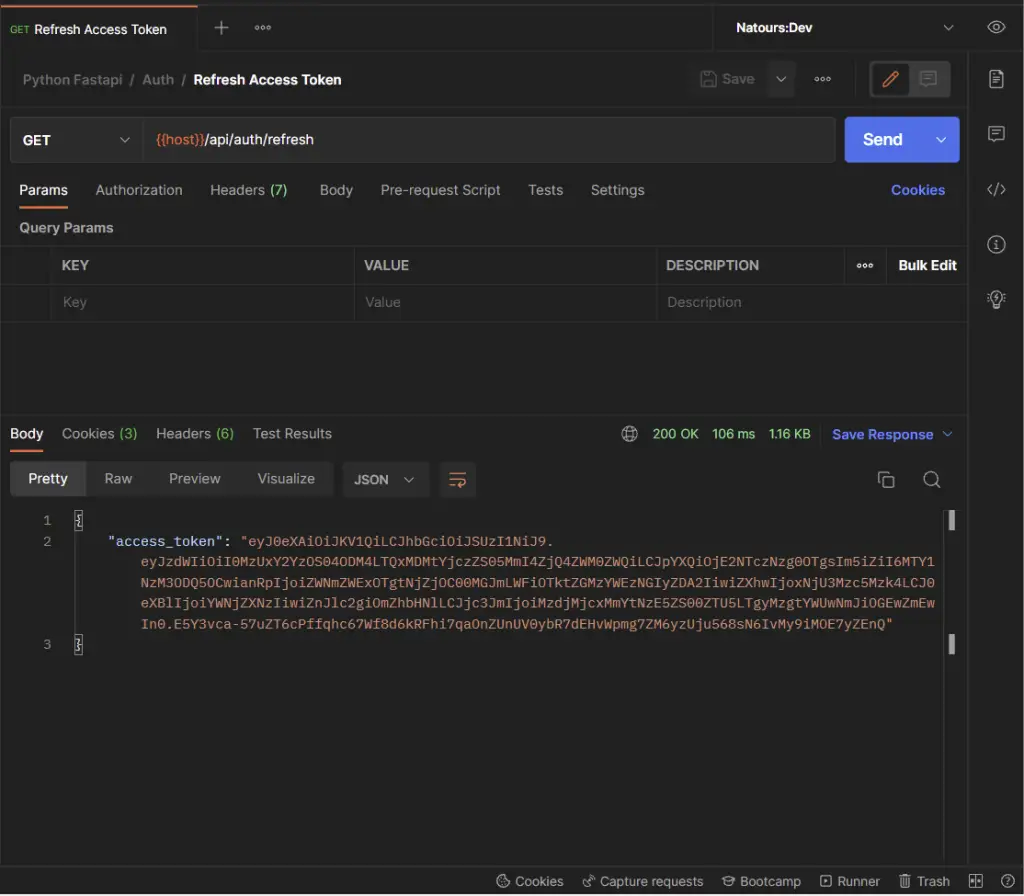
-Refresh the access token
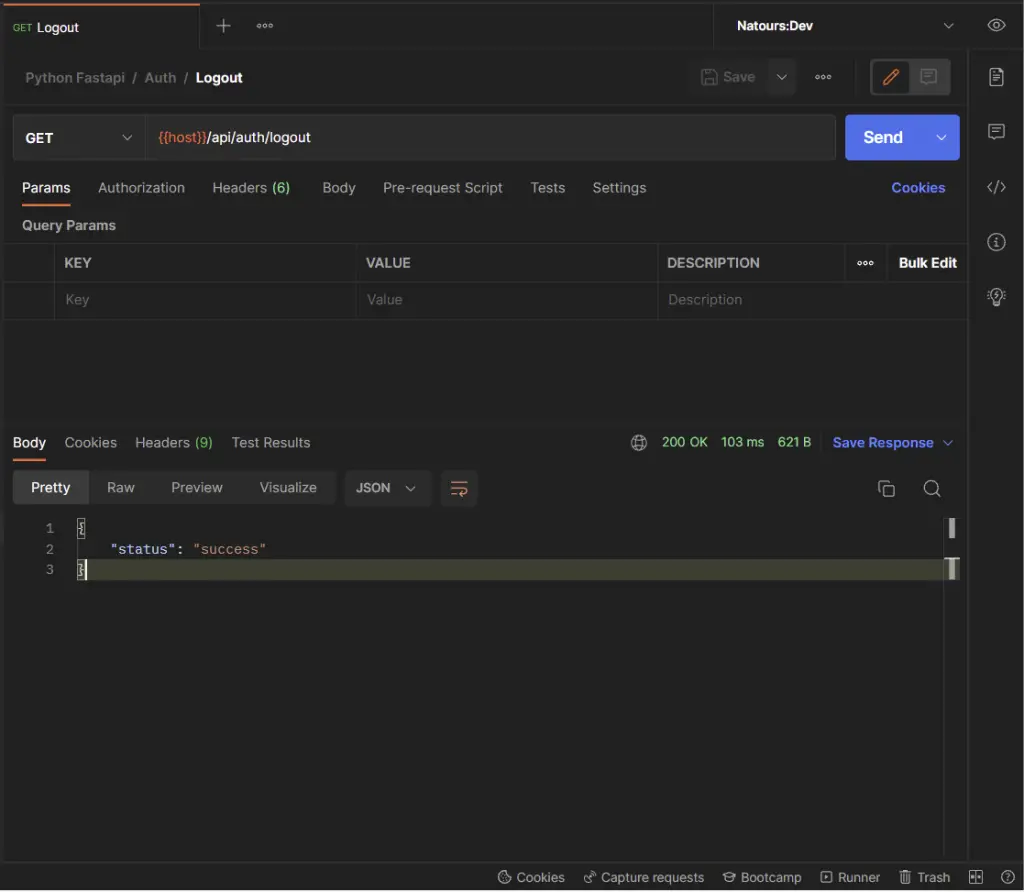
-Logout the authenticated user
Conclusion
With this FastAPI, PostgreSQL, Pydantic, SQLAlchemy, and Docker example in Python, you’ve learned how to add access and refresh token functionalities to your FastAPI apps.
FastAPI, Pydantic, and SQLAlchemy Source Code
You can find the complete source code on my GitHub page
Thanks for job
Hi, for pydantic > 2 we could’nt using auth jwt, could you provide tutorial for using another jwt