

In this article, you’ll learn how to upload images with React, RTK Query, Redux Toolkit, Zod, React Hook Form and Material UI.
In brief, you’ll learn how to create a reusable image upload component with React Hook Form and Material UI.

You can also read:
- React, Material UI and React Hook Form: Login and Signup Forms
- How I Setup Redux Toolkit and RTK Query the right way
- Form Validation with React Hook Form, Material UI, React and TypeScript
- How to Customize Material-UI Rating Component with React and TypeScript
- How to Setup Material-UI v5 with React JS and TypeScript
React Image Upload with React Hook Form, Redux Toolkit and TypeScript Overview
We are going to build a custom image upload component capable of:
- Uploading a single image to a server
- Uploading an array of images to a server
- Uploading single and multiple images to a server
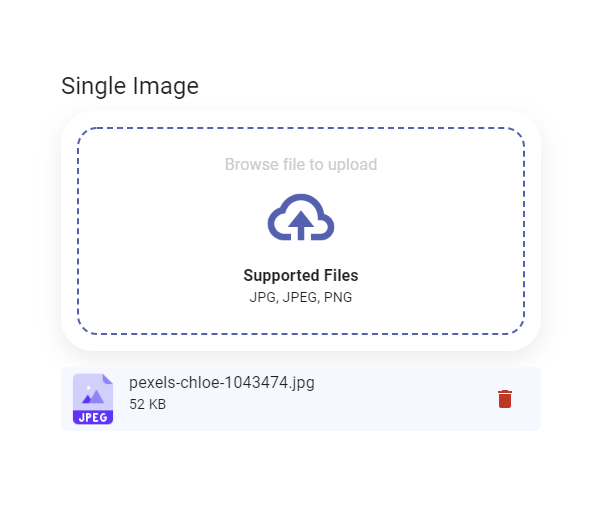
This is what a single image upload will look like:
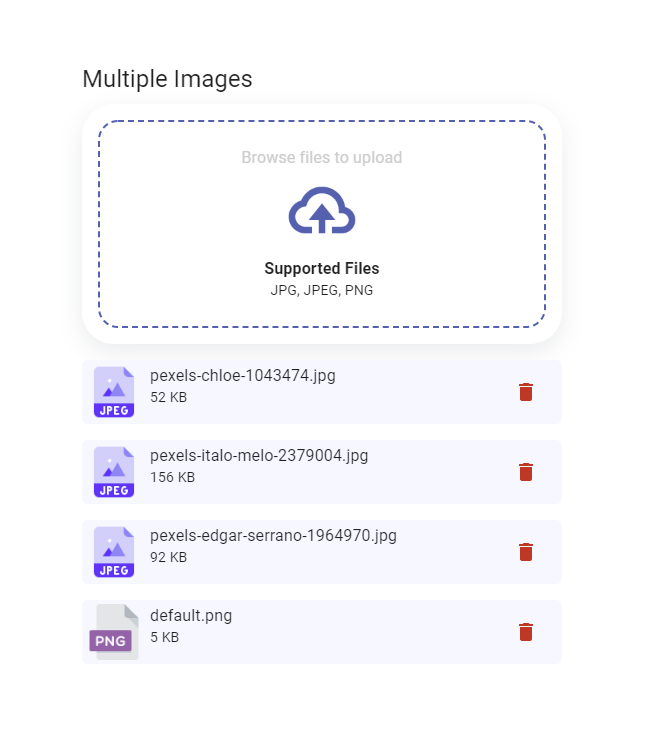
Below is what a multiple image upload will look like:
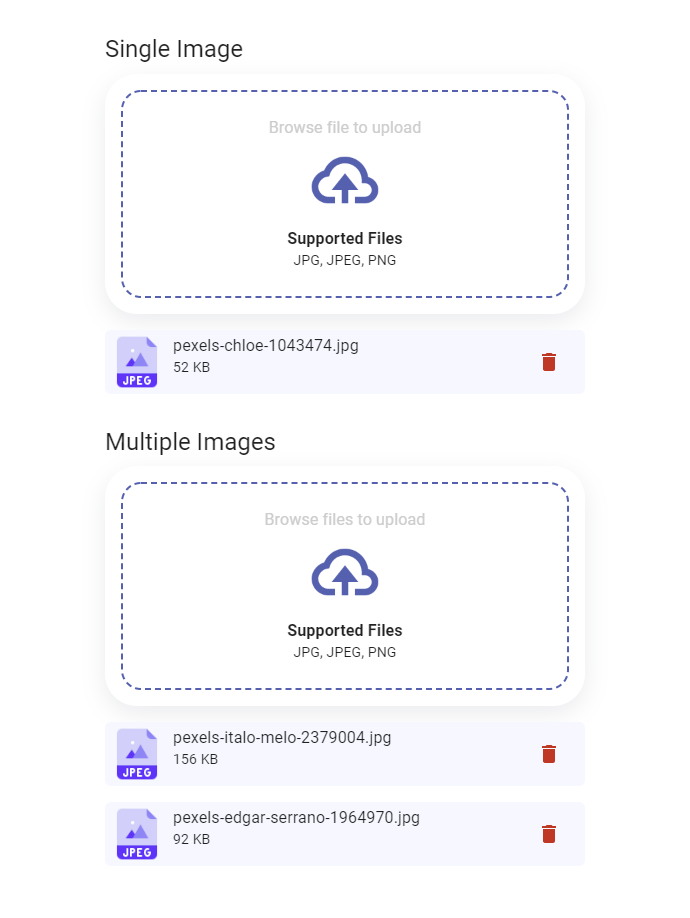
Below is what both single and multiple FileUpload components will look like:
Technologies
Rest API for Image Upload and Storage
Here are the API endpoints we will use RTK Query to make HTTP requests to:
| Method | Endpoint | Description |
|---|---|---|
| POST | /upload | uploads both single and multiple files |
| POST | /upload/single | uploads single file |
| POST | /upload/multiple | uploads multiple files |
You can find more details about the Rest API image upload implementations in one of the following:
- Upcoming…
React Image Upload with React Hook Form, RTK Query Project Overview
In the project structure below I deleted some of the unnecessary files added by Create-React-App.
At the end of this React image upload article, your folder structure should look somewhat like this:
mui-app/
├── node_modules/
├── public/
│ ├── favicon.ico
│ └── index.html
├── src/
│ ├── assets/
│ │ ├── cloud-upload.png
│ │ ├── default.png
│ │ ├── jpeg.png
│ │ ├── jpg.png
│ │ ├── png.png
│ │ └── svg.png
│ ├── components/
│ │ ├── FileConfig.ts
│ │ └── FileUpload.tsx
│ ├── redux/
│ │ ├── store.ts
│ │ └── uploadAPI.ts
│ ├── App.tsx
│ ├── index.tsx
│ ├── react-app-env.d.ts
│ └── theme.ts
├── .gitignore
├── package.json
├── README.md
├── tsconfig.json
└── yarn.lock
If by any chance you are also using VS Code then your folder structure should look somehow like the image below.
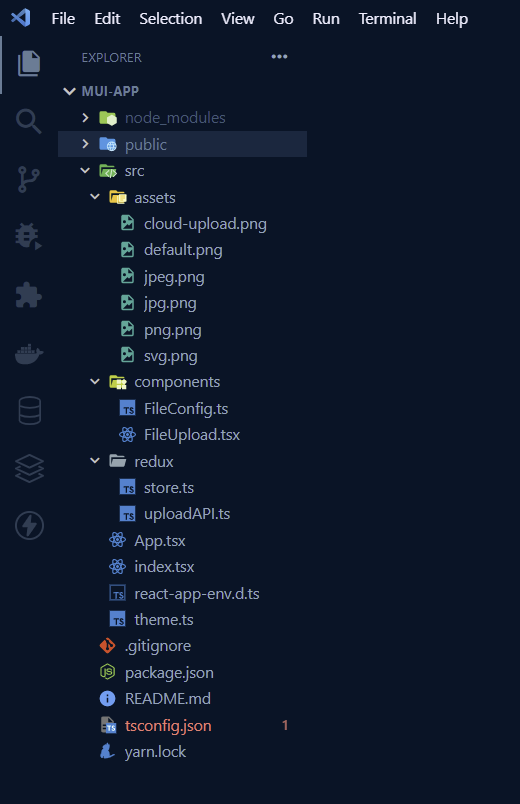
Let me give a brief description of the project structure:
- src/assets – contains the different images representing the image extensions (PNG, JPG, JPEG, SVG) we’ll accept in this article
- src/components/FileConfig.ts – we’ll import and export the various images in the assets folder from this file.
- src/components/FileUpload.tsx – contains the actual file upload implementation with React Hook Form and Material UI
- src/redux/store.ts – contains redux store configurations
- src/redux/uploadAPI.ts – contains all the endpoints implementations with RTK Query
- src/App.tsx – contains the form built with Material UI. This is where the image upload will take place.
Create a Config File for the Image Upload Component
Create a new FileConfig.ts file in the components folder then copy and paste the code snippets below into it.
src/components/FileConfig.ts
import png from '../assets/png.png';
import jpg from '../assets/jpg.png';
import svg from '../assets/svg.png';
import defaultImage from '../assets/default.png';
import jpeg from '../assets/jpeg.png';

export const ImageConfig: {
  png: string;
  jpg: string;
  svg: string;
  default: string;
  jpeg: string;
  'svg+xml': string;
} = {
  png,
  jpg,
  svg,
  'svg+xml': svg,
  default: defaultImage,
  jpeg,
};
Here is what I did in the FileConfig.ts file:
- I imported all the images from the assets folder.
- Next, I used named export to export the images in an object.
- Later we can access any of the images by using the object notation syntax.
Create the Image Upload Component with Material UI
Note: the goal is to create one reusable image upload component that we can use to upload single or multiple images.
Am going to list the different steps we need to follow in order to create the image upload component.
Step 1: Define the Image Component Props with TypeScript
The FileUpload component will accept three props:
- limit – the number of images the FileUpload component should accept. Needed for validation.
- multiple -boolean that tells the underlying file input field whether the FileUpload will accept single or multiple images. Needed for HTML file input validation.
- name – a string that will be used by React-Hook-Form
interface IFileUploadProps {
  limit: number;
  multiple: boolean;
  name: string;
}
Step 2: Define custom styles for the Box MUI component
Next, let’s add some styles to the Material UI Box component and assign it to the CustomBox variable.
This will prevent us from polluting the actual JSX with inline styles.
const CustomBox = styled(Box)({
  '&.MuiBox-root': {
    backgroundColor: '#fff',
    borderRadius: '2rem',
    boxShadow: 'rgba(149, 157, 165, 0.2) 0px 8px 24px',
    padding: '1rem',
  },
  '&.MuiBox-root:hover, &.MuiBox-root.dragover': {
    opacity: 0.6,
  },
});
Step 3: Define the FileUpload Component with States
Next, let’s import the necessary libraries and components into the file then let’s define the FileUpload component.
import {
  Box,
  FormHelperText,
  IconButton,
  Stack,
  Typography,
} from '@mui/material';
import { styled } from '@mui/material/styles';
import React, { useCallback, useEffect, useRef, useState } from 'react';
import DeleteIcon from '@mui/icons-material/Delete';
import uploadImg from '../assets/cloud-upload.png';
import { ImageConfig } from './FileConfig';
import { Controller, useController, useFormContext } from 'react-hook-form';

// ? FileUpload Props Here


// ? Custom Styles for the Box Component


// ? FileUpload Component
const FileUpload: React.FC<IFileUploadProps> = ({ limit, multiple, name }) => {
// ? Form Context
  const {
    control,
    formState: { isSubmitting, errors },
  } = useFormContext();

  // ? State with useState()
  const { field } = useController({ name, control });
  const [singleFile, setSingleFile] = useState<File[]>([]);
  const [fileList, setFileList] = useState<File[]>([]);
  const wrapperRef = useRef<HTMLDivElement>(null);

  // ? Toggle the dragover class
  const onDragEnter = () => wrapperRef.current?.classList.add('dragover');
  const onDragLeave = () => wrapperRef.current?.classList.remove('dragover');


  // ? Actual JSX
  return (
    <>
    </>
  );
};

export default FileUpload;
Here is a breakdown of what I did above:
- First, I defined the FileUpload component and provided it with the prop types we defined above.
- I then destructured the limit, name and multiple props.
- Next, I used the
useFormContexthook to have access to the form context. I then destructured the methods returned by theuseFormContexthook. - Next, I used the
useControllerhook to have access to the field object returned by the render prop in the Controller component. Doing it this way will allow us to use the field object outside the Controller component. - Next, I used React
useStatehook to define a state for both the single and multiple Files. - Finally, I defined two functions to toggle the
dragoverclass on the wrapperRef which is a reference to a Material UI Box component.
Step 4: File Upload Service
Here comes the good part. Instead of passing the onChange function that exists in the field object directly to the input field onChange prop, I decided to pass my own function to the input onChange prop so that I can have access to the event object.
The field object of React Hook Form is an object destructured from the callback function passed to the render prop of the Controller component.
const FileUpload: React.FC<IFileUploadProps> = ({ limit, multiple, name }) => {
  // ? Form Context

  // ? State with useState()

  // ? Toggle the dragover class

  // ? Image Upload Service
  const onFileDrop = useCallback(
    (e: React.SyntheticEvent<EventTarget>) => {
      const target = e.target as HTMLInputElement;
      if (!target.files) return;

      if (limit === 1) {
        const newFile = Object.values(target.files).map((file: File) => file);
        if (singleFile.length >= 1) return alert('Only a single image allowed');
        setSingleFile(newFile);
        field.onChange(newFile[0]);
      }

      if (multiple) {
        const newFiles = Object.values(target.files).map((file: File) => file);
        if (newFiles) {
          const updatedList = [...fileList, ...newFiles];
          if (updatedList.length > limit || newFiles.length > 3) {
            return alert(`Image must not be more than ${limit}`);
          }
          setFileList(updatedList);
          field.onChange(updatedList);
        }
      }
    },
    [field, fileList, limit, multiple, singleFile]
  );

  // ? remove multiple images
  const fileRemove = (file: File) => {
    const updatedList = [...fileList];
    updatedList.splice(fileList.indexOf(file), 1);
    setFileList(updatedList);
  };

  // ? remove single image
  const fileSingleRemove = () => {
    setSingleFile([]);
  };

  // ? TypeScript Type
  type CustomType = 'jpg' | 'png' | 'svg';

  // ? Calculate Size in KiloByte and MegaByte
  const calcSize = (size: number) => {
    return size < 1000000
      ? `${Math.floor(size / 1000)} KB`
      : `${Math.floor(size / 1000000)} MB`;
  };

  // ? Reset the State

  // ? Actual JSX
  return (
    <>

    </>
  );
};
Below is the explanation of what I did in the above code snippets:
- Let me clear the air first, I placed the
onFileDropfunction in a ReactuseCallbackhook because I used the field object in theonFileDropfunction.
Now, if I didn’t use theuseCallbackhook then the FileUpload component will end up in an infinite render loop since a new field object will be created on every render. - Next, If the limit prop passed to the FileUpload component is 1 then it means we are dealing with a single file.
I then looped through the FileList object and then updated the state with the array returned by the map function.
Also, I passed the single File to the onChange method on the field object so that React Hook Form can have access to it. - Next, I checked if the FileUpload component is allowed to accept multiple Files by checking if the multiple prop is true.
I then looped through the FileList object and updated the state. Also, I passed the Files array to the field method onChange method. - Next, I defined a function to remove a particular image from the multiple images state. I also, defined a function to reset the single image state when called.
- Finally, I defined a utility function to calculate the file size in either KB or MB.
Step 5: Reset the Files State
Next, we need a way to reset the multiple and single file states when the form is been submitted.
This is where the React useEffect hook becomes our savior. If the form is been submitted then we will reset the two file states to empty arrays.
const FileUpload: React.FC<IFileUploadProps> = ({ limit, multiple, name }) => {
  // ? Form Context

  // ? State with useState()

  // ? Toggle the dragover class

  // ? Image Upload Service

  // ? remove multiple images

  // ? remove single image

  // ? TypeScript Type

  // ? Calculate Size in KiloByte and MegaByte

  // ? Reset the State
  useEffect(() => {
    if (isSubmitting) {
      setFileList([]);
      setSingleFile([]);
    }
  }, [isSubmitting]);


  // ? Actual JSX
  return (
    <>
    </>
  );
};
Step 6: Display the Image Uploader and Images Preview
Now let’s render the UI part of the FileUpload component with the help of Material UI components and the Controller component of React Hook Form.
const FileUpload: React.FC<IFileUploadProps> = ({ limit, multiple, name }) => {
  // ? Form Context

  // ? State with useState()

  // ? Toggle the dragover class

  // ? Image Upload Service

  // ? remove multiple images

  // ? remove single image

  // ? TypeScript Type

  // ? Calculate Size in KiloByte and MegaByte

  // ? Reset the State

  // ? Actual JSX
  return (
    <>
      <CustomBox>
        <Box
          display='flex'
          justifyContent='center'
          alignItems='center'
          sx={{
            position: 'relative',
            width: '100%',
            height: '13rem',
            border: '2px dashed #4267b2',
            borderRadius: '20px',
          }}
          ref={wrapperRef}
          onDragEnter={onDragEnter}
          onDragLeave={onDragLeave}
          onDrop={onDragLeave}
        >
          <Stack justifyContent='center' sx={{ p: 1, textAlign: 'center' }}>
            <Typography sx={{ color: '#ccc' }}>
              {limit > 1 ? 'Browse files to upload' : 'Browse file to upload'}
            </Typography>
            <div>
              <img
                src={uploadImg}
                alt='file upload'
                style={{ width: '5rem' }}
              />
            </div>
            <Typography variant='body1' component='span'>
              <strong>Supported Files</strong>
            </Typography>
            <Typography variant='body2' component='span'>
              JPG, JPEG, PNG
            </Typography>
          </Stack>
          <Controller
            name={name}
            defaultValue=''
            control={control}
            render={({ field: { name, onBlur, ref } }) => (
              <input
                type='file'
                name={name}
                onBlur={onBlur}
                ref={ref}
                onChange={onFileDrop}
                multiple={multiple}
                accept='image/jpg, image/png, image/jpeg'
                style={{
                  opacity: 0,
                  position: 'absolute',
                  top: 0,
                  left: 0,
                  width: '100%',
                  height: '100%',
                  cursor: 'pointer',
                }}
              />
            )}
          />
        </Box>
      </CustomBox>

      <FormHelperText
        sx={{ textAlign: 'center', my: 1 }}
        error={!!errors[name]}
      >
        {errors[name] ? errors[name].message : ''}
      </FormHelperText>

      {/* ?Image Preview ? */}
      {fileList.length > 0 || singleFile.length > 0 ? (
        <Stack spacing={2} sx={{ my: 2 }}>
          {(multiple ? fileList : singleFile).map((item, index) => {
            const imageType = item.type.split('/')[1] as CustomType;
            return (
              <Box
                key={index}
                sx={{
                  position: 'relative',
                  backgroundColor: '#f5f8ff',
                  borderRadius: 1.5,
                  p: 0.5,
                }}
              >
                <Box display='flex'>
                  <img
                    src={ImageConfig[`${imageType}`] || ImageConfig['default']}
                    alt='upload'
                    style={{
                      height: '3.5rem',
                      objectFit: 'contain',
                    }}
                  />
                  <Box sx={{ ml: 1 }}>
                    <Typography>{item.name}</Typography>
                    <Typography variant='body2'>
                      {calcSize(item.size)}
                    </Typography>
                  </Box>
                </Box>
                <IconButton
                  onClick={() => {
                    if (multiple) {
                      fileRemove(item);
                    } else {
                      fileSingleRemove();
                    }
                  }}
                  sx={{
                    color: '#df2c0e',
                    position: 'absolute',
                    right: '1rem',
                    top: '50%',
                    transform: 'translateY(-50%)',
                  }}
                >
                  <DeleteIcon />
                </IconButton>
              </Box>
            );
          })}
        </Stack>
      ) : null}
    </>
  );
};
The FileUpload component UI has two parts:
- The file input component
I used the useRef hook to have access to the MUI Box component and changed its opacity depending on the drag-and-drop events.
Next, I used the Controller component from React Hook Form to display the HTML input element and passed the appropriate methods to it. - A component to display the files stored in the state.
Next, I created a component to display the files from the state in the UI. I also included a button to remove a particular file from the state.
Add an Image Upload Endpoint to RTK Query
In this article, I used RTK Query instead of Axios or React Query to send the files to the server.
RTK Query uses the fetch API to make HTTP requests but you can also write your own custom baseQuery to use Axios.
In this article, am going to use the fetchBaseQuery which is a wrapper around the fetch API but with additional features.
I then defined three endpoints to upload the files to the server.
uploadImage– responsible for uploading single and multiple imagesuploadSingleImage– responsible for uploading a single image to the serveruploadMultipleImage– responsible for uploading an array of images to the server.
import { createApi, fetchBaseQuery } from '@reduxjs/toolkit/query/react';

export const uploadAPI = createApi({
  reducerPath: 'uploadAPI',
  baseQuery: fetchBaseQuery({ baseUrl: 'http://localhost:8000/api/' }),
  endpoints: (builder) => ({
    uploadImage: builder.mutation<{}, FormData>({
      query(data) {
        return {
          url: 'upload',
          method: 'POST',
          credentials: 'include',
          body: data,
        };
      },
    }),
    uploadSingleImage: builder.mutation<{}, FormData>({
      query(data) {
        return {
          url: 'upload/single',
          method: 'POST',
          credentials: 'include',
          body: data,
        };
      },
    }),
    uploadMultipleImage: builder.mutation<{}, FormData>({
      query(data) {
        return {
          url: 'upload/multiple',
          method: 'POST',
          credentials: 'include',
          body: data,
        };
      },
    }),
  }),
});

export const { useUploadImageMutation } = uploadAPI;
Add the FileUpload Component to the Form
I choose to put the form logic inside the App.tsx file instead of creating a page component for it.
To be able to upload the images to a server, I will be using RTK Query to create mutations that can send the files.
import {
  Box,
  Button,
  Container,
  CssBaseline,
  Stack,
  Typography,
} from '@mui/material';
import { ThemeProvider } from '@mui/material/styles';
import { FormProvider, SubmitHandler, useForm } from 'react-hook-form';
import { array, object, TypeOf, z } from 'zod';
import { zodResolver } from '@hookform/resolvers/zod';
import FileUpload from './components/FileUpload';
import theme from './theme';
import { useUploadImageMutation } from './redux/uploadAPI';

const imageUploadSchema = object({
  imageCover: z.instanceof(File),
  images: array(z.instanceof(File)),
});

type IUploadImage = TypeOf<typeof imageUploadSchema>;

function App() {
  const [uploadImage] = useUploadImageMutation();

  const methods = useForm<IUploadImage>({
    resolver: zodResolver(imageUploadSchema),
  });

  const onSubmitHandler: SubmitHandler<IUploadImage> = (values) => {
    const formData = new FormData();
    formData.append('imageCover', values.imageCover);

    if (values.images.length > 0) {
      values.images.forEach((el) => formData.append('images', el));
    }

    console.log(values);

    // Call the Upload API
    uploadImage(formData);
  };

  return (
    <ThemeProvider theme={theme}>
      <CssBaseline />
      <Container maxWidth={false}>
        <Box
          display='flex'
          sx={{
            justifyContent: 'center',
            alignItems: 'center',
            height: '100vh',
          }}
        >
          <Box display='flex' flexDirection='column' sx={{ width: '30%' }}>
            {/* Single Image Upload */}
            <FormProvider {...methods}>
              <Box
                component='form'
                noValidate
                autoComplete='off'
                onSubmit={methods.handleSubmit(onSubmitHandler)}
              >
                <Stack marginBottom={2}>
                  <Typography
                    textAlign='center'
                    variant='h4'
                    component='h1'
                    gutterBottom
                  >
                    Single Image Upload
                  </Typography>
                  <FileUpload limit={1} multiple={false} name='imageCover' />
                </Stack>
                {/* Multiple Image Upload */}
                <Typography
                  textAlign='center'
                  variant='h4'
                  component='h1'
                  gutterBottom
                >
                  Multiple Image Upload
                </Typography>
                <FileUpload limit={3} multiple name='images' />
                <Button
                  variant='contained'
                  type='submit'
                  fullWidth
                  sx={{ py: '0.8rem', my: 2 }}
                >
                  Submit Images
                </Button>
              </Box>
            </FormProvider>
          </Box>
        </Box>
      </Container>
    </ThemeProvider>
  );
}

export default App;
Here is a breakdown of what I did above:
- First I created a schema with Zod to validate the form.
- I then extracted the TypeScript type from the schema by using the TypeOf function from Zod.
- Next, I evoked the
useUploadImageMutationhook to have access to theuploadImagemutation function. - Next, I provided the validation schema to the
useFormhook through thezodResolverfunction. The useForm hook takes a generic so I passed the inferred type of the schema to it. - I then defined an
onSubmitHandlerto get the form values passed by thehandleSubmitmethod of theuseFormhook. - In the
onSubmitHandlerI created an instance of the FormData class and appended the respective files to it. I then passed the FormData instance to theuploadImagemutation function to send the files to the server. - Finally, I used the FormProvider component from React Hook Form to provide the form context to the FileUpload component. Without the FormProvider we’ll get errors in the console.
Conclusion
In this article, you learned how to upload images with React, Redux Toolkit, RTK Query, Zod, Material UI, and React Hook Form.
Check out the source codes:
Amazing explanation bro. Keep it up
goood bro
It’s very helpful