
In this article, you’ll learn how to implement JWT Authentication with an Access and a Refresh token using Node.js, TypeScript, MongoDB, Redis, and Docker.
Node.js, TypeScript, and MongoDB Tutorial Series:
- Node.js + TypeScript + MongoDB: JWT Authentication
- Node.js + TypeScript + MongoDB: JWT Refresh Token
- Google OAuth Authentication React.js and Node.js(No Passport)
You can also read:
- Form Validation with React Hook Form, Material UI, React and TypeScript
- How to Setup Material-UI v5 with React JS and TypeScript
- 16 Complicated Programming Terms You Need To Know

Run the Frontend and Backend Apps
To successfully run both the backend and frontend projects on your machine, follow these step-by-step instructions:
- Begin by downloading or cloning the project from its GitHub repository: https://github.com/wpcodevo/JWT_Authentication_React. Open the source code in your preferred text editor.
- In the integrated terminal of your IDE or text editor, execute the command
docker-compose up -dto launch the MongoDB and Redis Docker containers. - Navigate to the backend directory using the command
cd ./backend. Runyarn installto install all required dependencies. - Open the
backend/src/app.tsfile and uncomment the Nodemailer code.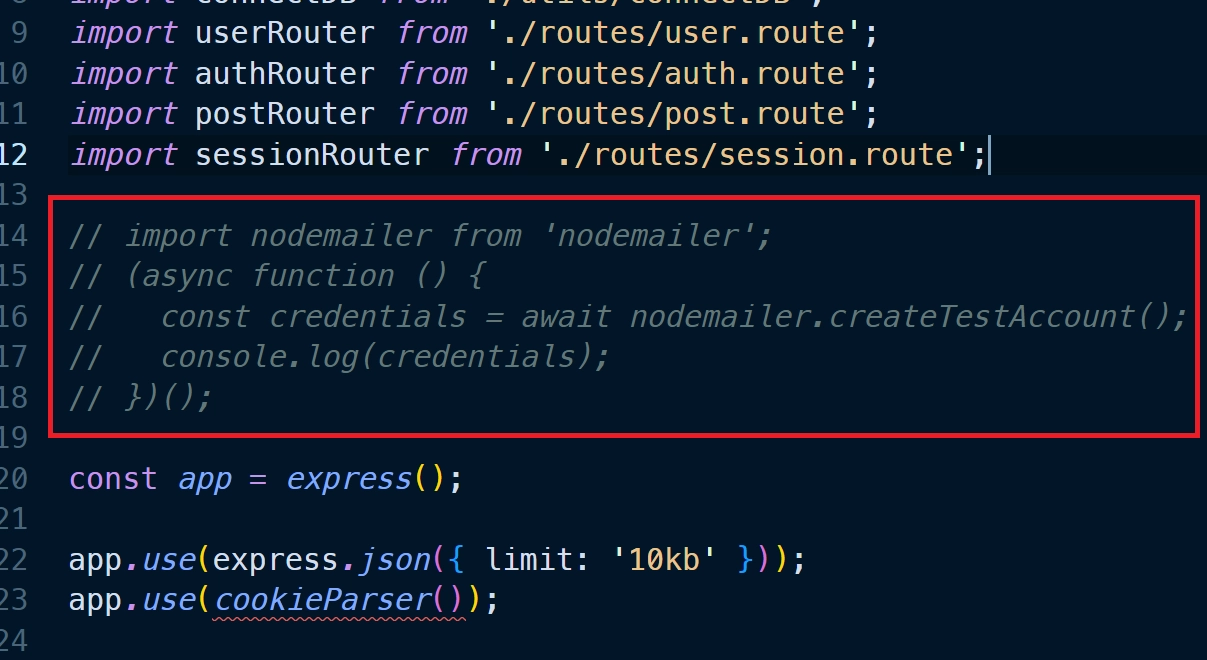
Then, run the commandyarn startto initiate the Node.js development server. You should see the Nodemailer SMTP credentials printed in the terminal. Copy the values of the ‘user‘ and ‘pass‘ fields and add them to their respective variables in thebackend/.envfile. Afterward, comment out the Nodemailer code in thebackend/src/app.tsfile, and save the file to restart the Node.js development server. - In another terminal, move to the frontend directory from the root level using the command
cd ./frontend. Runyarn installto install all necessary dependencies. Once the installation is complete, executeyarn devto start the Vite development server. - Open the application in your browser by visiting
http://localhost:3000/and explore the app’s features. During the registration and password reset process, a Nodemailer link will be printed in the terminal of the backend server that you can click to open the mailbox.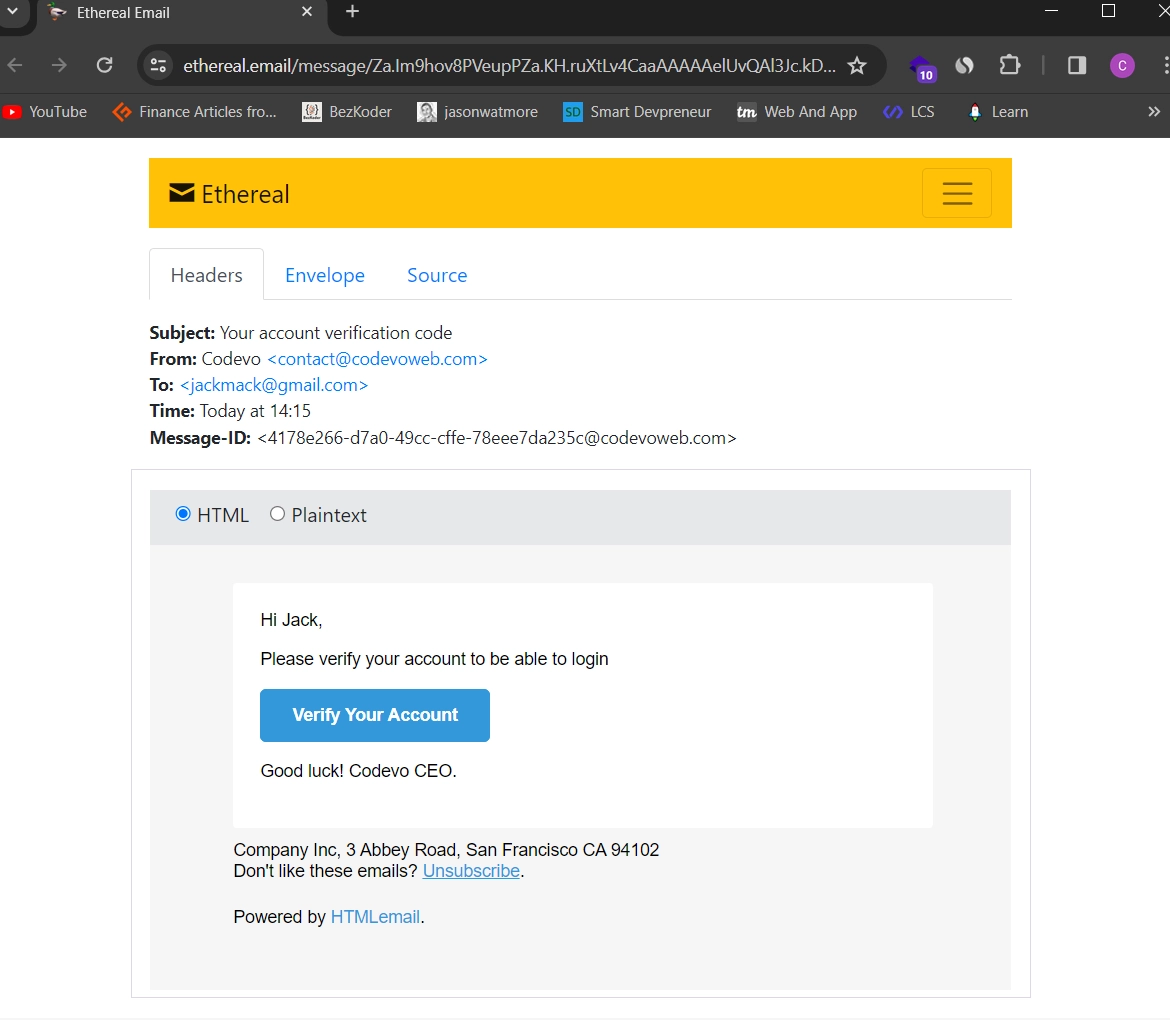
Note: Do not visit the app usinghttp://127.0.0.1:3000/to avoid getting CORS errors.
JWT Refresh Token with Node.js, TypeScript, and MongoDB Overview
These are the API endpoints we need for this JWT Authentication Rest API
| RESOURCE | HTTP METHOD | ROUTE | DESCRIPTION |
|---|---|---|---|
| users | GET | /api/users | returns all the users and their information |
| users | GET | /api/users/me | return the logged-in user’s information |
| users | POST | /api/auth/register | Create a new user |
| users | POST | /api/auth/login | Logs the user in |
| users | GET | /api/auth/refresh | refreshes the access token |
| users | GET | /api/auth/logout | logs the user out |
For more details, please visit Node.Js + TypeScript + MongoDB: JWT Authentication
Below is a graphical overview of the different requests/responses in the JWT Authentication process to refresh a new access token.
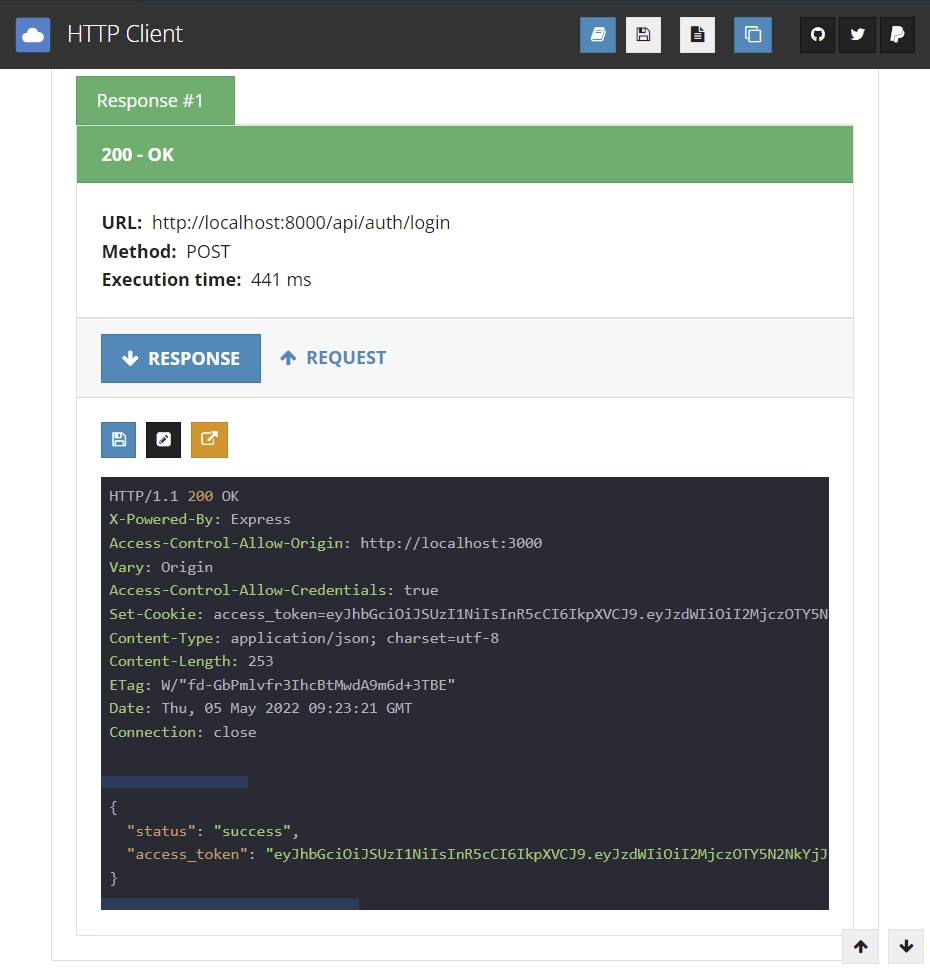
– Make a login request to /api/auth/login endpoint with the email and password credentials of the user.
The login request will return a JSON response with an access token. Note: I returned the access token in the response in order to use it as a bearer token in the Authorization header since the VS Code HTTP Client doesn’t support cookies.
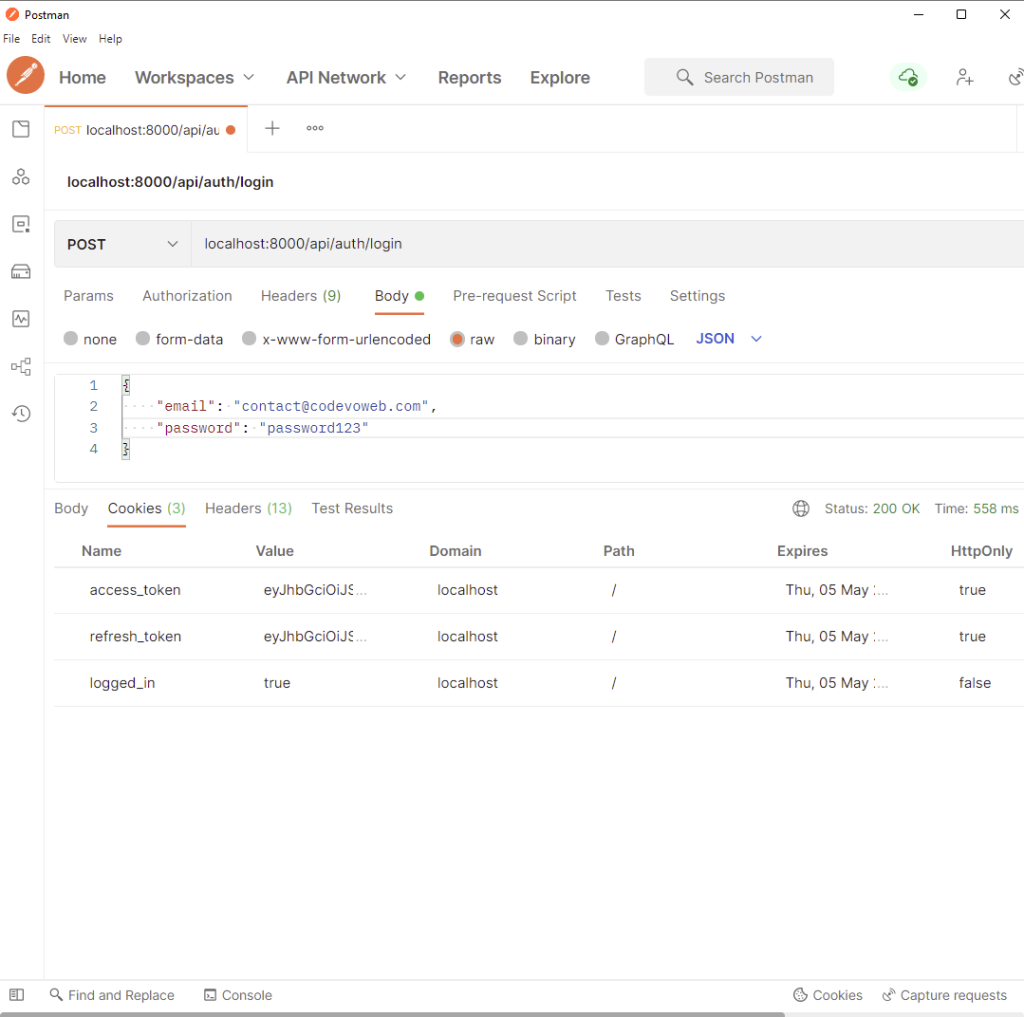
Let’s make the same request in Postman in order to see the cookies returned by the server.
After making the same login request /api/auth/login with the user’s email and password, assuming the credentials are valid you should see the access and refresh token cookies in the response cookies tab of Postman.
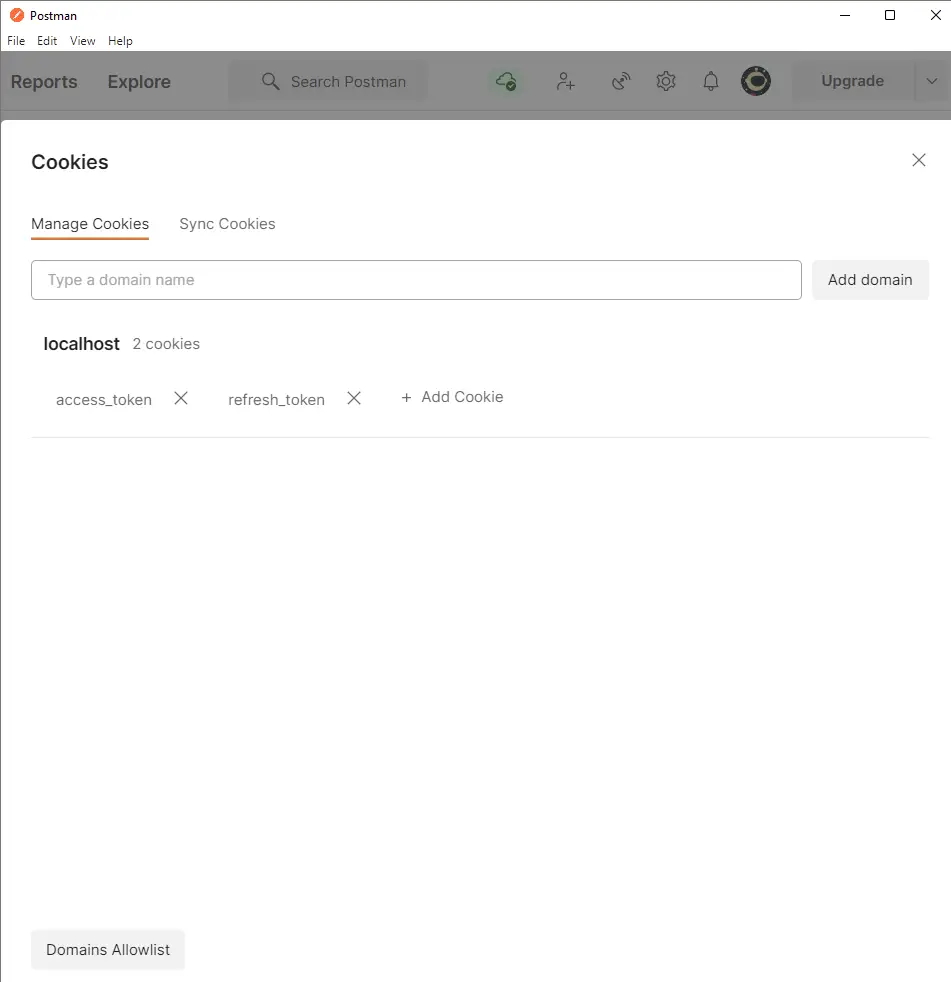
When you open the actual cookies tab in Postman you should see the same access and refresh token cookies.
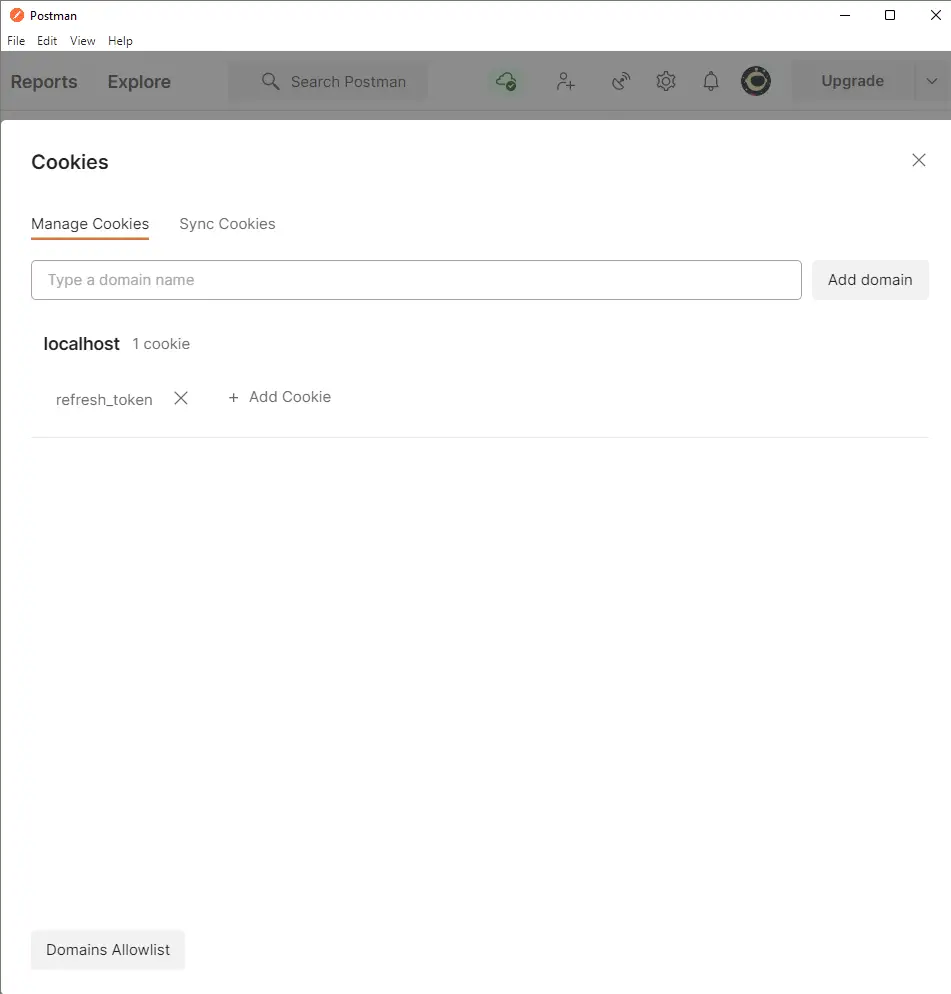
Now, let’s assume the access token has expired by deleting it manually.
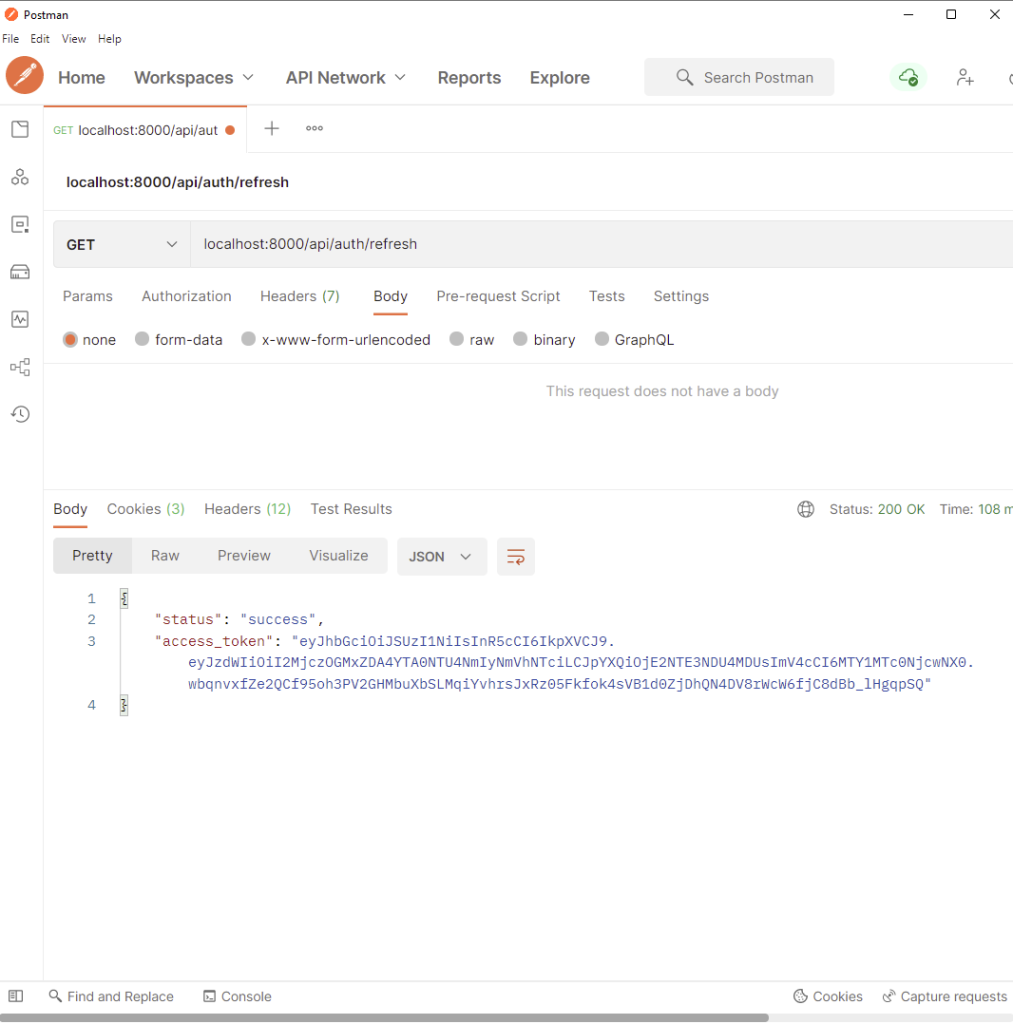
Next, let’s make a GET request to /api/auth/refresh to get a new access token.
Note: In this article, I designed the logic around refreshing a new access token in such a way that the refresh token can only be used once.
Now, when the request is successful you should see a new access token in the response body.
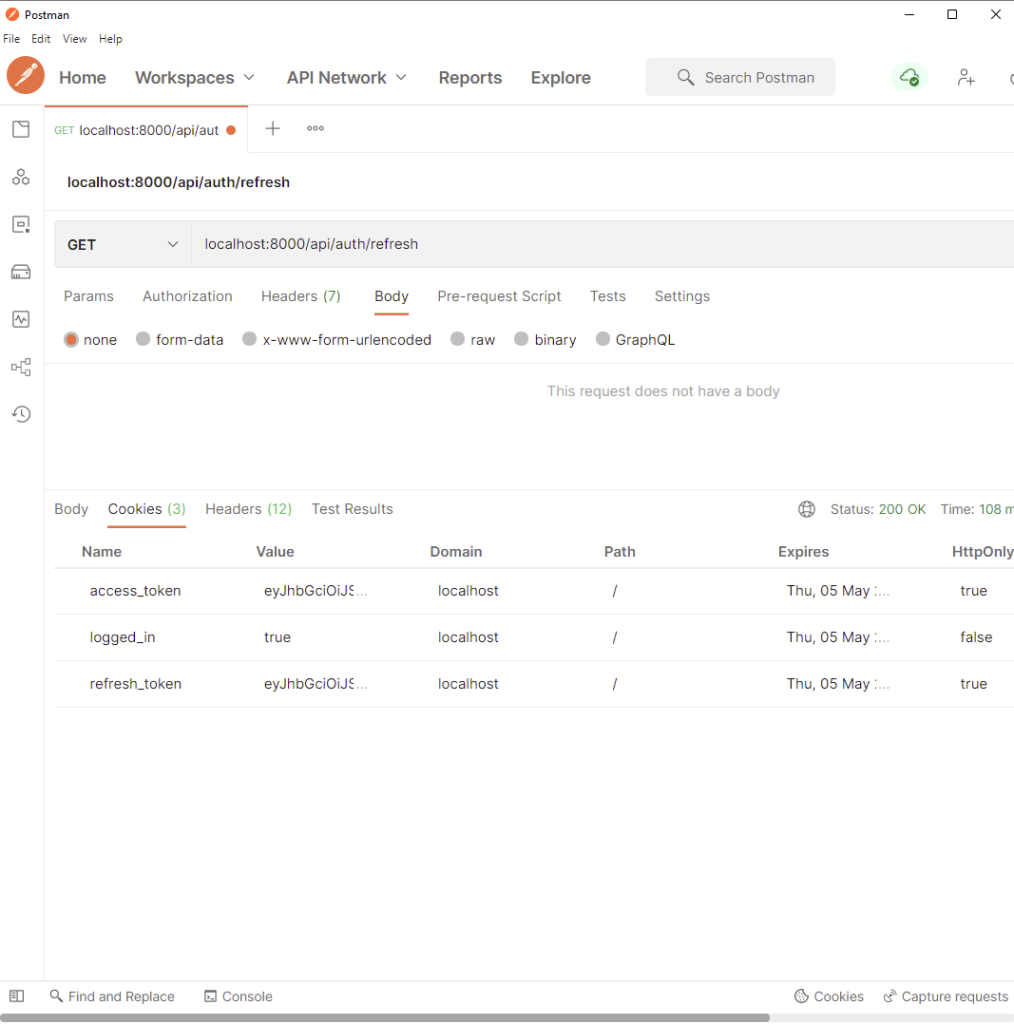
Also, when you check the cookies tab you should see both the access and refresh token cookies.
Below is the 401 response you’ll get when you do not include the access token in the Authorization header or cookie.
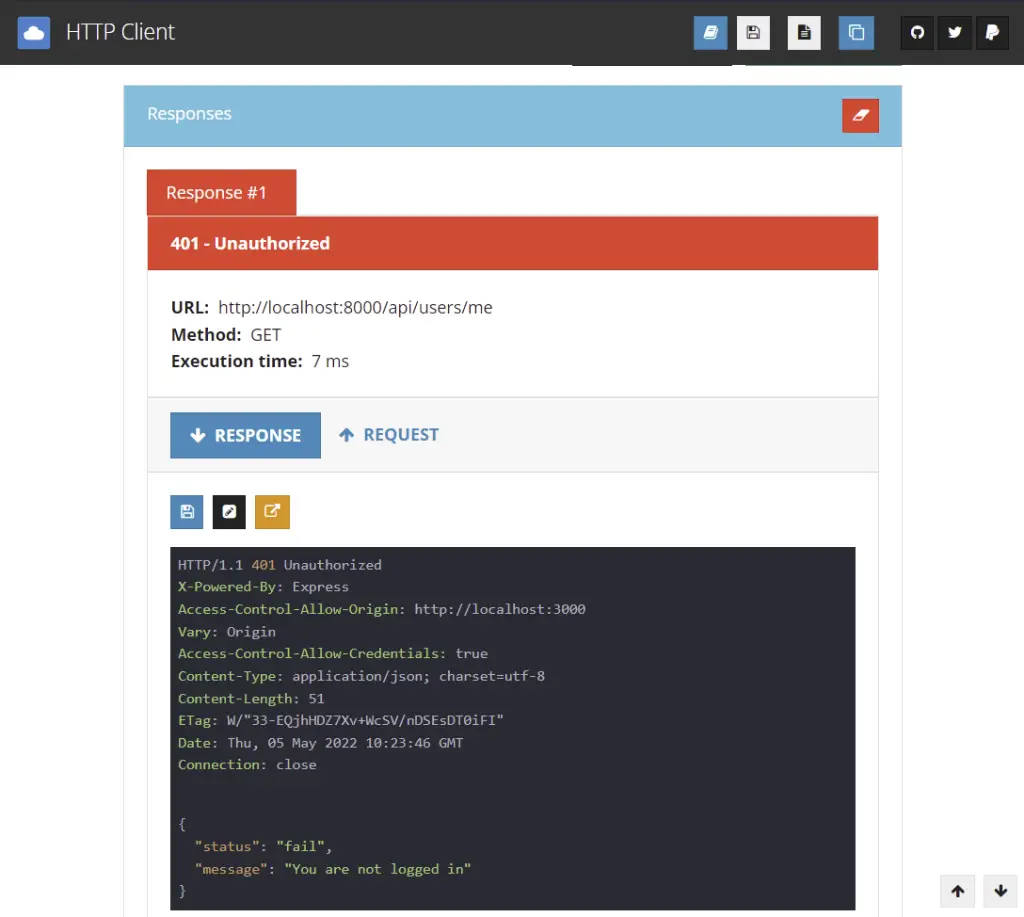
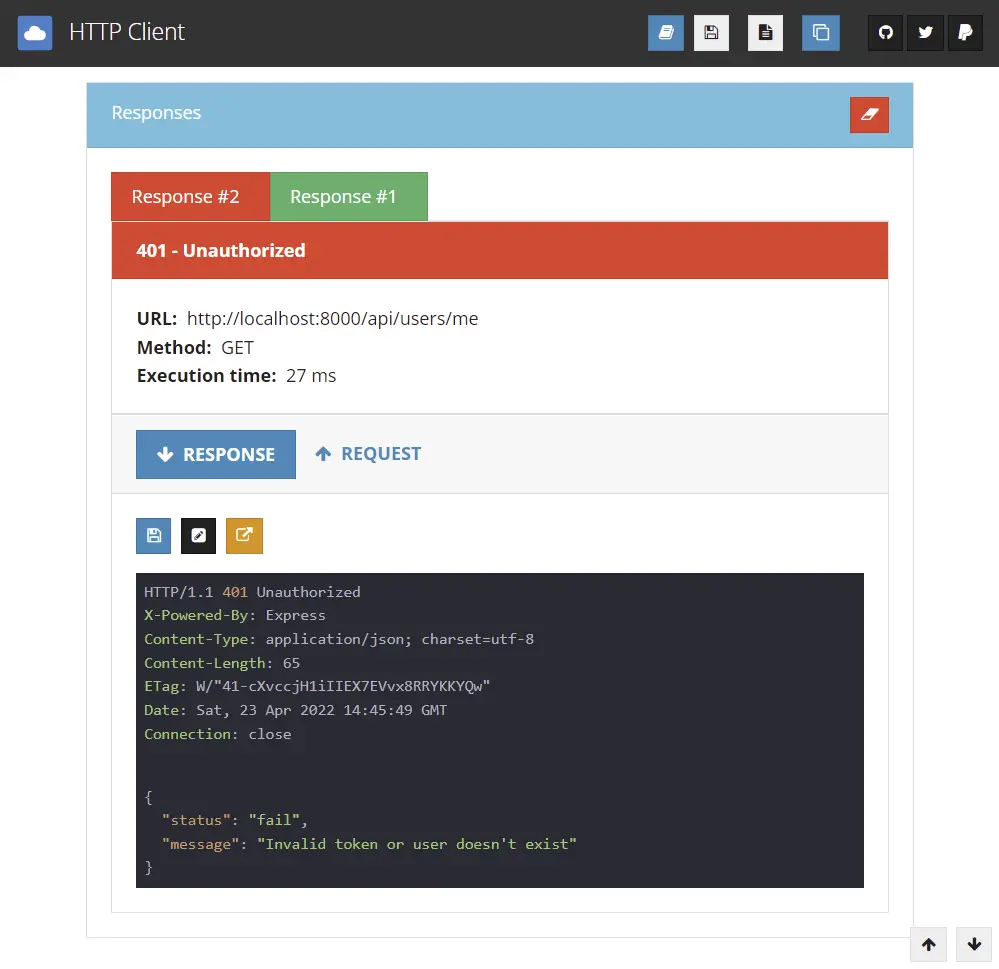
Let’s say a user logged into his account and received the required cookies. Later, the admin deleted the user for some reason. When the user makes a request to a protected route with his access token, he’ll get this unauthorized response.
Also, this is the response you’ll get when you manipulate the access token.
JWT Refresh Token Implementation Flow
The diagram below demonstrates how the JWT Refresh and Access Tokens Implementation Works.
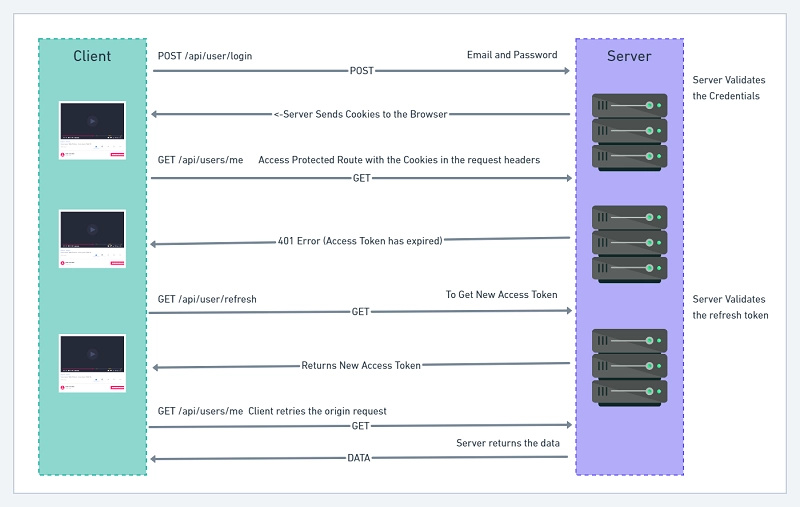
Let me break down the steps in the JWT Refresh Token Flow above:
- First, the user tries to log into the application with his Email and Password
- The server receives that request and validates the Email and Password
- If the credentials are valid the server will send the refresh and access tokens as cookies to the user’s browser.
- Later, the user will send a GET request to access a protected route with the cookies in the request headers.
- The server will validate the access token and if it has been manipulated or has expired then the server will send a 401 error to the user.
- The frontend application will then receive that unauthorized error and use interceptors to refresh the access token.
- That is the frontend app will make a GET request to
/api/auth/refreshto get a new access token as a cookie. This happens in the background. - The frontend application will then try the origin request after receiving the new access token.
Generate Public and Private Keys for the Token
If you followed the previous Node.Js + TypeScript + MongoDB: JWT Authentication article you would have known how to generate both the private and public keys yourself.
Never mind I’m still going to guide you on how you can generate the public and private keys for the JWT refresh token.
You can generate the keys in the terminal yourself if you have knowledge about that but am going to use this website to generate them.
Navigate to this website and click on the “Generate New Keys” button to generate both the private and public keys.
Next, copy the private key and visit this website to encode the private key in base64.
On the Base64 Decode and Encode website, paste the private key in the input field and click on the “Encode” button.
Next, copy the encoded private key and update the .env file with it.
Repeat the process for the public key.
Below is how your .env file should look like:
.env
NODE_ENV=development
MONGODB_USERNAME=edemziddah
MONGODB_PASSWORD=password123
MONGODB_DATABASE_NAME=jwtAuth

ACCESS_TOKEN_PRIVATE_KEY=LS0tLS1CRUdJTiBSU0EgUFJJVkFURSBLRVktLS0tLQpNSUlCT2dJQkFBSkJBTlFLQStSV2ZQZFdHR25iYS9WRVo1TUs5cG1nMUlQay9paEE5dXF2Ny8rNVlzRjNUVURoCnFHZXN1bGJhdFFGdkNPaHVmSlNJQmFWT3RjbVZrTWZoWmRrQ0F3RUFBUUpBYkVlTkF6NnpaQzhBR3BhbGc4TmgKelBJdFNmaWFiWnd6dWVTcTh0L1RoRmQrUGhqN2IxTmphdjBMTjNGamhycjlzV3B2UjBBNW13OFpoSUFUNzZMUgpzUUloQU95Zmdhdy9BSTVoeGs3NmtWaVRRV0JNdjdBeERwdi9oSG1aUFdxclpyL1ZBaUVBNVdjalpmK0NaYlhTCnlpV3dUbEVENGVZQ3BSNk16Qk8wbFVhbExKdVRFL1VDSUhWTWZSUE9CNUNObDZqL1BaNFRJWTJEZm1MeGJyU1cKYmkxNWNhQzNaekFoQWlBNmUrVG1hQkdTWkp4c3ROY1I0RTJoRmNhdTJlOERTRExOcThrSWFsRkEwUUloQUlwUApUODFlWlNzYmVrNTlidGJPZ3J3bTJBdzJqUVk4TitJa3FMSTNySWFFCi0tLS0tRU5EIFJTQSBQUklWQVRFIEtFWS0tLS0t
ACCESS_TOKEN_PUBLIC_KEY=LS0tLS1CRUdJTiBQVUJMSUMgS0VZLS0tLS0KTUZ3d0RRWUpLb1pJaHZjTkFRRUJCUUFEU3dBd1NBSkJBTlFLQStSV2ZQZFdHR25iYS9WRVo1TUs5cG1nMUlQawovaWhBOXVxdjcvKzVZc0YzVFVEaHFHZXN1bGJhdFFGdkNPaHVmSlNJQmFWT3RjbVZrTWZoWmRrQ0F3RUFBUT09Ci0tLS0tRU5EIFBVQkxJQyBLRVktLS0tLQ==

REFRESH_TOKEN_PRIVATE_KEY=LS0tLS1CRUdJTiBSU0EgUFJJVkFURSBLRVktLS0tLQpNSUlCT2dJQkFBSkJBSnBBM08xOEZQRWtQR3lGZzUrS0xQUjJuSWFsQk1UeXo2bjJhdG1xQVNJZUFIMVBjeDRHCmZWV0pCWjRQUTBGTzlRYzBGYmxwMzB4UTl3WVpYSnBOVDdFQ0F3RUFBUUpBT1JwTDd1cGhRa2VjeXJ1K1Z5QXEKdGpEMmp1Mmx6MWJudzA2Q2phTmVtZ2NWMk9Fa25lbGplQTZOZGNGT3h6N0hRbTduRVVBbXJLV1JBM2htZ2hyNApRUUloQU96RmNGRmJuOUdoSzFrZ0RidWNqSFJYS2JEekcrQXBXbDlzTFVEZGJGMnBBaUVBcHNmWTZWdmJoTU5tCjlEcy9HRHNMZVhKaVVVWG9HNjUveldVQUJTRlpWc2tDSVFDcmFZMFUrWFpNdDVmQVlGcFExdGRBYXRIK0R5TEIKT0c3NjRrQW8wNlRlY1FJZ0gzb2ViVVNoOUxld2FhMzQ1WWpYVEkrVEVNWEIzZCtjVFZhZm4xaEE5VWtDSURNcApCMnVmMk85TDBENm1FbTBkSE5HZU5ITk9yMUhrRC9ZWjBWWFFESFgyCi0tLS0tRU5EIFJTQSBQUklWQVRFIEtFWS0tLS0t
REFRESH_TOKEN_PUBLIC_KEY=LS0tLS1CRUdJTiBQVUJMSUMgS0VZLS0tLS0KTUZ3d0RRWUpLb1pJaHZjTkFRRUJCUUFEU3dBd1NBSkJBSnBBM08xOEZQRWtQR3lGZzUrS0xQUjJuSWFsQk1UeQp6Nm4yYXRtcUFTSWVBSDFQY3g0R2ZWV0pCWjRQUTBGTzlRYzBGYmxwMzB4UTl3WVpYSnBOVDdFQ0F3RUFBUT09Ci0tLS0tRU5EIFBVQkxJQyBLRVktLS0tLQ==
Update Environment Variables in Config
Open your config folder and update the default.ts and custom-environment-variables.ts files.
Update Environment Variables in default.ts
In the default.ts file, I added two more fields, a refresh token expire field and the URL the frontend website will be running on.
config/default.ts
export default {
  port: 8000,
  accessTokenExpiresIn: 15,
  refreshTokenExpiresIn: 59,
  origin: 'http://localhost:3000',
};
Update Environment Variables in Custom-Environment-Variables.ts
In the custom-environment-variables.ts file, I added two fields (“refreshTokenPrivateKey” & “refreshTokenPublicKey” ).
Both properties should have values pointing to the right variables we defined in the .env file.
The config module will pull those variables in the .env file when we access their corresponding properties (“refreshTokenPrivateKey” & “refreshTokenPublicKey”).
config/custom-environment-variables.ts
export default {
  dbName: 'MONGODB_USERNAME',
  dbPass: 'MONGODB_PASSWORD',
  accessTokenPrivateKey: 'ACCESS_TOKEN_PRIVATE_KEY',
  accessTokenPublicKey: 'ACCESS_TOKEN_PUBLIC_KEY',
  refreshTokenPrivateKey: 'REFRESH_TOKEN_PRIVATE_KEY',
  refreshTokenPublicKey: 'REFRESH_TOKEN_PUBLIC_KEY',
};
Update the Sign and Verify JWT Utility Functions
Next, let’s update the signJwt and verifyJwt functions.
The goal is to use the same signJwt function to sign both the access and refresh tokens.
Also, the same logic applies to the token verification function verifyJwt.
src/utils/jwt.ts
import jwt, { SignOptions } from 'jsonwebtoken';
import config from 'config';

export const signJwt = (
  payload: Object,
  key: 'accessTokenPrivateKey' | 'refreshTokenPrivateKey',
  options: SignOptions = {}
) => {
  const privateKey = Buffer.from(config.get<string>(key), 'base64').toString(
    'ascii'
  );
  return jwt.sign(payload, privateKey, {
    ...(options && options),
    algorithm: 'RS256',
  });
};

export const verifyJwt = <T>(
  token: string,
  key: 'accessTokenPublicKey' | 'refreshTokenPublicKey'
): T | null => {
  try {
    const publicKey = Buffer.from(config.get<string>(key), 'base64').toString(
      'ascii'
    );
    return jwt.verify(token, publicKey) as T;
  } catch (error) {
    console.log(error);
    return null;
  }
};
Breakdown of what I did above:
- I exported both the
signJwtandverifyJwtfunctions from the jwt.ts file. - Based on the value of the key passed to the signJwt function, the corresponding variable will be fetched from the
.envfile by the config module. - I then used the
Buffer.from()method of Node.js to decode the encoded private keys to an ASCII string. - Then I used the RS256 algorithm to sign the access or refresh tokens and returned them from the
signJwtfunction. - In the
verifyJwtfunction, I decoded the public keys and used thejwt.verify()method to verify the refresh and access tokens. - I then made the
verifyJwtfunction return a generic or null.
Update the Sign Token Service Function
The signToken service function is responsible for creating a user session in the Redis database and also signing both an access and a refresh token.
src/services/user.service.ts
// Sign Token
export const signToken = async (user: DocumentType<User>) => {
  // Sign the access token
  const access_token = signJwt({ sub: user._id }, 'accessTokenPrivateKey', {
    expiresIn: `${config.get<number>('accessTokenExpiresIn')}m`,
  });

  // Sign the refresh token
  const refresh_token = signJwt({ sub: user._id }, 'refreshTokenPrivateKey', {
    expiresIn: `${config.get<number>('refreshTokenExpiresIn')}m`,
  });

  // Create a Session
  redisClient.set(user._id, JSON.stringify(user), {
    EX: 60 * 60,
  });

  // Return access token
  return { access_token, refresh_token };
};
Here is what I did above:
- I exported the
signTokenfunction from the user.service.ts file - In the
signTokenfunction, I first signed both the access and refresh tokens. - I also provided the
signJwtutility function with the corresponding token expiration time in minutes and used the user’s id as the payload. - Next, I used the
redisClient.set()method to save the user’s information into Redis with the user’s id as the key. - Lastly, I exported the access and refresh tokens in an object
Update the Login Controller
Now, let’s update the loginHandler in the auth.controller.ts file and call the signToken service function with the user document as an argument.
Let’s destructure the access and refresh tokens returned by the signToken function.
src/controllers/auth.controller.ts
// Cookie options
const accessTokenCookieOptions: CookieOptions = {
  expires: new Date(
    Date.now() + config.get<number>('accessTokenExpiresIn') * 60 * 1000
  ),
  maxAge: config.get<number>('accessTokenExpiresIn') * 60 * 1000,
  httpOnly: true,
  sameSite: 'lax',
};

const refreshTokenCookieOptions: CookieOptions = {
  expires: new Date(
    Date.now() + config.get<number>('refreshTokenExpiresIn') * 60 * 1000
  ),
  maxAge: config.get<number>('refreshTokenExpiresIn') * 60 * 1000,
  httpOnly: true,
  sameSite: 'lax',
};

// Only set secure to true in production
if (process.env.NODE_ENV === 'production')
  accessTokenCookieOptions.secure = true;

export const loginHandler = async (
  req: Request<{}, {}, LoginUserInput>,
  res: Response,
  next: NextFunction
) => {
  try {
    // Get the user from the collection
    const user = await findUser({ email: req.body.email });

    // Check if user exist and password is correct
    if (
      !user ||
      !(await user.comparePasswords(user.password, req.body.password))
    ) {
      return next(new AppError('Invalid email or password', 401));
    }

    // Create the Access and refresh Tokens
    const { access_token, refresh_token } = await signToken(user);

    // Send Access Token in Cookie
    res.cookie('access_token', access_token, accessTokenCookieOptions);
    res.cookie('refresh_token', refresh_token, refreshTokenCookieOptions);
    res.cookie('logged_in', true, {
      ...accessTokenCookieOptions,
      httpOnly: false,
    });

    // Send Access Token
    res.status(200).json({
      status: 'success',
      access_token,
    });
  } catch (err: any) {
    next(err);
  }
};
Next, define the cookie options for the access and refresh tokens at the top level of the file.
Now let’s get to the logic part:
- First, I checked if a user with the provided email exists in the database.
- I then hashed the provided password and compared it with the hashed password in the database.
- Next, I signed both the access and refresh tokens if none of the above checks returned an error.
- I then added both the access and refresh tokens to the
res.cookieobject to be sent to the user’s browser. - Finally, I sent a JSON response containing the access token. This last step is needed if you want to copy and paste the access token in the Authorization header as a Bearer token. In a production application, make sure you send both the access and refresh tokens as HTTP-only cookies.
Create a Controller to Refresh Access Token
Here is where the refreshing of a new access token logic is going to happen so please pay attention.
The logic about refreshing an access token depends on your project. In this article, the user can refresh the access token after every 15 minutes within a valid session.
In brief, the user can use the refresh token as many times within a valid session. The user will be automatically redirected to the login page when he tries to refresh the access token after the session has expired.
Now create the refresh token handler and paste the code snippets below into it
src/controllers/auth.controller.ts
const logout = (res: Response) => {
  res.cookie('access_token', '', { maxAge: 1 });
  res.cookie('refresh_token', '', { maxAge: 1 });
  res.cookie('logged_in', '', {
    maxAge: 1,
  });
};

export const refreshAccessTokenHandler = async (
  req: Request,
  res: Response,
  next: NextFunction
) => {
  try {
    // Get the refresh token from cookie
    const refresh_token = req.cookies.refresh_token as string;

    // Validate the Refresh token
    const decoded = verifyJwt<{ sub: string }>(
      refresh_token,
      'refreshTokenPublicKey'
    );
    const message = 'Could not refresh access token';
    if (!decoded) {
      return next(new AppError(message, 403));
    }

    // Check if the user has a valid session
    const session = await redisClient.get(decoded.sub);
    if (!session) {
      return next(new AppError(message, 403));
    }

    // Check if the user exist
    const user = await findUserById(JSON.parse(session)._id);

    if (!user) {
      return next(new AppError(message, 403));
    }

    // Sign new access token
    const access_token = signJwt({ sub: user._id }, 'accessTokenPrivateKey', {
      expiresIn: `${config.get<number>('accessTokenExpiresIn')}m`,
    });

    // Send the access token as cookie
    res.cookie('access_token', access_token, accessTokenCookieOptions);
    res.cookie('logged_in', true, {
      ...accessTokenCookieOptions,
      httpOnly: false,
    });

    // Send response
    res.status(200).json({
      status: 'success',
      access_token,
    });
  } catch (err: any) {
    next(err);
  }
};
Here is what I did above:
- First, I retrieved the refresh token from the
req.cookiesobject - I then validated the refresh token to make sure it wasn’t manipulated.
- Next, I used the user’s ID we stored in the JsonwebToken payload to check if the user has a valid session in the Redis database. In this mini-project, I made the user’s info in the Redis database expire after 60 minutes.
- After that, I checked if the user still exists in our database.
- If none of the above checks returns an error then I signed a new access token and sent it as a cookie to the user’s browser.
- Finally, I sent the access token in the response body. This step is only needed for testing the JWT API in development mode. Always make sure you send the tokens in an HTTPOnly cookie to reduce your chances of being hacked.
How to Expire JWT Access and Refresh Token Cookies
In order to expire the Access and Refresh token cookies in the user’s browser, you need to send new access and refresh tokens as cookies to the user’s browser but the cookies should have empty string values and also a maxAge of 1.
The maxAge is in milliseconds so setting the maxAge to 1 will expire the cookies immediately the browser receives them.
src/controllers/auth.controller.ts
const logout = (res: Response) => {
  res.cookie('access_token', '', { maxAge: 1 });
  res.cookie('refresh_token', '', { maxAge: 1 });
  res.cookie('logged_in', '', {
    maxAge: 1,
  });
};
Create a Controller to Logout User
Now, let’s define the logout controller so that the user can easily log out from the application.
When the user makes a GET request to the endpoint /api/auth/logout , we’ll first get the user’s information from res.locals.user .
Note: the user can only log out if he has a valid access token.
Next, let’s delete the user’s session from the Redis database.
Finally, let’s send expired access and refresh token cookies to the user’s browser.
src/controllers/auth.controller.ts
export const logoutHandler = async (
  req: Request,
  res: Response,
  next: NextFunction
) => {
  try {
   const user = res.locals.user;
    await redisClient.del(user._id);
    logout(res);
    return res.status(200).json({ status: 'success' });
  } catch (err: any) {
    next(err);
  }
};
Update the Authentication Routes
src/routes/user.route.ts
import express from 'express';
import {
  getAllUsersHandler,
  getMeHandler,
} from '../controllers/user.controller';
import { deserializeUser } from '../middleware/deserializeUser';
import { requireUser } from '../middleware/requireUser';
import { restrictTo } from '../middleware/restrictTo';

const router = express.Router();

router.use(deserializeUser, requireUser);

// Admin Get Users route
router.get('/', restrictTo('admin'), getAllUsersHandler);

// Get my info route
router.get('/me', getMeHandler);

export default router;
The user.route.ts contains the routes to:
- Get all users (only by Admin)
- Get the currently logged in credentials
src/routes/auth.route.ts
import express from 'express';
import {
  loginHandler,
  logoutHandler,
  refreshAccessTokenHandler,
  registerHandler,
} from '../controllers/auth.controller';
import { deserializeUser } from '../middleware/deserializeUser';
import { requireUser } from '../middleware/requireUser';
import { validate } from '../middleware/validate';
import { createUserSchema, loginUserSchema } from '../schema/user.schema';

const router = express.Router();

// Register user route
router.post('/register', validate(createUserSchema), registerHandler);

// Login user route
router.post('/login', validate(loginUserSchema), loginHandler);

// Refresh access toke route
router.get('/refresh', refreshAccessTokenHandler);

router.use(deserializeUser, requireUser);

// Logout User
router.get('/logout', logoutHandler);

export default router;
The auth.route.ts contains the routes to:
- Login a user
- Register a user
- Refresh an access token
- Logout a user
Update app.ts
Finally, update the routes in the app.ts file to have /api prefix.
src/app.ts
require('dotenv').config();
import express, { NextFunction, Request, Response } from 'express';
import morgan from 'morgan';
import config from 'config';
import cors from 'cors';
import cookieParser from 'cookie-parser';
import connectDB from './utils/connectDB';
import userRouter from './routes/user.route';
import authRouter from './routes/auth.route';

const app = express();

// Middleware

// 1. Body Parser
app.use(express.json({ limit: '10kb' }));

// 2. Cookie Parser
app.use(cookieParser());

// 3. Cors
app.use(
  cors({
    origin: config.get<string>('origin'),
    credentials: true,
  })
);

// 4. Logger
if (process.env.NODE_ENV === 'development') app.use(morgan('dev'));

// 5. Routes
app.use('/api/users', userRouter);
app.use('/api/auth', authRouter);

// Testing
app.get(
  '/api/healthChecker',
  (req: Request, res: Response, next: NextFunction) => {
    res.status(200).json({
      status: 'success',
      message: 'Welcome to CodevoWeb????',
    });
  }
);

// UnKnown Routes
app.all('*', (req: Request, res: Response, next: NextFunction) => {
  const err = new Error(`Route ${req.originalUrl} not found`) as any;
  err.statusCode = 404;
  next(err);
});

// Global Error Handler
app.use((err: any, req: Request, res: Response, next: NextFunction) => {
  err.status = err.status || 'error';
  err.statusCode = err.statusCode || 500;

  res.status(err.statusCode).json({
    status: err.status,
    message: err.message,
  });
});

const port = config.get<number>('port');
app.listen(port, () => {
  console.log(`Server started on port: ${port}`);
  // ? call the connectDB function here
  connectDB();
});
Conclusion
In this comprehensive article, you learned how to handle JWT Authentication with Access and Refresh tokens using Node.js, TypeScript, Typegoose, Docker-compose, Redis, and MongoDB.
Checkout source code on GitHub
Why did you remove the origin to my git repo? The docker-compose file which I downloaded was structured with frontend as a volume like this:
version: “3.8”
services:
frontend:
image: node:18-slim
command: ./run.sh
env_file:
– ./.env
working_dir: /frontend
ports:
– “3000:3000”
user: “501:20”
volumes:
– type: bind
source: ./frontend
target: /frontend
mongo:
image: mongo:latest
container_name: mongo
env_file:
– ./.env
environment:
MONGO_INITDB_ROOT_USERNAME: ${MONGODB_USERNAME}
MONGO_INITDB_ROOT_PASSWORD: ${MONGODB_PASSWORD}
MONGO_INITDB_DATABASE: ${MONGODB_DATABASE_NAME}
volumes:
– mongo:/data/db
ports:
– “6000:27017”
redis:
image: redis:latest
container_name: redis
ports:
– “6379:6379”
volumes:
– redis:/data
volumes:
mongo:
redis: