This article will teach you how to implement Google OAuth Authentication with React.js, MongoDB-Go-Driver, and Golang.
In addition, you will learn how to return JWT access and refresh token cookies to the user’s browser or client after being authenticated on the server.
Related Articles:
- Google OAuth Authentication React.js and Node.js(No Passport)
- Google OAuth Authentication React.js, MongoDB and Golang
- GitHub OAuth Authentication Vuejs, MongoDB and Golang
- GitHub OAuth Authentication Vue.js and Node.js (No Passport)
- GitHub OAuth Authentication React.js and Node.js(No Passport)
- How to Implement GitHub OAuth in React.js
- How to Implement Google OAuth2 in React.js
Prerequisites
- Have some basic knowledge of HTML, CSS, React.js, MongoDB, and Golang
- Have Golang installed on your computer
Generate Google client ID and client secret
To begin, search for Google OAuth in your browser and click the first link that appears in the search results. You should be taken to OAuth 2.0 to Access Google APIs.
On this page, you will find step-by-step instructions on how to get the access keys. However, I will guide you on creating the client Id and secret the right way.
To retrieve the OAuth 2.0 client credentials, click on the Google API Console link.
Note: You will need a Google account to access the Google API Console.
Create a New Project
Now, click on the Google-Oauth dropdown and a modal should appear where you can choose an existing project or create a new one.
If you haven’t created any project yet, click on the “New Project” button then type the project name and click on the “CREATE” button.
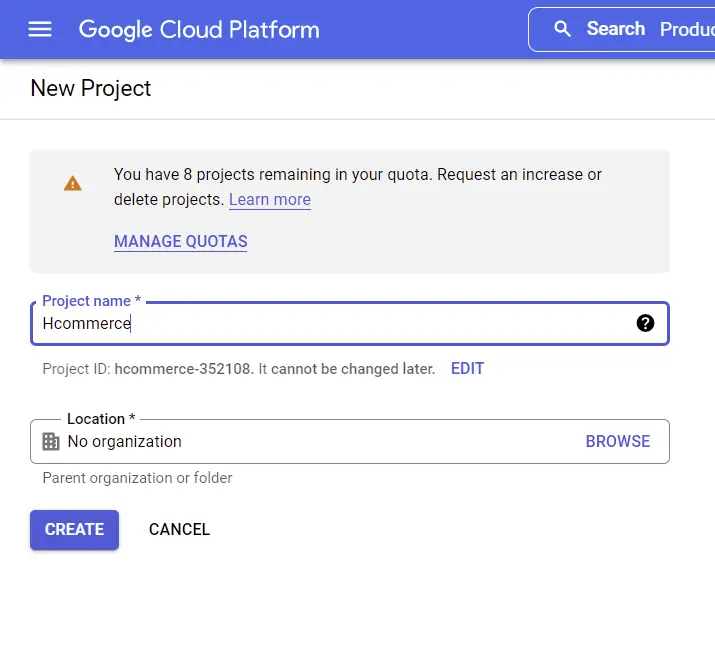
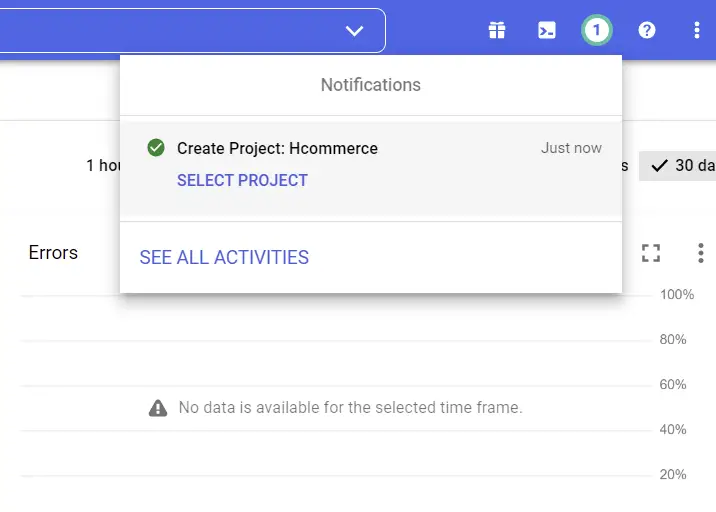
Now, wait for a few seconds for Google to set up the project. Once the project has been successfully created, you will see a success notification.
Next, click on the “SELECT PROJECT” button and tap anywhere on the browser to close the modal.
Create an OAuth Consent Screen
To begin, we first need to create a consent screen before we can generate the credentials. The consent screen is where the user will be redirected when they click on the Sign in with Google OAuth button.
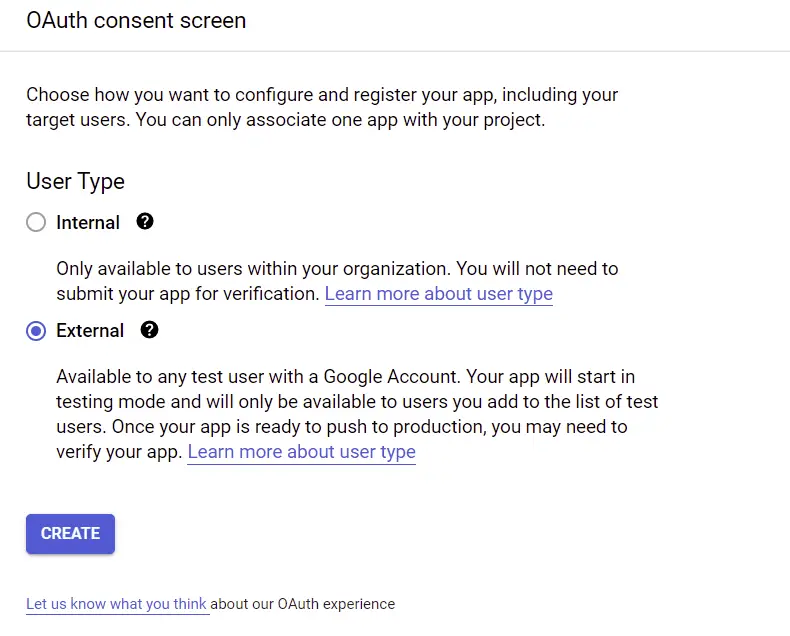
Next, select the OAuth consent screen menu under “APIs & Services” on the left sidebar. On the OAuth consent screen, choose the External User Type if your application is for the public and click on the “CREATE” button.
Next, provide the necessary information for the app consent screen.
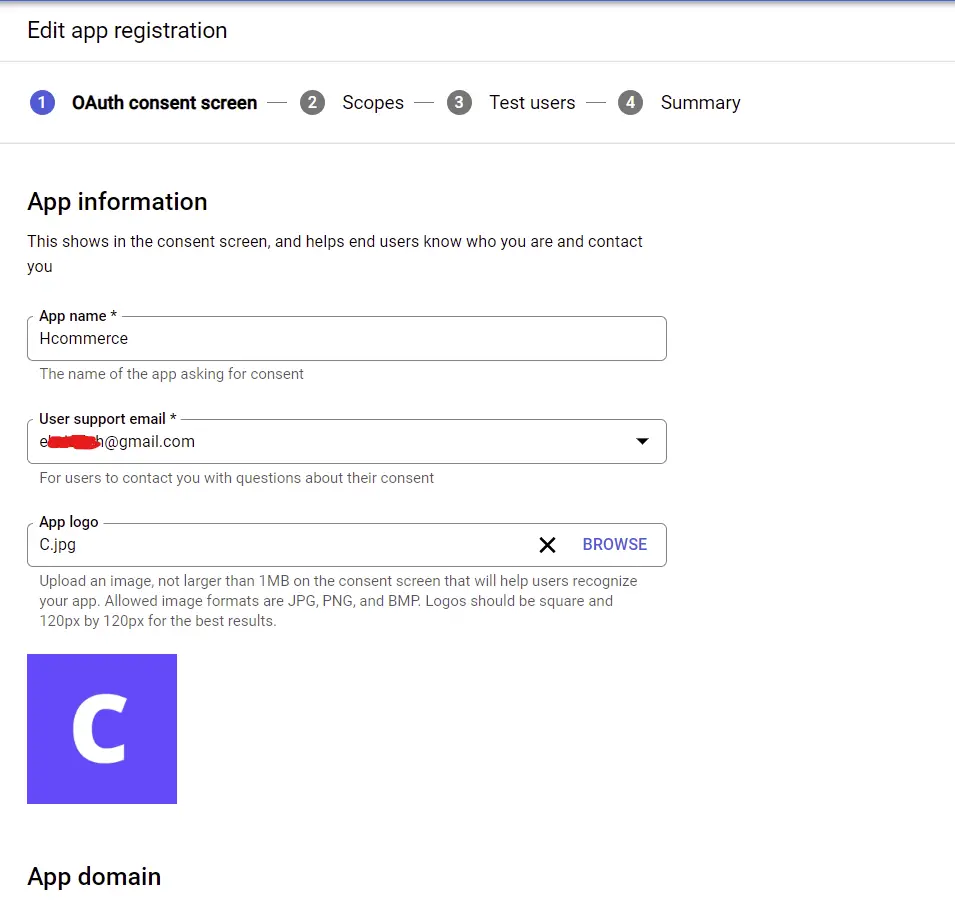
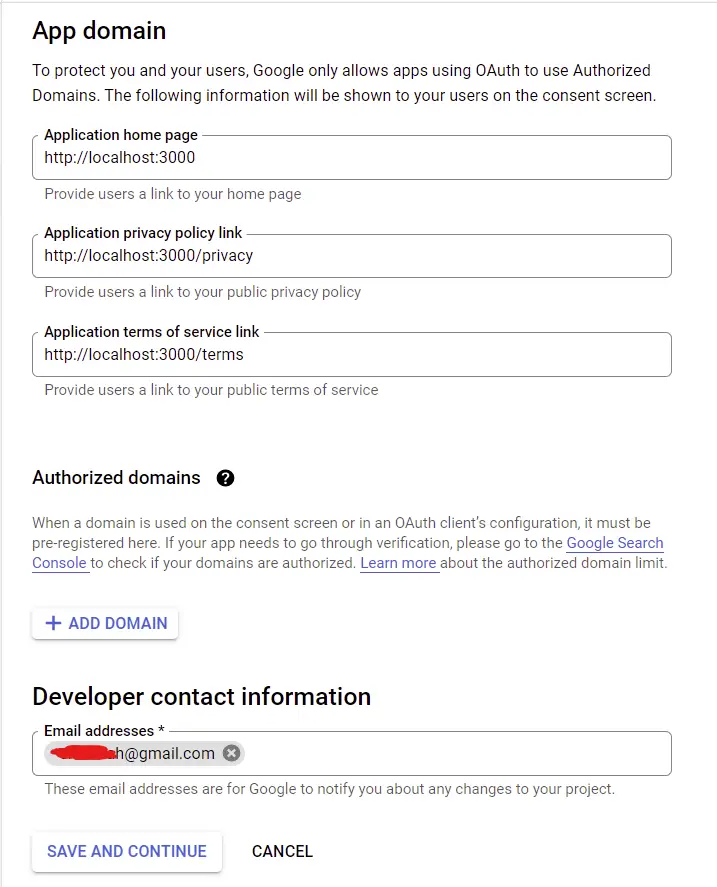
After filling the fields, click on the “SAVE AND CONTINUE” button.
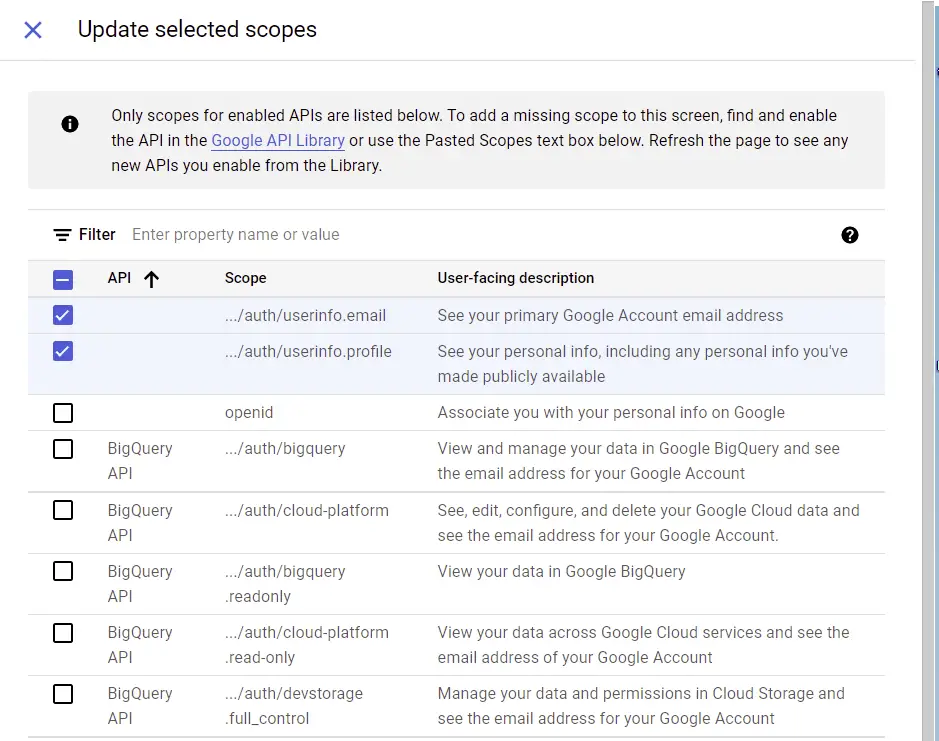
Click on the “ADD OR REMOVE SCOPES” button on the scopes page. The number of scopes you can add depends on the type of application you are working on but am only interested in the user’s email and profile information.
After choosing the scopes, scroll down and click on the “UPDATE” button. Next, click on the “SAVE AND CONTINUE” button.
Now, click on the ADD USERS button on the Test users tab to add a test user.
Note: The test user is the only account that will have permission to log into your application whilst in sandbox mode.
After adding the test user, click on “SAVE AND CONTINUE”.
On the Summary tab, carefully review your information and click on the “BACK TO DASHBOARD” button once you are convinced the data you provided is correct.
Generate the OAuth Credentials
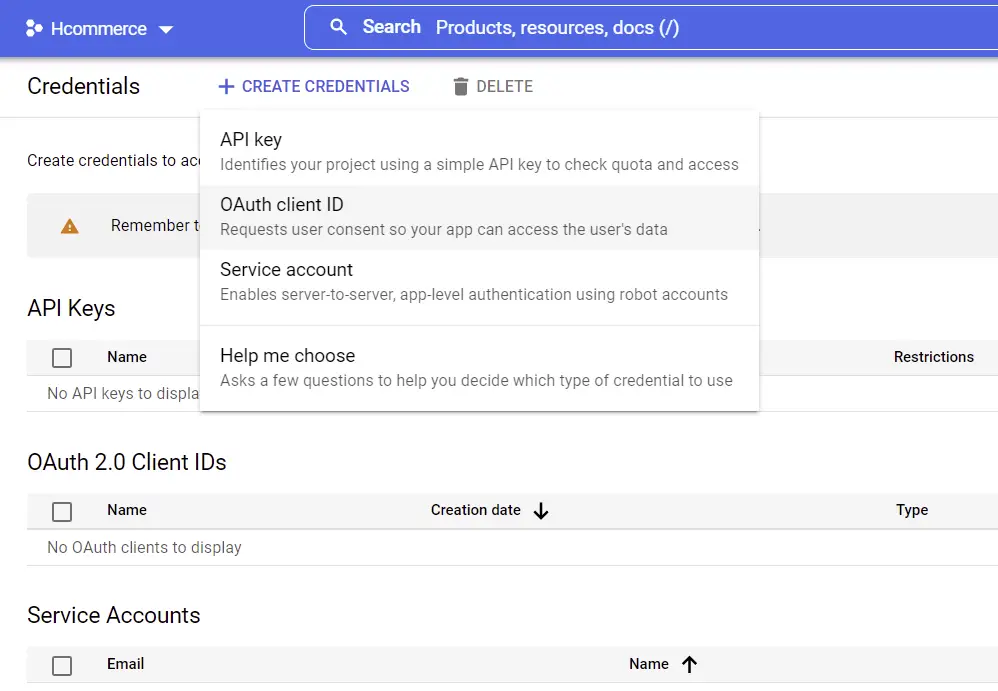
On the sidebar under “APIs & Services” select Credentials. On the Credentials tab, click on “CREATE CREDENTIALS” and choose OAuth client ID.
Next, provide the necessary information to allow access to the user’s data. The authorized redirect URI should point to a route on your server. This will enable us to make the GET request directly from the consent screen to the server.
There are different ways you can implement this but I find this method much quicker.
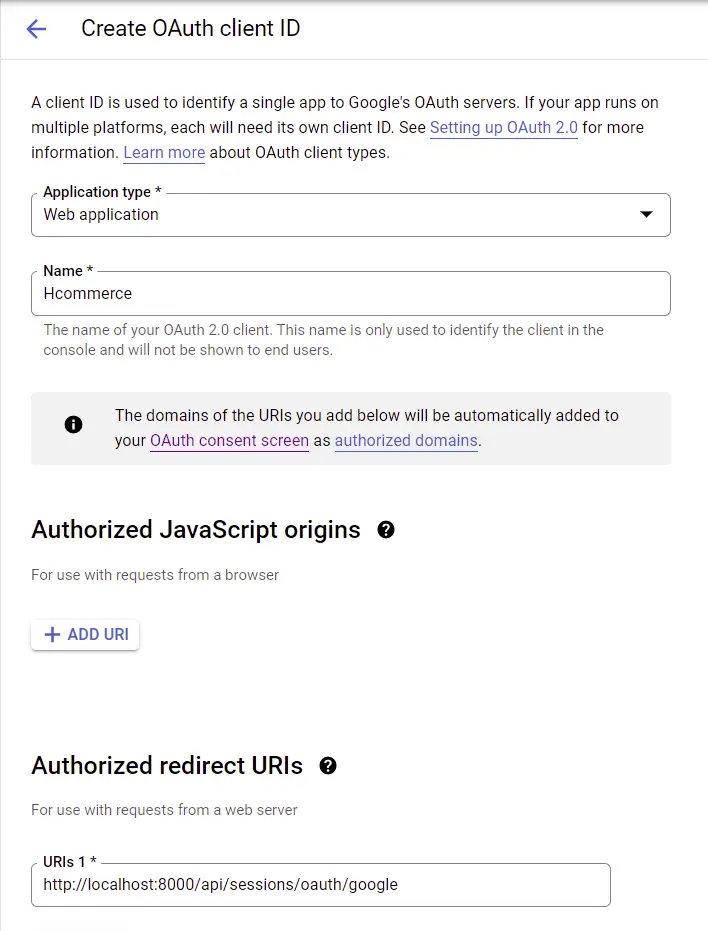
After providing the required data, click on the “CREATE” button and you should get the generated client ID and client secret.
Edit your .env file in your server folder and add the client Id, client secret, and authorized redirect URI.
.env
GOOGLE_OAUTH_CLIENT_ID=your client Id here
GOOGLE_OAUTH_CLIENT_SECRET=your client secret here
GOOGLE_OAUTH_REDIRECT_URL=http://localhost:8000/api/sessions/oauth/google
In addition, update the .env.local file in the React.js application.
REACT_APP_GOOGLE_OAUTH_CLIENT_ID=your client Id here
REACT_APP_GOOGLE_OAUTH_CLIENT_SECRET=your client secret here
REACT_APP_GOOGLE_OAUTH_ENDPOINT=http://localhost:8000
REACT_APP_GOOGLE_OAUTH_REDIRECT=http://localhost:8000/api/sessions/oauth/google
Generate the Consent Screen URL
After all the configurations above, we are now ready to implement Google OAuth Authentication in our React.js application.
Now we need to define a function to generate the OAuth consent screen URL based on the client ID, the scopes, and the authorized redirect URL.
src/utils/getGoogleUrl.ts
export const getGoogleUrl = (from: string) => {
  const rootUrl = `https://accounts.google.com/o/oauth2/v2/auth`;

  const options = {
    redirect_uri: process.env.REACT_APP_GOOGLE_OAUTH_REDIRECT as string,
    client_id: process.env.REACT_APP_GOOGLE_OAUTH_CLIENT_ID as string,
    access_type: 'offline',
    response_type: 'code',
    prompt: 'consent',
    scope: [
      'https://www.googleapis.com/auth/userinfo.profile',
      'https://www.googleapis.com/auth/userinfo.email',
    ].join(' '),
    state: from,
  };

  const qs = new URLSearchParams(options);

  return `${rootUrl}?${qs.toString()}`;
};
Build the Google OAuth Button with React and MUI
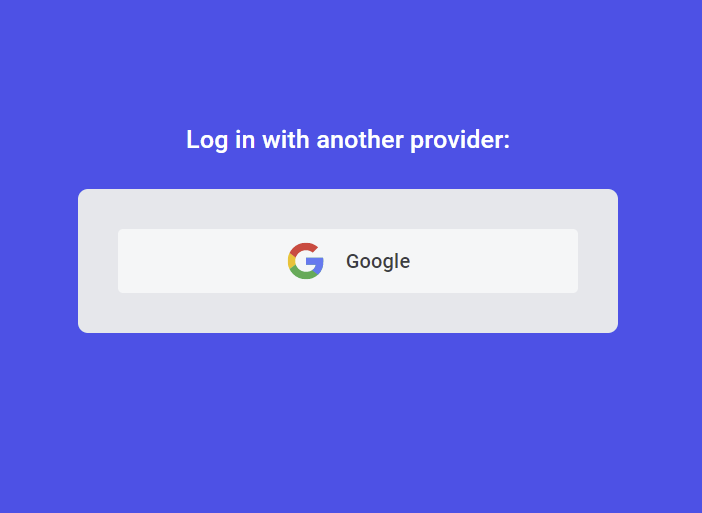
Next, create a login screen with a Google OAuth button having href={getGoogleUrl(from)}.
Let’s create a simple Google OAuth button with React and Material UI.
src/pages/login.page.tsx
import { Box, Container, Typography, Link as MuiLink } from '@mui/material';
import { useLocation } from 'react-router-dom';
import { ReactComponent as GoogleLogo } from '../assets/google.svg';
import { getGoogleUrl } from '../utils/getGoogleUrl';

const LoginPage = () => {
  const location = useLocation();
  let from = ((location.state as any)?.from?.pathname as string) || '/';

  return (
    <Container
      maxWidth={false}
      sx={{
        display: 'flex',
        justifyContent: 'center',
        alignItems: 'center',
        height: '100vh',
        backgroundColor: '#2363eb',
      }}
    >
      <Box width='27rem'>
        <Typography
          variant='h6'
          component='p'
          sx={{
            my: '1.5rem',
            textAlign: 'center',
            color: 'white',
          }}
        >
          Log in with another provider:
        </Typography>
        <Box
          width='100%'
          sx={{
            backgroundColor: '#e5e7eb',
            p: { xs: '1rem', sm: '2rem' },
            borderRadius: 2,
          }}
        >
          <MuiLink
            href={getGoogleUrl(from)}
            sx={{
              backgroundColor: '#f5f6f7',
              borderRadius: 1,
              py: '0.6rem',
              columnGap: '1rem',
              textDecoration: 'none',
              color: '#393e45',
              cursor: 'pointer',
              fontWeight: 500,
              '&:hover': {
                backgroundColor: '#fff',
                boxShadow: '0 1px 13px 0 rgb(0 0 0 / 15%)',
              },
            }}
            display='flex'
            justifyContent='center'
            alignItems='center'
          >
            <GoogleLogo style={{ height: '2rem' }} />
            Google
          </MuiLink>
        </Box>
      </Box>
    </Container>
  );
};

export default LoginPage;
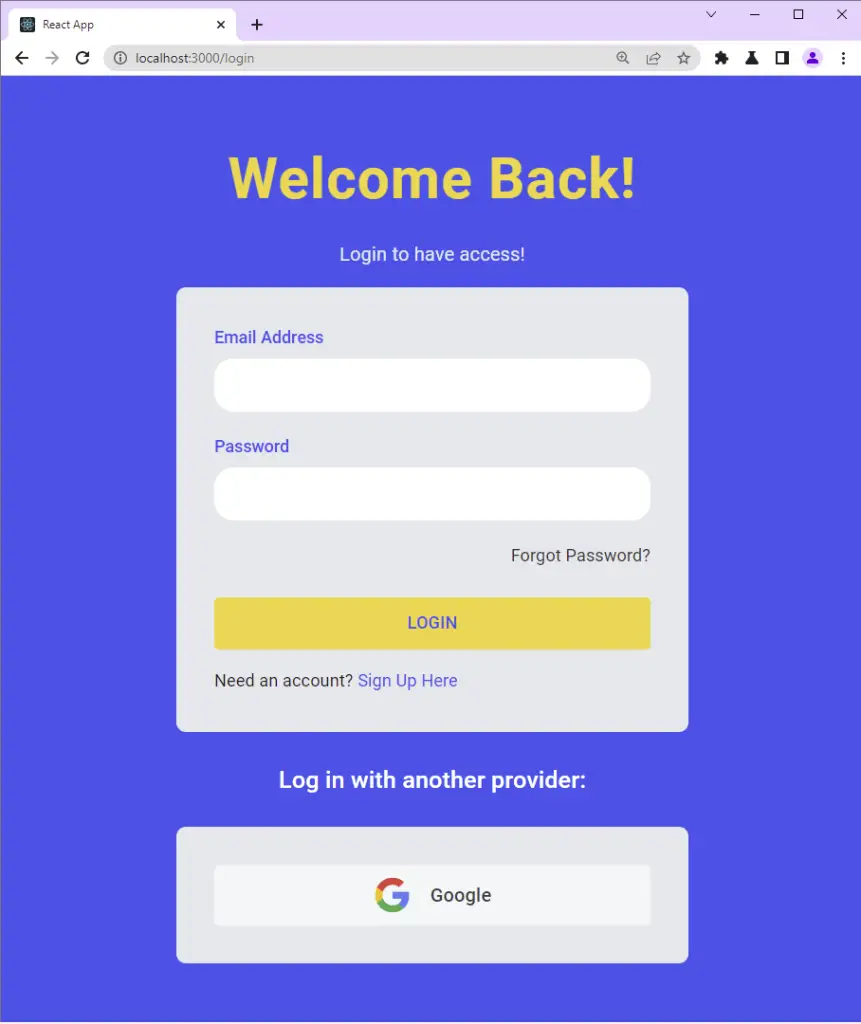
If you came from a previous tutorial in this series, then update the login.page.tsx file to have the Google OAuth button.
src/pages/login.page.tsx
import { Box, Container, Typography, Link as MuiLink } from '@mui/material';
import { styled } from '@mui/material/styles';
import { FormProvider, SubmitHandler, useForm } from 'react-hook-form';
import { object, string, TypeOf } from 'zod';
import { zodResolver } from '@hookform/resolvers/zod';
import FormInput from '../components/FormInput';
import { useEffect } from 'react';
import { Link, useLocation, useNavigate } from 'react-router-dom';
import { LoadingButton as _LoadingButton } from '@mui/lab';
import { toast } from 'react-toastify';
import { useLoginUserMutation } from '../redux/api/authApi';
import { ReactComponent as GoogleLogo } from '../assets/google.svg';
import { getGoogleUrl } from '../utils/getGoogleUrl';

const LoadingButton = styled(_LoadingButton)`
  padding: 0.6rem 0;
  background-color: #f9d13e;
  color: #2363eb;
  font-weight: 500;

  &:hover {
    background-color: #ebc22c;
    transform: translateY(-2px);
  }
`;

const LinkItem = styled(Link)`
  text-decoration: none;
  color: #2363eb;
  &:hover {
    text-decoration: underline;
  }
`;

const loginSchema = object({
  email: string()
    .nonempty('Email address is required')
    .email('Email Address is invalid'),
  password: string()
    .nonempty('Password is required')
    .min(8, 'Password must be more than 8 characters')
    .max(32, 'Password must be less than 32 characters'),
});

export type LoginInput = TypeOf<typeof loginSchema>;

const LoginPage = () => {
  const methods = useForm<LoginInput>({
    resolver: zodResolver(loginSchema),
  });

  // ? API Login Mutation
  const [loginUser, { isLoading, isError, error, isSuccess }] =
    useLoginUserMutation();

  const navigate = useNavigate();
  const location = useLocation();

  const from = ((location.state as any)?.from.pathname as string) || '/profile';

  const {
    reset,
    handleSubmit,
    formState: { isSubmitSuccessful },
  } = methods;

  useEffect(() => {
    if (isSuccess) {
      toast.success('You successfully logged in');
      navigate(from);
    }
    if (isError) {
      if (Array.isArray((error as any).data.error)) {
        (error as any).data.error.forEach((el: any) =>
          toast.error(el.message, {
            position: 'top-right',
          })
        );
      } else {
        toast.error((error as any).data.message, {
          position: 'top-right',
        });
      }
    }
    // eslint-disable-next-line react-hooks/exhaustive-deps
  }, [isLoading]);

  useEffect(() => {
    if (isSubmitSuccessful) {
      reset();
    }
    // eslint-disable-next-line react-hooks/exhaustive-deps
  }, [isSubmitSuccessful]);

  const onSubmitHandler: SubmitHandler<LoginInput> = (values) => {
    // ? Executing the loginUser Mutation
    loginUser(values);
  };

  return (
    <Container
      maxWidth={false}
      sx={{
        display: 'flex',
        justifyContent: 'center',
        alignItems: 'center',
        height: '100vh',
        backgroundColor: '#2363eb',
      }}
    >
      <Box
        sx={{
          display: 'flex',
          justifyContent: 'center',
          alignItems: 'center',
          flexDirection: 'column',
        }}
      >
        <Typography
          textAlign='center'
          component='h1'
          sx={{
            color: '#f9d13e',
            fontWeight: 600,
            fontSize: { xs: '2rem', md: '3rem' },
            mb: 2,
            letterSpacing: 1,
          }}
        >
          Welcome Back!
        </Typography>
        <Typography
          variant='body1'
          component='h2'
          sx={{ color: '#e5e7eb', mb: 2 }}
        >
          Login to have access!
        </Typography>

        <FormProvider {...methods}>
          <Box
            component='form'
            onSubmit={handleSubmit(onSubmitHandler)}
            noValidate
            autoComplete='off'
            maxWidth='27rem'
            width='100%'
            sx={{
              backgroundColor: '#e5e7eb',
              p: { xs: '1rem', sm: '2rem' },
              borderRadius: 2,
            }}
          >
            <FormInput name='email' label='Email Address' type='email' />
            <FormInput name='password' label='Password' type='password' />

            <Typography
              sx={{ fontSize: '0.9rem', mb: '1rem', textAlign: 'right' }}
            >
              <LinkItem to='/forgotpassword' style={{ color: '#333' }}>
                Forgot Password?
              </LinkItem>
            </Typography>

            <LoadingButton
              variant='contained'
              sx={{ mt: 1 }}
              fullWidth
              disableElevation
              type='submit'
              loading={isLoading}
            >
              Login
            </LoadingButton>

            <Typography sx={{ fontSize: '0.9rem', mt: '1rem' }}>
              Need an account? <LinkItem to='/register'>Sign Up Here</LinkItem>
            </Typography>
          </Box>
        </FormProvider>
        <Typography
          variant='h6'
          component='p'
          sx={{
            my: '1.5rem',
            textAlign: 'center',
            color: 'white',
          }}
        >
          Log in with another provider:
        </Typography>
        <Box
          maxWidth='27rem'
          width='100%'
          sx={{
            backgroundColor: '#e5e7eb',
            p: { xs: '1rem', sm: '2rem' },
            borderRadius: 2,
          }}
        >
          <MuiLink
            href={getGoogleUrl(from)}
            sx={{
              backgroundColor: '#f5f6f7',
              borderRadius: 1,
              py: '0.6rem',
              columnGap: '1rem',
              textDecoration: 'none',
              color: '#393e45',
              cursor: 'pointer',
              fontWeight: 500,
              '&:hover': {
                backgroundColor: '#fff',
                boxShadow: '0 1px 13px 0 rgb(0 0 0 / 15%)',
              },
            }}
            display='flex'
            justifyContent='center'
            alignItems='center'
          >
            <GoogleLogo style={{ height: '2rem' }} />
            Google
          </MuiLink>
        </Box>
      </Box>
    </Container>
  );
};

export default LoginPage;
Click on the Google OAuth button and you should be taken to the consent screen where you’ll see your logged-in Google accounts.
On the consent screen, click on the test user account or sign in with the test account if you haven’t already.
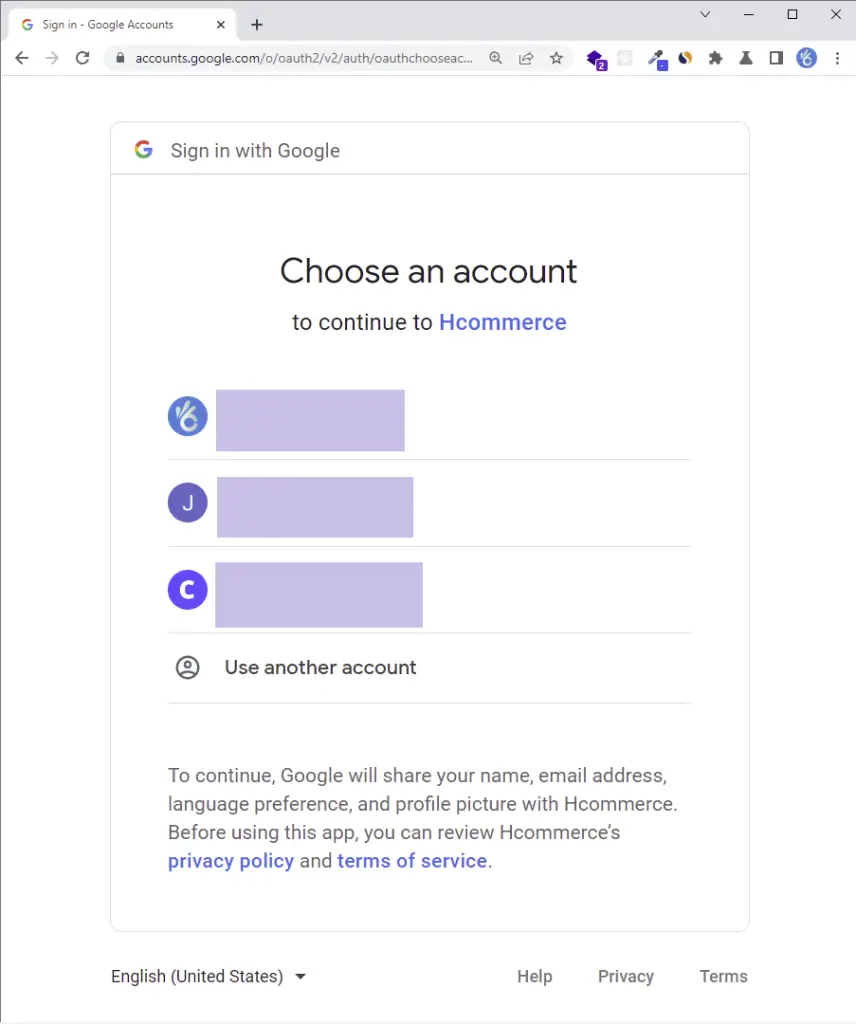
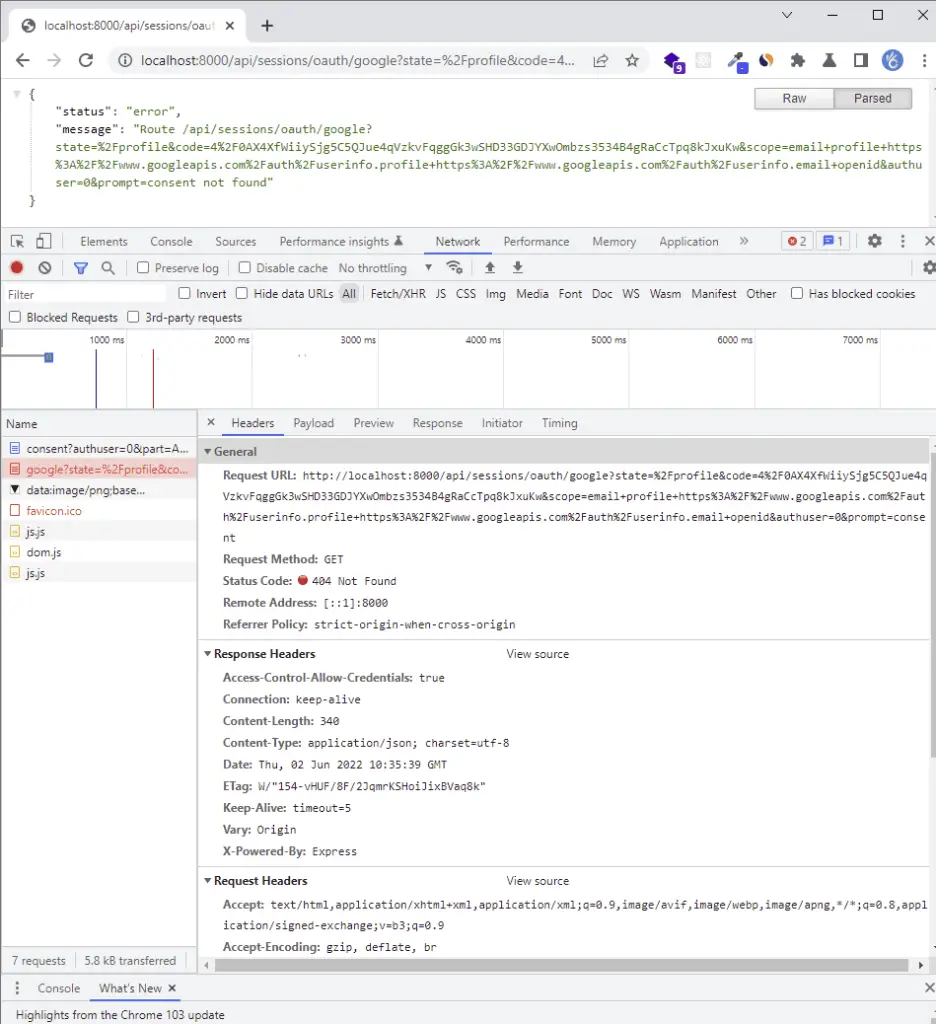
The server should return a 404 error only if it is running. The most exciting part of the authorized redirect URI is the code in the query string.
The server returned the 404 error because we haven’t added the Google OAuth logic yet.
Implement the Google OAuth in Golang and MongoDB
Update the config/default.go file to have the OAuth client Id, the React origin URL, the client secret, and the authorized redirect URL.
Adding the environment variables to the Config struct will enable Viper to load and make them available in the project.
go get github.com/spf13/viper
config/default.go
type Config struct {
	DBUri    string `mapstructure:"MONGODB_LOCAL_URI"`
	RedisUri string `mapstructure:"REDIS_URL"`
	Port     string `mapstructure:"PORT"`

	ClientOrigin string `mapstructure:"CLIENT_ORIGIN"`

	AccessTokenPrivateKey  string        `mapstructure:"ACCESS_TOKEN_PRIVATE_KEY"`
	AccessTokenPublicKey   string        `mapstructure:"ACCESS_TOKEN_PUBLIC_KEY"`
	RefreshTokenPrivateKey string        `mapstructure:"REFRESH_TOKEN_PRIVATE_KEY"`
	RefreshTokenPublicKey  string        `mapstructure:"REFRESH_TOKEN_PUBLIC_KEY"`
	AccessTokenExpiresIn   time.Duration `mapstructure:"ACCESS_TOKEN_EXPIRED_IN"`
	RefreshTokenExpiresIn  time.Duration `mapstructure:"REFRESH_TOKEN_EXPIRED_IN"`
	AccessTokenMaxAge      int           `mapstructure:"ACCESS_TOKEN_MAXAGE"`
	RefreshTokenMaxAge     int           `mapstructure:"REFRESH_TOKEN_MAXAGE"`

	GoogleClientID         string `mapstructure:"GOOGLE_OAUTH_CLIENT_ID"`
	GoogleClientSecret     string `mapstructure:"GOOGLE_OAUTH_CLIENT_SECRET"`
	GoogleOAuthRedirectUrl string `mapstructure:"GOOGLE_OAUTH_REDIRECT_URL"`
}

func LoadConfig(path string) (config Config, err error) {
	viper.AddConfigPath(path)
	viper.SetConfigType("env")
	viper.SetConfigName("app")

	viper.AutomaticEnv()

	err = viper.ReadInConfig()
	if err != nil {
		return
	}

	err = viper.Unmarshal(&config)
	return
}
Retrieve the Google OAuth Access Token and User’s Profile
Now create a utils/googleOAuth.go file and add these two functions:
GetGoogleOauthToken()– To get the OAuth Access Token from the Google APIGetGoogleUser()– Retrieves the user’s profile data with the OAuth Access Token
utils/googleOAuth.go
type GoogleOauthToken struct {
	Access_token string
	Id_token     string
}

type GoogleUserResult struct {
	Id             string
	Email          string
	Verified_email bool
	Name           string
	Given_name     string
	Family_name    string
	Picture        string
	Locale         string
}

func GetGoogleOauthToken(code string) (*GoogleOauthToken, error) {
	const rootURl = "https://oauth2.googleapis.com/token"

	config, _ := config.LoadConfig(".")
	values := url.Values{}
	values.Add("grant_type", "authorization_code")
	values.Add("code", code)
	values.Add("client_id", config.GoogleClientID)
	values.Add("client_secret", config.GoogleClientSecret)
	values.Add("redirect_uri", config.GoogleOAuthRedirectUrl)

	query := values.Encode()

	req, err := http.NewRequest("POST", rootURl, bytes.NewBufferString(query))
	if err != nil {
		return nil, err
	}

	req.Header.Set("Content-Type", "application/x-www-form-urlencoded")
	client := http.Client{
		Timeout: time.Second * 30,
	}

	res, err := client.Do(req)
	if err != nil {
		return nil, err
	}

	if res.StatusCode != http.StatusOK {
		return nil, errors.New("could not retrieve token")
	}

	resBody, err := ioutil.ReadAll(res.Body)
	if err != nil {
		return nil, err
	}

	var GoogleOauthTokenRes map[string]interface{}

	if err := json.Unmarshal(resBody, &GoogleOauthTokenRes); err != nil {
		return nil, err
	}

	tokenBody := &GoogleOauthToken{
		Access_token: GoogleOauthTokenRes["access_token"].(string),
		Id_token:     GoogleOauthTokenRes["id_token"].(string),
	}

	return tokenBody, nil
}

func GetGoogleUser(access_token string, id_token string) (*GoogleUserResult, error) {
	rootUrl := fmt.Sprintf("https://www.googleapis.com/oauth2/v1/userinfo?alt=json&access_token=%s", access_token)

	req, err := http.NewRequest("GET", rootUrl, nil)
	if err != nil {
		return nil, err
	}

	req.Header.Set("Authorization", fmt.Sprintf("Bearer %s", id_token))

	client := http.Client{
		Timeout: time.Second * 30,
	}

	res, err := client.Do(req)
	if err != nil {
		return nil, err
	}

	if res.StatusCode != http.StatusOK {
		return nil, errors.New("could not retrieve user")
	}

	resBody, err := ioutil.ReadAll(res.Body)
	if err != nil {
		return nil, err
	}

	var GoogleUserRes map[string]interface{}

	if err := json.Unmarshal(resBody, &GoogleUserRes); err != nil {
		return nil, err
	}

	userBody := &GoogleUserResult{
		Id:             GoogleUserRes["id"].(string),
		Email:          GoogleUserRes["email"].(string),
		Verified_email: GoogleUserRes["verified_email"].(bool),
		Name:           GoogleUserRes["name"].(string),
		Given_name:     GoogleUserRes["given_name"].(string),
		Picture:        GoogleUserRes["picture"].(string),
		Locale:         GoogleUserRes["locale"].(string),
	}

	return userBody, nil
}
Update the User Model
If you followed the previous tutorials in this series then update the models/user.model.go file to have the Photo and Provider fields.
When a user registers an account through Google OAuth, we’ll set the provider field to Google whereas a normal user who registers with email and password will have the provider to be local .
models/user.model.ts
type SignUpInput struct {
	Name            string    `json:"name" bson:"name" binding:"required"`
	Email           string    `json:"email" bson:"email" binding:"required"`
	Password        string    `json:"password" bson:"password" binding:"required,min=8"`
	PasswordConfirm string    `json:"passwordConfirm" bson:"passwordConfirm,omitempty" binding:"required"`
	Role            string    `json:"role" bson:"role"`
	Provider        string    `json:"provider,omitempty" bson:"provider,omitempty"`
	Photo           string    `json:"photo,omitempty" bson:"photo,omitempty"`
	Verified        bool      `json:"verified" bson:"verified"`
	CreatedAt       time.Time `json:"created_at" bson:"created_at"`
	UpdatedAt       time.Time `json:"updated_at" bson:"updated_at"`
}

type SignInInput struct {
	Email    string `json:"email" bson:"email" binding:"required"`
	Password string `json:"password" bson:"password" binding:"required"`
}

type DBResponse struct {
	ID              primitive.ObjectID `json:"id" bson:"_id"`
	Name            string             `json:"name" bson:"name"`
	Email           string             `json:"email" bson:"email"`
	Password        string             `json:"password" bson:"password"`
	PasswordConfirm string             `json:"passwordConfirm,omitempty" bson:"passwordConfirm,omitempty"`
	Provider        string             `json:"provider" bson:"provider"`
	Photo           string             `json:"photo,omitempty" bson:"photo,omitempty"`
	Role            string             `json:"role" bson:"role"`
	Verified        bool               `json:"verified" bson:"verified"`
	CreatedAt       time.Time          `json:"created_at" bson:"created_at"`
	UpdatedAt       time.Time          `json:"updated_at" bson:"updated_at"`
}

type UserResponse struct {
	ID        primitive.ObjectID `json:"id,omitempty" bson:"_id,omitempty"`
	Name      string             `json:"name,omitempty" bson:"name,omitempty"`
	Email     string             `json:"email,omitempty" bson:"email,omitempty"`
	Role      string             `json:"role,omitempty" bson:"role,omitempty"`
	Photo     string             `json:"photo,omitempty" bson:"photo,omitempty"`
	Provider  string             `json:"provider" bson:"provider"`
	CreatedAt time.Time          `json:"created_at" bson:"created_at"`
	UpdatedAt time.Time          `json:"updated_at" bson:"updated_at"`
}

type UpdateDBUser struct {
	ID              primitive.ObjectID `json:"id,omitempty" bson:"_id,omitempty"`
	Name            string             `json:"name,omitempty" bson:"name,omitempty"`
	Email           string             `json:"email,omitempty" bson:"email,omitempty"`
	Password        string             `json:"password,omitempty" bson:"password,omitempty"`
	PasswordConfirm string             `json:"passwordConfirm,omitempty" bson:"passwordConfirm,omitempty"`
	Role            string             `json:"role,omitempty" bson:"role,omitempty"`
	Provider        string             `json:"provider" bson:"provider"`
	Photo           string             `json:"photo,omitempty" bson:"photo,omitempty"`
	Verified        bool               `json:"verified,omitempty" bson:"verified,omitempty"`
	CreatedAt       time.Time          `json:"created_at,omitempty" bson:"created_at,omitempty"`
	UpdatedAt       time.Time          `json:"updated_at,omitempty" bson:"updated_at,omitempty"`
}

func FilteredResponse(user *DBResponse) UserResponse {
	return UserResponse{
		ID:        user.ID,
		Email:     user.Email,
		Name:      user.Name,
		Role:      user.Role,
		Provider:  user.Provider,
		Photo:     user.Photo,
		CreatedAt: user.CreatedAt,
		UpdatedAt: user.UpdatedAt,
	}
}
Add a Service to Upsert the User
First, let’s create a helper function to marshal and unmarshal the struct into a BSON document.
utils/helper.go
func ToDoc(v interface{}) (doc *bson.D, err error) {
	data, err := bson.Marshal(v)
	if err != nil {
		return
	}

	err = bson.Unmarshal(data, &doc)
	return
}
Next, add the UpsertUser method to the UserService interface.
services/user.service.go
type UserService interface {
	FindUserById(string) (*models.DBResponse, error)
	FindUserByEmail(string) (*models.DBResponse, error)
	UpsertUser(string, *models.UpdateDBUser) (*models.DBResponse, error)
}
Now add the code below to the services/user.service.impl.go file to enable us to upsert the user’s information in the MongoDB database.
services/user.service.impl.go
type UserServiceImpl struct {
	collection *mongo.Collection
	ctx        context.Context
}

func NewUserServiceImpl(collection *mongo.Collection, ctx context.Context) UserService {
	return &UserServiceImpl{collection, ctx}
}

// FindUserByID

// FindUserByEmail

// UpsertUser
func (uc *UserServiceImpl) UpsertUser(email string, data *models.UpdateDBUser) (*models.DBResponse, error) {
	doc, err := utils.ToDoc(data)
	if err != nil {
		return nil, err
	}

	opts := options.FindOneAndUpdate().SetUpsert(true).SetReturnDocument(1)
	query := bson.D{{Key: "email", Value: email}}
	update := bson.D{{Key: "$set", Value: doc}}
	res := uc.collection.FindOneAndUpdate(uc.ctx, query, update, opts)

	var updatedPost *models.DBResponse

	if err := res.Decode(&updatedPost); err != nil {
		return nil, errors.New("no post with that Id exists")
	}

	return updatedPost, nil
}
In the above code, you’ll notice that we used .SetUpsert(true) on the FindOneAndUpdateOptions instance returned by options.FindOneAndUpdate() .
Adding .SetUpsert(true) will instruct the MongoDB server to create the user if the email used in the BSON query doesn’t exist. On the other hand, MongoDB will only update the user’s data if that email already exists in the database.
Create the Google OAuth Controller
To generate the JWT tokens, we will use the Golang JWT package. In the future, the version might change so visit their GitHub page to see the current version.
go get -u github.com/golang-jwt/jwt/v4
Functions to sign and verify the access and refresh tokens
utils/token.go
func CreateToken(ttl time.Duration, payload interface{}, privateKey string) (string, error) {
	decodedPrivateKey, err := base64.StdEncoding.DecodeString(privateKey)
	if err != nil {
		return "", fmt.Errorf("could not decode key: %w", err)
	}
	key, err := jwt.ParseRSAPrivateKeyFromPEM(decodedPrivateKey)

	if err != nil {
		return "", fmt.Errorf("create: parse key: %w", err)
	}

	now := time.Now().UTC()

	claims := make(jwt.MapClaims)
	claims["sub"] = payload
	claims["exp"] = now.Add(ttl).Unix()
	claims["iat"] = now.Unix()
	claims["nbf"] = now.Unix()

	token, err := jwt.NewWithClaims(jwt.SigningMethodRS256, claims).SignedString(key)

	if err != nil {
		return "", fmt.Errorf("create: sign token: %w", err)
	}

	return token, nil
}

func ValidateToken(token string, publicKey string) (interface{}, error) {
	decodedPublicKey, err := base64.StdEncoding.DecodeString(publicKey)
	if err != nil {
		return nil, fmt.Errorf("could not decode: %w", err)
	}

	key, err := jwt.ParseRSAPublicKeyFromPEM(decodedPublicKey)

	if err != nil {
		return "", fmt.Errorf("validate: parse key: %w", err)
	}

	parsedToken, err := jwt.Parse(token, func(t *jwt.Token) (interface{}, error) {
		if _, ok := t.Method.(*jwt.SigningMethodRSA); !ok {
			return nil, fmt.Errorf("unexpected method: %s", t.Header["alg"])
		}
		return key, nil
	})

	if err != nil {
		return nil, fmt.Errorf("validate: %w", err)
	}

	claims, ok := parsedToken.Claims.(jwt.MapClaims)
	if !ok || !parsedToken.Valid {
		return nil, fmt.Errorf("validate: invalid token")
	}

	return claims["sub"], nil
}
Now let’s add the GoogleOAuth controller to the controllers/auth.controller.go file. This controller will be evoked when the user is redirected to the server.
controllers/auth.controller.ts
type AuthController struct {
	authService services.AuthService
	userService services.UserService
}

func NewAuthController(authService services.AuthService, userService services.UserService) AuthController {
	return AuthController{authService, userService}
}

// SignUp User

// SignIn User

// Refresh Access Token

func (ac *AuthController) GoogleOAuth(ctx *gin.Context) {
	code := ctx.Query("code")
	var pathUrl string = "/"

	if ctx.Query("state") != "" {
		pathUrl = ctx.Query("state")
	}

	if code == "" {
		ctx.JSON(http.StatusUnauthorized, gin.H{"status": "fail", "message": "Authorization code not provided!"})
		return
	}

	// Use the code to get the id and access tokens
	tokenRes, err := utils.GetGoogleOauthToken(code)

	if err != nil {
		ctx.JSON(http.StatusBadGateway, gin.H{"status": "fail", "message": err.Error()})
	}

	user, err := utils.GetGoogleUser(tokenRes.Access_token, tokenRes.Id_token)

	if err != nil {
		ctx.JSON(http.StatusBadGateway, gin.H{"status": "fail", "message": err.Error()})
	}

	createdAt := time.Now()
	resBody := &models.UpdateDBUser{
		Email:     user.Email,
		Name:      user.Name,
		Photo:     user.Picture,
		Provider:  "google",
		Role:      "user",
		Verified:  true,
		CreatedAt: createdAt,
		UpdatedAt: createdAt,
	}

	updatedUser, err := ac.userService.UpsertUser(user.Email, resBody)
	if err != nil {
		ctx.JSON(http.StatusBadGateway, gin.H{"status": "fail", "message": err.Error()})
	}

	config, _ := config.LoadConfig(".")

	// Generate Tokens
	access_token, err := utils.CreateToken(config.AccessTokenExpiresIn, updatedUser.ID.Hex(), config.AccessTokenPrivateKey)
	if err != nil {
		ctx.JSON(http.StatusBadRequest, gin.H{"status": "fail", "message": err.Error()})
		return
	}

	refresh_token, err := utils.CreateToken(config.RefreshTokenExpiresIn, updatedUser.ID.Hex(), config.RefreshTokenPrivateKey)
	if err != nil {
		ctx.JSON(http.StatusBadRequest, gin.H{"status": "fail", "message": err.Error()})
		return
	}

	ctx.SetCookie("access_token", access_token, config.AccessTokenMaxAge*60, "/", "localhost", false, true)
	ctx.SetCookie("refresh_token", refresh_token, config.RefreshTokenMaxAge*60, "/", "localhost", false, true)
	ctx.SetCookie("logged_in", "true", config.AccessTokenMaxAge*60, "/", "localhost", false, false)

	ctx.Redirect(http.StatusTemporaryRedirect, fmt.Sprint(config.ClientOrigin, pathUrl))
}
Create the Route
Now create a routes/session.routes.go file and add the code below. We have to create a new route file because later we will be adding GitHub and Facebook OAuth and it makes a lot of sense to group them in a single route file.
routes/session.routes.go
type SessionRouteController struct {
	authController controllers.AuthController
}

func NewSessionRouteController(authController controllers.AuthController) SessionRouteController {
	return SessionRouteController{authController}
}

func (rc *SessionRouteController) SessionRoute(rg *gin.RouterGroup) {
	router := rg.Group("/sessions/oauth")

	router.GET("/google", rc.authController.GoogleOAuth)
}
Register the Session Router
Next, add the router defined above to the middleware stack in the main.go file. Also, remember to install the cors package to enable you to make requests from the React.js app.
var (
	server      *gin.Engine
	ctx         context.Context
	mongoclient *mongo.Client
	redisclient *redis.Client

	userService         services.UserService
	UserController      controllers.UserController
	UserRouteController routes.UserRouteController

	authCollection         *mongo.Collection
	authService            services.AuthService
	AuthController         controllers.AuthController
	AuthRouteController    routes.AuthRouteController
	SessionRouteController routes.SessionRouteController
)

func init() {
	config, err := config.LoadConfig(".")
	if err != nil {
		log.Fatal("Could not load environment variables", err)
	}

	ctx = context.TODO()

	// Connect to MongoDB
	mongoconn := options.Client().ApplyURI(config.DBUri)
	mongoclient, err := mongo.Connect(ctx, mongoconn)

	if err != nil {
		panic(err)
	}

	if err := mongoclient.Ping(ctx, readpref.Primary()); err != nil {
		panic(err)
	}

	fmt.Println("MongoDB successfully connected...")

	// Connect to Redis
	redisclient = redis.NewClient(&redis.Options{
		Addr: config.RedisUri,
	})

	if _, err := redisclient.Ping(ctx).Result(); err != nil {
		panic(err)
	}

	err = redisclient.Set(ctx, "test", "Welcome to Golang with Redis and MongoDB", 0).Err()
	if err != nil {
		panic(err)
	}

	fmt.Println("Redis client connected successfully...")

	// Collections
	authCollection = mongoclient.Database("golang_mongodb").Collection("users")
	userService = services.NewUserServiceImpl(authCollection, ctx)
	authService = services.NewAuthService(authCollection, ctx)
	AuthController = controllers.NewAuthController(authService, userService)
	AuthRouteController = routes.NewAuthRouteController(AuthController)
	SessionRouteController = routes.NewSessionRouteController(AuthController)

	UserController = controllers.NewUserController(userService)
	UserRouteController = routes.NewRouteUserController(UserController)

	server = gin.Default()
}

func main() {
	config, err := config.LoadConfig(".")

	if err != nil {
		log.Fatal("Could not load config", err)
	}

	defer mongoclient.Disconnect(ctx)

	value, err := redisclient.Get(ctx, "test").Result()

	if err == redis.Nil {
		fmt.Println("key: test does not exist")
	} else if err != nil {
		panic(err)
	}

	corsConfig := cors.DefaultConfig()
	corsConfig.AllowOrigins = []string{"http://localhost:8000", "http://localhost:3000"}
	corsConfig.AllowCredentials = true

	server.Use(cors.New(corsConfig))

	router := server.Group("/api")
	router.GET("/healthchecker", func(ctx *gin.Context) {
		ctx.JSON(http.StatusOK, gin.H{"status": "success", "message": value})
	})

	AuthRouteController.AuthRoute(router)
	UserRouteController.UserRoute(router, userService)
	SessionRouteController.SessionRoute(router)
	log.Fatal(server.Run(":" + config.Port))
}
Conclusion
Congrats for reaching the end. In this article, you learned how to add Google OAuth Authentication to your React.js, Golang, and MongoDB applications.
You can find the complete code used in this tutorial on GitHub

Great tutorial! I notice that the ‘state’ is never really explained, could you perhaps include something about it?
Thank you for taking the time to read my tutorial and leave a comment! I appreciate your feedback and am happy to explain the state parameter in more detail.
In short, the state parameter is an important security feature in the Google OAuth flow. When we generate the consent screen URL, we include a random string of characters in the state parameter.
This helps us ensure that the authorization code we receive later comes from the same place that requested it originally. By doing this, we can protect against cross-site request forgery (CSRF) attacks, where a malicious third party tries to trick the user into granting access to their data.
Here’s how it works: When a user clicks “Allow” on the consent screen, Google sends an authorization code back to our server, along with the state parameter. We can then compare the value of the state parameter that we originally sent with the value of the state parameter that Google returned.
If they match, then we know that the authorization code is legitimate and came from the same place that requested it. If they don’t match, we can reject the authorization code and prevent any unauthorized access to our user’s data.
The state parameter also allows us to redirect the user to a protected page after they’ve been authenticated. For example, if a user was trying to access a page that requires authentication, we can store the protected page’s URL in the state parameter. After the user has been authenticated, we can redirect them to the protected page by extracting the URL from the state parameter.
I hope this explanation helps clarify the importance of the state parameter in the Google OAuth flow. If you have any more questions or feedback, please don’t hesitate to let me know!
Hi Edem, thanks for the explanation! I found ‘let from = ((location.state as any)?.from?.pathname as string) || ‘/’;’ in the login page code, it all makes sense!