
Deno is a modern runtime for JavaScript, TypeScript, and WebAssembly built with Rust programming language. This makes it secure and fast. It was built by Ryan Dahl, the same guy who had a major role in the development of Node.js.
Ryan Dahl noticed there were some capabilities he could have improved in Node.js and decided to build Deno to solve those issues. One of the main goals of Deno is to bring most of the web platform APIs to the server side.
The most eye-catching feature of Deno is that it supports TypeScript as a first-class language by default. This means you can run TypeScript code without the need for any external or third-party packages.
In this article, you will learn how to set up a Deno CRUD API project that runs on an Oak middleware server and uses a MongoDB database. If you are familiar with Node.js then getting up and running with Deno won’t be that difficult.
Related articles:
- How to Setup and Use MongoDB with Deno
- How to Set up Deno RESTful CRUD Project with MongoDB
- Authentication with Bcrypt, JWT, and Cookies in Deno
- Complete Deno CRUD RESTful API with MongoDB
Prerequisites
Before proceeding with this tutorial, you should:
- Be familiar with JavaScript and TypeScript.
- Familiarity with other web frameworks like Express.js, Gin Gonic, Fastify, FastAPI, and more will be highly beneficial.
- Install the Deno VS Code extension created by the Denoland team.
This extension brings Deno support to VS Code. Note: The extension uses the Deno binary under the hood so you need to make sure you have Deno installed on your local machine. - Some understanding of CRUD APIs
- A database GUI client (MongoDB Compass, or even MySQL VS Code extension, my favorite VS Code extension for working with different database servers) to manage the database.
Once you have the Deno VS Code extension installed, create a .vscode/settings.json file and add the following code.
{
  "deno.enable": true,
  "deno.unstable": true
}
This will tell VS Code to enable Deno in the project.
Step 1 – Set up and install Deno
First things first, make sure you have Deno installed on your system. If you haven’t already done that then follow one of these installation options specific to your operating system.
Shell (Mac, Linux):
curl -fsSL https://deno.land/install.sh | shPowerShell (Windows):
irm https://deno.land/install.ps1 | iexHomebrew (Mac):
brew install denoFor more options, visit the deno_install guide. After installing the Deno binary on your machine, close the terminal, open a new terminal and run this command to check if the installation was successful.
deno --versionIf the command prints the version of Deno in the console then that means the installation was successful.

Step 2 – Create the Deno Server with Oak Middleware
If you are familiar with Node.js, you will notice that Deno uses module references by URLs or file paths instead of a package.json file. So instead of downloading all the third-party dependencies into the project directory as seen in Node.js, Deno downloads the modules and caches them globally.
The remote imports are cached in a special folder specified by the DENO_DIR environment variable. However, it will default to the system’s cache folder if theDENO_DIR is not specified.
To avoid importing the module URLs everywhere, we will create a file where we will import and re-export the external libraries. This file will serve the same purpose as Node’s package.json file.
The Deno team recommends that we create a deps.ts file to serve as a centralized solution where all the third-party dependencies will be managed.
To do that, create a src/deps.ts file and add the following dependencies:
src/deps.ts
export { Application, Router, helpers } from 'https://deno.land/x/oak/mod.ts';
export type { RouterContext, Context } from 'https://deno.land/x/oak/mod.ts';
export { config as dotenvConfig } from 'https://deno.land/x/dotenv/mod.ts';
export {
  Database,
  MongoClient,
  Bson,
  ObjectId,
} from 'https://deno.land/x/mongo@v0.31.1/mod.ts';
oak– A middleware framework built on top of Deno’s native HTTP server.dotenv– This package loads environment variables from a configuration file.mongo– A MongoDB database driver developed for Deno
Now let’s start by creating a src/server.ts file to set up the Deno HTTP server with the Oak middleware framework.
src/server.ts
import { Application, Router } from './deps.ts';
import type { RouterContext } from './deps.ts';

const app = new Application();

const router = new Router();

// Health checker
router.get<string>('/api/healthchecker', (ctx: RouterContext<string>) => {
  ctx.response.status = 200
  ctx.response.body = {
    status: "success",
    message: "Welcome to Deno with MongoDB"
  }
});

app.use(router.routes());
app.use(router.allowedMethods());

app.addEventListener('listen', ({ port, secure }) => {
  console.log(
    `? Server started on ${secure ? 'https://' : 'http://'}localhost:${port}`
  );
});

const port = 8000
app.listen({ port });
We are using the Oak framework to set up and run the Deno HTTP server. You will notice that we imported the Oak modules and TypeScript type from the src/deps.ts file instead adding the URLs directly in the src/server.ts file.
Next, we created new instances of the Router and Application classes. The Application class is responsible for coordinating the HTTP server, running the middleware functions, and handling errors that occur when the requests are being processed.
The Router class produces a middleware pipeline that can be connected to the Application to enable routing based on the pathname of the incoming request.
So we created a health checker route /api/healthchecker to check if the Deno server we configured properly.
Before the server starts processing requests, the application will emit a “listen” event. So we used the .addEventListener() method to listen to that event and log a message to the console.
Finally, we evoked the Application .listen() method to open the server and process the registered middleware for each request.
We are now ready to start the server but before that let’s install the denon package to help us hot-reload the server upon every file change. Alternatively, you can run the server with the Deno CLI if you don’t want to restart the server after making changes in your source code.
Run the following command to install the Denon package. This package is similar to nodemon in Node.js.
deno install -qAf --unstable https://deno.land/x/denon/denon.ts
Now that you have it installed, we can start using it in the project. Run the command below to start the Deno server.
denon run --allow-net --allow-read --allow-write --allow-env src/server.ts
Due to Deno’s security, we specified all the permissions we want to enable in the project.
--allow-net– Grants network access--allow-read– Grants read access to system files.--allow-write– Grants write access to system files.--allow-env– Allow our application to set and get environment variables.
For more details, read Deno’s permission list.
With that out of the way, open any API testing tool like Postman and make a request to the http://localhost:8000/api/healthchecker endpoint.
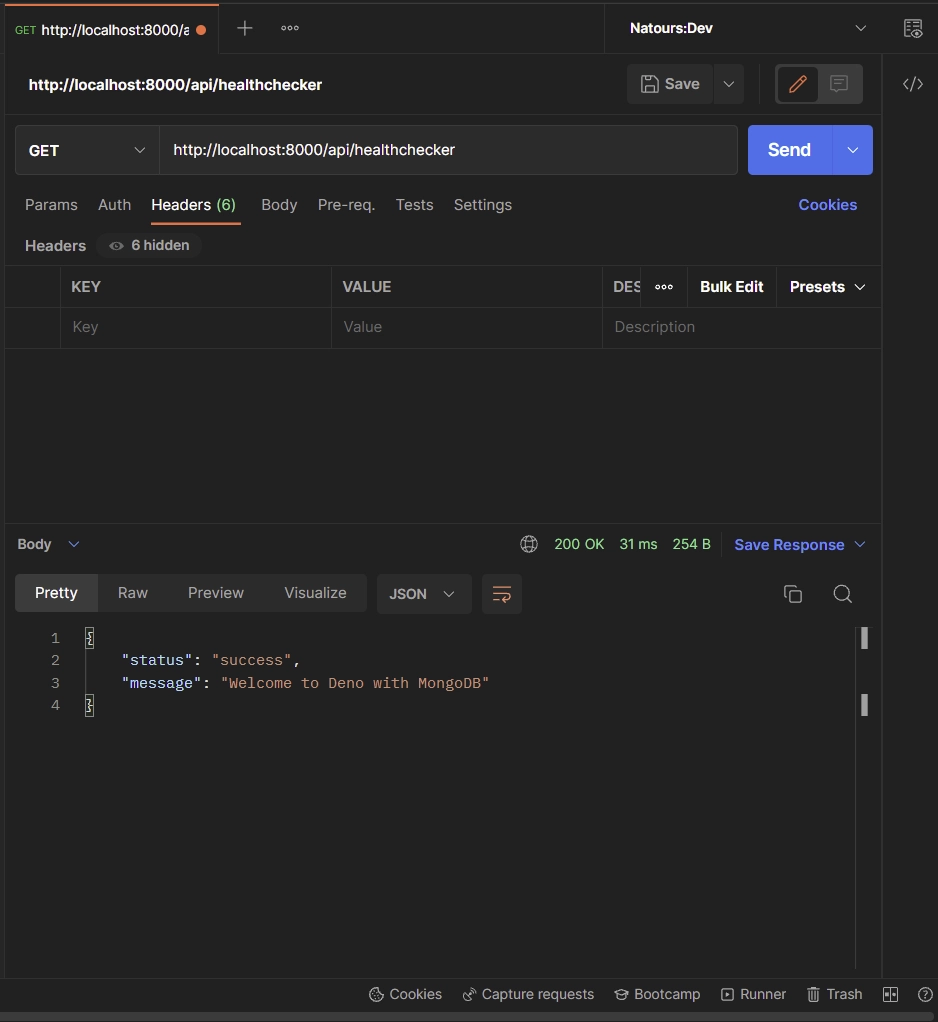
Alternatively, you can make the request in the browser and you should see the JSON response.
Step 3 – Setup the MongoDB Server with Docker
In this step, you will set up a MongoDB server with Docker, and Docker compose. You can download the MongoDB server binary from the official MongoDB website and run it on your machine but using Docker will make it easier to manage.
Docker compose is a tool that comes bundled with Docker and can be used to manage multiple containers as a service.
In this project, we only have one container which is the MongoDB container. So create a docker-compose.yml file and add the following configurations.
docker-compose.yml
version: '3.9'
services:
  mongo:
    image: mongo:latest
    container_name: mongo
    environment:
      MONGO_INITDB_ROOT_USERNAME: ${MONGO_INITDB_ROOT_USERNAME}
      MONGO_INITDB_ROOT_PASSWORD: ${MONGO_INITDB_ROOT_PASSWORD}
      MONGO_INITDB_DATABASE: ${MONGO_INITDB_DATABASE}
    env_file:
      - ./.env
    volumes:
      - mongo:/data/db
    ports:
      - '6000:27017'
volumes:
  mongo:
The above configurations will pull the latest MongoDB image from the Docker hub site, build the container, and map port 6000 to the default MongoDB port.
Since we used placeholders for the MongoDB credentials in the docker-compose.yml file, let’s create an environment variables file and add the credentials that will be used by the Mongo Docker image to set up the MongoDB server.
.env
MONGO_INITDB_ROOT_USERNAME=admin
MONGO_INITDB_ROOT_PASSWORD=password123
MONGO_INITDB_DATABASE=deno_mongodb
Now let’s build the MongoDB Docker image and run the container with this command:
docker-compose up -d
You can run this command to stop the container:
docker-compose down
Now that we have the MongoDB server running, replace the content of the .env file with the following environment variables.
.env
MONGO_INITDB_ROOT_USERNAME=admin
MONGO_INITDB_ROOT_PASSWORD=password123
MONGO_INITDB_DATABASE=deno_mongodb

NODE_ENV=development
SERVER_PORT=8000

MONGODB_URI=mongodb://admin:password123@localhost:6000
Next, create a src/config/default.ts file to help us load the environment variables and provide their corresponding TypeScript types.
src/config/default.ts
import { dotenvConfig } from '../deps.ts';
dotenvConfig({ export: true, path: '.env' });

const config: {
  serverPort: number;
  dbUri: string;
  dbName: string;
} = {
  serverPort: parseInt(Deno.env.get('SERVER_PORT') as unknown as string),
  dbUri: Deno.env.get('MONGODB_URI') as unknown as string,
  dbName: Deno.env.get('MONGO_INITDB_DATABASE') as unknown as string,
};

export default config;
Now let’s create a utility function to connect the Deno application to the running MongoDB server.
To do this, create a src/utils/connectDB.ts file and add the following code snippets.
src/utils/connectDB.ts
import { MongoClient } from '../deps.ts';
import config from '../config/default.ts';

const dbUri = config.dbUri;
const dbName = Deno.env.get('MONGO_INITDB_DATABASE') as string;

const client: MongoClient = new MongoClient();
await client.connect(dbUri);
console.log('? Connected to MongoDB Successfully');

export const db = client.database(dbName);
We used the MongoClient class to create a new MongoDB client and evoked the .connect() method to create a connection between the Deno and MongoDB servers.
After that, we used the .database() method to create a new database before exporting the returned object from the file.
Step 4 – Create the Database Model
In this section, you will create a MongoDB collection that will return an object containing functions for interacting with the MongoDB server.
src/models/user.model.ts
import { db } from '../utils/connectDB.ts';
import { ObjectId } from '../deps.ts';

interface UserSchema {
  _id?: ObjectId;
  name: string;
  email: string;
}

export const User = db.collection<UserSchema>('users');
We created a TypeScript interface to reflect the MongoDB document in the database. Next, we evoked the .collection() method and provided it with the TypeScript interface to create the collection with the name users in the database.
The .collection() method returns an object that contains a bunch of functions including the database CRUD functions for interacting with the MongoDB server.
Step 5 – Add the Route to the Server
Now that we have the MongoDB model defined, let’s create a route to add a new document to the database.
src/server.ts
import { Application, Router, Bson } from './deps.ts';
import type { RouterContext } from './deps.ts';
import config from './config/default.ts';
import { User } from './models/user.model.ts';

const app = new Application();

const router = new Router();

// Health checker
router.get<string>('/api/healthchecker', (ctx: RouterContext<string>) => {
  ctx.response.status = 200
  ctx.response.body = {
    status: "success",
    message: "Welcome to Deno with MongoDB"
  }
});

// Create a new user
router.post<string>('/api/users', async(ctx: RouterContext<string>)=> {
try {
  const {name, email}:{name: string, email: string} = await ctx.request.body().value
  const userId: string | Bson.ObjectId = await User.insertOne({name,email})

  if(!userId){
    ctx.response.status = 500;
  ctx.response.body = {
    status: 'error',
    message: "Something bad happened"
  }
    return
  }

  const user = await User.findOne({_id: userId})

  ctx.response.status = 200;
  ctx.response.body = {
    status: 'success',
    user
  }

} catch (error) {
  ctx.response.status = 500;
  ctx.response.body = {
    status: 'error',
    message: error.message
  }
}
})

app.use(router.routes());
app.use(router.allowedMethods());

app.addEventListener('listen', ({ port, secure }) => {
  console.log(
    `? Server started on ${secure ? 'https://' : 'http://'}localhost:${port}`
  );
});

const port = config.serverPort;
app.listen({ port });
After inserting the new document into the database, MongoDB will return the Object ID of the newly created document.
So we will query the database by evoking the .findOne() method and pass the Object ID as a filter to retrieve the newly created document.
Remember that querying and mutating the database is an asynchronous process and you need to use a try...catch block to handle the errors.
Now let’s start the Deno server again with:
denon run --allow-net --allow-read --allow-write --allow-env src/server.ts
Step 6 – Test the API Endpoints
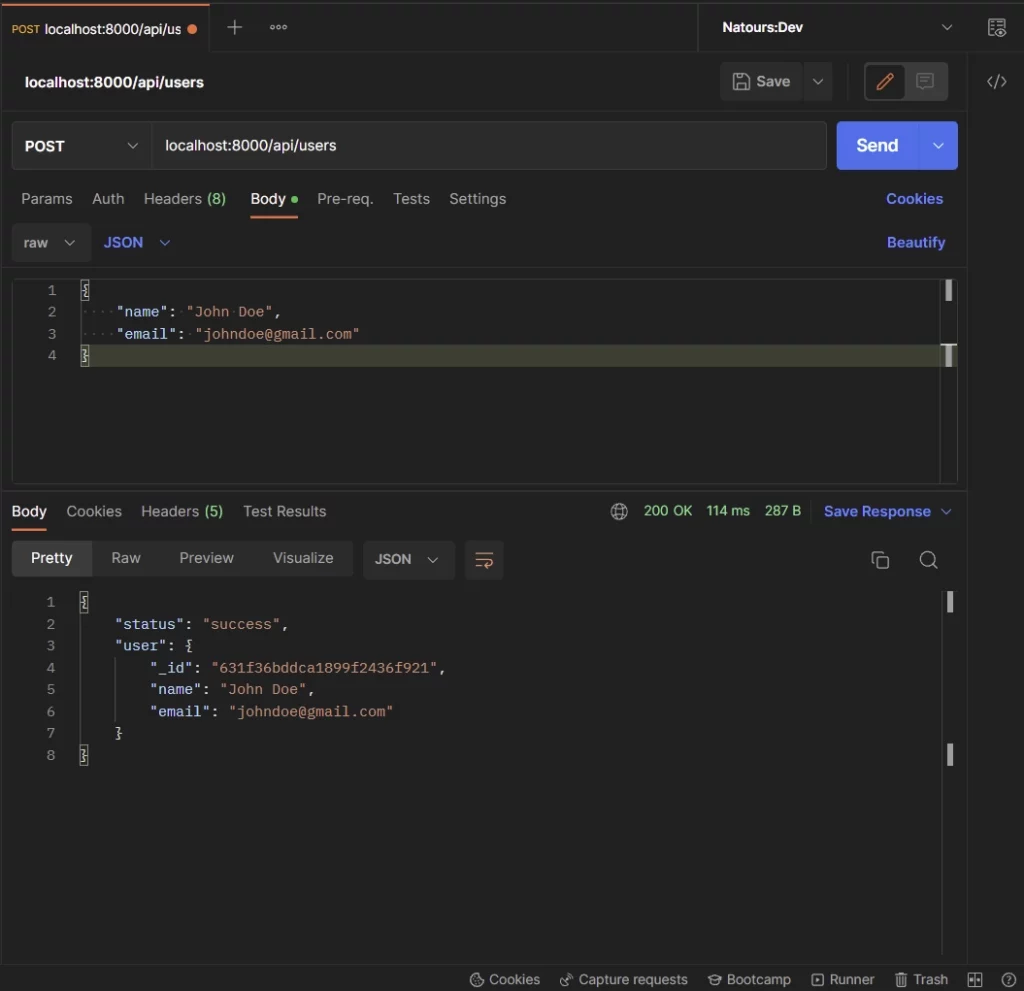
Once the server is up and running, open any API testing tool like Postman, Insomnia, or Thunder Client and make a POST request to the localhost:8000/api/users endpoint on the server with the payload included in the request to add the new document to the database.
Conclusion
In this article, you learned how to set up a Deno CRUD API project with MongoDB and Docker. In the next article, we will implement JSON Web Token authentication to secure the Deno API.
You can find the complete source code from this GitHub repository