

In this article, you’ll learn how to implement CRUD (Create, Read, Update, and Delete) operations with DenoDB in Deno. The Deno CRUD API will run on an Oak middleware framework and store data in an SQLite database. Nevertheless, the code in this project can be adjusted to work with any DenoDB-supported database like MySQL, SQLite, MariaDB, PostgreSQL, and MongoDB.
To avoid over-complicating the project, we’ll query and mutate the database directly in the CRUD route handlers instead of using a CRUD service layer to handle the communication between the database and the route controllers.
More practice:
- How to Setup and Use MongoDB with Deno
- How to Set up Deno RESTful CRUD Project with MongoDB
- Authentication with Bcrypt, JWT, and Cookies in Deno
- Complete Deno CRUD RESTful API with MongoDB
Prerequisites
This tutorial is structured in a way to make it easier for beginners to follow but these prerequisites are needed to make the process smoother for you.
- You should have the latest version of Deno installed on your machine. If you already have the binary installed, run
deno upgradeto upgrade to the newest version. - You should have basic knowledge of JavaScript and TypeScript.
- You should have a basic understanding of CRUD architecture.
Run the Deno CRUD API Locally
- Navigate to https://deno.land/manual/getting_started/installation to install the Deno binary on your system. Run
deno upgradeto get the newest version of Deno. - Visit https://github.com/wpcodevo/deno-crud-app to download or clone the Deno CRUD project and open it with an IDE or text editor.
- Run
deno run -A src/server.tsto install the project’s dependencies and start the Deno Oak HTTP server on port 8000. - Test the CRUD API in an API testing software or set up the frontend application to interact with the Deno API.
Run a React.js App with the Deno CRUD API
For full details about the React.js CRUD app see the post Build a React.js CRUD App using a RESTful API. But to get up and running quickly just follow the steps below.
- Install Node.js from https://nodejs.org and run
npm install -g yarnto install the Yarn package manager globally. - Visit https://github.com/wpcodevo/reactjs-crud-note-app to download or clone the React.js CRUD project and open it with an IDE or text editor.
- Open the integrated terminal in your IDE and run
yarnoryarn installto install the required dependencies. - Start the application by running
yarn devfrom the command line in the project root directory. - Open http://localhost:3000/ in a new tab to test the React CRUD app against the Deno CRUD API. Note: Accessing the app on the URL
http://127.0.0.1:3000will result in a site can’t be reached or a CORS error.
Setup Deno
First and foremost, navigate to your Desktop or any location and create a new folder named deno-crud-app. After that, open the newly-created folder with an IDE or code editor (for this tutorial, I’ll use VS Code).
mkdir deno-crud-app
cd deno-crud-app && code .
To avoid getting unnecessary warnings and red squiggly lines in VS Code, create a .vscode folder in the root directory and within the .vscode folder, create a settings.json file, and add the following configurations.
.vscode/settings.json
{
  "deno.enable": true,
  "deno.unstable": true
}
The above settings will tell VS Code to prepare the workspace for Deno development.
By default, Deno doesn’t have a package manager registry like NPM or Yarn. So, in order to load third-party modules into the project, we have to use URL imports.
However, to avoid scattering URL imports all over our code, we’ll simulate a package.json file by creating a src/deps.ts file to manage all the third-party modules from a centralized location. To do that, create an src folder in the root directory. Within the src folder, create a deps.ts file and add the following dependencies.
src/deps.ts
export {
  Application,
  helpers,
  Router,
} from "https://deno.land/x/oak@v11.1.0/mod.ts";
export type {
  Context,
  RouterContext,
} from "https://deno.land/x/oak@v11.1.0/mod.ts";
export * as logger from "https://deno.land/x/oak_logger@1.0.0/mod.ts";
export { z } from "https://deno.land/x/zod@v3.19.1/mod.ts";
export {
  Database,
  SQLite3Connector,
  Model,
  DataTypes,
} from "https://deno.land/x/denodb@v1.1.0/mod.ts";
export { oakCors } from "https://deno.land/x/cors@v1.2.2/mod.ts";
oak– A middleware framework for handling HTTP with Denooak_logger– An HTTP request middleware logger for Deno oak.zod– A schema validation library with static type inferencedenodb– An ORM for Deno that supports MySQL, SQLite, MariaDB, PostgreSQL, and MongoDB.cors– A CORS middleware for Deno
With that out of the way, we are now ready to create the entry point of our application and set up the Deno Oak HTTP server. Create a new file named server.ts in the src folder and add the following contents.
src/server.ts
import { Application, Router } from "./deps.ts";
import type { RouterContext } from "./deps.ts";

const app = new Application();
const router = new Router();

router.get<string>("/api/healthchecker", (ctx: RouterContext<string>) => {
  ctx.response.body = {
    status: "success",
    message: "Build a CRUD API with Deno and DenoDB",
  };
});

app.use(router.routes());
app.use(router.allowedMethods());

app.addEventListener("listen", ({ port, secure }) => {
  console.log(
    `🚀 Server started on ${secure ? "https://" : "http://"}localhost:${port}`
  );
});

const port = 8000;
app.listen({ port });
First, we imported the dependencies from the src/deps.ts file. As you already know, Oak is the web framework we’ll use to build the REST API.
Then, we created an instance of the Oak application class with new Application() and assigned it to an app variable.
Then, we created an Oak router and added a /api/healthchecker route to the middleware pipeline of the router.
Then, we registered the router in the application using app.use(router.routes()) and allowed the HTTP methods specified in the router.
Then, we added an event listener to the app to log a message in the console when the HTTP server starts listening on the specified port number.
Finally, we called the app.listen() method to listen on port 8000 for incoming connections.
To start the Deno HTTP server, we can use the deno CLI but since Deno doesn’t come with a hot-reloading feature, we’ll have to install the Denon package which will help us restart the HTTP server upon every file change.
Install the Denon package globally with this command:
deno install -qAf --unstable https://deno.land/x/denon/denon.ts
All right! Let’s start the Deno HTTP server.
denon run --allow-net --allow-read --allow-write --allow-env src/server.ts
Once the server is listening on port 8000, go to http://localhost:8000/api/healthchecker to access the health checker route we just defined.

Setup an SQLite Database with DenoDB
In this section, you’ll set up DenoDB to store, retrieve, and manage data in an SQLite database. Even though we’ll use SQLite as the dialect in this tutorial, you can visit https://eveningkid.com/denodb-docs/docs/guides/connect-database to use a supported database connector or client for your dialect.
Connect the App to the Database
DenoDB uses Deno SQLite for SQLite support. To connect and manage the SQLite database, we’ll import the SQLite3Connector from the src/deps.ts file and create a new connector.
Next, we’ll create a new database with the connector and assign it to a db variable. The db variable will contain methods for linking and synchronizing the models to the database.
So, create a connectDB.ts file in the src folder and add the following code snippets.
src/connectDB.ts
import { Database, SQLite3Connector } from "./deps.ts";

const connector = new SQLite3Connector({
  filepath: "./database.sqlite",
});

const db = new Database(connector);

export default db;
Create the Database Model
Models represent tables in a SQL database and documents in a NoSQL database. The models will have methods for creating and reading documents or records from the underlying NoSQL or SQL database respectively.
Create a models folder in the src directory and create a note.model.ts file in the “models” folder. Open the note.model.ts file and add the following code.
src/models/note.model.ts
import { Model, DataTypes } from "../deps.ts";

class NoteModel extends Model {
  static table = "notes";

  static fields = {
    id: { type: DataTypes.INTEGER, primaryKey: true },
    title: { type: DataTypes.STRING, unique: true },
    content: { type: DataTypes.STRING },
    category: { type: DataTypes.STRING, allowNull: true },
    createdAt: { type: DataTypes.DATETIME, allowNull: true },
    updatedAt: { type: DataTypes.DATETIME, allowNull: true },
  };
}

export default NoteModel;
Let’s evaluate the above code. First, we imported the Model class and the DataTypes utility from the src/deps.ts file.
Then, we inherited the Model class to create a NoteModel class and used the static table property to change the name of the underlying SQL table. The NoteModel class will be translated into an SQL table by DenoDB.
Then, we defined the fields that DenoDB will convert into columns using the static fields property.
Finally, we exported the NoteModel from the file.
Create the Request Validation Schemas
It is important to validate incoming request data before they even reach the route handlers. There is a saying that you don’t trust user inputs even if you know the users of the application. Validating the incoming data will prevent users from sending garbage values to the database.
Validation Schemas
Now let’s create the Zod validation schemas and infer types from them. So, create a schema folder in the src directory and create a note.schema.ts file within the schema folder. After that, open the newly-created note.schema.ts file and add the following schemas.
src/schema/note.schema.ts
import { z } from "../deps.ts";

export const createNoteSchema = z.object({
  body: z.object({
    title: z.string({
      required_error: "Title is required",
    }),
    content: z.string({
      required_error: "Content is required",
    }),
    category: z.string().optional(),
  }),
});

const params = {
  params: z.object({
    noteId: z.string(),
  }),
};

export const getNoteSchema = z.object({
  ...params,
});

export const updateNoteSchema = z.object({
  ...params,
  body: z
    .object({
      title: z.string(),
      content: z.string(),
      category: z.string(),
    })
    .partial(),
});

export const deleteNoteSchema = z.object({
  ...params,
});

export type CreateNoteInput = z.TypeOf<typeof createNoteSchema>["body"];
export type GetNoteInput = z.TypeOf<typeof getNoteSchema>["params"];
export type UpdateNoteInput = z.TypeOf<typeof updateNoteSchema>;
export type DeleteNoteInput = z.TypeOf<typeof deleteNoteSchema>["params"];
Middleware to Validate the Request Bodies
Now that we’ve defined the validation schemas, let’s create a middleware that Oak will use to validate the incoming request body before calling the next middleware in the middleware pipeline if there weren’t any validation errors.
This middleware will accept a schema as an argument, parse the schema and return validation errors to the client if any of the rules defined in the schema was violated.
To do that, create a validate.ts file in the src folder and add the following content.
src/validate.ts
import { z, RouterContext, helpers } from "./deps.ts";

const validate =
  (schema: z.AnyZodObject) =>
  async (ctx: RouterContext<string>, next: () => any): Promise<void> => {
    try {
      schema.parse({
        params: ctx.params,
        query: helpers.getQuery(ctx),
        body: await ctx.request.body().value,
      });

      await next();
    } catch (err) {
      if (err instanceof z.ZodError) {
        ctx.response.status = 400;
        ctx.response.body = {
          status: "fail",
          error: err.errors,
        };
        return;
      }
      await next();
    }
  };
export default validate;
Add the CRUD Middleware Functions
In this section, you’ll create CRUD functions that the Oak router will use to perform the CRUD operations against the database. We’ll create the Oak router in a moment after defining all the route handlers.
To begin, create a controllers folder in the src directory and create a note.controller.ts file in the “controllers” folder. After that, open the newly-created note.controller.ts file and add the following imports.
src/controllers/note.controller.ts
import { RouterContext } from "../deps.ts";
import NoteModel from "../models/note.model.ts";
import type {
  CreateNoteInput,
  UpdateNoteInput,
} from "../schema/note.schema.ts";
CREATE Route Middleware
The first task in CRUD is to create a new record. To do this, we’ll create a middleware (route handler or controller) that Oak will evoke when a POST request is made to the /api/notes endpoint.
So, open the src/controllers/note.controller.ts file and add the following code after the import statements.
src/controllers/note.controller.ts
// [...] CREATE Route Middleware
const createNoteController = async ({
  request,
  response,
}: RouterContext<string>) => {
  try {
    const { title, category, content }: CreateNoteInput = await request.body()
      .value;

    const createdAt = new Date();
    const updatedAt = createdAt;

    const payload = {
      title,
      content,
      category: category ? category : "",
      createdAt,
      updatedAt,
    };
    const { lastInsertId } = (await NoteModel.create(payload)) as unknown as {
      affectedRows: number;
      lastInsertId: number;
    };

    const note = await NoteModel.where("id", lastInsertId).first();

    response.status = 201;
    response.body = {
      status: "success",
      note,
    };
  } catch (error) {
    if ((error.message as string).includes("UNIQUE constraint failed")) {
      response.status = 409;
      response.body = {
        status: "fail",
        message: "Note with that title already exists",
      };
      return;
    }
    response.status = 500;
    response.body = { status: "error", message: error.message };
    return;
  }
};
Here, we extracted the title, category, and content from the request body by calling the request.body() method and accessing the data via the .value property.
Next, we defined the createdAt and updatedAt fields before calling the NoteModel.create() method to add the data to the database. Since the create method available on a model only returns the ID of the newly-created record instead of the complete record, we had to make another query with the lastInsertId to retrieve the record.
Also, since we added a unique constraint on the title field, DenoDB will return an error if the unique constraint was violated. So, we had to handle such errors in the catch block and return a nicely formatted error message to the client.
UPDATE Route Middleware
At this point, we have the logic for creating new records. Now let’s create a route handler to update an existing record in the database. This route middleware will be evoked when a PATCH request is made to the /api/notes/:noteId endpoint.
src/controllers/note.controller.ts
// [...] UPDATE Route Middleware
const updateNoteController = async ({
  params,
  request,
  response,
}: RouterContext<string>) => {
  try {
    const payload: UpdateNoteInput["body"] = await request.body().value;

    const { affectedRows } = (await NoteModel.where("id", params.noteId).update(
      {
        ...payload,
        updatedAt: new Date(),
      }
    )) as unknown as { affectedRows: number };

    if (affectedRows === 0) {
      response.status = 404;
      response.body = {
        status: "fail",
        message: "No note with that Id exists",
      };
      return;
    }

    const note = await NoteModel.where("id", params.noteId).first();

    response.status = 200;
    response.body = {
      status: "success",
      note,
    };
  } catch (error) {
    response.status = 500;
    response.body = { status: "error", message: error.message };
    return;
  }
};
Here, we extracted the incoming data from the request body and assigned it to a payload variable.
Then, we called the NoteModel.where() method to find the record that matches the ID and evoked the .update() method on the query to update the fields of the found record.
Since the .update() method only returns an affectedRows variable that indicates the number of rows that were updated, we had to fire another query to fetch the newly-updated record.
Single READ Route Middleware
The second task in CRUD is to fetch a record. To do that, we’ll create a route handler that Oak will call to retrieve a single record when a GET request is made to the /api/notes/:noteId endpoint.
Here, we’ll extract the noteId from the request URL parameters and construct a query with the WHERE clause. After that, we’ll evoke the .first() method to retrieve the first record of the current query.
src/controllers/note.controller.ts
// [...] Single READ Route Middleware
const findNoteController = async ({
  params,
  response,
}: RouterContext<string>) => {
  try {
    const note = await NoteModel.where("id", params.noteId).first();

    if (!note) {
      response.status = 404;
      response.body = {
        status: "success",
        message: "No note with that Id exists",
      };
      return;
    }

    response.status = 200;
    response.body = {
      status: "success",
      note,
    };
  } catch (error) {
    response.status = 500;
    response.body = { status: "error", message: error.message };
    return;
  }
};
Multiple READ Route Middleware
Here, we’ll implement another READ operation but this time, we’ll return a list of selected records. That means this route handler will have a pagination feature where a user can specify page or limit parameters in the request URL.
src/controllers/note.controller.ts
// [...] Multiple READ Route Middleware
const findAllNotesController = async ({
  request,
  response,
}: RouterContext<string>) => {
  try {
    const page = request.url.searchParams.get("page");
    const limit = request.url.searchParams.get("limit");
    const intPage = page ? parseInt(page) : 1;
    const intLimit = limit ? parseInt(limit) : 10;
    const skip = (intPage - 1) * intLimit;

    const notes = await NoteModel.offset(skip).limit(intLimit).get();

    response.status = 200;
    response.body = {
      status: "success",
      results: notes.length,
      notes,
    };
  } catch (error) {
    response.status = 500;
    response.body = { status: "error", message: error.message };
    return;
  }
};
Let’s evaluate the above code. First, we extracted the page and limit parameters from the request URL and parsed them into integers.
Then, we created a statement to calculate the skip or offset value and assigned it to a skip variable.
Then, we constructed a new query with the .offset() method and passed the number of records to skip as an argument to it.
Next, we evoked the .limit() method to limit the number of results returned from the query and called the .get() method to execute the query.
DELETE Route Middleware
The last task in CRUD is to delete a record. To do this, we’ll create a route controller that will be evoked to remove a record from the database when a DELETE request is made to the /api/notes/:noteId endpoint.
Here, we’ll extract the noteId from the request URL parameters and construct a new database query with the WHERE clause. After that, we’ll evoke the .delete() method to delete the record that matches that ID.
src/controllers/note.controller.ts
// [...] DELETE Route Middleware
const deleteNoteController = async ({
  params,
  response,
}: RouterContext<string>) => {
  try {
    const note = (await NoteModel.where(
      "id",
      params.noteId
    ).delete()) as unknown as { affectedRows: number };

    if (note.affectedRows === 0) {
      response.status = 404;
      response.body = {
        status: "fail",
        message: "No note with that Id exists",
      };
      return;
    }

    response.status = 204;
  } catch (error) {
    response.status = 500;
    response.body = { status: "error", message: error.message };
    return;
  }
};
Complete CRUD Route Middleware
src/controllers/note.controller.ts
import { RouterContext } from "../deps.ts";
import NoteModel from "../models/note.model.ts";
import type {
  CreateNoteInput,
  UpdateNoteInput,
} from "../schema/note.schema.ts";

// [...] CREATE Route Middleware
const createNoteController = async ({
  request,
  response,
}: RouterContext<string>) => {
  try {
    const { title, category, content }: CreateNoteInput = await request.body()
      .value;

    const createdAt = new Date();
    const updatedAt = createdAt;

    const payload = {
      title,
      content,
      category: category ? category : "",
      createdAt,
      updatedAt,
    };
    const { lastInsertId } = (await NoteModel.create(payload)) as unknown as {
      affectedRows: number;
      lastInsertId: number;
    };

    const note = await NoteModel.where("id", lastInsertId).first();

    response.status = 201;
    response.body = {
      status: "success",
      note,
    };
  } catch (error) {
    console.log(error);
    if ((error.message as string).includes("UNIQUE constraint failed")) {
      response.status = 409;
      response.body = {
        status: "fail",
        message: "Note with that title already exists",
      };
      return;
    }
    response.status = 500;
    response.body = { status: "error", message: error.message };
    return;
  }
};

// [...] UPDATE Route Middleware
const updateNoteController = async ({
  params,
  request,
  response,
}: RouterContext<string>) => {
  try {
    const payload: UpdateNoteInput["body"] = await request.body().value;

    const { affectedRows } = (await NoteModel.where("id", params.noteId).update(
      {
        ...payload,
        updatedAt: new Date(),
      }
    )) as unknown as { affectedRows: number };

    if (affectedRows === 0) {
      response.status = 404;
      response.body = {
        status: "fail",
        message: "No note with that Id exists",
      };
      return;
    }

    const note = await NoteModel.where("id", params.noteId).first();

    response.status = 200;
    response.body = {
      status: "success",
      note,
    };
  } catch (error) {
    response.status = 500;
    response.body = { status: "error", message: error.message };
    return;
  }
};

// [...] Single READ Route Middleware
const findNoteController = async ({
  params,
  response,
}: RouterContext<string>) => {
  try {
    const note = await NoteModel.where("id", params.noteId).first();

    if (!note) {
      response.status = 404;
      response.body = {
        status: "success",
        message: "No note with that Id exists",
      };
      return;
    }

    response.status = 200;
    response.body = {
      status: "success",
      note,
    };
  } catch (error) {
    response.status = 500;
    response.body = { status: "error", message: error.message };
    return;
  }
};

// [...] Multiple READ Route Middleware
const findAllNotesController = async ({
  request,
  response,
}: RouterContext<string>) => {
  try {
    const page = request.url.searchParams.get("page");
    const limit = request.url.searchParams.get("limit");
    const intPage = page ? parseInt(page) : 1;
    const intLimit = limit ? parseInt(limit) : 10;
    const skip = (intPage - 1) * intLimit;

    const notes = await NoteModel.offset(skip).limit(intLimit).get();

    response.status = 200;
    response.body = {
      status: "success",
      results: notes.length,
      notes,
    };
  } catch (error) {
    response.status = 500;
    response.body = { status: "error", message: error.message };
    return;
  }
};

// [...] DELETE Route Middleware
const deleteNoteController = async ({
  params,
  response,
}: RouterContext<string>) => {
  try {
    const note = (await NoteModel.where(
      "id",
      params.noteId
    ).delete()) as unknown as { affectedRows: number };

    if (note.affectedRows === 0) {
      response.status = 404;
      response.body = {
        status: "fail",
        message: "No note with that Id exists",
      };
      return;
    }

    response.status = 204;
  } catch (error) {
    response.status = 500;
    response.body = { status: "error", message: error.message };
    return;
  }
};

export default {
  createNoteController,
  updateNoteController,
  findNoteController,
  findAllNotesController,
  deleteNoteController,
};
Create the CRUD Routes
Now that we’ve created all the route handlers, let’s configure the server to process requests from these routes:
/api/notes– GET, POST/api/notes/:noteId– GET, PATCH, DELETE
To do this, we’ll add five routes to the Oak router middleware pipeline that the server will use to perform the CRUD operations. Each middleware route will call a route controller to handle the incoming request.
Create a routes folder in the src directory and within the routes folder, create a note.routes.ts file and add the following code snippets.
src/routes/note.routes.ts
import { Router } from "../deps.ts";
import noteController from "../controllers/note.controller.ts";
import { createNoteSchema, updateNoteSchema } from "../schema/note.schema.ts";
import validate from "../validate.ts";

const router = new Router();

router.get<string>("/", noteController.findAllNotesController);
router.post<string>(
  "/",
  validate(createNoteSchema),
  noteController.createNoteController
);
router.patch<string>(
  "/:noteId",
  validate(updateNoteSchema),
  noteController.updateNoteController
);
router.get<string>("/:noteId", noteController.findNoteController);
router.delete<string>("/:noteId", noteController.deleteNoteController);

export default router;
Quite a lot is happening in the above code, let’s break it down:
First, we imported the necessary dependencies at the top of the file. This includes the Zod schemas, the validation middleware, and the route handlers.
Then, we created a new Oak router and assigned it to a router variable.
Next, we defined five routes to evoke the CRUD route controllers we created in the src/controllers/note.controller.ts file. In addition, we added the validate() middleware to the POST and PATCH middleware stack. This will ensure that the request bodies are validated against the rules defined in the schemas before the requests reach the route controllers.
Finally, we exported the router from the file.
It’s now time to register the CRUD router. To do this, create a index.ts file in the routes folder and add the code below. We could have registered the routers in the src/server.ts file but doing it in a different file will make the server file clean. That means, if you’ve five routers in your application, you can register all of them in the src/routes/index.ts file.
src/routes/index.ts
import { Application } from "../deps.ts";
import noteRouter from "./note.routes.ts";

function init(app: Application) {
  app.use(noteRouter.prefix("/api/notes/").routes());
}

export default {
  init,
};
Register the CRUD Router
Finally, we’re now ready to link the database model, sync the models with the database, and configure the server to accept cross-origin requests from specific domains.
To do this, open the src/server.ts file and replace its content with the following:
src/server.ts
import { Application, oakCors, Router } from "./deps.ts";
import type { RouterContext } from "./deps.ts";
import { logger } from "./deps.ts";
import appRouter from "./routes/index.ts";
import NoteModel from "./models/note.model.ts";
import db from "./connectDB.ts";

db.link([NoteModel]);

const app = new Application();
const router = new Router();

// Middleware Logger
app.use(logger.default.logger);
app.use(logger.default.responseTime);

app.use(
  oakCors({
    origin: /^.+localhost:(3000|3001)$/,
    credentials: true,
  })
);

router.get<string>("/api/healthchecker", (ctx: RouterContext<string>) => {
  ctx.response.body = {
    status: "success",
    message: "Build a CRUD API with Deno and DenoDB",
  };
});

appRouter.init(app);
app.use(router.routes());
app.use(router.allowedMethods());

app.addEventListener("listen", ({ port, secure }) => {
  console.log(
    `🚀 Server started on ${secure ? "https://" : "http://"}localhost:${port}`
  );
});

const port = 8000;

await db.sync({ drop: true });
console.info("✅ Database connected...");
app.listen({ port });
We imported the db variable from the src/connectDB.ts file and called the db.link() method to link the models. If you’ve more than one model, put them in the array to link them together.
Then, we added the oakCors() middleware to the middleware pipeline. This will configure the server to accept requests from the provided origins.
At the end of the file, we called db.sync() method to push the models to the database. This will create the SQL representation of the models in the SQLite database. Also, passing drop: true will drop the tables in the database whenever the server restarts.
Testing the Deno CRUD API
At this point, we are ready to test the Deno CRUD API. Open your terminal and run this command to start the Deno HTTP server.
denon run --allow-net --allow-read --allow-write --allow-env src/server.ts
Running the above command will start the server on port 8000 and create a database.sqlite file in the root directory.
If you decide to test the API with Postman, follow these steps to import the Postman collection I used.
Step 1: Click on the Import button in Postman
Step 2: Under the File tab on the Import popup, click on Choose Files and navigate to the Note App.postman_collection.json file in the Deno CRUD project.
Step 3: Choose the Note App.postman_collection.json file and click on the Import button under the Import Elements tab in Postman to add the new collection.
If you are using Thunder Client in VS Code, you can import the same collection to test the API.
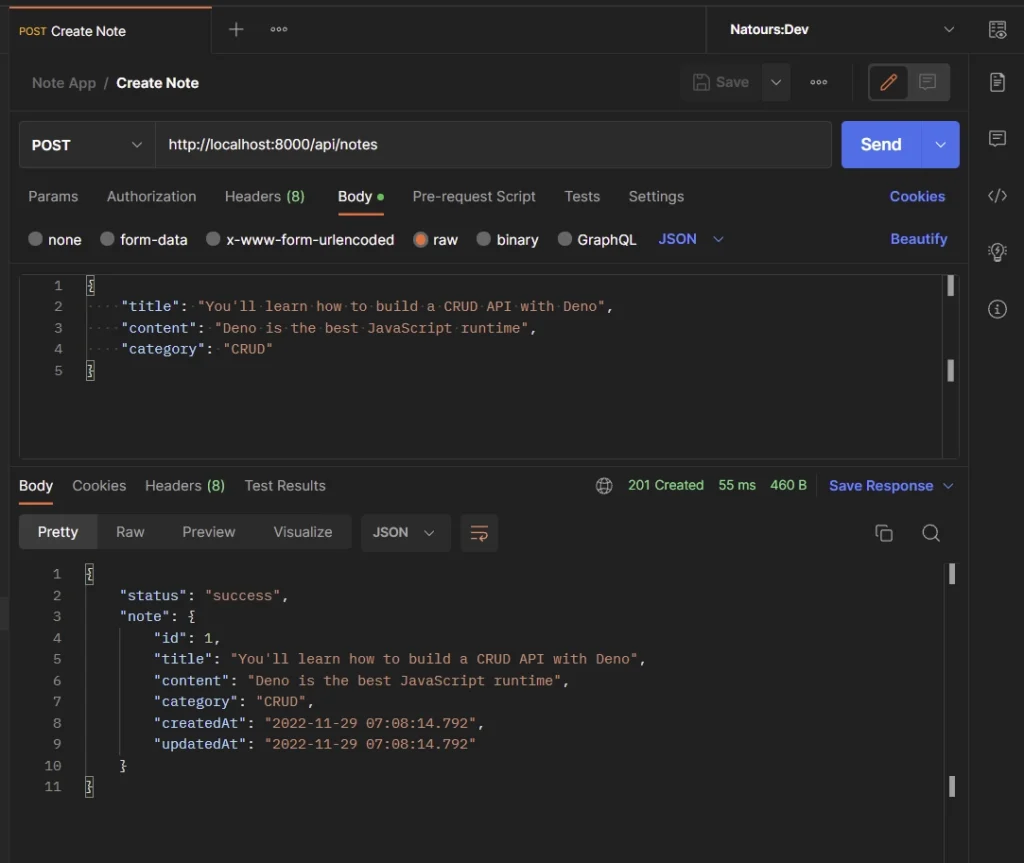
Create a New Record
To create a new record, add the JSON object and make a POST request to the http://localhost:8000/api/notes endpoint. The Deno API will then validate the request payload against the schema rules, add the new record to the database, and return the newly-created record.
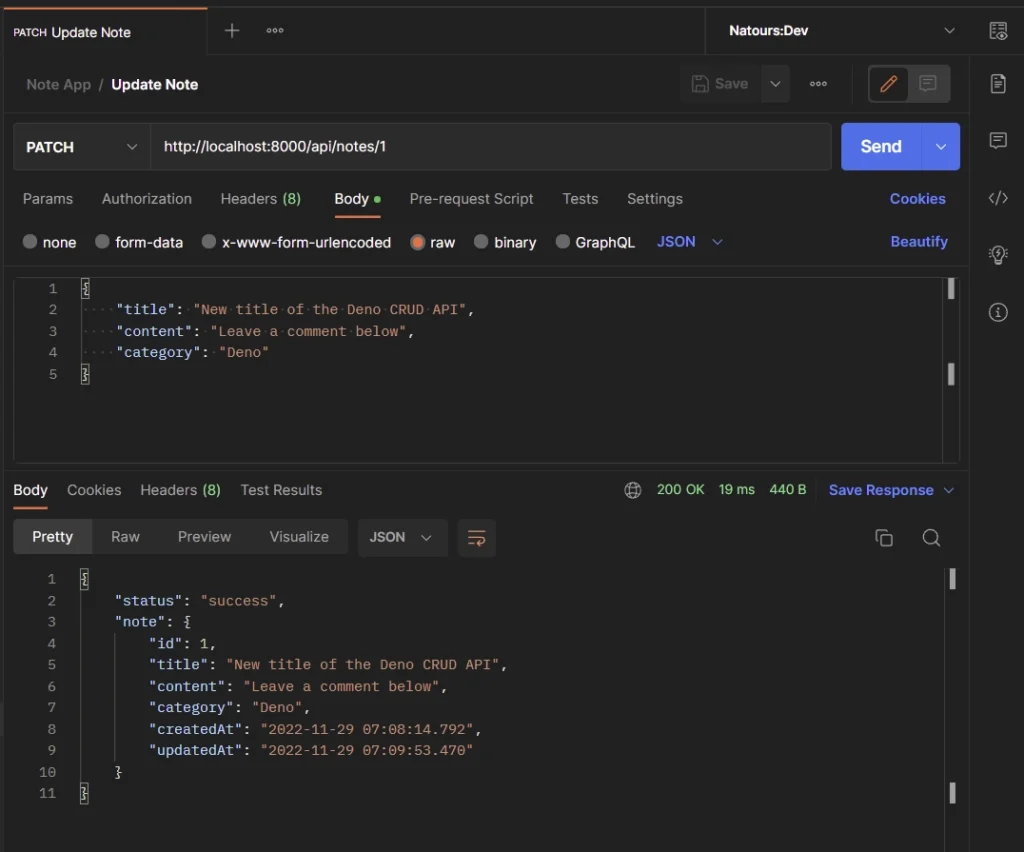
Update a Record
To update an existing record, edit the JSON object and make a PATCH request to the http://localhost:8000/api/notes/:noteId endpoint. The Deno API will then retrieve the ID of the record from the request parameters, validate the request body against the schema rules, and update the record that matches that ID in the database.
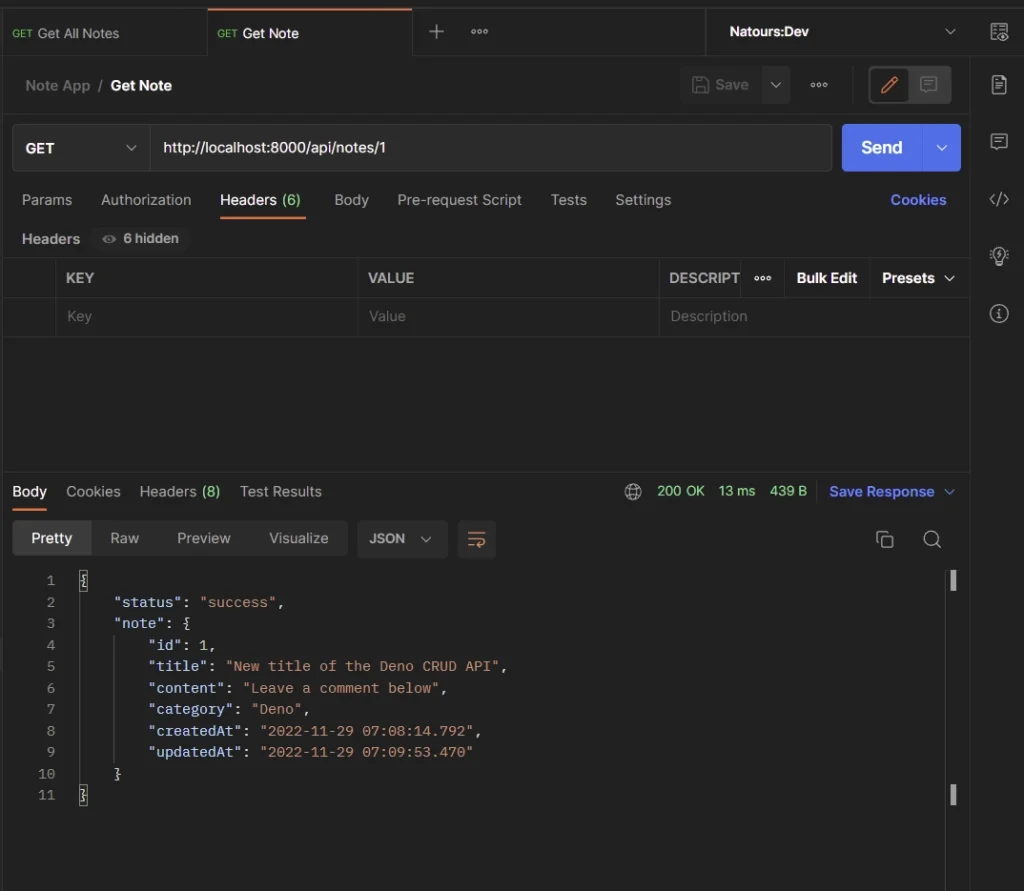
Get a Single Record
To retrieve a single record, make a GET request to the http://localhost:8000/api/notes/:noteId endpoint. The Deno API will retrieve the record’s ID from the request parameter and query the database to retrieve the record that matches that ID.
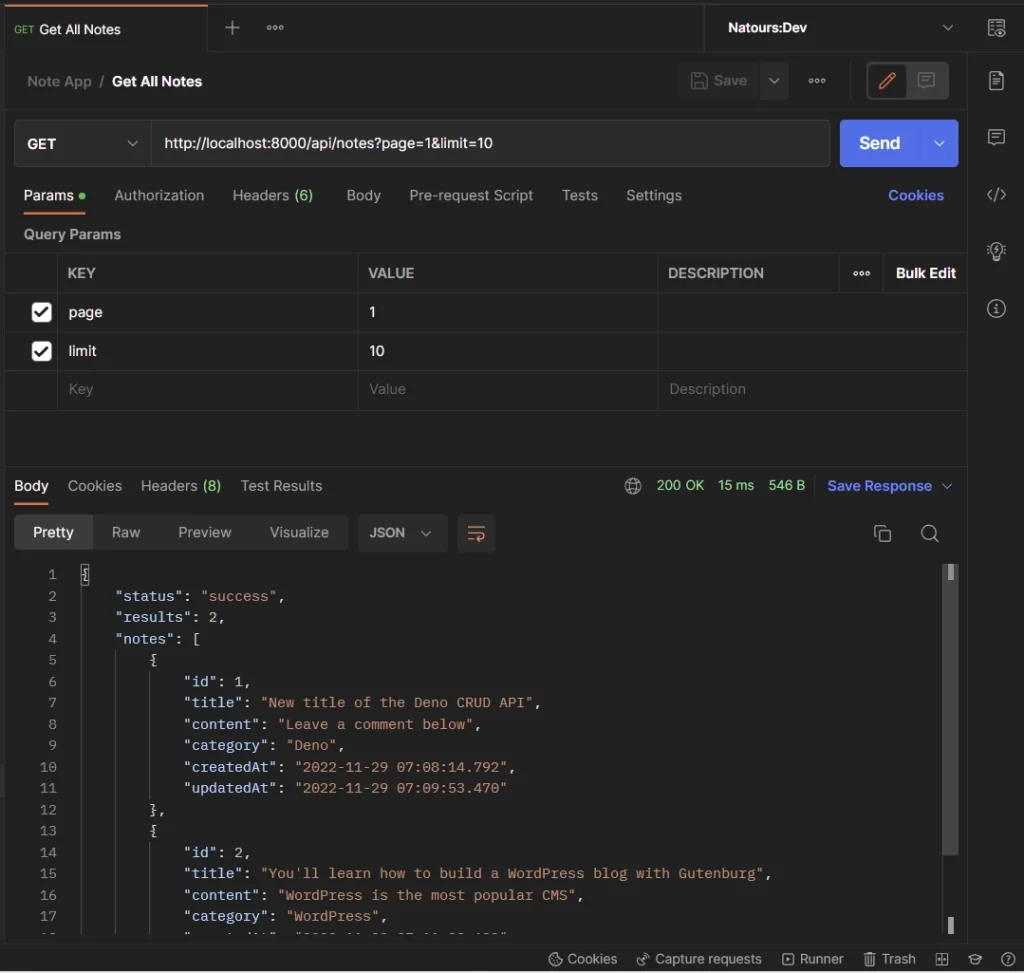
Get Multiple Record
To get all the records, make a GET request to the http://localhost:8000/api/notes?page=1&limit=10 endpoint. Since the API has a pagination feature, you can provide page and limit numbers to retrieve a selected list of the records. By default, the API will return only 10 records if the page and limit parameters were not provided in the request URL.
Delete a Record
To delete a record, make a DELETE request to the http://localhost:8000/api/notes/:noteId endpoint. The Deno API will extract the record’s ID from the request parameters and query the database to remove the record that matches that ID.

Conclusion
Congrats on making it to the end. In this article, you learned how to create a CRUD API with Deno and DenoDB. Take it as a challenge and add authentication to the Deno CRUD API so that only authenticated users can access certain routes.
You can find the complete source code of the Deno CRUD API on GitHub.
It would be wonderful if you could create a Deno Fresh frontend app to go along with this Build CRUD API with Deno backend.
Thank you for your suggestion! I’m glad to hear that you would find a Deno Fresh frontend app useful.
I’ll definitely consider adding that in the future. Your feedback is greatly appreciated and helps me to create better content.
Excellent. I will certainly keep an eye out for your Fresh CRUD frontend post.