

In this article, you’ll learn how to implement Google OAuth Authentication with React.js and Node.js without using Passport. You’ll also learn how to send JWT access and refresh tokens after the user has been authenticated.
Related articles:
- GitHub OAuth Authentication Vue.js and Node.js (No Passport)
- Google OAuth Authentication React.js and Node.js(No Passport)
- GitHub OAuth Authentication React.js and Node.js(No Passport)
- How to Implement GitHub OAuth in React.js
- How to Implement Google OAuth2 in React.js
Prerequisites
- Have some basic knowledge of HTML, CSS, React.js, and Node.js
- Have Node.js installed on your machine
Create Google client ID and client secret
Open your browser and search for Google OAuth. Click on the first link in the search results and you should be taken to OAuth 2.0 to Access Google APIs.
On this page, you will find the instructions to get the access keys but don’t worry I will guide you on how to do it the right way.
Click on the Google API Console where we will obtain the OAuth 2.0 client credentials.
You need a Google account to access the Google API Console page.
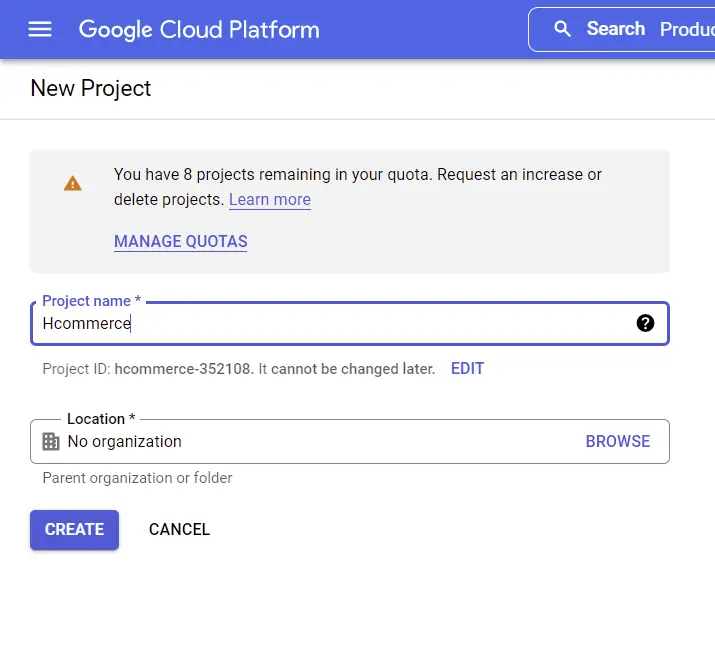
Create a New Project
Click on the Google-Oauth dropdown, a popup should appear where you can select an existing project or create a new one.
Click on the “New Project” button then provide the project name and click on the “CREATE” button.
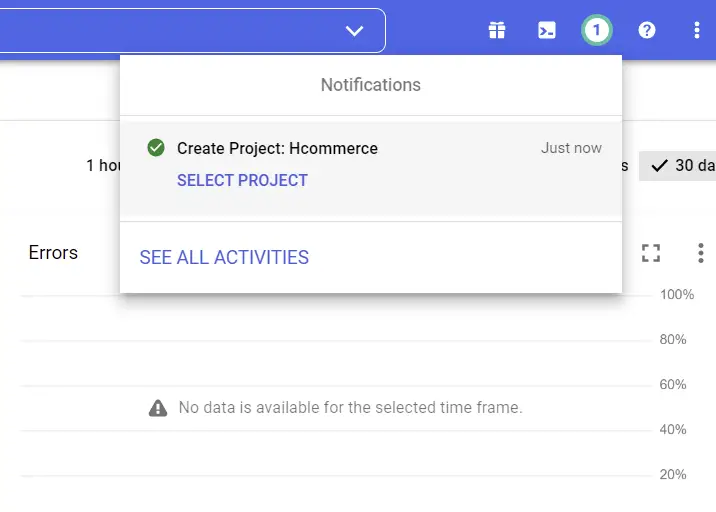
Now wait for Google to do its job and once the project has been successfully created, you should see a success notification.
Click on the “SELECT PROJECT” button and tap anywhere on the screen to close the popup.
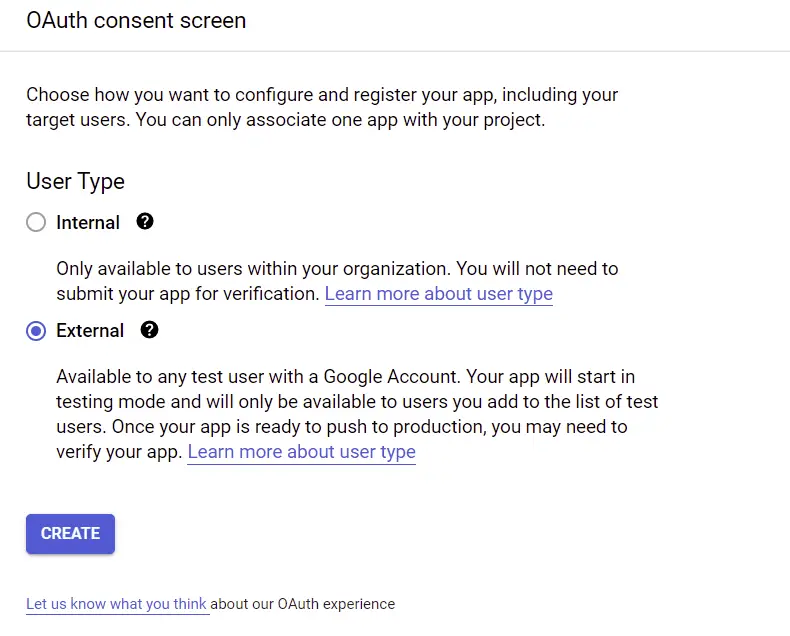
Create an OAuth Consent Screen
Before we can create the credentials, we first need to create a consent screen. The consent screen is where the user will be redirected when they click on the link.
On the sidebar under “APIs & Services” select OAuth consent screen. On the OAuth consent screen tab, select the External User Type if you are making a publicly facing application and click on the “CREATE” button.
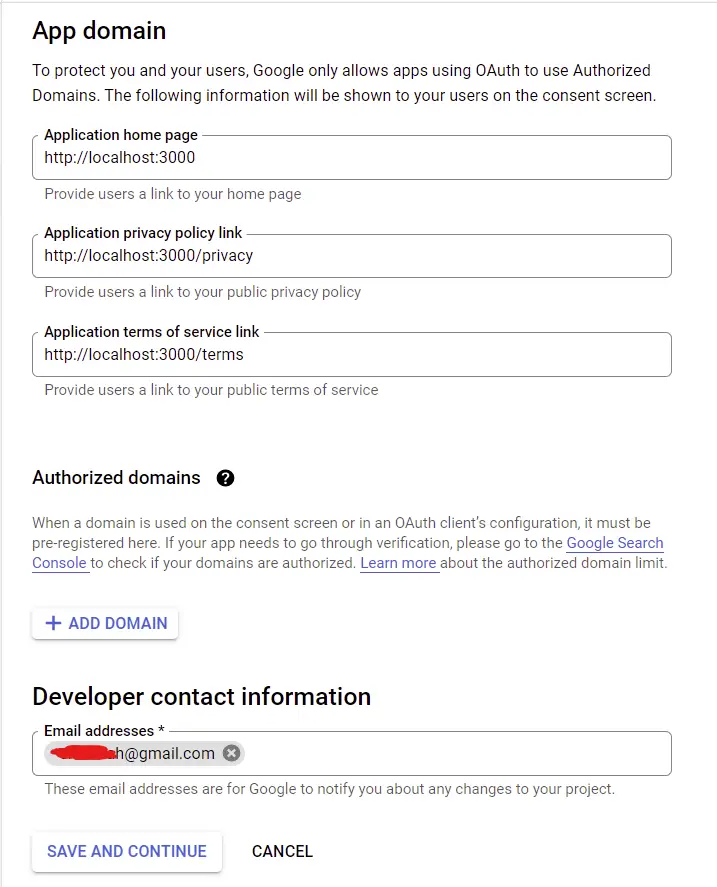
Next, provide the required information for the consent screen
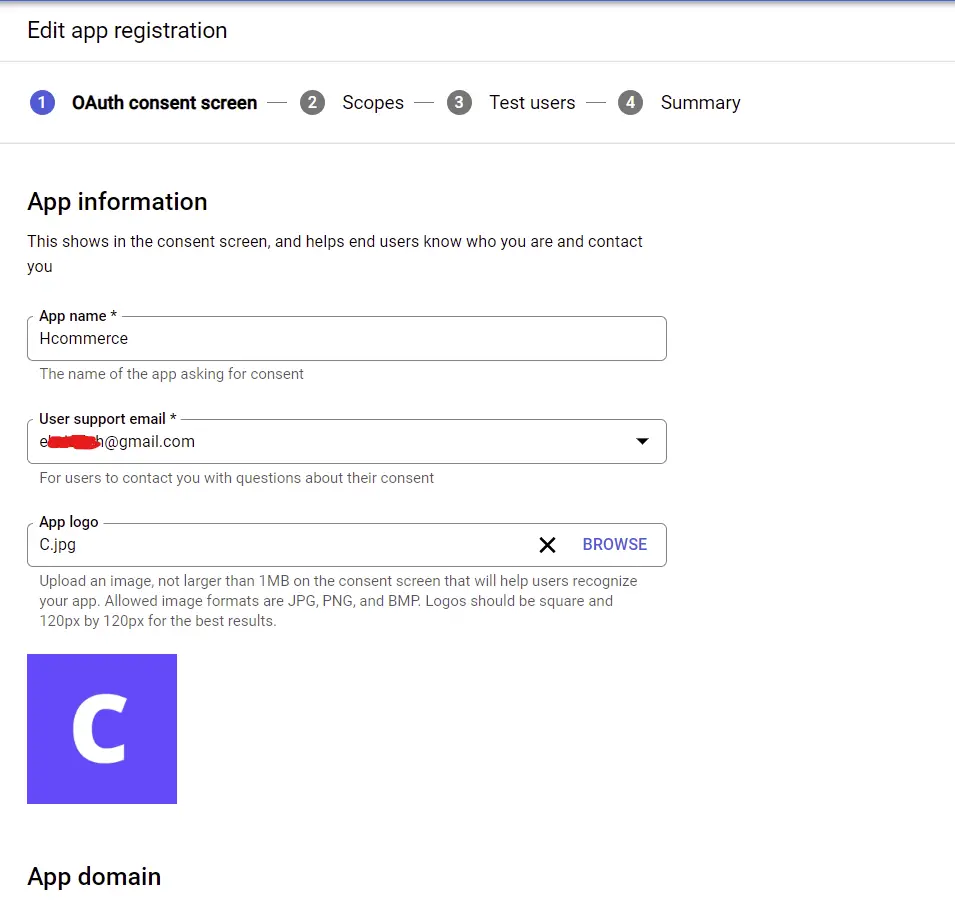
Once you are done, click on the “SAVE AND CONTINUE” button.
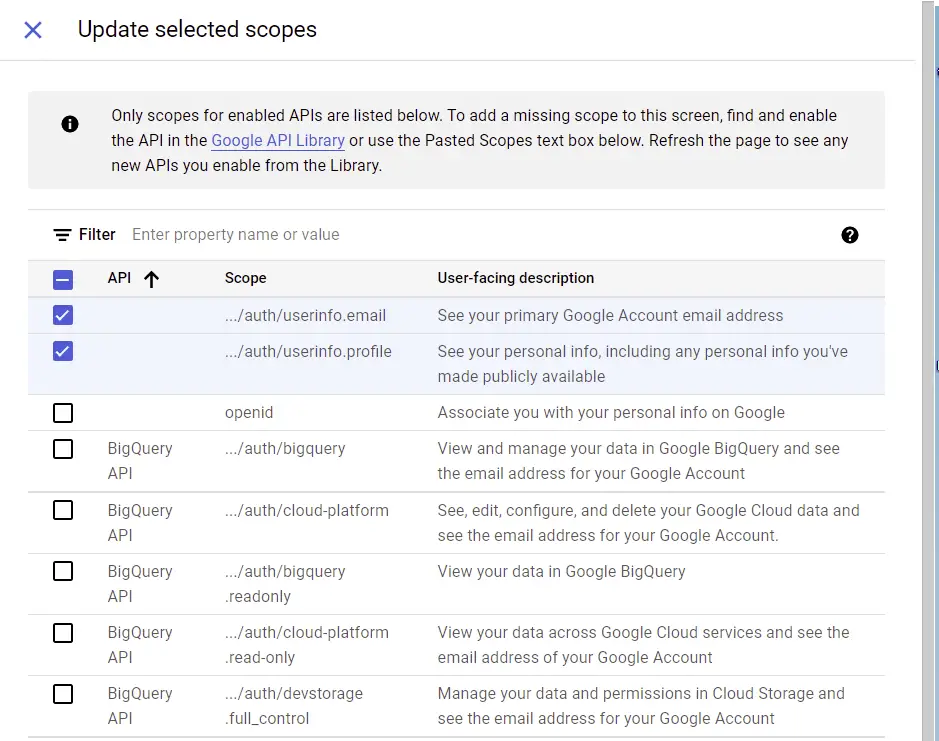
On the Scopes tab, click on the “ADD OR REMOVE SCOPES”. There are many scopes you can add depending on your application but am only interested in the user’s email and profile information.
Scroll down and click on the “UPDATE” button after selecting the scopes and then click on the “SAVE AND CONTINUE” button.
On the Test users tab, click on the ADD USERS button to add a test user. The test user is the only account that will be able to log into your application whilst in sandbox mode.
Once you have added the test user, click on “SAVE AND CONTINUE”.
On the Summary tab, review the information and click on the “BACK TO DASHBOARD” button.
Create the OAuth Credentials
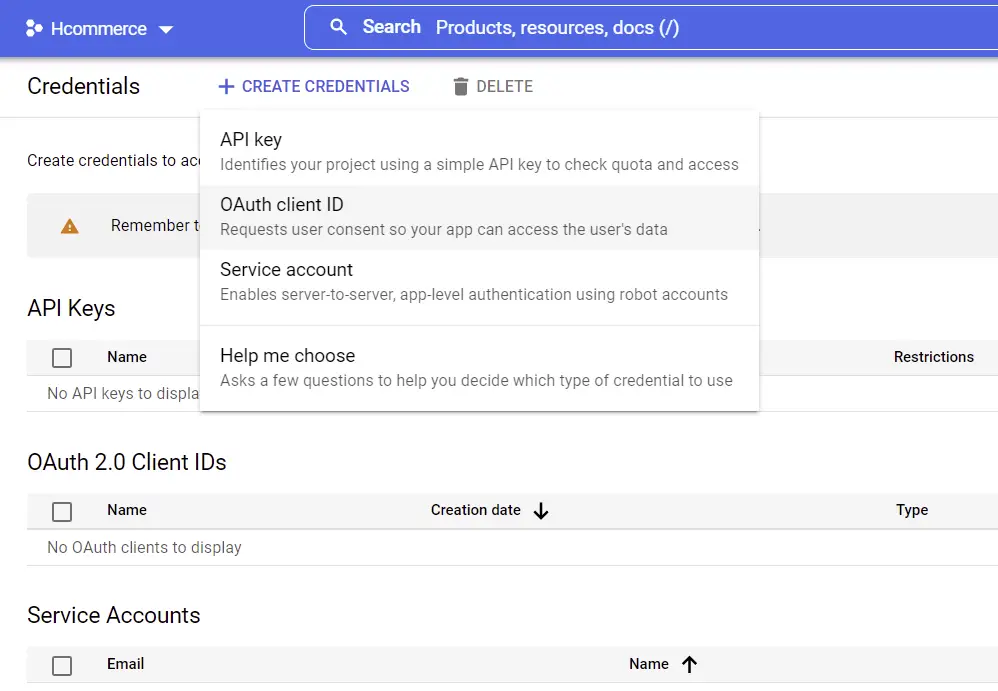
On the sidebar under “APIs & Services” select Credentials. On the Credentials tab, click on “CREATE CREDENTIALS” and choose OAuth client ID.
Now provide the required fields. The authorized redirect URL should point to your server to enable us to make the GET request directly from the consent screen.
There are many ways you can do this but I find this method a lot quicker.
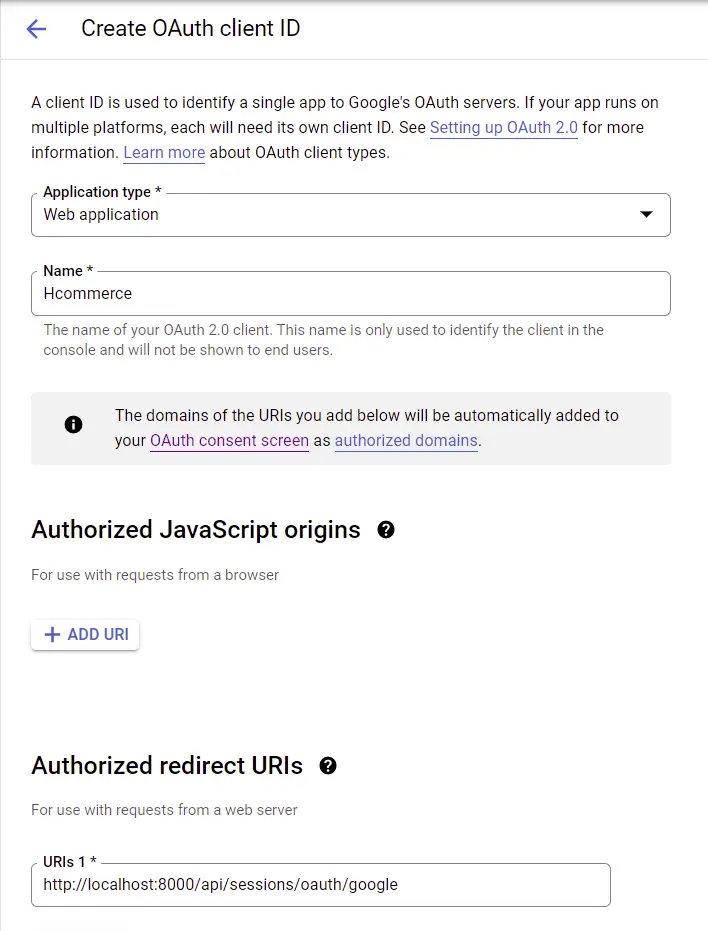
Next, click on “CREATE” and you should get your client ID and client secret.
Update your .env file on the server with the credentials.
.env
GOOGLE_OAUTH_CLIENT_ID=your client Id here
GOOGLE_OAUTH_CLIENT_SECRET=your client secret here
GOOGLE_OAUTH_REDIRECT_URL=http://localhost:8000/api/sessions/oauth/google
Also, update the .env.local file in the React application.
REACT_APP_GOOGLE_OAUTH_CLIENT_ID=your client Id here
REACT_APP_GOOGLE_OAUTH_CLIENT_SECRET=your client secret here
REACT_APP_GOOGLE_OAUTH_ENDPOINT=http://localhost:8000
REACT_APP_GOOGLE_OAUTH_REDIRECT=http://localhost:8000/api/sessions/oauth/google
Build the Consent Screen URL
Now, we are ready to implement Google OAuth Authentication in our application.
To begin, we need to build the OAuth consent screen link based on the client ID and the redirect URL.
Also, we need to provide the scopes we selected in the credentials tab above.
src/utils/getGoogleUrl.ts
export const getGoogleUrl = (from: string) => {
  const rootUrl = `https://accounts.google.com/o/oauth2/v2/auth`;

  const options = {
    redirect_uri: process.env.REACT_APP_GOOGLE_OAUTH_REDIRECT as string,
    client_id: process.env.REACT_APP_GOOGLE_OAUTH_CLIENT_ID as string,
    access_type: 'offline',
    response_type: 'code',
    prompt: 'consent',
    scope: [
      'https://www.googleapis.com/auth/userinfo.profile',
      'https://www.googleapis.com/auth/userinfo.email',
    ].join(' '),
    state: from,
  };

  const qs = new URLSearchParams(options);

  return `${rootUrl}?${qs.toString()}`;
};
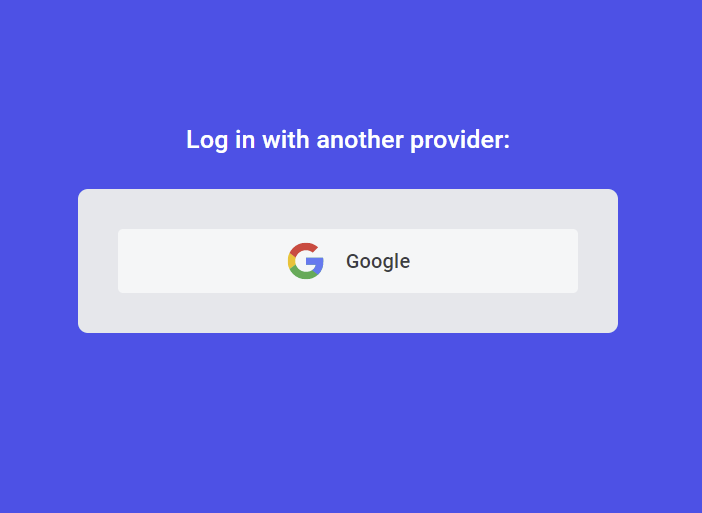
Build the Google OAuth Login Page with React and MUI
Next, create a login screen with the consent screen link. I created a simple login page having the Google login button with React and Material UI for those who are not following the tutorials in this series.
src/pages/login.page.tsx
import { Box, Container, Typography, Link as MuiLink } from '@mui/material';
import { useLocation } from 'react-router-dom';
import { ReactComponent as GoogleLogo } from '../assets/google.svg';
import { getGoogleUrl } from '../utils/getGoogleUrl';

const LoginPage = () => {
  const location = useLocation();
  let from = ((location.state as any)?.from?.pathname as string) || '/';

  return (
    <Container
      maxWidth={false}
      sx={{
        display: 'flex',
        justifyContent: 'center',
        alignItems: 'center',
        height: '100vh',
        backgroundColor: '#2363eb',
      }}
    >
      <Box width='27rem'>
        <Typography
          variant='h6'
          component='p'
          sx={{
            my: '1.5rem',
            textAlign: 'center',
            color: 'white',
          }}
        >
          Log in with another provider:
        </Typography>
        <Box
          width='100%'
          sx={{
            backgroundColor: '#e5e7eb',
            p: { xs: '1rem', sm: '2rem' },
            borderRadius: 2,
          }}
        >
          <MuiLink
            href={getGoogleUrl(from)}
            sx={{
              backgroundColor: '#f5f6f7',
              borderRadius: 1,
              py: '0.6rem',
              columnGap: '1rem',
              textDecoration: 'none',
              color: '#393e45',
              cursor: 'pointer',
              fontWeight: 500,
              '&:hover': {
                backgroundColor: '#fff',
                boxShadow: '0 1px 13px 0 rgb(0 0 0 / 15%)',
              },
            }}
            display='flex'
            justifyContent='center'
            alignItems='center'
          >
            <GoogleLogo style={{ height: '2rem' }} />
            Google
          </MuiLink>
        </Box>
      </Box>
    </Container>
  );
};

export default LoginPage;
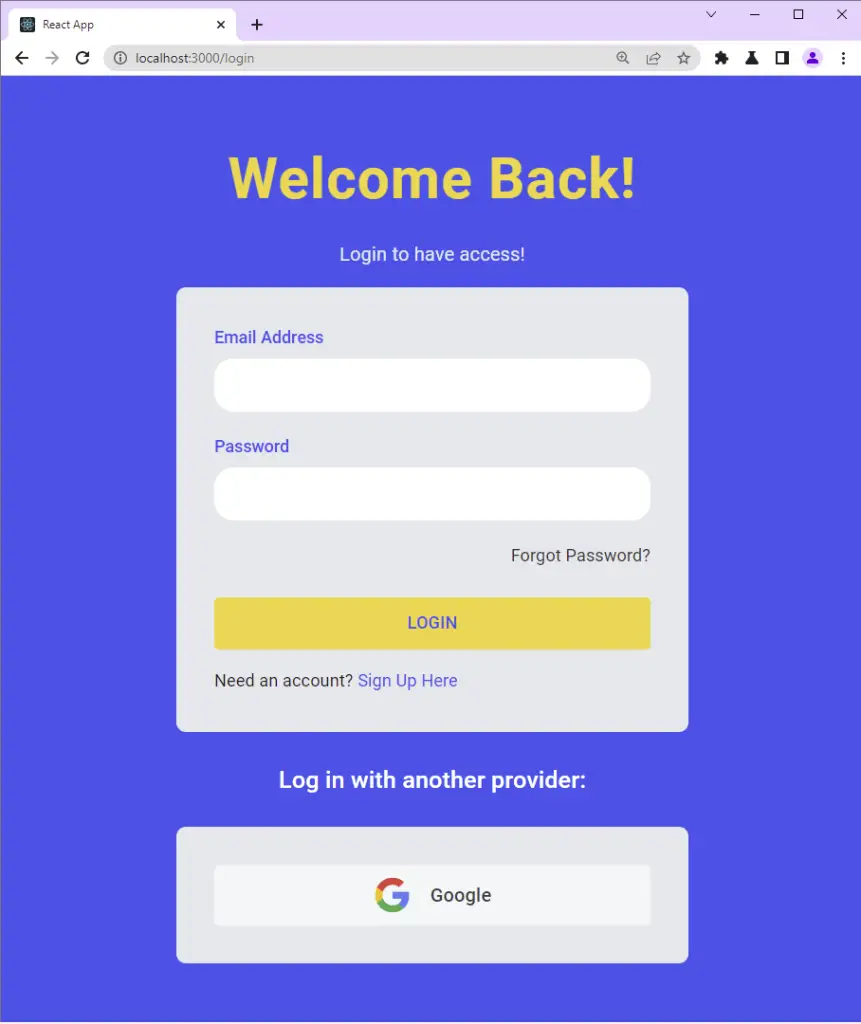
If you are coming from the previous tutorial in this series, then update the login.page.tsx file to include the Google login button.
src/pages/login.page.tsx
import { Box, Container, Typography, Link as MuiLink } from '@mui/material';
import { styled } from '@mui/material/styles';
import { FormProvider, SubmitHandler, useForm } from 'react-hook-form';
import { object, string, TypeOf } from 'zod';
import { zodResolver } from '@hookform/resolvers/zod';
import FormInput from '../components/FormInput';
import { useEffect } from 'react';
import { Link, useLocation, useNavigate } from 'react-router-dom';
import { LoadingButton as _LoadingButton } from '@mui/lab';
import { toast } from 'react-toastify';
import { useLoginUserMutation } from '../redux/api/authApi';
import { ReactComponent as GoogleLogo } from '../assets/google.svg';
import { getGoogleUrl } from '../utils/getGoogleUrl';

const LoadingButton = styled(_LoadingButton)`
  padding: 0.6rem 0;
  background-color: #f9d13e;
  color: #2363eb;
  font-weight: 500;

  &:hover {
    background-color: #ebc22c;
    transform: translateY(-2px);
  }
`;

const LinkItem = styled(Link)`
  text-decoration: none;
  color: #2363eb;
  &:hover {
    text-decoration: underline;
  }
`;

const loginSchema = object({
  email: string()
    .nonempty('Email address is required')
    .email('Email Address is invalid'),
  password: string()
    .nonempty('Password is required')
    .min(8, 'Password must be more than 8 characters')
    .max(32, 'Password must be less than 32 characters'),
});

export type LoginInput = TypeOf<typeof loginSchema>;

const LoginPage = () => {
  const methods = useForm<LoginInput>({
    resolver: zodResolver(loginSchema),
  });

  // ? API Login Mutation
  const [loginUser, { isLoading, isError, error, isSuccess }] =
    useLoginUserMutation();

  const navigate = useNavigate();
  const location = useLocation();

  const from = ((location.state as any)?.from.pathname as string) || '/profile';

  const {
    reset,
    handleSubmit,
    formState: { isSubmitSuccessful },
  } = methods;

  useEffect(() => {
    if (isSuccess) {
      toast.success('You successfully logged in');
      navigate(from);
    }
    if (isError) {
      if (Array.isArray((error as any).data.error)) {
        (error as any).data.error.forEach((el: any) =>
          toast.error(el.message, {
            position: 'top-right',
          })
        );
      } else {
        toast.error((error as any).data.message, {
          position: 'top-right',
        });
      }
    }
    // eslint-disable-next-line react-hooks/exhaustive-deps
  }, [isLoading]);

  useEffect(() => {
    if (isSubmitSuccessful) {
      reset();
    }
    // eslint-disable-next-line react-hooks/exhaustive-deps
  }, [isSubmitSuccessful]);

  const onSubmitHandler: SubmitHandler<LoginInput> = (values) => {
    // ? Executing the loginUser Mutation
    loginUser(values);
  };

  return (
    <Container
      maxWidth={false}
      sx={{
        display: 'flex',
        justifyContent: 'center',
        alignItems: 'center',
        height: '100vh',
        backgroundColor: '#2363eb',
      }}
    >
      <Box
        sx={{
          display: 'flex',
          justifyContent: 'center',
          alignItems: 'center',
          flexDirection: 'column',
        }}
      >
        <Typography
          textAlign='center'
          component='h1'
          sx={{
            color: '#f9d13e',
            fontWeight: 600,
            fontSize: { xs: '2rem', md: '3rem' },
            mb: 2,
            letterSpacing: 1,
          }}
        >
          Welcome Back!
        </Typography>
        <Typography
          variant='body1'
          component='h2'
          sx={{ color: '#e5e7eb', mb: 2 }}
        >
          Login to have access!
        </Typography>

        <FormProvider {...methods}>
          <Box
            component='form'
            onSubmit={handleSubmit(onSubmitHandler)}
            noValidate
            autoComplete='off'
            maxWidth='27rem'
            width='100%'
            sx={{
              backgroundColor: '#e5e7eb',
              p: { xs: '1rem', sm: '2rem' },
              borderRadius: 2,
            }}
          >
            <FormInput name='email' label='Email Address' type='email' />
            <FormInput name='password' label='Password' type='password' />

            <Typography
              sx={{ fontSize: '0.9rem', mb: '1rem', textAlign: 'right' }}
            >
              <LinkItem to='/forgotpassword' style={{ color: '#333' }}>
                Forgot Password?
              </LinkItem>
            </Typography>

            <LoadingButton
              variant='contained'
              sx={{ mt: 1 }}
              fullWidth
              disableElevation
              type='submit'
              loading={isLoading}
            >
              Login
            </LoadingButton>

            <Typography sx={{ fontSize: '0.9rem', mt: '1rem' }}>
              Need an account? <LinkItem to='/register'>Sign Up Here</LinkItem>
            </Typography>
          </Box>
        </FormProvider>
        <Typography
          variant='h6'
          component='p'
          sx={{
            my: '1.5rem',
            textAlign: 'center',
            color: 'white',
          }}
        >
          Log in with another provider:
        </Typography>
        <Box
          maxWidth='27rem'
          width='100%'
          sx={{
            backgroundColor: '#e5e7eb',
            p: { xs: '1rem', sm: '2rem' },
            borderRadius: 2,
          }}
        >
          <MuiLink
            href={getGoogleUrl(from)}
            sx={{
              backgroundColor: '#f5f6f7',
              borderRadius: 1,
              py: '0.6rem',
              columnGap: '1rem',
              textDecoration: 'none',
              color: '#393e45',
              cursor: 'pointer',
              fontWeight: 500,
              '&:hover': {
                backgroundColor: '#fff',
                boxShadow: '0 1px 13px 0 rgb(0 0 0 / 15%)',
              },
            }}
            display='flex'
            justifyContent='center'
            alignItems='center'
          >
            <GoogleLogo style={{ height: '2rem' }} />
            Google
          </MuiLink>
        </Box>
      </Box>
    </Container>
  );
};

export default LoginPage;
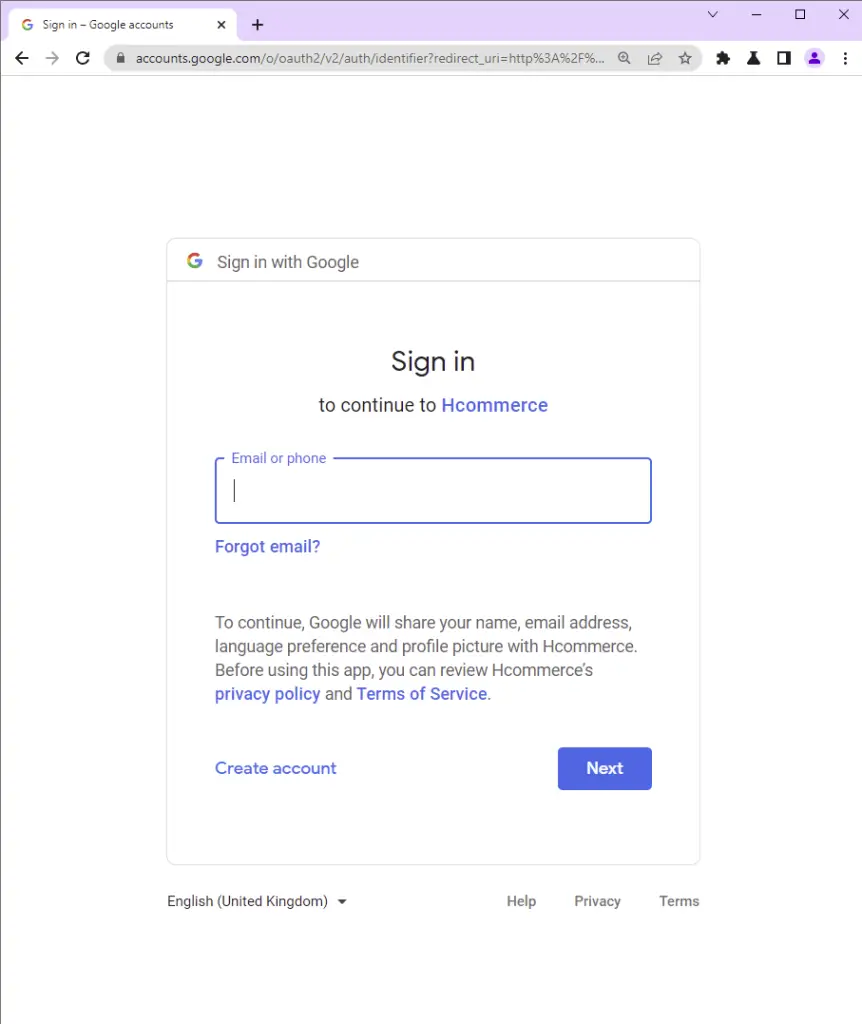
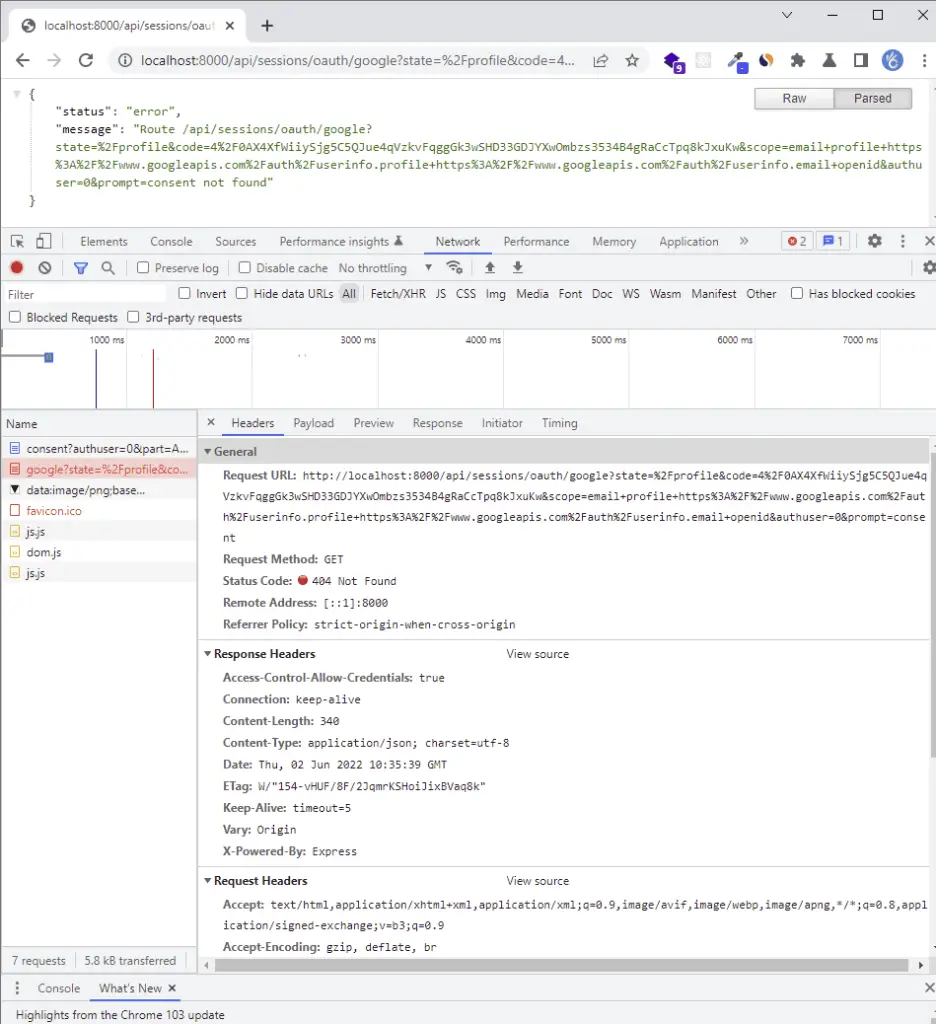
Once you click on the Google button, you should be taken to the consent screen where you’ll see your Google accounts.
I opened the link in a private window to avoid disclosing my Google accounts.
On the consent screen, click on the test user account or log in with the test Google account if you haven’t done that.
You should get a 404 error assuming the server is running. The most exciting part of the redirect URL is the code in the query string.
The reason why we got the 404 error was that we haven’t implemented it on the server yet.
Implement the OAuth Authentication on the Node.js Server
To make the HTTP requests to Google, we’ll use Axios. Run this command to install the Axios package.
yarn add axios
Update the config/custom-environment-variables.ts file to have the OAuth client Id, client secret, and the redirect URL.
config/custom-environment-variables.ts
export default {
  dbName: 'MONGODB_USERNAME',
  dbPass: 'MONGODB_PASSWORD',

  accessTokenPrivateKey: 'ACCESS_TOKEN_PRIVATE_KEY',
  accessTokenPublicKey: 'ACCESS_TOKEN_PUBLIC_KEY',
  refreshTokenPrivateKey: 'REFRESH_TOKEN_PRIVATE_KEY',
  refreshTokenPublicKey: 'REFRESH_TOKEN_PUBLIC_KEY',

  googleClientId: 'GOOGLE_OAUTH_CLIENT_ID',
  googleClientSecret: 'GOOGLE_OAUTH_CLIENT_SECRET',
  googleOauthRedirect: 'GOOGLE_OAUTH_REDIRECT_URL',
};
Get Google OAuth Access Token and User’s Profile
Now create a session.service.ts file in the services folder and add these two functions:
getGoogleOauthToken()– To get the OAuth Access Token from GooglegetGoogleUser()– Get the user’s profile information with the OAuth Access Token
src/services/session.service.ts
import config from 'config';
import axios from 'axios';
import qs from 'qs';

interface GoogleOauthToken {
  access_token: string;
  id_token: string;
  expires_in: number;
  refresh_token: string;
  token_type: string;
  scope: string;
}

export const getGoogleOauthToken = async ({
  code,
}: {
  code: string;
}): Promise<GoogleOauthToken> => {
  const rootURl = 'https://oauth2.googleapis.com/token';

  const options = {
    code,
    client_id: config.get<string>('googleClientId'),
    client_secret: config.get<string>('googleClientSecret'),
    redirect_uri: config.get<string>('googleOauthRedirect'),
    grant_type: 'authorization_code',
  };
  try {
    const { data } = await axios.post<GoogleOauthToken>(
      rootURl,
      qs.stringify(options),
      {
        headers: {
          'Content-Type': 'application/x-www-form-urlencoded',
        },
      }
    );

    return data;
  } catch (err: any) {
    console.log('Failed to fetch Google Oauth Tokens');
    throw new Error(err);
  }
};

interface GoogleUserResult {
  id: string;
  email: string;
  verified_email: boolean;
  name: string;
  given_name: string;
  family_name: string;
  picture: string;
  locale: string;
}

export async function getGoogleUser({
  id_token,
  access_token,
}: {
  id_token: string;
  access_token: string;
}): Promise<GoogleUserResult> {
  try {
    const { data } = await axios.get<GoogleUserResult>(
      `https://www.googleapis.com/oauth2/v1/userinfo?alt=json&access_token=${access_token}`,
      {
        headers: {
          Authorization: `Bearer ${id_token}`,
        },
      }
    );

    return data;
  } catch (err: any) {
    console.log(err);
    throw Error(err);
  }
}
Update the User Model
If you followed the previous tutorials in this series then update the user.model.ts file to have the following fields.
src/models/user.model.ts
import {
  DocumentType,
  getModelForClass,
  index,
  modelOptions,
  pre,
  prop,
} from '@typegoose/typegoose';
import bcrypt from 'bcryptjs';

@index({ email: 1 })
@pre<User>('save', async function () {
  // Hash password if the password is new or was updated
  if (!this.isModified('password')) return;

  // Hash password with costFactor of 12
  this.password = await bcrypt.hash(this.password, 12);
})
@modelOptions({
  schemaOptions: {
    // Add createdAt and updatedAt fields
    timestamps: true,
  },
})

// Export the User class to be used as TypeScript type
export class User {
  @prop()
  name: string;

  @prop({ unique: true, required: true })
  email: string;

  @prop({ required: true, minlength: 8, maxLength: 32, select: false })
  password: string;

  @prop({ default: 'user' })
  role: string;

  @prop({ default: 'default.png' })
  photo: string;

  @prop({ default: false })
  verified: boolean;

  @prop({ default: 'local' })
  provider: string;

  // Instance method to check if passwords match
  async comparePasswords(hashedPassword: string, candidatePassword: string) {
    return await bcrypt.compare(candidatePassword, hashedPassword);
  }
}

// Create the user model from the User class
const userModel = getModelForClass(User);
export default userModel;
Add a Service to Update the User
Next, add the code below to the user.service.ts file to help us update the user’s information in the MongoDB database.
src/services/user.service.ts
export const findAndUpdateUser = async (
  query: FilterQuery<User>,
  update: UpdateQuery<User>,
  options: QueryOptions
) => {
  return await userModel.findOneAndUpdate(query, update, options);
};
Create the Google OAuth Controller
Add the googleOauthHandler to the auth.controller.ts . This handler will be called when the user gets redirected to the server.
src/controllers/auth.controller.ts
export const googleOauthHandler = async (
  req: Request,
  res: Response,
  next: NextFunction
) => {
  try {
    // Get the code from the query
    const code = req.query.code as string;
    const pathUrl = (req.query.state as string) || '/';

    if (!code) {
      return next(new AppError('Authorization code not provided!', 401));
    }

    // Use the code to get the id and access tokens
    const { id_token, access_token } = await getGoogleOauthToken({ code });

    // Use the token to get the User
    const { name, verified_email, email, picture } = await getGoogleUser({
      id_token,
      access_token,
    });

    // Check if user is verified
    if (!verified_email) {
      return next(new AppError('Google account not verified', 403));
    }

    // Update user if user already exist or create new user
    const user = await findAndUpdateUser(
      { email },
      {
        name,
        photo: picture,
        email,
        provider: 'Google',
        verified: true,
      },
      { upsert: true, runValidators: false, new: true, lean: true }
    );

    if (!user)
      return res.redirect(`${config.get<string>('origin')}/oauth/error`);

    // Create access and refresh token
    const { access_token: accessToken, refresh_token } = await signToken(user);

    // Send cookie
    res.cookie('refresh-token', refresh_token, refreshTokenCookieOptions);
    res.cookie('access-token', accessToken, accessTokenCookieOptions);
    res.cookie('logged_in', true, {
      expires: new Date(
        Date.now() + config.get<number>('accessTokenExpiresIn') * 60 * 1000
      ),
    });

    res.redirect(`${config.get<string>('origin')}${pathUrl}`);
  } catch (err: any) {
    console.log('Failed to authorize Google User', err);
    return res.redirect(`${config.get<string>('origin')}/oauth/error`);
  }
};
Create the Route
Now create a session.routes.ts file in the routes folder and add the code below.
src/routes/session.routes.ts
import express from 'express';
import { googleOauthHandler } from '../controllers/auth.controller';

const router = express.Router();

router.get('/oauth/google', googleOauthHandler);

export default router;
Register the Session Router
Next, add the router defined above to the middleware stack in the app.ts file.
import sessionRouter from './routes/session.route';

// ? Register the session router
app.use('/api/sessions', sessionRouter);
Conclusion
Congrats for reaching the end. In this article, you learned how to implement Google OAuth in React.js, Node.js, and MongoDB applications without using the Passport.js library.
You can find the complete code used in this tutorial on GitHub
when u pass redirect uri in front end app and redirect uri points to backend server code what will front end app do at that time
and when during get access token and refresh token you pass again redirect-uri what will be that redirect uri in backend.
what will be redirect uri when u pass code to this function
export const getGoogleOauthToken = async ({
code,
}: {
code: string;
}): Promise => {
const rootURl = ‘https://oauth2.googleapis.com/token’;
const options = {
code,
client_id: config.get(‘googleClientId’),
client_secret: config.get(‘googleClientSecret’),
redirect_uri: config.get(‘googleOauthRedirect’), // what will be this?? is it backend or frontend url
grant_type: ‘authorization_code’,
};
try {
const { data } = await axios.post(
rootURl,
qs.stringify(options),
{
headers: {
‘Content-Type’: ‘application/x-www-form-urlencoded’,
},
}
);
return data;
} catch (err: any) {
console.log(‘Failed to fetch Google Oauth Tokens’);
throw new Error(err);
}
}
The
redirect_uriis the callback URL that you specified when registering your OAuth application with the Google Cloud Console. This URL serves as the endpoint where the Google OAuth authorization API redirects the user after they grant permission to your application on the OAuth consent screen. In this application, theredirect_uripoints to a route on the backend server.When the user selects their desired account on the consent screen, Google will automatically redirect the request to the specified
redirect_urialong with acodequery parameter appended to the URL.The Node.js server then extracts this code from the URL and initiates a request to the Google OAuth Token endpoint to obtain access and refresh tokens. Once the tokens are successfully obtained, the backend server can utilize the access token to fetch the user’s information.
Now, addressing your specific questions:
redirect_uriin the frontend app and it points to the backend server code, the frontend app itself won’t take any action. Instead, the user’s browser will be automatically redirected to the OAuth consent screen, where they can choose an account and grant permission.redirect_uriis once again passed in the backend server code. This is necessary because the Google OAuth Token API requires theredirect_urito be included in the request.It’s worth noting that implementing OAuth manually can be complex and prone to security issues. In production applications, it is generally recommended to use well-established OAuth libraries that handle the implementation using best practices and provide built-in security measures.
If you have any further questions, feel free to ask.