
This article will teach you how to create a CRUD RESTful API with Python, FastAPI, SQLAlchemy ORM, Pydantic, Alembic, PostgreSQL, and Docker-compose to perform the basic Create/Read/Update/Delete operations against a database.
API with Python, FastAPI, SQLAlchemy ORM, Alembic, and PostgreSQL:
- RESTful API with Python & FastAPI: Access and Refresh Tokens
- RESTful API with Python & FastAPI: Send HTML Emails
- CRUD RESTful API Server with Python, FastAPI, and PostgreSQL
Related articles:
- Node.js, Express, TypeORM, PostgreSQL: CRUD Rest API
- Build CRUD RESTful API Server with Golang, Gin, and MongoDB
- Next.js Full-Stack App with React Query, and GraphQL-CodeGen
- Build Full-Stack tRPC CRUD Application with Node.js, and React.js
- GraphQL CRUD API with Next.js, MongoDB, and TypeGraphQL
Python, FastAPI, PostgreSQL CRUD API Overview
We’ll build a CRUD RESTful API with Python and FastAPI to perform Create/Read/Update/Delete operations against a PostgreSQL database.
You can import the Postman collection I used in testing the API into your Postman to make your life easier.
| RESOURCE | HTTP METHOD | ROUTE | DESCRIPTION |
|---|---|---|---|
| posts | GET | /api/posts | Fetch all posts |
| posts | POST | /api/posts | Create a new post |
| posts | GET | /api/posts/:postId | Request a single post |
| posts | PUT | /api/posts/:postId | Update a post |
| posts | DELETE | /api/posts/:postId | Remove a post |
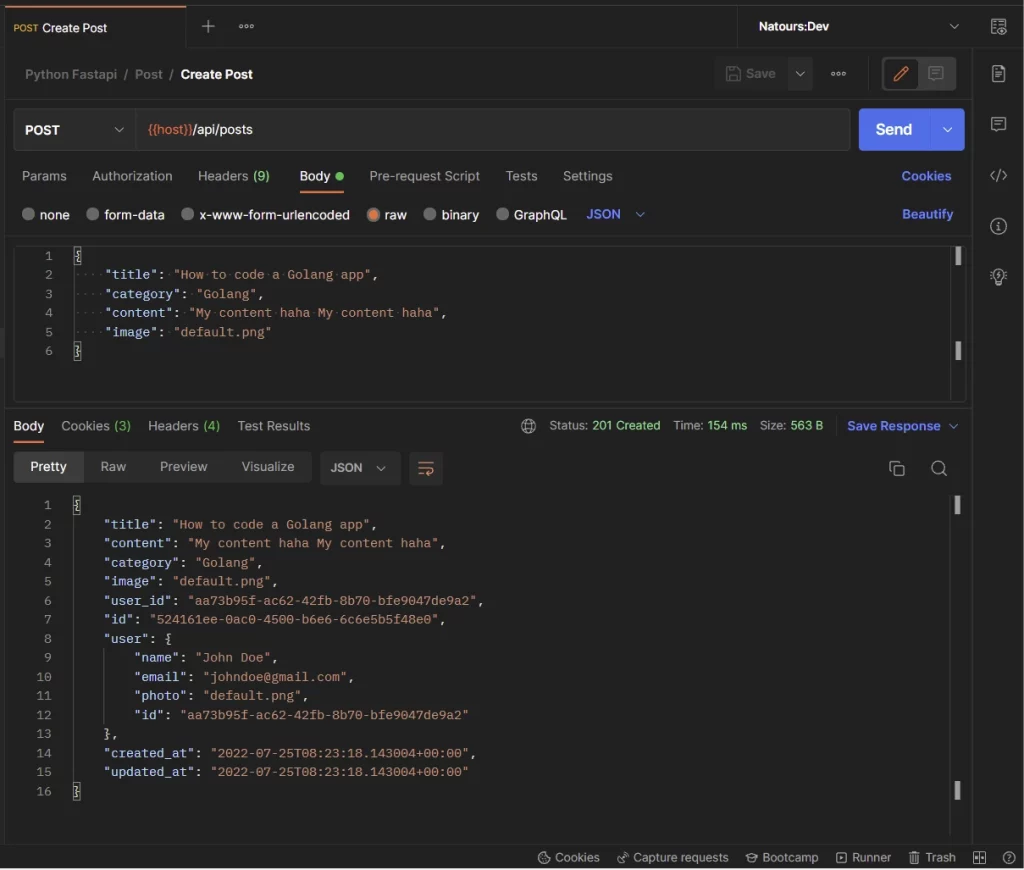
-You can create a new post in the database by making a POST request to the/api/posts endpoint with the necessary data.
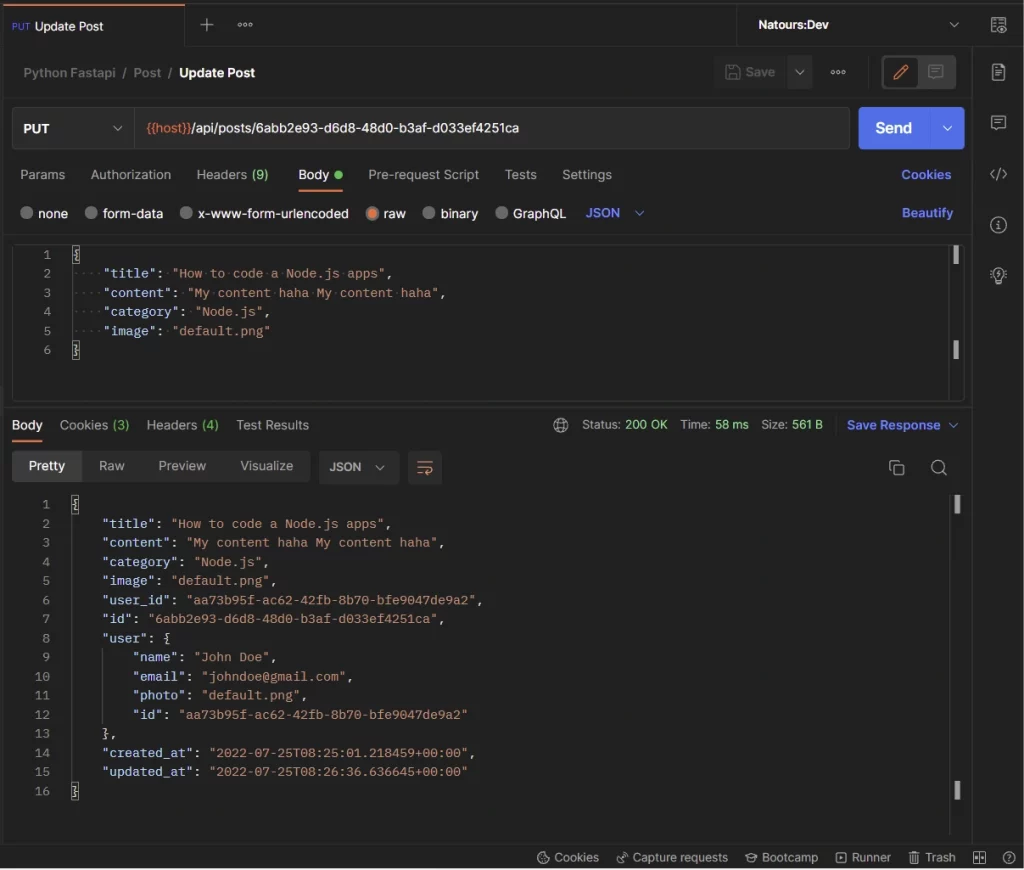
-To update a post in the database, you need to make a PUT request to the/api/posts/:postId endpoint with the edited data.
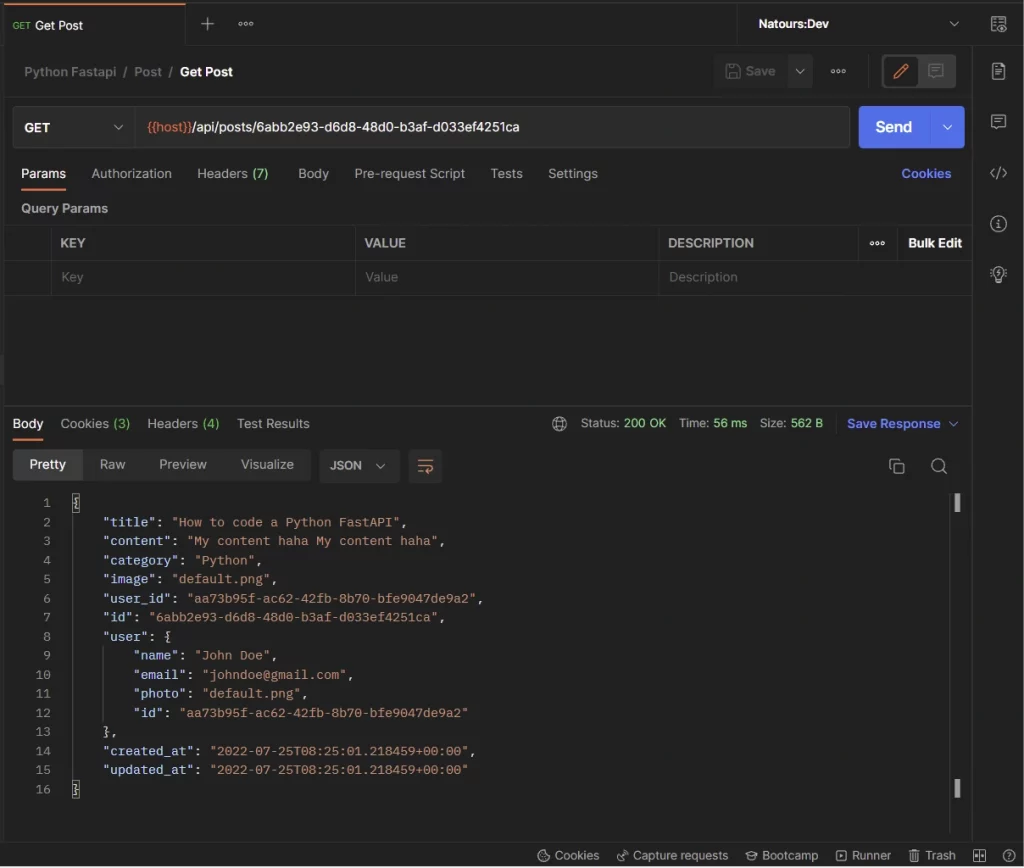
-You can request a single post from the database by making a GET request to the /api/posts/:postId endpoint.
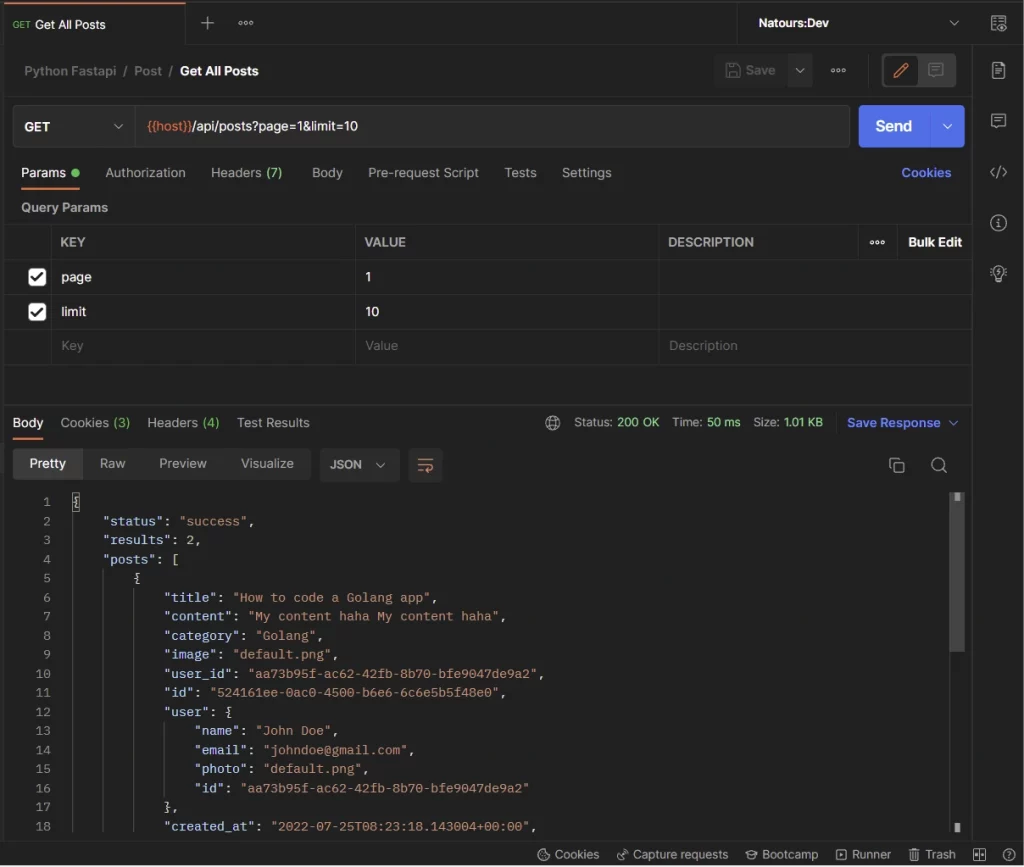
-You can also fetch all the posts from the database or a paginated list of the posts by making a GET request to the /api/posts?page=1&limit=10 endpoint.
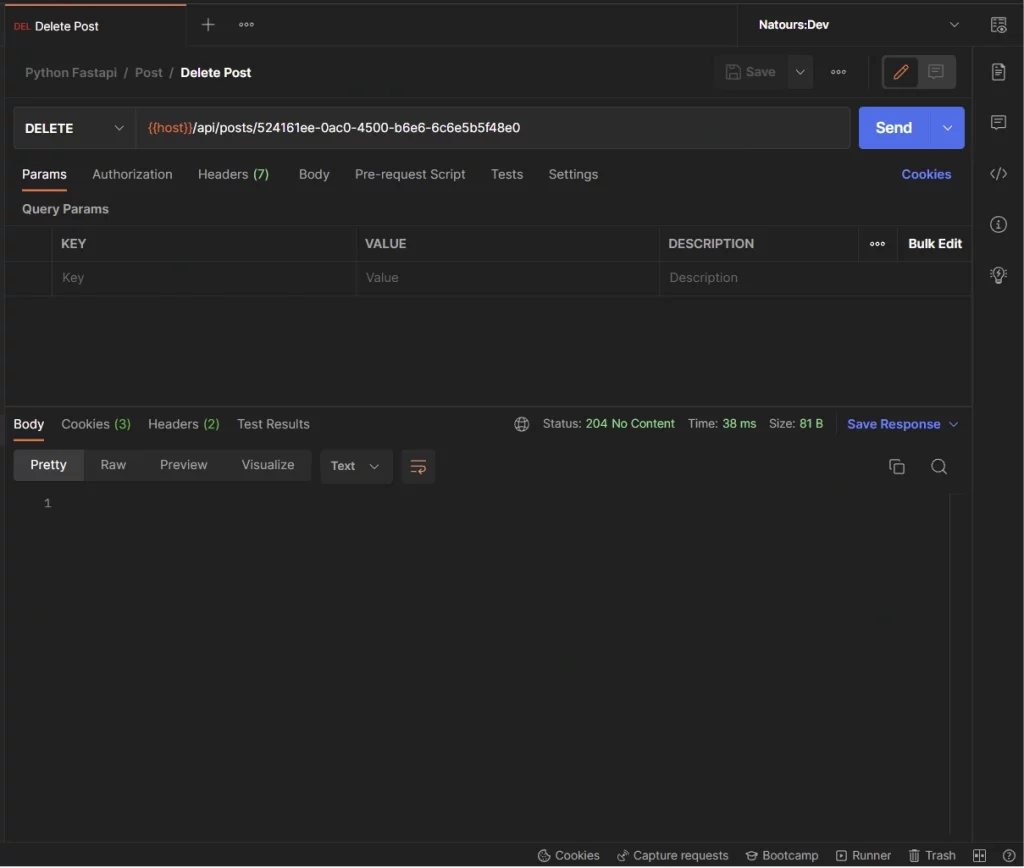
-Finally, you can also delete a post in the database by making a DELETE request to the /api/posts/:postId endpoint.
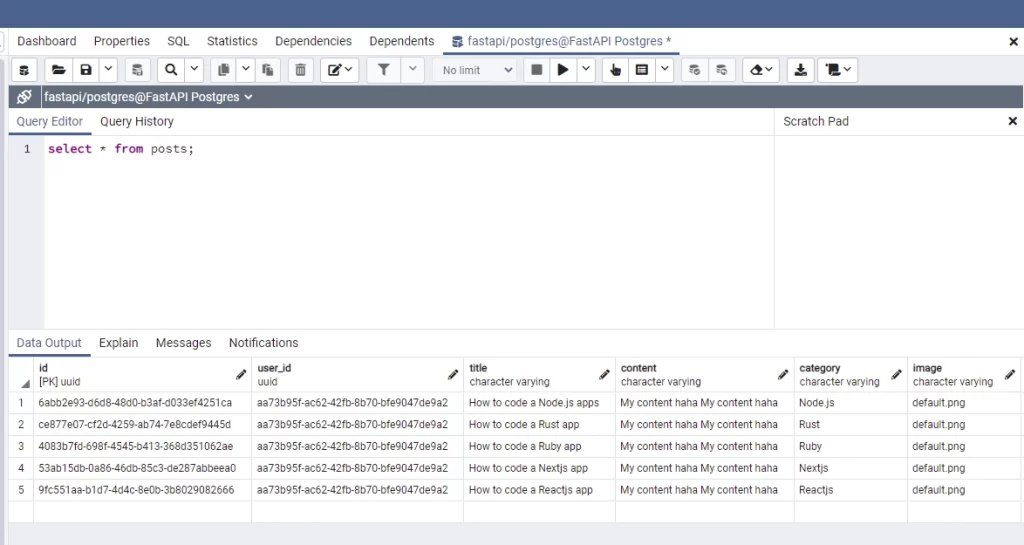
-You can open the pgAdmin application to see all the posts you created.
Prerequisites
Before you start this tutorial:
- Basic knowledge of Python, and FastAPI will be helpful
- Intermediate understanding of SQLAlchemy, and how ORMs work will be highly beneficial.
- Have Docker and Python +3.6 installed
Setting up FastAPI and PostgreSQL
By default, the FastAPI framework supports both NoSQL and SQL databases, making it a great choice for developers.
The code we are going to write can easily be adapted to utilize any database supported by SQLAlchemy, like:
- PostgreSQL
- MySQL
- MS-SQL
- Firebird
- SQLite
- Oracle, etc.
When it comes to working with the PostgreSQL database, the easiest way to run the Postgres server on your system is by using Docker and Docker-compose. At this point, you need to make sure you already have Docker installed on your machine.
I going to use VS Code (Visual Studio Code) as my text editor but feel free to use any IDE or text editor of your choice.
Let’s start by creating a new project called python_fastapi to contain the FastAPI project:
$ mkdir python_fastapi
$ cd python_fastapi
$ code . # opens the project with VS Code
Open the integrated terminal in your text editor or IDE and run this command to create a virtual environment:
Windows Machine:
$ py -3 -m venv venvmacOS Machine:
$ python3 -m venv venvNow create docker-compose.yml file in the root project and add the following configurations:
docker-compose.yml
version: '3'
services:
  postgres:
    image: postgres
    container_name: postgres
    ports:
      - '6500:5432'
    restart: always
    env_file:
      - ./.env
    volumes:
      - postgres-db:/var/lib/postgresql/data
volumes:
  postgres-db:
Next, create a .env file in the root project and add the following credentials. These credentials will be used by the Postgres Docker image to configure the PostgreSQL database.
.env
DATABASE_PORT=6500
POSTGRES_PASSWORD=password123
POSTGRES_USER=postgres
POSTGRES_DB=fastapi
POSTGRES_HOST=postgres
POSTGRES_HOSTNAME=127.0.0.1
.gitignore
__pycache__
venv/
.env
Start the PostgreSQL Docker container with this command:
$ docker-compose up -dYou can stop the container with this command:
$ docker-compose downBuilding the FastAPI Server
First and foremost, We need to activate the virtual environment we created. To do that, create a app/main.py file for VS Code to prepare the Python development environment.
Next, close and reopen the integrated terminal for VS Code to automatically activate the virtual environment.
Also, let’s turn the app folder into a Python package by creating an empty app/__init__.py file.
Install the FastAPI library and its peer dependencies:
pip install fastapi[all]
Starting the FastAPI Server
Open the app/main.py file and add the following code to help us initialize the FastAPI server.
from fastapi import FastAPI

app = FastAPI()


@app.get('/api/healthchecker')
def root():
    return {'message': 'Hello World'}
Start the FastAPI server with this command:
uvicorn app.main:app --host localhost --port 8000 --reload
Let’s evaluate the above command:
uvicorn– a high-performance ASGI server for python applications.app.main: the path to theapp/main.pyfileapp.main:app: the object returned by evokingFASTAPI()--host: specifies the hostname--port: specifies the port. Default is 8000.--reload: auto-reload the server upon every file change
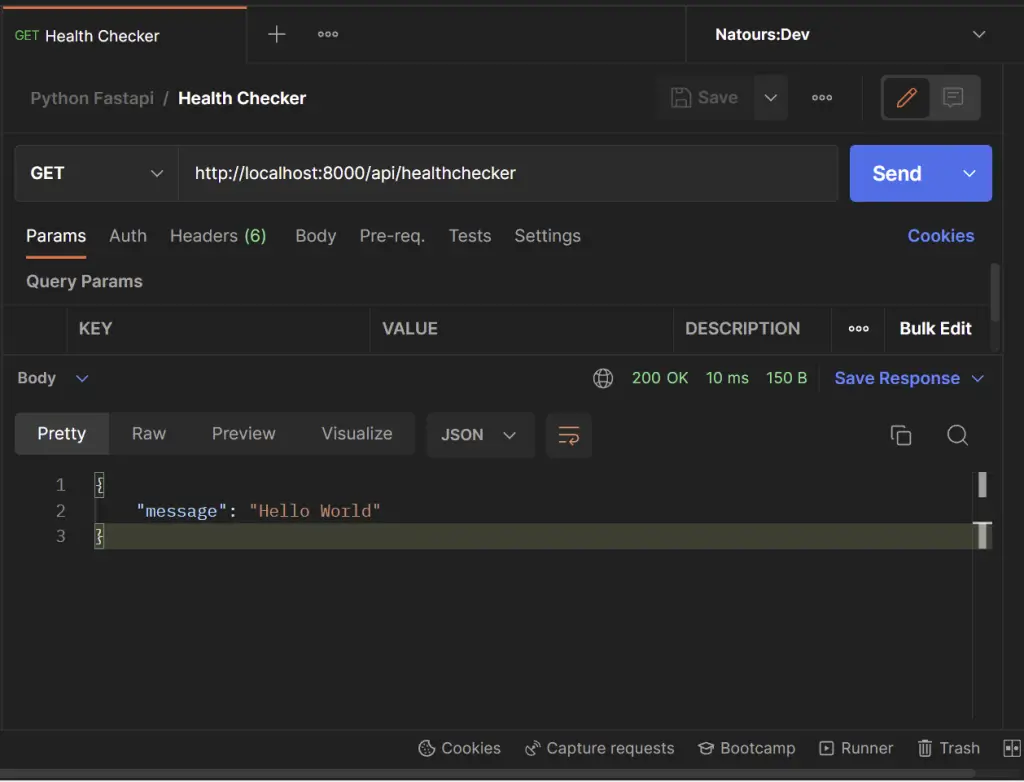
Open any API testing tool of your choice and make a GET request to http://localhost:8000/api/healthchecker . You should get the Hello World message we returned from the path operation function.
Setting up Environment Variables
Out-of-the-box, Pydantic has a built-in tool for reading, loading, and validating the environment variables specified in a configuration file.
All we have to do is to create a custom class model that inherits the BaseSettings class provided by Pydantic.
Replace the content of the .env file with the following environment variables:
.env
DATABASE_PORT=6500
POSTGRES_PASSWORD=password123
POSTGRES_USER=postgres
POSTGRES_DB=fastapi
POSTGRES_HOST=postgres
POSTGRES_HOSTNAME=127.0.0.1

ACCESS_TOKEN_EXPIRES_IN=15
REFRESH_TOKEN_EXPIRES_IN=60
JWT_ALGORITHM=RS256

CLIENT_ORIGIN=http://localhost:3000

JWT_PRIVATE_KEY=LS0tLS1CRUdJTiBSU0EgUFJJVkFURSBLRVktLS0tLQpNSUlCT2dJQkFBSkJBSSs3QnZUS0FWdHVQYzEzbEFkVk94TlVmcWxzMm1SVmlQWlJyVFpjd3l4RVhVRGpNaFZuCi9KVHRsd3h2a281T0pBQ1k3dVE0T09wODdiM3NOU3ZNd2xNQ0F3RUFBUUpBYm5LaENOQ0dOSFZGaHJPQ0RCU0IKdmZ2ckRWUzVpZXAwd2h2SGlBUEdjeWV6bjd0U2RweUZ0NEU0QTNXT3VQOXhqenNjTFZyb1pzRmVMUWlqT1JhUwp3UUloQU84MWl2b21iVGhjRkltTFZPbU16Vk52TGxWTW02WE5iS3B4bGh4TlpUTmhBaUVBbWRISlpGM3haWFE0Cm15QnNCeEhLQ3JqOTF6bVFxU0E4bHUvT1ZNTDNSak1DSVFEbDJxOUdtN0lMbS85b0EyaCtXdnZabGxZUlJPR3oKT21lV2lEclR5MUxaUVFJZ2ZGYUlaUWxMU0tkWjJvdXF4MHdwOWVEejBEWklLVzVWaSt6czdMZHRDdUVDSUVGYwo3d21VZ3pPblpzbnU1clBsTDJjZldLTGhFbWwrUVFzOCtkMFBGdXlnCi0tLS0tRU5EIFJTQSBQUklWQVRFIEtFWS0tLS0t
JWT_PUBLIC_KEY=LS0tLS1CRUdJTiBQVUJMSUMgS0VZLS0tLS0KTUZ3d0RRWUpLb1pJaHZjTkFRRUJCUUFEU3dBd1NBSkJBSSs3QnZUS0FWdHVQYzEzbEFkVk94TlVmcWxzMm1SVgppUFpSclRaY3d5eEVYVURqTWhWbi9KVHRsd3h2a281T0pBQ1k3dVE0T09wODdiM3NOU3ZNd2xNQ0F3RUFBUT09Ci0tLS0tRU5EIFBVQkxJQyBLRVktLS0tLQ==
Next, we need to configure the custom class to know the path to the configuration file. This will ensure that the model class initializer reads the content of the environment variables file if we do not initialize the class attributes.
Now create a app/config.py file and add the custom class model Settings :
app/config.py
from pydantic import BaseSettings

class Settings(BaseSettings):
    DATABASE_PORT: int
    POSTGRES_PASSWORD: str
    POSTGRES_USER: str
    POSTGRES_DB: str
    POSTGRES_HOST: str
    POSTGRES_HOSTNAME: str

    JWT_PUBLIC_KEY: str
    JWT_PRIVATE_KEY: str
    REFRESH_TOKEN_EXPIRES_IN: int
    ACCESS_TOKEN_EXPIRES_IN: int
    JWT_ALGORITHM: str

    CLIENT_ORIGIN: str

    class Config:
        env_file = './.env'


settings = Settings()
Connecting to the PostgreSQL Server
There are numerous libraries we can use to interact with the PostgreSQL server in a Python application. Most of the libraries depend on the native PostgreSQL driver to function properly.
There are a couple of PostgreSQL adapters but Psycopg is the most popular PostgreSQL database adapter for Python programming language.
Below are the features of a good PostgreSQL driver:
- It should support client-side and server-side cursors
- It should have asynchronous communication and notifications support
- It should support Python types and adapt to matching PostgreSQL data types.
By default, SQLAlchemy uses psycopg2 under the hood to interact with the PostgreSQL server.
pip install sqlalchemy psycopg2
- SQLAlchemy – a popular Python ORM (object-relational mapper)
- Psycopg – a popular PostgreSQL driver
Now let’s create the utility functions to connect and discount the PostgreSQL server. Create a app/database.py file and add the following code:
app/database.py
from sqlalchemy import create_engine
from sqlalchemy.ext.declarative import declarative_base
from sqlalchemy.orm import sessionmaker
from .config import settings

SQLALCHEMY_DATABASE_URL = f"postgresql://{settings.POSTGRES_USER}:{settings.POSTGRES_PASSWORD}@{settings.POSTGRES_HOSTNAME}:{settings.DATABASE_PORT}/{settings.POSTGRES_DB}"

engine = create_engine(
    SQLALCHEMY_DATABASE_URL
)
SessionLocal = sessionmaker(autocommit=False, autoflush=False, bind=engine)

Base = declarative_base()


def get_db():
    db = SessionLocal()
    try:
        yield db
    finally:
        db.close()
Installing the UUID OSSP PostgreSQL Plugin
By default, PostgreSQL has native support for the UUID data type, however, since we want to use it as a default value for the ID column, we need to install the UUID OSSP module plugin for it to work.
To install the UUID OSSP module extension, we first need to access the bash shell of the running PostgreSQL Docker container with docker exec -it <container name> bash and run the CREATE EXTENSION command to install it.
docker exec -it postgres bash
Once you have access to the bash shell, we can use execute any PostgreSQL commands to communicate with the Postgres server.
Now use the following steps to install the UUID plugin:
Step 1: Log into the running Postgres database with this command psql -U <database username> <database name>:
psql -U admin fastapiadmin– is the database username provided in the.envfilefastapi– is the database name provided in the.envfile
Step 2: You can display all the available extensions with this command
select * from pg_available_extensions;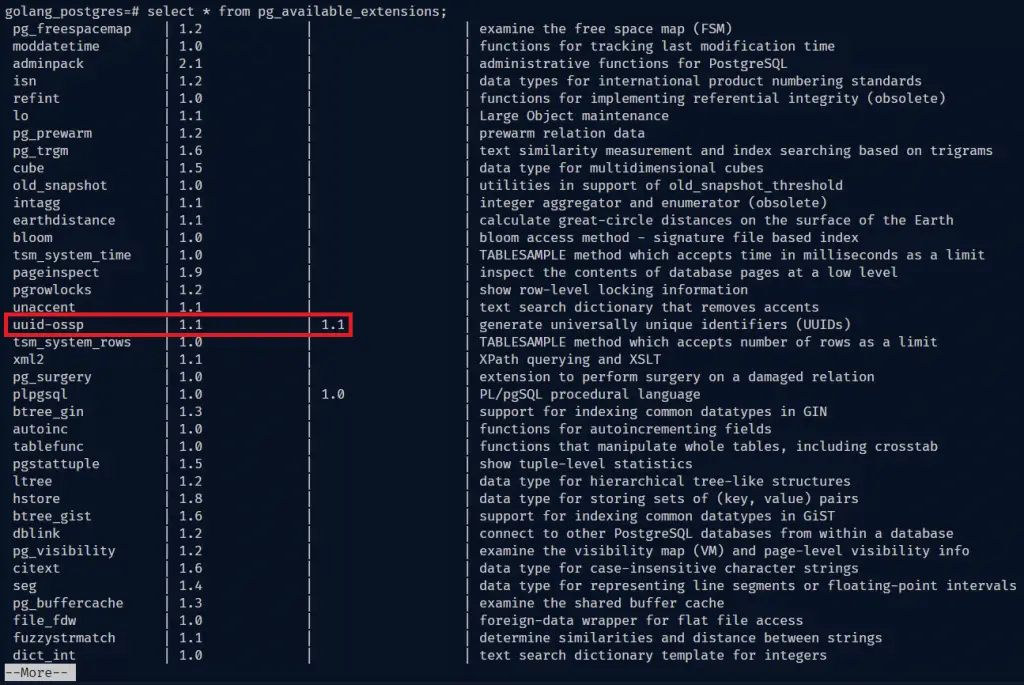
After displaying the available extensions, you will notice the uuid-ossp module plugin is available but not installed.
You can hit the Enter key multiple times to scroll down the list and press q to exit.
Step 3: Now install the uuid-ossp module with this command
CREATE EXTENSION IF NOT EXISTS "uuid-ossp";After installing the UUID OSSP module, use \q to exit the Postgres server shell and exit to exit the Docker container bash shell.
How to Create Database Models with SQLAlchemy
We already covered RESTful API with Python & FastAPI: Access and Refresh Tokens where we defined the users table with SQLAlchemy, so I’ll skip the finer details. If you arrived here by Googling questions about How to build RESTful APIs with FastAPI and Python, you should probably catch up on how to implement JWT authentication with FastAPI.
SQLAlchemy allows us to define module-level constructs to represent the structure of the data we will be fetching from the database.
We use Declarative Mapping to create both a Python object model and database metadata to represent the real SQL tables in the database.
Now replace the content of the app/models.py file with the following models:
app/models.py
import uuid
from .database import Base
from sqlalchemy import TIMESTAMP, Column, ForeignKey, String, Boolean, text
from sqlalchemy.dialects.postgresql import UUID
from sqlalchemy.orm import relationship


class User(Base):
    __tablename__ = 'users'
    id = Column(UUID(as_uuid=True), primary_key=True, nullable=False,
                default=uuid.uuid4)
    name = Column(String,  nullable=False)
    email = Column(String, unique=True, nullable=False)
    password = Column(String, nullable=False)
    photo = Column(String, nullable=True)
    verified = Column(Boolean, nullable=False, server_default='False')
    verification_code = Column(String, nullable=True, unique=True)
    role = Column(String, server_default='user', nullable=False)
    created_at = Column(TIMESTAMP(timezone=True),
                        nullable=False, server_default=text("now()"))
    updated_at = Column(TIMESTAMP(timezone=True),
                        nullable=False, server_default=text("now()"))


class Post(Base):
    __tablename__ = 'posts'
    id = Column(UUID(as_uuid=True), primary_key=True, nullable=False,
                default=uuid.uuid4)
    user_id = Column(UUID(as_uuid=True), ForeignKey(
        'users.id', ondelete='CASCADE'), nullable=False)
    title = Column(String, nullable=False)
    content = Column(String, nullable=False)
    category = Column(String, nullable=False)
    image = Column(String, nullable=False)
    created_at = Column(TIMESTAMP(timezone=True),
                        nullable=False, server_default=text("now()"))
    updated_at = Column(TIMESTAMP(timezone=True),
                        nullable=False, server_default=text("now()"))
    user = relationship('User')
In layman’s terms, when we create a model with an ORM like SQLAlchemy, that translates to an SQL table in the database.
In the above code, we created two class models that inherited the Base class we exported in the app/database.py file to help us create the users and posts tables in the PostgreSQL database.
Also, we used uuid.uuid4 function as a default value for the ID column. This will instruct PostgreSQL to generate a UUID for the ID column anytime a new record is added.
Creating Validation Schemas with Pydantic
We are now ready to create the validation schemas with Pydantic to validate the requests and responses.
Replace the content of the app/schemas.py file with the following schema definitions:
app/schemas.py
from datetime import datetime
from typing import List
import uuid
from pydantic import BaseModel, EmailStr, constr


class UserBaseSchema(BaseModel):
    name: str
    email: EmailStr
    photo: str

    class Config:
        orm_mode = True


class CreateUserSchema(UserBaseSchema):
    password: constr(min_length=8)
    passwordConfirm: str
    role: str = 'user'
    verified: bool = False


class LoginUserSchema(BaseModel):
    email: EmailStr
    password: constr(min_length=8)


class UserResponse(UserBaseSchema):
    id: uuid.UUID
    created_at: datetime
    updated_at: datetime


class FilteredUserResponse(UserBaseSchema):
    id: uuid.UUID


class PostBaseSchema(BaseModel):
    title: str
    content: str
    category: str
    image: str
    user_id: uuid.UUID | None = None

    class Config:
        orm_mode = True


class CreatePostSchema(PostBaseSchema):
    pass


class PostResponse(PostBaseSchema):
    id: uuid.UUID
    user: FilteredUserResponse
    created_at: datetime
    updated_at: datetime


class UpdatePostSchema(BaseModel):
    title: str
    content: str
    category: str
    image: str
    user_id: uuid.UUID | None = None
    created_at: datetime | None = None
    updated_at: datetime | None = None

    class Config:
        orm_mode = True


class ListPostResponse(BaseModel):
    status: str
    results: int
    posts: List[PostResponse]
Creating the FastAPI Controllers
Now that we’ve defined the validation schemas and database model, let’s create the FastAPI path operation functions to perform the CRUD functionalities.
@router.get('/api/posts/')– This path operation function will retrieve a paginated list of post items from the database and return them to the client.@router.post('/api/posts/')– This path operation function will add a new post item to the database.@router.put('/api/notes/{id}')– This path operation function will update the fields of a post item in the database.@router.get('/api/notes/{id}')– This path operation function will get a single post item from the database and return it to the client.@router.delete('/api/notes/{id}')– This path operation function will delete a single post item in the database.
To begin, create a “routers” folder in the app directory. Then, create a post.py file in the “routers” folder and add these module imports:
app/routers/post.py
from datetime import datetime
import uuid
from .. import schemas, models
from sqlalchemy.orm import Session
from fastapi import Depends, HTTPException, status, APIRouter, Response
from ..database import get_db
from app.oauth2 import require_user
Fetch All Posts Handler
The first path operation function will perform the READ functionality of CRUD. This route handler will be evoked to return a selected list of records. To avoid sending a huge JSON payload of all the records to the client, we’ll add a pagination feature where a user can select a range of records in the database. If the user doesn’t provide the limit parameter in the URL, the route controller will only return the first 10 records.
So, open the app/routers/post.py file and add this block of code:
app/routers/post.py
# [...] import
router = APIRouter()

# [...] Get All Posts


@router.get('/', response_model=schemas.ListPostResponse)
def get_posts(db: Session = Depends(get_db), limit: int = 10, page: int = 1, search: str = '', user_id: str = Depends(require_user)):
    skip = (page - 1) * limit

    posts = db.query(models.Post).group_by(models.Post.id).filter(
        models.Post.title.contains(search)).limit(limit).offset(skip).all()
    return {'status': 'success', 'results': len(posts), 'posts': posts}
Above, we calculated the number of records to skip based on the page and limit parameters. Next, we created a query and appended all the relevant query methods before calling the .all() function to execute it.
Then, we returned the list of records retrieved from the database to the client in the JSON response.
Create New Post Handler
This path operation function will perform the CREATE functionality of CRUD. When a POST request is made to the /api/notes/ endpoint, this route handler will be evoked to add the data to the database.
To validate the request body and send appropriate validation errors to the client, we’ll pass the CreatePostSchema as a dependency to the path operation function.
FastAPI will use the CreatePostSchema to deserialize the JSON payload, validate the data against the rules defined in the schema and assign the resulting Python object to the post variable.
app/routers/post.py
# [...] import
router = APIRouter()

# [...] Get All Posts

# [...] Create Post
@router.post('/', status_code=status.HTTP_201_CREATED, response_model=schemas.PostResponse)
def create_post(post: schemas.CreatePostSchema, db: Session = Depends(get_db), owner_id: str = Depends(require_user)):
    post.user_id = uuid.UUID(owner_id)
    new_post = models.Post(**post.dict())
    db.add(new_post)
    db.commit()
    db.refresh(new_post)
    return new_post
The require_user dependency will ensure that the user is authenticated before the actual request is processed. To add the new record to the database, we created an instance of the Post model using the data provided in the request body and called the db.add() method to add the data to the current transaction.
Then, we called the db.commit() method to save the data in the database. Once the data has been stored in the database, the db.refresh() method will be called to update the fields of the model instance with the fields of the newly-created record.
Update Post Handler
Now that we are able to add new records, let’s create a path operation function to edit a single record in the database. This route controller will perform the UPDATE operation of CRUD.
To begin, we’ll construct a query to find the record by ID and assign the query to the post_query variable. Then, we’ll execute the query to get the record that matches the provided ID. If no record was found, a 404 error will be returned to the client.
app/routers/post.py
# [...] import
router = APIRouter()

# [...] Get All Posts

# [...] Create Post

# [...] Update Post
@router.put('/{id}', response_model=schemas.PostResponse)
def update_post(id: str, post: schemas.UpdatePostSchema, db: Session = Depends(get_db), user_id: str = Depends(require_user)):
    post_query = db.query(models.Post).filter(models.Post.id == id)
    updated_post = post_query.first()

    if not updated_post:
        raise HTTPException(status_code=status.HTTP_200_OK,
                            detail=f'No post with this id: {id} found')
    if updated_post.user_id != uuid.UUID(user_id):
        raise HTTPException(status_code=status.HTTP_403_FORBIDDEN,
                            detail='You are not allowed to perform this action')
    post.user_id = user_id
    post_query.update(post.dict(exclude_unset=True), synchronize_session=False)
    db.commit()
    return updated_post
Above, we called the .update() method on the current query to update the fields with the ones provided in the request body. Then, we called the db.commit() method to save the changes to the database. Lastly, we returned the newly-updated record to the client in the JSON response.
Get a Single Post Handler
This path operation function will also perform a READ functionality but it will only return a single record. Here, we’ll extract the ID parameter from the request URL and query the database to find the record that matches the current query.
To do this, we’ll construct a new query and append the .filter() method to select the record with the provided ID. After that, we’ll call the .first() method to execute the query and return the found record to the client.
app/routers/post.py
# [...] import
router = APIRouter()

# [...] Get All Posts

# [...] Create Post

# [...] Update Post

# [...] Get a single post
@router.get('/{id}', response_model=schemas.PostResponse)
def get_post(id: str, db: Session = Depends(get_db), user_id: str = Depends(require_user)):
    post = db.query(models.Post).filter(models.Post.id == id).first()
    if not post:
        raise HTTPException(status_code=status.HTTP_404_NOT_FOUND,
                            detail=f"No post with this id: {id} found")
    return post
Remove Post Handler
Finally, let’s create a path operation function to handle DELETE requests. This route handler will be called to delete a record in the database when a DELETE request is made to the /api/posts/{id} endpoint.
app/routers/post.py
# [...] import
router = APIRouter()

# [...] Get All Posts
# [...] Create Post
# [...] Update Post
# [...] Get a single post

# [...] Delete Post
@router.delete('/{id}')
def delete_post(id: str, db: Session = Depends(get_db), user_id: str = Depends(require_user)):
    post_query = db.query(models.Post).filter(models.Post.id == id)
    post = post_query.first()
    if not post:
        raise HTTPException(status_code=status.HTTP_404_NOT_FOUND,
                            detail=f'No post with this id: {id} found')

    if str(post.user_id) != user_id:
        raise HTTPException(status_code=status.HTTP_403_FORBIDDEN,
                            detail='You are not allowed to perform this action')
    post_query.delete(synchronize_session=False)
    db.commit()
    return Response(status_code=status.HTTP_204_NO_CONTENT)
Let’s evaluate the above code. First, we created a query to find a record by the ID provided in the request URL. Then, we evoked the post_query.first() method to retrieve the found record and assigned it to the “post” variable.
Next, we called the post_query.delete() method to delete the record in the current transaction. After that, we called the db.commit() method to permanently delete the record in the database.
Complete Code for the Post Handlers
app/routers/post.py
import uuid
from .. import schemas, models
from sqlalchemy.orm import Session
from fastapi import Depends, HTTPException, status, APIRouter, Response
from ..database import get_db
from app.oauth2 import require_user

router = APIRouter()


@router.get('/', response_model=schemas.ListPostResponse)
def get_posts(db: Session = Depends(get_db), limit: int = 10, page: int = 1, search: str = '', user_id: str = Depends(require_user)):
    skip = (page - 1) * limit

    posts = db.query(models.Post).group_by(models.Post.id).filter(
        models.Post.title.contains(search)).limit(limit).offset(skip).all()
    return {'status': 'success', 'results': len(posts), 'posts': posts}


@router.post('/', status_code=status.HTTP_201_CREATED, response_model=schemas.PostResponse)
def create_post(post: schemas.CreatePostSchema, db: Session = Depends(get_db), owner_id: str = Depends(require_user)):
    post.user_id = uuid.UUID(owner_id)
    new_post = models.Post(**post.dict())
    db.add(new_post)
    db.commit()
    db.refresh(new_post)
    return new_post


@router.put('/{id}', response_model=schemas.PostResponse)
def update_post(id: str, post: schemas.UpdatePostSchema, db: Session = Depends(get_db), user_id: str = Depends(require_user)):
    post_query = db.query(models.Post).filter(models.Post.id == id)
    updated_post = post_query.first()

    if not updated_post:
        raise HTTPException(status_code=status.HTTP_200_OK,
                            detail=f'No post with this id: {id} found')
    if updated_post.user_id != uuid.UUID(user_id):
        raise HTTPException(status_code=status.HTTP_403_FORBIDDEN,
                            detail='You are not allowed to perform this action')
    post.user_id = user_id
    post_query.update(post.dict(exclude_unset=True), synchronize_session=False)
    db.commit()
    return updated_post


@router.get('/{id}', response_model=schemas.PostResponse)
def get_post(id: str, db: Session = Depends(get_db), user_id: str = Depends(require_user)):
    post = db.query(models.Post).filter(models.Post.id == id).first()
    if not post:
        raise HTTPException(status_code=status.HTTP_404_NOT_FOUND,
                            detail=f"No post with this id: {id} found")
    return post


@router.delete('/{id}')
def delete_post(id: str, db: Session = Depends(get_db), user_id: str = Depends(require_user)):
    post_query = db.query(models.Post).filter(models.Post.id == id)
    post = post_query.first()
    if not post:
        raise HTTPException(status_code=status.HTTP_404_NOT_FOUND,
                            detail=f'No post with this id: {id} found')

    if str(post.user_id) != user_id:
        raise HTTPException(status_code=status.HTTP_403_FORBIDDEN,
                            detail='You are not allowed to perform this action')
    post_query.delete(synchronize_session=False)
    db.commit()
    return Response(status_code=status.HTTP_204_NO_CONTENT)
Adding the FastAPI Routers
At this point, we’ve implemented the five CRUD functionalities. Now let’s register the router in the app so that a client can interact with the path operation functions.
app/main.py
from fastapi import FastAPI
from fastapi.middleware.cors import CORSMiddleware
from app.config import settings
from app.routers import user, auth, post

app = FastAPI()

origins = [
    settings.CLIENT_ORIGIN,
]

app.add_middleware(
    CORSMiddleware,
    allow_origins=origins,
    allow_credentials=True,
    allow_methods=["*"],
    allow_headers=["*"],
)


app.include_router(auth.router, tags=['Auth'], prefix='/api/auth')
app.include_router(user.router, tags=['Users'], prefix='/api/users')
app.include_router(post.router, tags=['Posts'], prefix='/api/posts')


@app.get('/api/healthchecker')
def root():
    return {'message': 'Hello World'}
Conclusion
With this FastAPI, PostgreSQL, Pydantic, SQLAlchemy, Alembic, and Docker-compose example in Python, you’ve learned how to build a Restful CRUD API server to perform the basic Create/Read/Update/Delete operations.
FastAPI and PostgreSQL CRUD API Source Code
You can get the complete source code in this GitHub repository
hello friend, I am following your instructions on FastAPI following the path :
https://codevoweb.com/crud-restful-api-server-with-python-fastapi-and-postgresql/
but when I call api : create/posts I get the following error:
{
“loc”: [
“body”,
“user”
],
“msg”: “instance of ObjectId expected”,
“type”: “type_error.arbitrary_type”,
“ctx”: {
“expected_arbitrary_type”: “ObjectId”
}
}
hope you can help me.
thanks you very much!
It appears that you have made modifications to the code, but I’m a bit confused about the error you’re getting regarding
ObjectId.This term is typically associated with MongoDB, whereas our project uses PostgreSQL and Sqlalchemy.
In order to assist you with this issue, I suggest that you upload your project to GitHub and send me the link through the contact form on the contact page. By doing so, I can examine your code and help identify where the problem is originating.
Thank you for your support, let me spend more time to review the code.
thank you very much
i have an error in app/routers/post.py at the 6th line, in the app.oauth2
Please can you elaborate on the type of error you got?
hay que hacer desde la parte 1 del proyecto
https://codevoweb.com/restful-api-with-python-fastapi-access-and-refresh-tokens/