
This article will teach you how to create a Node.js gRPC server and client to authenticate a user with JSON Web Tokens using TypeScript, Node.js, PostgreSQL, Redis, Prisma, and Docker-compose.
Build gRPC API with Node.js and Prisma Series:
- Build a Node.js gRPC Server and Client: Register and Login User
- Build Node.js gRPC API Server and Client: Send HTML Emails
- Build a Complete gRPC CRUD API with Node.js and Express
Related articles:
- API with Golang + MongoDB + Redis + Gin Gonic: Project Setup
- Golang & MongoDB: JWT Authentication and Authorization
- API with Golang + MongoDB: Send HTML Emails with Gomail
- API with Golang, Gin Gonic & MongoDB: Forget/Reset Password
- Build Golang gRPC Server and Client: SignUp User & Verify Email
- Build Golang gRPC Server and Client: Access & Refresh Tokens
- Build CRUD RESTful API Server with Golang, Gin, and MongoDB
What the course will cover
- How to create a gRPC API server method to register and login a user
- How to create a gRPC API server method to authenticate users with access and refresh tokens.
- How to build a gRPC client to interact with the gRPC API server
- How to build a gRPC API server to get the authenticated user’s credentials
Prerequisites
Before you begin this tutorial:
Software
- Basic knowledge of Node.js and PostgreSQL will be helpful
- An intermediate understanding of Prisma, and how to use ORMs and pgAdmin will be highly beneficial.
- Have Docker and Node.js installed
VS Code Extensions
- DotENV – Get syntax highlighting for any environment variables file having
.envextension. - Proto3 – To get syntax highlighting, syntax validation, line and block comments, compilation, code snippets, code completion, and code formatting for all files ending with
.protoextension. - MySQL – A database client for VS Code. This extension will enable us to view the data stored in the database.
The VS Code Proto3 extension uses the Protocol buffer compiler under the hood so you need to install the Protoc compiler for it to function properly.
You can visit the official gRPC website to install the Protocol buffer compiler needed for your operating system.
By default, the protocol buffer compiler looks for the proto files in the root directory and we need to manually tell it the location of the proto files.
To do that, open the settings page in VS Code and search for Proto3. Next, click on the Edit in settings.json link and add this option to the Protoc configuration.
{
   "options": ["--proto_path=proto"]
}
Setting up PostgreSQL and Redis Servers
PostgreSQL originally named POSTGRES is a powerful, free, and open-source relational database management system developed at the University of California, Berkeley.
Usually, we install the PostgreSQL server from the official Postgres website, however, we are going to use Docker to run the PostgreSQL server on our machine. This will give us the ability to easily run and maintain it in a development environment.
Since we want to run the Redis and PostgreSQL Docker containers simultaneously, we will be using a docker-compose.yml file to easily configure and run them.
First and foremost, let’s create a project folder named node-grpc-prisma and open it with an IDE or text editor.
$ mkdir node-grpc-prismaIn the project root directory, create a docker-compose.yml file and add the following code to configure the Redis and PostgreSQL images.
docker-compose.yml
version: '3'
services:
  postgres:
    image: postgres
    container_name: postgres
    ports:
      - '6500:5432'
    restart: always
    env_file:
      - ./.env
    volumes:
      - postgres-db:/var/lib/postgresql/data
  redis:
    image: redis:latest
    container_name: redis
    ports:
      - '6379:6379'
    volumes:
      - redis:/data
volumes:
  postgres-db:
  redis:
The Postgres Docker image requires some credentials to set up the PostgreSQL server so add the following environment variables:
.env
DATABASE_PORT=6500
POSTGRES_PASSWORD=password123
POSTGRES_USER=postgres
POSTGRES_DB=grpc-node-prisma
POSTGRES_HOST=postgres
POSTGRES_HOSTNAME=127.0.0.1
.gitignore
node_modules
.env
Now run the Redis and PostgreSQL containers with this command:
docker-compose up -dYou can stop the containers with this command:
docker-compose downCreating the gRPC Protocol Buffer Messages
Before we can start using gRPC, we need to create the Protocol Buffer files to list the RPC services and methods using the protocol buffer language.
One best practice is to keep all the Protocol buffer files in a single folder to make your project cleaner and enable you to easily generate the gRPC server and client stubs or interfaces.
Now create a proto folder in the root directory. This folder will contain all the Protocol buffer files.
Define the gRPC User Protocol Buffer Message
To define a protocol buffer message, we specify the version of the protocol buffer language at the beginning of the proto file, in our example the Protobuf language is proto3.
Next, we specify the package name using the package keyword provided by the proto3 language.
Benefits of using Protobuf packages
Grouping the Protobuf messages under packages will help us:
- Avoid naming conflicts in the Protobuf message objects
- For easy portability. This ensures that the generated TypeScript interfaces and type aliases are also grouped in folders.
- To load the Protobuf files in Node.js based on the packages they belong to.
Now to define the field (name/value pairs) of a protocol buffer message, we specify the field type followed by the field name and a unique identifier that will be used by the gRPC framework to easily identify the fields in the message binary format.
The field numbers that range from 1 to 15 take one byte to encode, whereas numbers in the range 16 through 2047 take two bytes to encode.
You can learn more about how to fields are encoded from the Protocol Buffer Encoding website.
Now let’s create a reusable Protobuf message that we can use in other Protobuf messages:
proto/user.proto
syntax = "proto3";

package auth;

import "google/protobuf/timestamp.proto";

message User {
  string id = 1;
  string name = 2;
  string email = 3;
  string role = 4;
  string photo = 5;
  string provider = 6;
  google.protobuf.Timestamp created_at = 7;
  google.protobuf.Timestamp updated_at = 8;
}

message UserResponse { User user = 1; }

message GenericResponse {
  string status = 1;
  string message = 2;
}
Quite a lot going on in the above, let’s break it down:
We created a User Protobuf message to contain the fields a user object should have.
Google has a standard library of popular data types including the Timestamp type which was not included in the built-in types of Protobuf.
So we imported the google.protobuf.Timestamp data type from the Google standard library and assigned it to the created_at and updated_at fields.
Define the gRPC Protocol Buffer Message to SignUp User
proto/rpc_signup_user.proto
syntax = "proto3";

package auth;

import "user.proto";

message SignUpUserInput {
  string name = 1;
  string email = 2;
  string password = 3;
  string passwordConfirm = 4;
  string photo = 5;
  string provider = 6;
}

message SignUpUserResponse { User user = 1; }
Define the gRPC Protocol Buffer Message to Login User
proto/rpc_signin_user.proto
syntax = "proto3";

package auth;

message SignInUserInput {
  string email = 1;
  string password = 2;
}

message SignInUserResponse {
  string status = 1;
  string access_token = 2;
  string refresh_token = 3;
}
Creating the RPC Services and Methods
Now that we have the RPC messages already defined, let’s create the gRPC service and add the RPC definitions.
Create a proto/services.proto file to contain all the gRPC services and other Protobuf messages.
proto/services.proto
syntax = "proto3";

package auth;

import "user.proto";
import "rpc_signup_user.proto";
import "rpc_signin_user.proto";

service AuthService {
  rpc SignUpUser(SignUpUserInput) returns (SignUpUserResponse) {}
  rpc SignInUser(SignInUserInput) returns (SignInUserResponse) {}
  rpc RefreshToken(RefreshTokenInput) returns (RefreshTokenResponse) {}
  rpc GetMe(GetMeInput) returns (UserResponse) {}
}

message GetMeInput { string access_token = 1; }
message RefreshTokenInput { string refresh_token = 1; }
message RefreshTokenResponse {
  string access_token = 1;
  string refresh_token = 2;
}
In the above code, we created an AuthService having the following RPC methods:
SignUpUser– To register a new userSignInUser– To login the registered userRefreshToken– To refresh the expired access tokenGetMe– To retrieve the currently authenticated user’s credentials.
Later, we will twerk the SignUpUser RPC method to send a verification code to the email address provided by the user.
This authentication step is required to ensure that only users with valid email addresses can log into our gRPC application.
Generating the gRPC Client and Server TypeScript Files
To begin, let’s initialize a new Node.js TypeScript project with this command:
yarn init -y && yarn add -D typescript && npx tsc --init
Replace the content of the “tsconfig.json” file with the following. This step is only needed when you are using Typegoose with MongoDB.
tsconfig.json
{
  "compilerOptions": {
    "target": "es2018",
    "experimentalDecorators": true,
    "emitDecoratorMetadata": true,
    "module": "commonjs",
    "esModuleInterop": true,
    "forceConsistentCasingInFileNames": true,
    "strict": true,
    "strictPropertyInitialization": false,
    "skipLibCheck": true
  }
}
Now let’s add the dependencies needed to generate TypeScript files from the Protobuf definitions.
yarn add @grpc/grpc-js @grpc/proto-loader
@grpc/grpc-js– A feature-rich implementation of gRPC for Nodejs.@grpc/proto-loader– This library contains utility functions for loading .proto files for use with gRPC.
Create a proto-gen.sh file and add this script to help us generate the TypeScript file from the Protobuf files.
proto-gen.sh
#!/bin/bash

rm -rf pb/
yarn proto-loader-gen-types --longs=String --enums=String --defaults --keepCase --oneofs --grpcLib=@grpc/grpc-js --outDir=pb/ proto/*.proto
Alternatively, you can copy the individual commands and run them directly in the terminal.
When the proto-gen.sh script is executed, the @grpc/proto-loader package will generate the TypeScript files from the proto files and put the resulting generated files in a pb folder.
You can open the pb folder to see the generated TypeScript files.
Generate the JWT Private and Public Keys
There are numerous ways we can generate the JSON Web Token private and public keys, however, we are going to use a Private and Public Keys Generation Site.
This website will enable us to generate the keys with just a click of a button. I already added the base64 encoded private and public keys to the .env file but you can follow these steps to generate them yourself.
Step 1: Navigate to the Private and Public Keys Generation Site, and click the “Generate New Keys” button to generate the keys.
Step 2: Copy the generated private key and navigate to the Base64 Encoding website to convert it to Base64.
Step 3: Copy the base64 encoded key and add it to the .env file as ACCESS_TOKEN_PRIVATE_KEY .
Step 4: Navigate back to the Private and Public Keys Generation Site and copy the corresponding public key.
Step 5: Navigate back to the Base64 Encoding website to encode the public key in base64 and add it to the .env file as ACCESS_TOKEN_PUBLIC_KEY.
Step 6: Repeat the above steps for the refresh token private and public keys.
In the end, the .env should look like this:
.env
DATABASE_PORT=6500
POSTGRES_PASSWORD=password123
POSTGRES_USER=postgres
POSTGRES_DB=grpc-node-prisma
POSTGRES_HOST=postgres
POSTGRES_HOSTNAME=127.0.0.1

DATABASE_URL="postgresql://postgres:password123@localhost:6500/grpc-node-prisma?schema=public"

ACCESS_TOKEN_PRIVATE_KEY=LS0tLS1CRUdJTiBSU0EgUFJJVkFURSBLRVktLS0tLQpNSUlCT1FJQkFBSkFVTWhaQjNucFJ6OEdrc0tneVZJcEZHMkJqZldHdElMWGNLUVFGMHZGbVZvOVVFcDhyOEVmCnI5T204azVTaXgrSi8rbXc0d08xVUlGb25rQTJFWnl6THdJREFRQUJBa0FDcVViOWp3K1hVRVU0S244L2dweGwKMXVHd3VvandnMnJ6aEFRZnNGaFhIKzlyQ1NWTmxNaEk0UWh4bWt3bHI2Y0NhUnFMUGg0Vk5lN3hKRDloWU5XcApBaUVBbXJ4TENiQXJJWDIvYkFETU1JdXljWFZKMnAwUk91S3FQOVBVeTB6ZG0zc0NJUUNGcGs5VDJKQ3NUVEhWCjErMWFVbk9JOFE3eUdNK1VQVGt6a200emNHcE8zUUloQUloOEU3Z2M4ejVjVzQ5WmVNSk5SbjI3VmdTRnpKL2oKTlFhTnc4SDdML0duQWlCTS9lUFJEMzg0WXpnRVV1SGZHSVNLTFNSSS8xWUZ0Y2RRR0ZqM3RSam8yUUlnS2t6ZwpVWFkwWjJRR1dqblFTdzdJRThaSDZuTHcydFUrci9LR0NZRzVKN3M9Ci0tLS0tRU5EIFJTQSBQUklWQVRFIEtFWS0tLS0t
ACCESS_TOKEN_PUBLIC_KEY=LS0tLS1CRUdJTiBQVUJMSUMgS0VZLS0tLS0KTUZzd0RRWUpLb1pJaHZjTkFRRUJCUUFEU2dBd1J3SkFVTWhaQjNucFJ6OEdrc0tneVZJcEZHMkJqZldHdElMWApjS1FRRjB2Rm1WbzlVRXA4cjhFZnI5T204azVTaXgrSi8rbXc0d08xVUlGb25rQTJFWnl6THdJREFRQUIKLS0tLS1FTkQgUFVCTElDIEtFWS0tLS0t

REFRESH_TOKEN_PRIVATE_KEY=LS0tLS1CRUdJTiBSU0EgUFJJVkFURSBLRVktLS0tLQpNSUlCT1FJQkFBSkFZOHRTUEZXMTk3bWgwcitCWUdLVTA4OFRPcDkrT2FObVNWQ1lMMTFhb05ZeEY1TSs1d0NSCnNDTnAxVEdHNW5zb215NW9QRitLajFsOGhjbmtUSUU2SndJREFRQUJBa0FVN2dLc1ZzbVlVQjJKWnRMS2xVSmoKZmUycGdPUG5VTWJXSDRvYmZQZlIvWGNteTdONkQyVXVQcnJ0MkdQVUpnNVJ4SG5NbVFpaDJkNHUwY3pqRDhpcApBaUVBcDFNaUtvY1BEWDJDU0lGN3c5SzVGWHlqMjIzQXJQcVJoUzNtL1dkVzVlVUNJUUNZcmxyeXRJOFkvODIzCkQ1ZTFHVExnbDlTcXN1UWdvaGF4ZCtKaXludGZHd0lnQ2xlK0xlakpTbWt1cTNLdGhzNDR1SlpLdnA2TElXWWYKcHA3T3YyMHExdTBDSVFDSy9lYWpuZ1hLLzB3NXcwTWJSUVpRK1VkTDRqRFZHRm5LVTFYUEUzOStVd0lnSEdLWgpjcDd2K3VyeG5kU05GK25MVEpZRG9abkMrKytteXRMaCtSUmU4dVU9Ci0tLS0tRU5EIFJTQSBQUklWQVRFIEtFWS0tLS0t
REFRESH_TOKEN_PUBLIC_KEY=LS0tLS1CRUdJTiBQVUJMSUMgS0VZLS0tLS0KTUZzd0RRWUpLb1pJaHZjTkFRRUJCUUFEU2dBd1J3SkFZOHRTUEZXMTk3bWgwcitCWUdLVTA4OFRPcDkrT2FObQpTVkNZTDExYW9OWXhGNU0rNXdDUnNDTnAxVEdHNW5zb215NW9QRitLajFsOGhjbmtUSUU2SndJREFRQUIKLS0tLS1FTkQgUFVCTElDIEtFWS0tLS0t
Next, let’s create a server/config/default.ts file to load the environment variables. Also, this file will contain the TypeScript types of the environment variables.
yarn add dotenv
server/config/default.ts
import path from 'path';
require('dotenv').config({ path: path.join(__dirname, '../../.env') });

const customConfig: {
  port: number;
  accessTokenExpiresIn: number;
  refreshTokenExpiresIn: number;
  dbUri: string;
  accessTokenPrivateKey: string;
  accessTokenPublicKey: string;
  refreshTokenPrivateKey: string;
  refreshTokenPublicKey: string;
  redisCacheExpiresIn: number;
} = {
  port: 8000,
  accessTokenExpiresIn: 15,
  refreshTokenExpiresIn: 60,
  redisCacheExpiresIn: 60,

  dbUri: process.env.DATABASE_URL as string,
  accessTokenPrivateKey: process.env.ACCESS_TOKEN_PRIVATE_KEY as string,
  accessTokenPublicKey: process.env.ACCESS_TOKEN_PUBLIC_KEY as string,
  refreshTokenPrivateKey: process.env.REFRESH_TOKEN_PRIVATE_KEY as string,
  refreshTokenPublicKey: process.env.REFRESH_TOKEN_PUBLIC_KEY as string,
};

export default customConfig;
Utility Function to Sign and Verify JWTs
With that out of the way, let’s create a server/utils/jwt.ts file and add these two utility functions to sign and verify the JWTs.
yarn add jsonwebtoken && yarn add -D @types/jsonwebtoken
Function to Sign the Access and Refresh Tokens
server/utils/jwt.ts
import jwt, { SignOptions } from 'jsonwebtoken';
import customConfig from '../config/default';

export const signJwt = (
  payload: Object,
  key: 'accessTokenPrivateKey' | 'refreshTokenPrivateKey',
  options: SignOptions = {}
) => {
  const privateKey = Buffer.from(customConfig[key], 'base64').toString('ascii');
  return jwt.sign(payload, privateKey, {
    ...(options && options),
    algorithm: 'RS256',
  });
};
Function to Verify the JWT Tokens
server/utils/jwt.ts
export const verifyJwt = <T>(
  token: string,
  key: 'accessTokenPublicKey' | 'refreshTokenPublicKey'
): T | null => {
  try {
    const publicKey = Buffer.from(customConfig[key], 'base64').toString(
      'ascii'
    );
    return jwt.verify(token, publicKey) as T;
  } catch (error) {
    console.log(error);
    return null;
  }
};
Defining the Database Models with Prisma
At the time of writing this article, Prisma supports databases like:
- PostgreSQL
- MySQL
- SQLite
- SQL Server
- MongoDB
- CockroachDB
In the nutshell, you can easily adapt the code in this tutorial to work with any of the Prisma-supported databases.
Install the following dependencies:
yarn add -D prisma && yarn add @prisma/client
Prisma provides an init command that we can use to initialize the Prisma project. By default the init command uses the PostgreSQL database, however, you can pass a --datasource-provider flag to change the database type.
npx prisma init --datasource-provider postgresql
The above command will create a server/prisma folder having a schema.prisma file.
The server/prisma/schema.prisma file will contain the settings to connect to the database and the models required to generate the SQL tables.
Now let’s create a User model in the server/prisma/schema.prisma file:
generator client {
  provider = "prisma-client-js"
}

datasource db {
  provider = "postgresql"
  url      = env("DATABASE_URL")
}


model User{
  @@map(name: "users")

  id String  @id @default(uuid())
  name String  @db.VarChar(255)
  email String @unique
  photo String? @default("default.png")
  verified Boolean? @default(false)

  password String
  role RoleEnumType? @default(user)

  created_at DateTime @default(now())
  updated_at DateTime @updatedAt

  provider String?
}

enum RoleEnumType {
  user
  admin
}
Database Migration with Prisma
Before you can run the Prisma migration command, you need to make sure the PostgreSQL Docker container is running.
Now add these scripts to the package.json file:
{
"scripts": {
        "db:migrate": "npx prisma migrate dev --name user-entity --create-only --schema ./server/prisma/schema.prisma && yarn prisma generate --schema ./server/prisma/schema.prisma",
    "db:push": "npx prisma db push --schema ./server/prisma/schema.prisma"
  },
}
--name– this flag specifies the migration name.--schema– this flag specifies the path to theschema.prismafile.--create-only– this command tells Prisma to only create the migration file without applying it.db:migrate– this script will execute the Prisma migrate and generate commands.
The migrate command will create a new migration file, whereas the generate command generates the TypeScript types based on the models defined in theschema.prismafile.db:push– this script will run the Prismadbcommand to push the changes to the database and keep the database in sync with the Prisma schema.
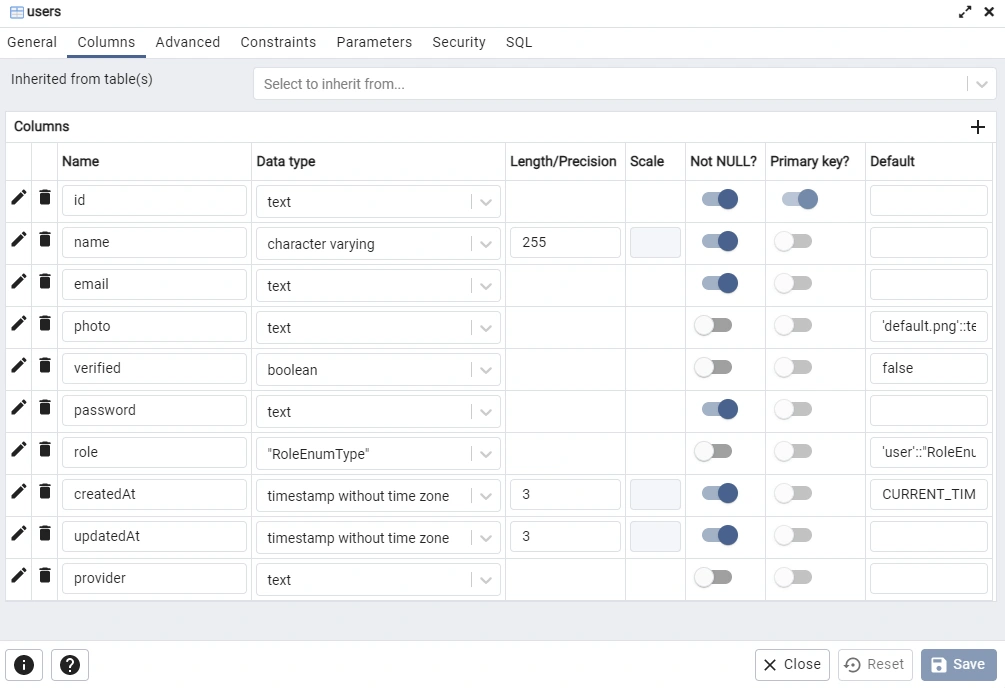
If you are comfortable with pgAdmin, you can sign in with the database credentials we specified in the .env file to see the SQL table added by Prisma.
Connecting to the PostgreSQL and Redis Servers
Connecting to the PostgreSQL Docker Container
server/utils/prisma.ts
import { PrismaClient } from '@prisma/client';

declare global {
  var prisma: PrismaClient | undefined;
}

export const prisma = global.prisma || new PrismaClient();

if (process.env.NODE_ENV !== 'production') {
  global.prisma = prisma;
}

async function connectDB() {
  try {
    await prisma.$connect();
    console.log('? Database connected successfully');
  } catch (error) {
    console.log(error);
    process.exit(1);
  } finally {
    await prisma.$disconnect();
  }
}

export default connectDB;
Connecting to the Redis Docker Container
yarn add redis
server/utils/connectRedis.ts
import { createClient } from 'redis';

const redisUrl = `redis://localhost:6379`;
const redisClient = createClient({
  url: redisUrl,
});

const connectRedis = async () => {
  try {
    await redisClient.connect();
    console.log('? Redis client connected...');
    redisClient.set(
      'tRPC',
      '??Welcome to tRPC with React.js, Express and Typescript!'
    );
  } catch (err: any) {
    console.log(err.message);
    process.exit(1);
  }
};

connectRedis();

redisClient.on('error', (err) => console.log(err));

export default redisClient;
Creating the Prisma Services
server/services/user.service.ts
import { Prisma, User } from '@prisma/client';
import customConfig from '../config/default';
import redisClient from '../utils/connectRedis';
import { signJwt } from '../utils/jwt';
import { prisma } from '../utils/prisma';

export const createUser = async (input: Prisma.UserCreateInput) => {
  return (await prisma.user.create({
    data: input,
  })) as User;
};

export const findUser = async (
  where: Partial<Prisma.UserCreateInput>,
  select?: Prisma.UserSelect
) => {
  return (await prisma.user.findFirst({
    where,
    select,
  })) as User;
};

export const findUniqueUser = async (
  where: Prisma.UserWhereUniqueInput,
  select?: Prisma.UserSelect
) => {
  return (await prisma.user.findUnique({
    where,
    select,
  })) as User;
};

export const updateUser = async (
  where: Partial<Prisma.UserWhereUniqueInput>,
  data: Prisma.UserUpdateInput,
  select?: Prisma.UserSelect
) => {
  return (await prisma.user.update({ where, data, select })) as User;
};

export const signTokens = async (user: Prisma.UserCreateInput) => {
  // 1. Create Session
  redisClient.set(`${user.id}`, JSON.stringify(user), {
    EX: customConfig.redisCacheExpiresIn * 60,
  });

  // 2. Create Access and Refresh tokens
  const access_token = signJwt({ sub: user.id }, 'accessTokenPrivateKey', {
    expiresIn: `${customConfig.accessTokenExpiresIn}m`,
  });

  const refresh_token = signJwt({ sub: user.id }, 'refreshTokenPrivateKey', {
    expiresIn: `${customConfig.refreshTokenExpiresIn}m`,
  });

  return { access_token, refresh_token };
};
Creating the Authentication Controllers
Since we have the services already defined, let’s create the authentication controllers to:
- validate and register a new user
- authenticate and sign in the registered user
- authenticate and refresh the expired access token
Before that install the Bcrypt package to hash the plain-text password provided by the user.
yarn add bcryptjs && yarn add -D @types/bcryptjs
Now create a server/controllers/auth.controller.ts file with the following imports.
server/controllers/auth.controller.ts
import bcrypt from 'bcryptjs';
import * as grpc from '@grpc/grpc-js';
import {
  createUser,
  findUniqueUser,
  findUser,
  signTokens,
} from '../services/user.service';
import { SignUpUserInput__Output } from '../../pb/auth/SignUpUserInput';
import { SignInUserInput__Output } from '../../pb/auth/SignInUserInput';
import { SignInUserResponse__Output } from '../../pb/auth/SignInUserResponse';
import { SignUpUserResponse } from '../../pb/auth/SignUpUserResponse';
import { RefreshTokenInput__Output } from '../../pb/auth/RefreshTokenInput';
import { RefreshTokenResponse } from '../../pb/auth/RefreshTokenResponse';
import { signJwt, verifyJwt } from '../utils/jwt';
import customConfig from '../config/default';
import redisClient from '../utils/connectRedis';
Controller to Register a New User
server/controllers/auth.controller.ts
// [...] imports

// [...] Register New User
export const registerHandler = async (
  req: grpc.ServerUnaryCall<SignUpUserInput__Output, SignUpUserResponse>,
  res: grpc.sendUnaryData<SignUpUserResponse>
) => {
  try {
    const hashedPassword = await bcrypt.hash(req.request.password, 12);
    const user = await createUser({
      email: req.request.email.toLowerCase(),
      name: req.request.name,
      password: hashedPassword,
      photo: req.request.photo,
      provider: 'local',
    });

    res(null, {
      user: {
        id: user.id,
        name: user.name,
        email: user.email,
        photo: user.photo!,
        provider: user.provider!,
        role: user.role!,
        created_at: {
          seconds: user.created_at.getTime() / 1000,
        },
        updated_at: {
          seconds: user.updated_at.getTime() / 1000,
        },
      },
    });
  } catch (err: any) {
    if (err.code === 'P2002') {
      res({
        code: grpc.status.ALREADY_EXISTS,
        message: 'Email already exists',
      });
    }
    res({ code: grpc.status.INTERNAL, message: err.message });
  }
};
Controller to Sign in the User
server/controllers/auth.controller.ts
// [...] imports

// [...] Register New User

// [...] Login User
export const loginHandler = async (
  req: grpc.ServerUnaryCall<
    SignInUserInput__Output,
    SignInUserResponse__Output
  >,
  res: grpc.sendUnaryData<SignInUserResponse__Output>
) => {
  try {
    // Get the user from the collection
    const user = await findUser({ email: req.request.email });

    // Check if user exist and password is correct
    if (!user || !(await bcrypt.compare(req.request.password, user.password))) {
      res({
        code: grpc.status.INVALID_ARGUMENT,
        message: 'Invalid email or password',
      });
    }

    // Create the Access and refresh Tokens
    const { access_token, refresh_token } = await signTokens(user);

    // Send Access Token
    res(null, {
      status: 'success',
      access_token,
      refresh_token,
    });
  } catch (err: any) {
    res({
      code: grpc.status.INTERNAL,
      message: err.message,
    });
  }
};
Controller to Refresh the Access Token
server/controllers/auth.controller.ts
// [...] imports

// [...] Register New User

// [...] Login User

// [...] Refresh Token
export const refreshAccessTokenHandler = async (
  req: grpc.ServerUnaryCall<RefreshTokenInput__Output, RefreshTokenResponse>,
  res: grpc.sendUnaryData<RefreshTokenResponse>
) => {
  try {
    // Get the refresh token from cookie
    const refresh_token = req.request.refresh_token as string;

    const message = 'Could not refresh access token';
    if (!refresh_token) {
      res({
        code: grpc.status.PERMISSION_DENIED,
        message,
      });
    }

    // Validate the Refresh token
    const decoded = verifyJwt<{ sub: string }>(
      refresh_token,
      'refreshTokenPublicKey'
    );

    if (!decoded) {
      res({
        code: grpc.status.PERMISSION_DENIED,
        message,
      });
      return;
    }

    // Check if the user has a valid session
    const session = await redisClient.get(decoded?.sub);
    if (!session) {
      res({
        code: grpc.status.PERMISSION_DENIED,
        message,
      });
      return;
    }

    // Check if the user exist
    const user = await findUniqueUser({ id: JSON.parse(session).id });

    if (!user) {
      res({
        code: grpc.status.PERMISSION_DENIED,
        message,
      });
    }

    // Sign new access token
    const access_token = signJwt({ sub: user.id }, 'accessTokenPrivateKey', {
      expiresIn: `${customConfig.accessTokenExpiresIn}m`,
    });

    // Send response
    res(null, { access_token, refresh_token });
  } catch (err: any) {
    res({
      code: grpc.status.INTERNAL,
      message: err.message,
    });
  }
};
Complete Code for the Auth Controllers
server/controllers/auth.controller.ts
import crypto from 'crypto';
import bcrypt from 'bcryptjs';
import * as grpc from '@grpc/grpc-js';
import {
  createUser,
  findUniqueUser,
  findUser,
  signTokens,
  updateUser,
} from '../services/user.service';
import { SignUpUserInput__Output } from '../../pb/auth/SignUpUserInput';
import { SignInUserInput__Output } from '../../pb/auth/SignInUserInput';
import { SignInUserResponse__Output } from '../../pb/auth/SignInUserResponse';
import { SignUpUserResponse } from '../../pb/auth/SignUpUserResponse';
import { RefreshTokenInput__Output } from '../../pb/auth/RefreshTokenInput';
import { RefreshTokenResponse } from '../../pb/auth/RefreshTokenResponse';
import { signJwt, verifyJwt } from '../utils/jwt';
import customConfig from '../config/default';
import redisClient from '../utils/connectRedis';
import { VerifyEmailInput__Output } from '../../pb/auth/VerifyEmailInput';
import { GenericResponse } from '../../pb/auth/GenericResponse';
import Email from '../utils/email';

export const registerHandler = async (
  req: grpc.ServerUnaryCall<SignUpUserInput__Output, SignUpUserResponse>,
  res: grpc.sendUnaryData<GenericResponse>
) => {
  try {
    const hashedPassword = await bcrypt.hash(req.request.password, 12);
    const user = await createUser({
      email: req.request.email.toLowerCase(),
      name: req.request.name,
      password: hashedPassword,
      photo: req.request.photo,
      verified: false,
      provider: 'local',
    });

    const verification_code = crypto.randomBytes(20).toString('hex');
    const hashed_verification_code = crypto
      .createHash('sha256')
      .update(verification_code)
      .digest('hex');
    await updateUser(
      { id: user.id },
      { verification_code: hashed_verification_code }
    );
    const redirectUrl = `https://localhost:3000/api/verifyemail?code=${verification_code}`;
    try {
      await new Email(user, redirectUrl).sendVerificationCode();
      res(null, { status: 'success', message: 'Email verification code sent' });
    } catch (error: any) {
      await updateUser({ id: user.id }, { verification_code: null });
      res({
        code: grpc.status.INTERNAL,
        message: error.message,
      });
    }
  } catch (err: any) {
    if (err.code === 'P2002') {
      res({
        code: grpc.status.ALREADY_EXISTS,
        message: 'Email already exists',
      });
    }
    res({ code: grpc.status.INTERNAL, message: err.message });
  }
};

export const loginHandler = async (
  req: grpc.ServerUnaryCall<
    SignInUserInput__Output,
    SignInUserResponse__Output
  >,
  res: grpc.sendUnaryData<SignInUserResponse__Output>
) => {
  try {
    // Get the user from the collection
    const user = await findUser({ email: req.request.email });

    if (user?.verified) {
      res({
        code: grpc.status.INVALID_ARGUMENT,
        message: 'Account not verified',
      });
    }

    // Check if user exist and password is correct
    if (!user || !(await bcrypt.compare(req.request.password, user.password))) {
      res({
        code: grpc.status.INVALID_ARGUMENT,
        message: 'Invalid email or password',
      });
    }

    // Create the Access and refresh Tokens
    const { access_token, refresh_token } = await signTokens(user);

    // Send Access Token
    res(null, {
      status: 'success',
      access_token,
      refresh_token,
    });
  } catch (err: any) {
    res({
      code: grpc.status.INTERNAL,
      message: err.message,
    });
  }
};

export const refreshAccessTokenHandler = async (
  req: grpc.ServerUnaryCall<RefreshTokenInput__Output, RefreshTokenResponse>,
  res: grpc.sendUnaryData<RefreshTokenResponse>
) => {
  try {
    // Get the refresh token from cookie
    const refresh_token = req.request.refresh_token as string;

    const message = 'Could not refresh access token';
    if (!refresh_token) {
      res({
        code: grpc.status.PERMISSION_DENIED,
        message,
      });
    }

    // Validate the Refresh token
    const decoded = verifyJwt<{ sub: string }>(
      refresh_token,
      'refreshTokenPublicKey'
    );

    if (!decoded) {
      res({
        code: grpc.status.PERMISSION_DENIED,
        message,
      });
      return;
    }

    // Check if the user has a valid session
    const session = await redisClient.get(decoded?.sub);
    if (!session) {
      res({
        code: grpc.status.PERMISSION_DENIED,
        message,
      });
      return;
    }

    // Check if the user exist
    const user = await findUniqueUser({ id: JSON.parse(session).id });

    if (!user) {
      res({
        code: grpc.status.PERMISSION_DENIED,
        message,
      });
    }

    // Sign new access token
    const access_token = signJwt({ sub: user.id }, 'accessTokenPrivateKey', {
      expiresIn: `${customConfig.accessTokenExpiresIn}m`,
    });

    // Send response
    res(null, { access_token, refresh_token });
  } catch (err: any) {
    res({
      code: grpc.status.INTERNAL,
      message: err.message,
    });
  }
};

export const verifyEmailHandler = async (
  req: grpc.ServerUnaryCall<VerifyEmailInput__Output, GenericResponse>,
  res: grpc.sendUnaryData<GenericResponse>
) => {
  try {
    const verification_code = crypto
      .createHash('sha256')
      .update(req.request.verification_code)
      .digest('hex');

    const user = await findUniqueUser({ verification_code });

    if (!user) {
      res({
        code: grpc.status.UNAUTHENTICATED,
        message: 'Could not verify email',
      });
    }

    await updateUser(
      { id: user.id },
      { verified: true, verification_code: null }
    );

    res(null, { status: 'success', message: 'Email verified successfully' });
  } catch (err: any) {
    res({
      code: grpc.status.INTERNAL,
      message: err.message,
    });
  }
};
Protecting Private RPC Methods
server/middleware/deserializeUser.ts
import { User } from '@prisma/client';
import { findUniqueUser } from '../services/user.service';
import redisClient from '../utils/connectRedis';
import { verifyJwt } from '../utils/jwt';

export const deserializeUser = async (
  access_token: string
): Promise<User | null> => {
  try {
    // Get the token
    if (!access_token) {
      return null;
    }

    // Validate Access Token
    const decoded = verifyJwt<{ sub: string }>(
      access_token,
      'accessTokenPublicKey'
    );

    if (!decoded) {
      return null;
    }

    // Check if user has a valid session
    const session = await redisClient.get(decoded.sub);

    if (!session) {
      return null;
    }

    // Check if user still exist
    const user = await findUniqueUser({ id: JSON.parse(session).id });

    if (!user) {
      return null;
    }

    return user;
  } catch (err: any) {
    return null;
  }
};
Getting the Authenticated User
server/controllers/user.controller.ts
import * as grpc from '@grpc/grpc-js';
import { GetMeInput__Output } from '../../pb/auth/GetMeInput';
import { UserResponse } from '../../pb/auth/UserResponse';
import { deserializeUser } from '../middleware/deserializeUser';

export const getMeHandler = async (
  req: grpc.ServerUnaryCall<GetMeInput__Output, UserResponse>,
  res: grpc.sendUnaryData<UserResponse>
) => {
  try {
    const user = await deserializeUser(req.request.access_token);
    if (!user) {
      res({
        code: grpc.status.NOT_FOUND,
        message: 'Invalid access token or session expired',
      });
      return;
    }

    res(null, {
      user: {
        id: user.id,
        name: user.name,
        email: user.email,
        photo: user.photo!,
        provider: user.provider!,
        role: user.role!,
        created_at: {
          seconds: user.created_at.getTime() / 1000,
        },
        updated_at: {
          seconds: user.updated_at.getTime() / 1000,
        },
      },
    });
  } catch (err: any) {
    res({
      code: grpc.status.INTERNAL,
      message: err.message,
    });
  }
};
Creating the gRPC Server in Node.js
server/app.ts
import path from 'path';
import * as grpc from '@grpc/grpc-js';
import * as protoLoader from '@grpc/proto-loader';
import { ProtoGrpcType } from '../pb/services';
import { AuthServiceHandlers } from '../pb/auth/AuthService';
import {
  loginHandler,
  refreshAccessTokenHandler,
  registerHandler,
} from './controllers/auth.controller';
import customConfig from './config/default';
import connectDB from './utils/prisma';
import { getMeHandler } from './controllers/user.controller';

const options: protoLoader.Options = {
  keepCase: true,
  longs: String,
  enums: String,
  defaults: true,
  oneofs: true,
};

const PORT = customConfig.port;
const PROTO_FILE = '../proto/services.proto';
const packageDef = protoLoader.loadSync(
  path.resolve(__dirname, PROTO_FILE),
  options
);

const proto = grpc.loadPackageDefinition(
  packageDef
) as unknown as ProtoGrpcType;

const authPackage = proto.auth;

const server = new grpc.Server();
server.addService(authPackage.AuthService.service, {
  SignUpUser: (req, res) => registerHandler(req, res),
  SignInUser: (req, res) => loginHandler(req, res),
  RefreshToken: (req, res) => refreshAccessTokenHandler(req, res),
  GetMe: (req, res) => getMeHandler(req, res),
} as AuthServiceHandlers);
server.bindAsync(
  `0.0.0.0:${PORT}`,
  grpc.ServerCredentials.createInsecure(),
  (err, port) => {
    if (err) {
      console.error(err);
      return;
    }
    server.start();
    connectDB();
    console.log(`? Server listening on ${port}`);
  }
);
Quite a lot happening in the above code, let’s break it down. First, we imported all the required dependencies including the controllers we defined above.
Next, we evoked the loadSync() function and provided it with the path to the proto file and a configuration object. The loadSync() function provided by the @grpc/proto-loader will load the proto files and return the Protobuf definitions.
Next, we called the loadPackageDefinition() function provided by the @grpc/grpc-js package to return the gRPC package definition as a gRPC object hierarchy.
Next, we created a new Node.js gRPC server and evoked the .addService() method to help us add the defined gRPC services to the server.
To start the gRPC server, we need to evoke the bindAsync() method and bind it to a port number. By default, gRPC works over HTTP/2 and since we are in a development environment, we need to create an insecure connection by evoking the grpc.ServerCredentials.createInsecure() method as the second argument.
Creating the gRPC Client in Node.js
The gRPC client is where we will call the RPC methods defined on the gRPC server. The article was getting too long and instead of separating the individual gRPC clients, I consolidated them into a single file to reduce the complexity of this project.
Create a client/app.ts file and add the following code.
client/app.ts
import path from 'path';
import * as grpc from '@grpc/grpc-js';
import * as protoLoader from '@grpc/proto-loader';
import { ProtoGrpcType } from '../pb/services';
import customConfig from '../server/config/default';

const options: protoLoader.Options = {
  keepCase: true,
  longs: String,
  enums: String,
  defaults: true,
  oneofs: true,
};
const PORT = customConfig.port;
const PROTO_FILE = '../proto/services.proto';
const packageDef = protoLoader.loadSync(
  path.resolve(__dirname, PROTO_FILE),
  options
);

const proto = grpc.loadPackageDefinition(
  packageDef
) as unknown as ProtoGrpcType;

const client = new proto.auth.AuthService(
  `0.0.0.0:${PORT}`,
  grpc.credentials.createInsecure()
);
const deadline = new Date();
deadline.setSeconds(deadline.getSeconds() + 5);
client.waitForReady(deadline, (err) => {
  if (err) {
    console.error(err);
    return;
  }
  onClientReady();
});

function onClientReady() {
  signUpUser()
}

function signUpUser() {
  client.SignUpUser(
    {
      name: 'Admin',
      email: 'admin@admin.com',
      password: 'password123',
      passwordConfirm: 'password123',
      photo: 'default.png',
    },
    (err, res) => {
      if (err) {
        console.error(err);
        return;
      }
      console.log(res);
    }
  );
}

function signInUser() {
  client.SignInUser(
    {
      email: 'admin@admin.com',
      password: 'password123',
    },
    (err, res) => {
      if (err) {
        console.error(err);
        return;
      }
      console.log(res);
    }
  );
}

function refreshToken() {
  client.RefreshToken(
    {
      refresh_token: '',
    },
    (err, res) => {
      if (err) {
        console.error(err);
        return;
      }
      console.log(res);
    }
  );
}

function getAuthenticatedUser() {
  client.getMe(
    {
      access_token: '',
    },
    (err, res) => {
      if (err) {
        console.error(err);
        return;
      }
      console.log(res);
    }
  );
}
The code above is similar to what we have in the server/app.ts file. Here we loaded the Protobuf definitions and created a new instance of the AuthService class with the port number and the insecure connection.
Starting the gRPC Client and Server
Install the ts-node-dev package to help us start the gRPC server and client. Also, this package will hot-reload the gRPC server upon any file change.
yarn add ts-node-dev
Update the package.json file with the following scripts:
{
"scripts": {
"start:server": "ts-node-dev --respawn --transpile-only server/app.ts",
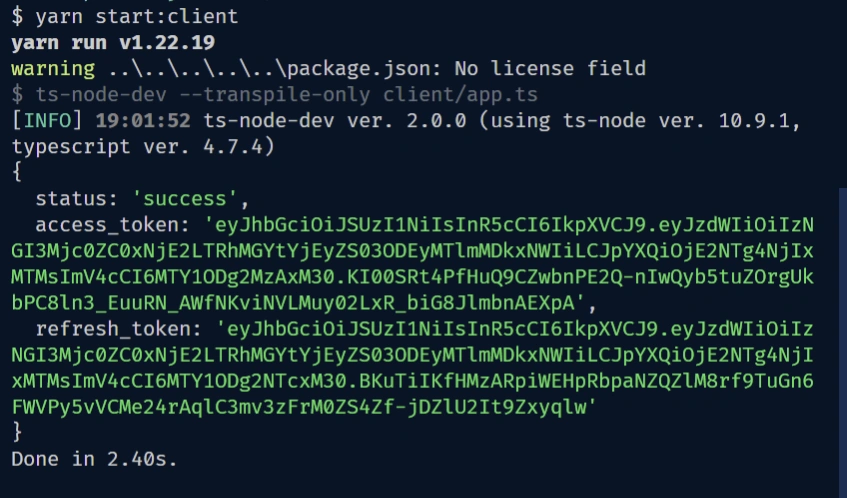
"start:client": "ts-node-dev --transpile-only client/app.ts",
"db:migrate": "npx prisma migrate dev --name updated-user-entity --create-only --schema ./server/prisma/schema.prisma && yarn prisma generate --schema ./server/prisma/schema.prisma",
"db:push": "npx prisma db push --schema ./server/prisma/schema.prisma"
}
}
start:server– this script will start the gRPC serverstart:client– this script will also start the gRPC client
Make sure both the Redis and PostgreSQL Docker containers are running
Now split the integrated terminal of your text editor or IDE into two and run yarn start:server to start the gRPC server on port 8000.
Calling the RPC method to Register a User
Now let’s use the gRPC client to call the SignUpUser RPC method, to add the new user to the PostgreSQL database.
// (...) code above

// [...] Register new user
function onClientReady() {
  signUpUser();
}

function signUpUser() {
  client.SignUpUser(
    {
      name: 'Admin',
      email: 'admin@admin.com',
      password: 'password123',
      passwordConfirm: 'password123',
      photo: 'default.png',
    },
    (err, res) => {
      if (err) {
        console.error(err);
        return;
      }
      console.log(res);
    }
  );
}
In the above, we called the SignUpUser RPC method from the gRPC client and passed an object containing the credentials required to register a new user.
The second argument is the callback function that will be evoked in the server to return the results to the client. In the callback function, we logged both the error is any and the result returned from the gRPC server.
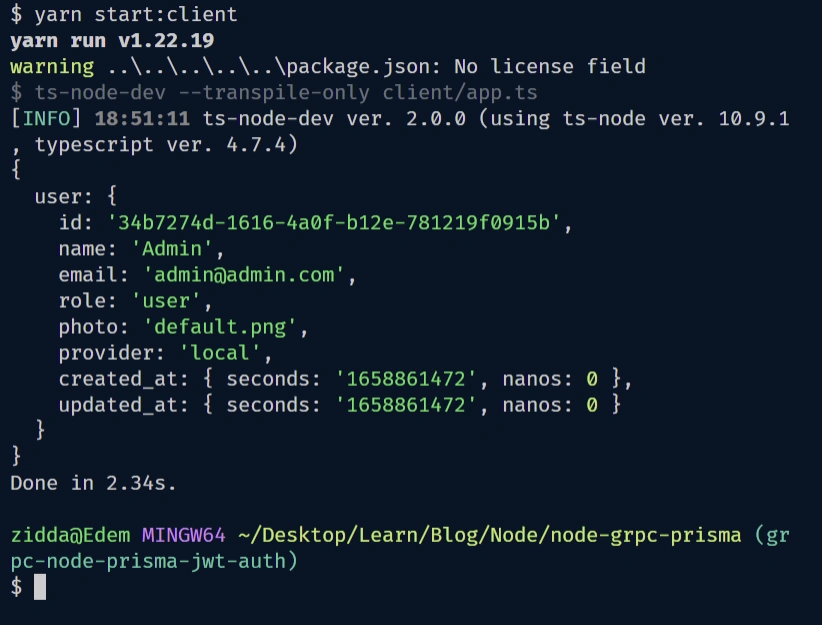
Now in the other terminal, run yarn start:client to start the gRPC client. Once the gRPC client is ready, the SignUpUser RPC method will be evoked to register the new user.
Within a few seconds, you should see the result in the terminal:
Calling the RPC method to Sign in the User
Now replace the signUpUser() function in the onClientReady() function with the signInUser() function and run the gRPC client again to log in the registered user.
Once again, after a few seconds, you should see the results returned by the gRPC server which in this section will be the access and the refresh tokens.
Calling the RPC to Get the Authenticated User
Replace the signInUser() function in the onClientReady() function with the getAuthenticatedUser() function to retrieve the authenticated user’s profile information.
Before calling the RPC method, copy the access token from the terminal and assign it to the access_token: '' property in the client.getMe() method.
Now run the gRPC client again yarn start:client and you should see the authenticated user’s credentials in the terminal.
Conclusion
Congratulations on reaching the end. In this article, you learned how to build a Node.js gRPC API with PostgreSQL, Prisma, Redis, and Docker-compose. Also, you learned how to create the gRPC client to call the RPC methods on the gRPC API.
Node.js gRPC Server and Client Source Code
You can find the complete Node.js gRPC server and client source code on my GitHub page.