
Visual Studio Code is an open-source editor developed by Microsoft and anyone with programming skills can customize it to meet their need.
VS Code has grown to become so popular that it’s now the default text editor for beginner developers.
VS Code is a flexible and lightweight IDE or text editor meaning it doesn’t eat up your memory and CPU like other IDEs that are robust.
VS Code has a lot of advantages that make it stand out from its competitors like Sublime Text, Atom, Vim, and Emacs.
Another great thing about VS Code is it has a lot of helpful tools and plugins that you can install from the Extension Marketplace to further make VS Code more powerful.
You can also read:
C++ Dev Tools
As a C++ developer, I recommend you choose one text editor like VS Code then get your hands dirty by playing with it, and also learn the various shortcuts VS Code provides to improve your productivity.
Since C++ is a compiled language, we are going to need a compiler to convert the human-readable code we write in VS Code into a binary executable file.
The computer or CPU doesn’t understand the human-readable code we write in the editor so we need a compiler that can compile our code to machine language for the CPU to understand.
Instead of installing a single compiler, we are going to install or set up three different compilers (Mingw, Msvc & Clang LLVM) so that we can test our C++ code to make sure it can run with different compilers.
In this article, we are going to set up VS Code workspace for C++ programming, install three different compilers, set up debugger settings and install helpful extensions and AI tools to ease our C++ development process.
Here are the steps:
- Installing three different Compilers
- VS Code Workspace Set up
- Install essential extensions and AI tools
- Setup debugger settings
Installing the different C++ Compilers
The C++ Compilers for Windows computer
- Mingw
- Msvc
- Clang llvm
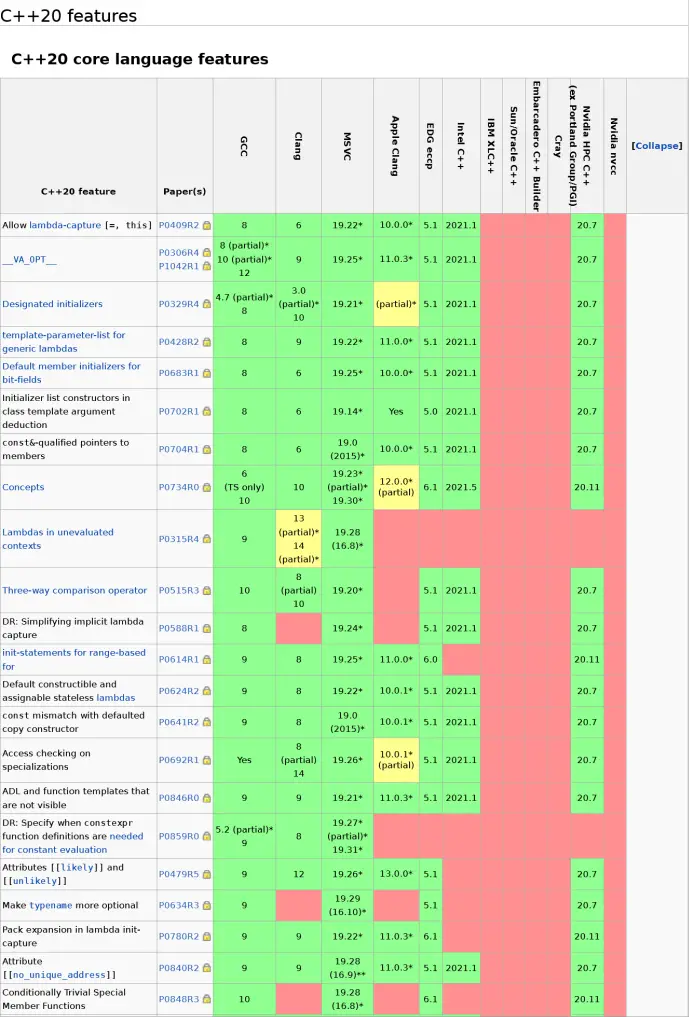
Before we start installing the various compilers, we need to check the features that are supported by the different compilers.
Search for C++ compiler support in Google and select the first link or visit C++ compiler support.
At the time of writing this article, C++20 is the latest stable version of C++ so scroll down to C++20 core language features.
Now you can see the various features that are supported by each compiler.
When am writing C++ programs my primary compiler is GCC but I also test my program with the other compilers to increase my chances of my program running well with other compilers.
If you happen to use a particular feature that doesn’t work with your compiler then this is a good place to come to see if your compiler supports that feature.
How to install Mingw compiler
Am going to show you how you can install both GCC and Clang compilers together.
Navigate to this website Winlibs, Winlibs is a cool project that allows us to install both GCC and Clang on a windows machine.
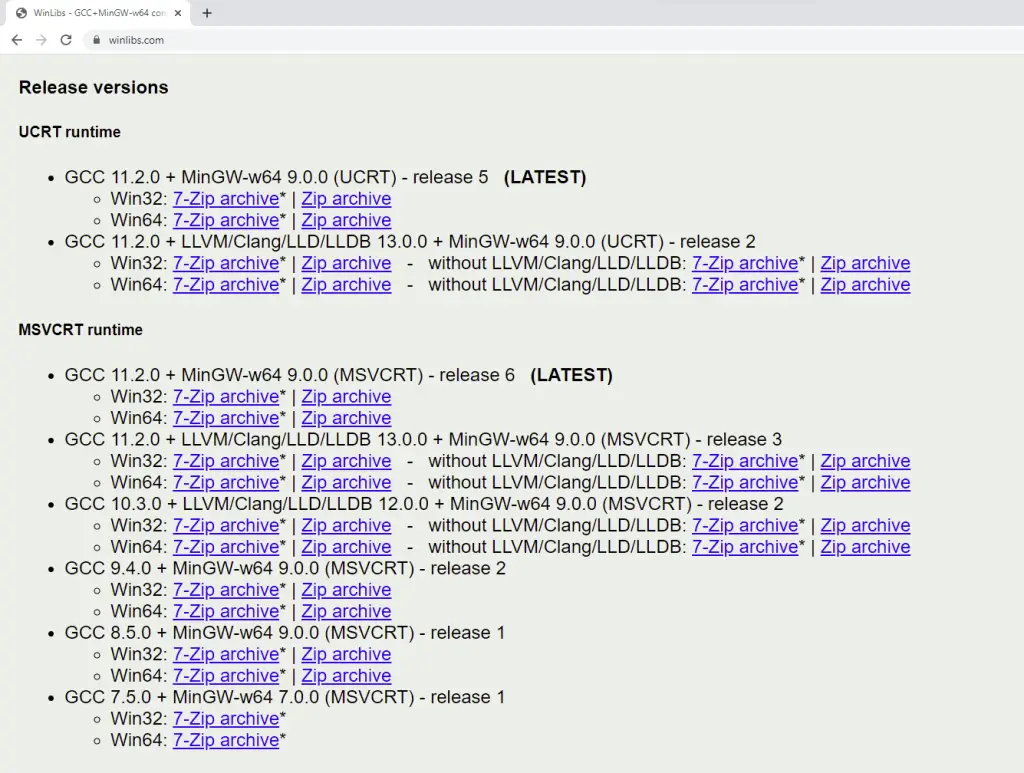
I recommend you download the latest release which in my case is 11.2.0 but by the time you’ll be reading this article the version might change.
Please grab the latest version and also I want you to download the version that has both GCC + LLVM/Clang/LLD/LLDB.
For the runtime, you can use UCRT runtime if you are on Windows 10 and above but if you targeting an older version of Windows then you can use the MSVCRT runtime.
Since am using Windows 11 am going to install the version that uses the UCRT runtime.
One last thing, if you are on a 32 bits Windows machine then download the version that has Win32, and also if you are on a 64 bits Windows machine then download the version that has Win64.
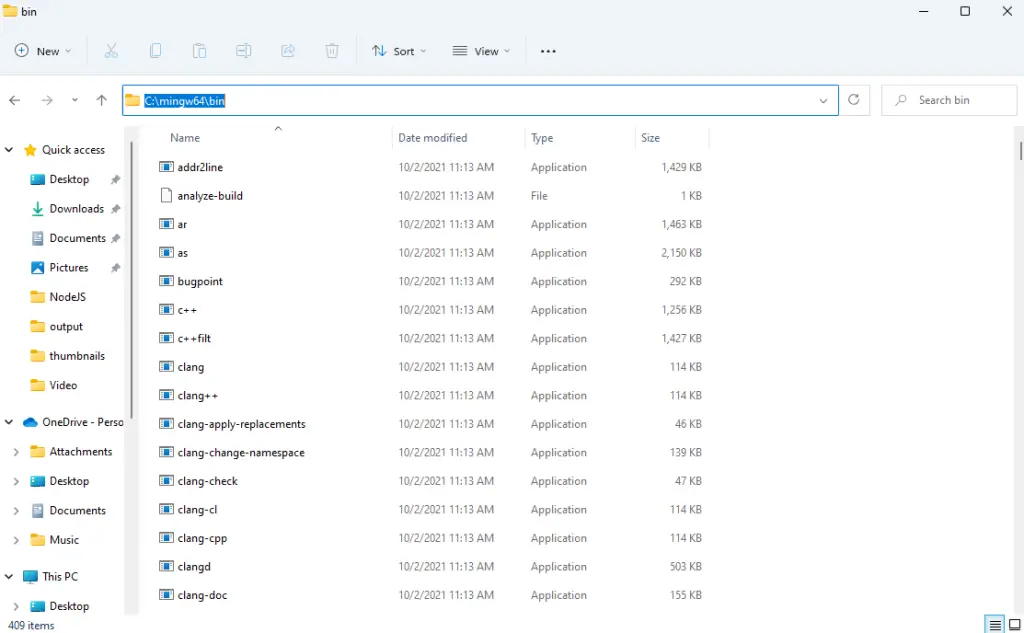
After the download is complete, you need to extract the Mingw64 folder from the zip file to a location on your C drive.
Now that you have the Mingw64 folder on your C drive, open it then click on the bin folder and copy the path.
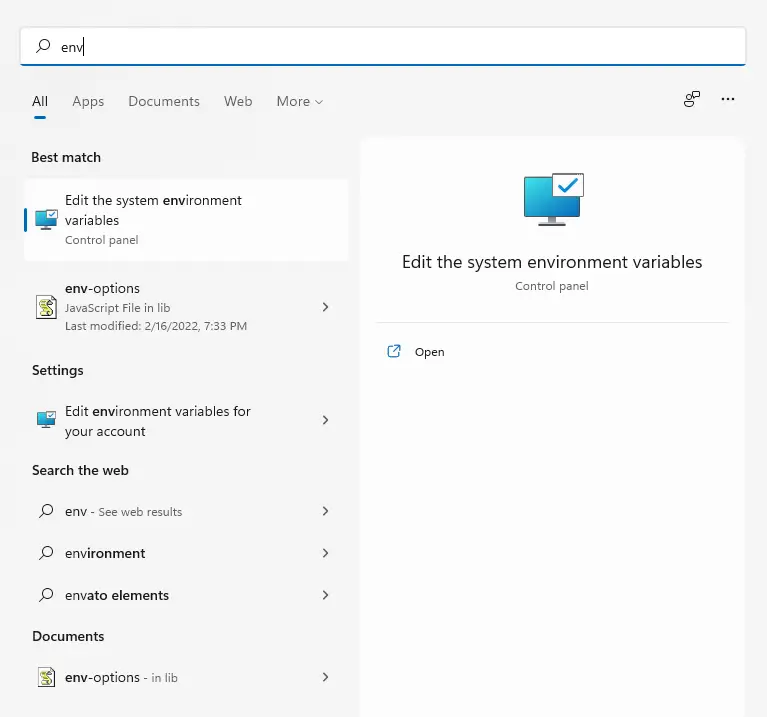
Open the windows menu by clicking the Windows key then search for env and click on Edit the System Environment Variables.
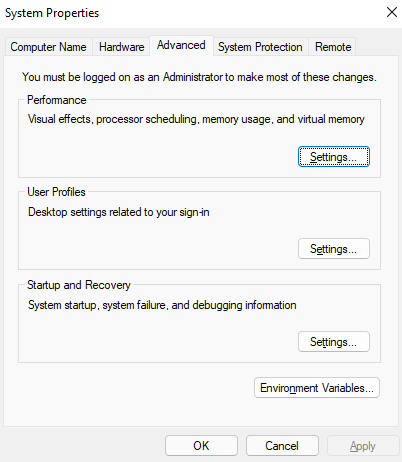
A popup of the System Properties will be displayed, click on the Environment Variables Tab under the Startup and Recovery.
A popup will show, under System Variables scroll down and select Path and click on Edit.
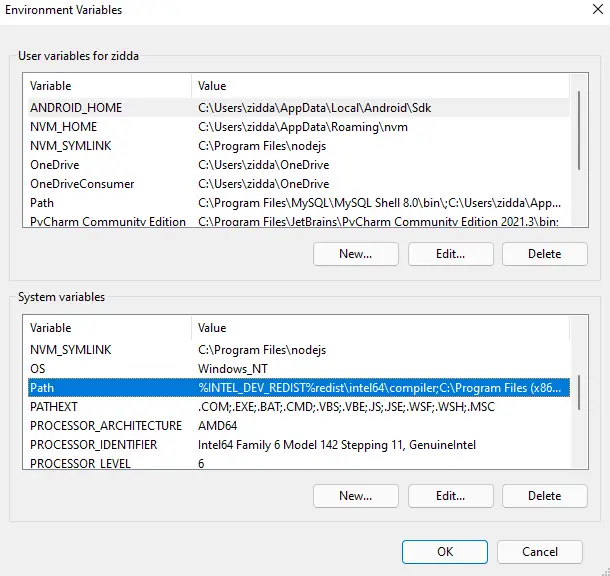
Then another popup will be displayed, click New and paste the Path we copied from the bin folder in the Mingw64 folder.
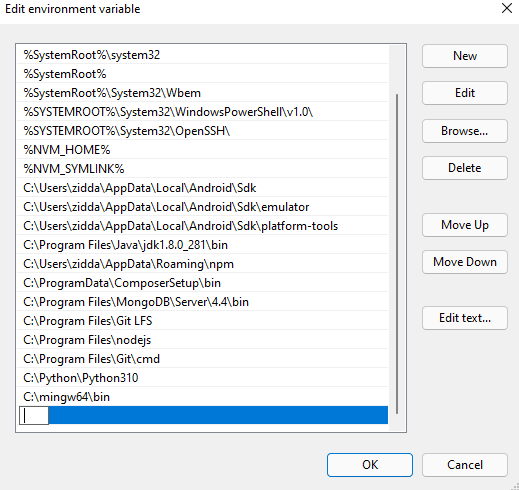
Now click on the Ok buttons on the various popups to close them.
One way to test if your G++ and Clang++ compilers are working is to open a command-line tool like cmd.
Run the g++ --version and you should see some information about the G++ compiler including the version.
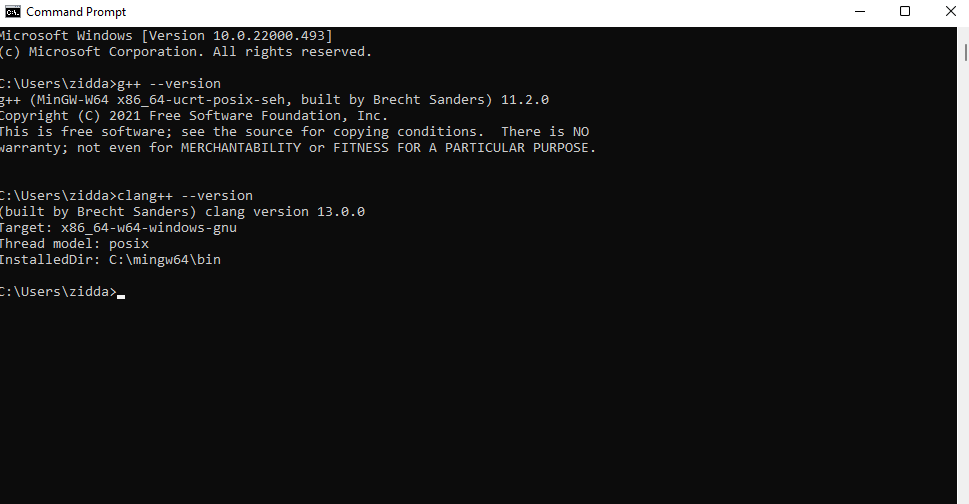
For the Clang compiler, run clang++ --version and you’ll see some information about the Clang compiler including the version.
In brief, these are the compilers we can use to write a C++20 application.
Now we have the GCC and the Clang LLVM compilers on our system through the MingW64 project.
It’s now time to install the Msvc compiler by Microsoft.
How to install Msvc compiler
To get a hold of the Msvc compiler you need to install Microsoft Visual Studio.
Navigate to the Microsoft Visual Studio 2019 download page – Microsoft Visual Studio 2019 has a community, Professional, and Enterprise version but we are going to install the community version since it’s enough to write C++ programs.
At the time of writing this article, Visual Studio 2019 is the latest version but if you find a newer version then don’t hesitate to download it.
After the download is complete, click on the Visual Studio 2019 installer and you should see a window like this.
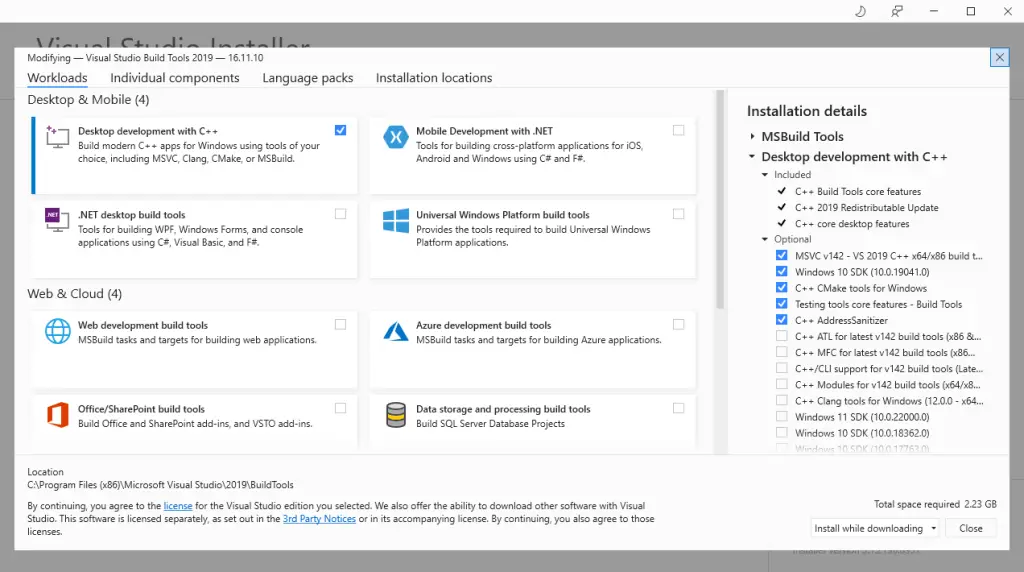
The window will give you a gist of all the tools you can install to use with the Microsoft Visual Studio IDE.
You should tick the Desktop development with C++ since we are interested in C++ and click on the download dropdown and select Install while downloading.
Once you click on Install while downloading, the installer will download the Visual Studio IDE and the MSVC compiler with the underlying compilers and some helpful tools we really need to write C++ applications.
Now we have three C++ compilers on our windows machine that we can use for C++ development.
We have the GCC compiler, Clang LLVM compiler, and MSVM compiler from Microsoft.
The C++ Compilers for Mac Computer
- GCC
- Clang llvm
The C++ Compilers for Linux Computer
- GCC
- Clang Apple
- Clang llvm
Download Visual Studio Code (VS Code) Editor
Now we need to install an IDE which is VS Code that we can connect to the three compilers so that we can start writing our C++ programs.
Search for VS Code in your browser and click on the first link or click here to navigate to the download page of VS Code.
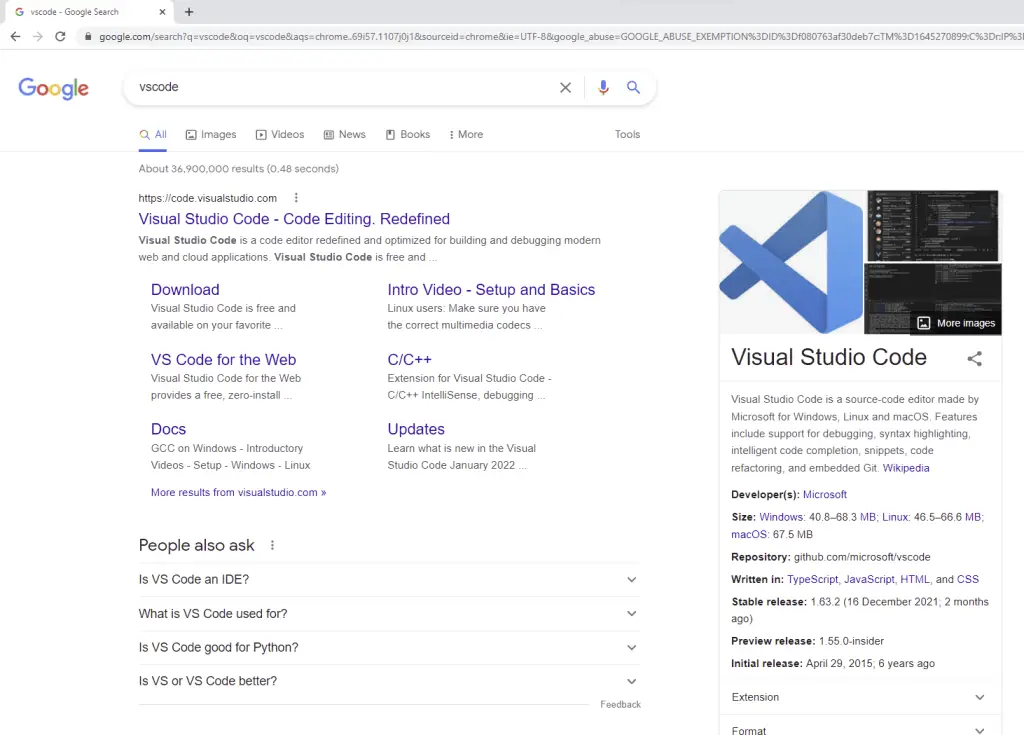
You can read more about it in the short description, you can see it’s supported on Windows, Linux, and macOS.
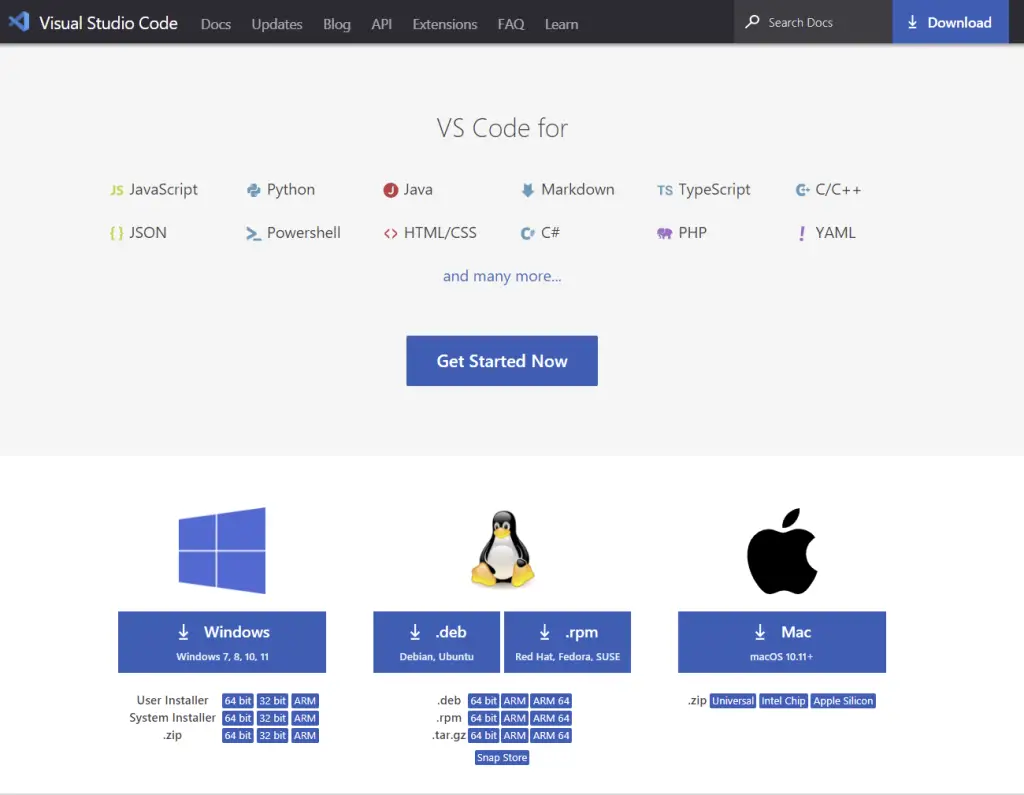
Scroll down to this section and click on the download button depending on your operating system.
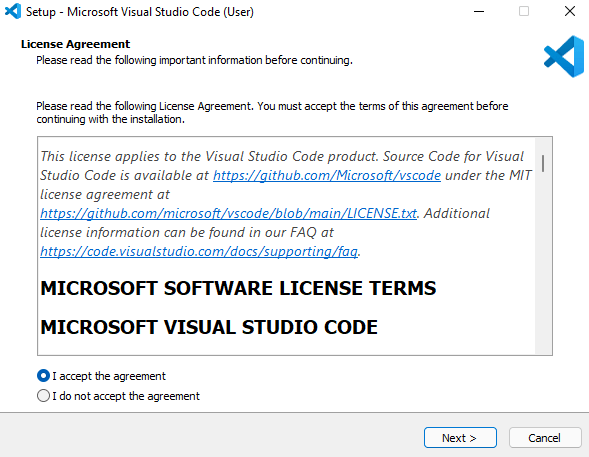
After the download is complete, click on the installer then accept the agreement and click Next.
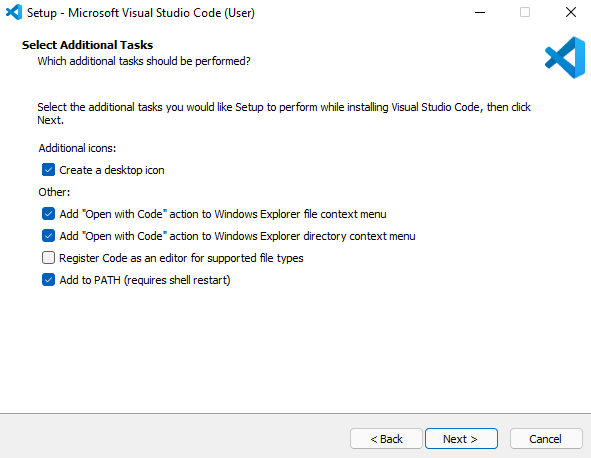
Make sure you check the following options shown in the image below and click on the Next button to install it.
Install essential extensions and AI tools
Now open VS Code and you should see a welcome message with some other helpful information you can read.
The first thing we have to do is to install some extensions to help ease our C++ development.
To access the Extensions market, click on View in the menu and select Extensions, or from the sidebar icons click on the extension icon.
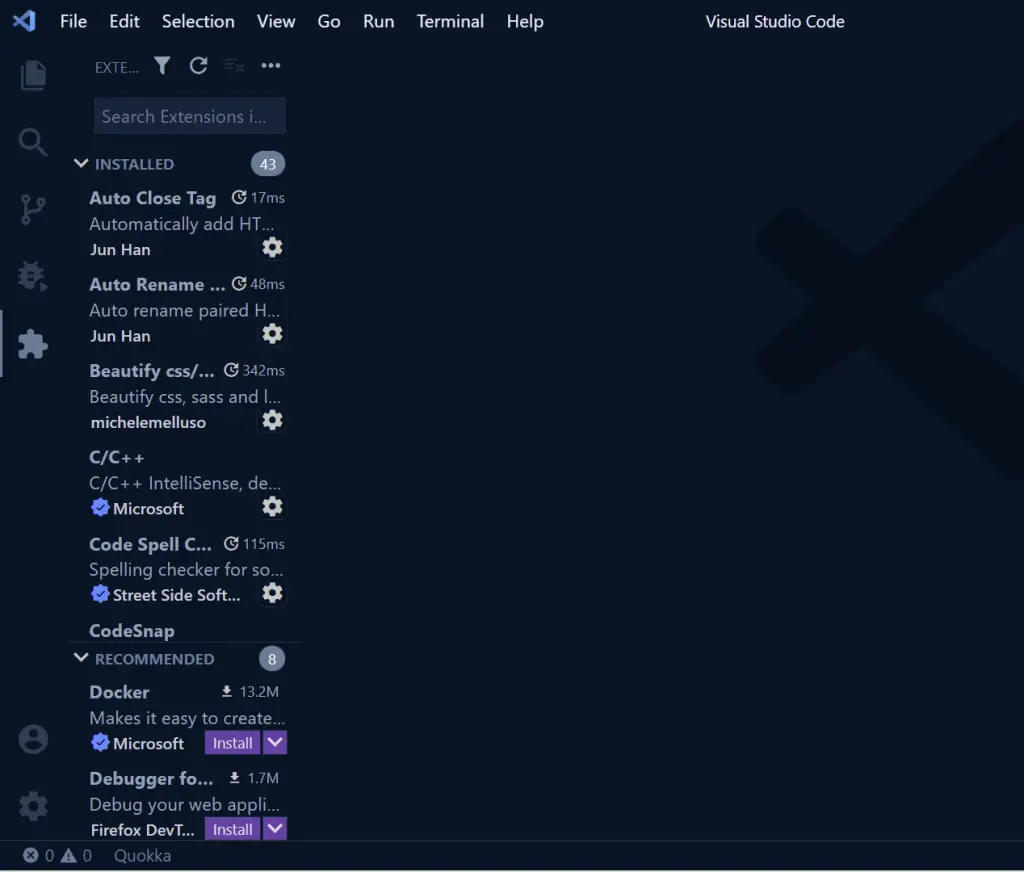
Here is a list of some of the essential VS Code extensions you can install to take your C++ development to the next level.
- C/C++ IntelliSense, debugging, and code browsing
- Clang-Format
- Tabnine AI Autocomplete
- GitHub Copilot

- Material Icon Theme

- GitLens — Git supercharged
- Night Owl Theme

C/C++ IntelliSense, debugging, and code browsing
The C/C++ extension will help VS Code support C/C++ so that you can get IntelliSense, autocompletion, and many more features when you are writing C++ code.
By default, the C/C++ extension does not come with the different compilers to compile our human-readable C++ code to an executable binary file.
That is the reason why we had to install the different C++ compilers before installing the C/C++ extension.
Tabnine AI Autocomplete
Tabnine AI Autocomplete extension is an AI tool that makes suggestions while you type.
Tabnine now supports 23 mainstream programming languages and five text editors.
Sometimes when am writing code I have the feeling of “Wow” how did it know what I wanted to type?
Material Icon Theme
VS Code by default comes with icons that are not that great so when you install an icon library like Material Icon theme it can make your editor look professional.
How to make VS Code use the Compilers we Installed
Now we need to connect VS Code editor to the compilers we installed so that we can compile our C++ applications easily through the Visual Studio Code editor.
What we are going to do is to set up a C++ template project we can use in all the applications we’ll be building.
We only need to copy the configuration files from the template folder and then paste them into the new project and we are good to go.
Create an empty folder on your computer then right-click on it and select Open with VS Code.
Once you’ve opened your template folder with VS Code, create a main.cpp file and paste the code snippets below into it.
#include <iostream>
int main() {
  auto result = (10 <=> 20) > 0;
  std::cout << "result: " << result << std::endl;
}
The C++ code snippets above will help us know if our compilers support C++20.
How to Configure GCC Compiler in VS Code
From VS Code menu click on Terminal and select Configure Task from the list.
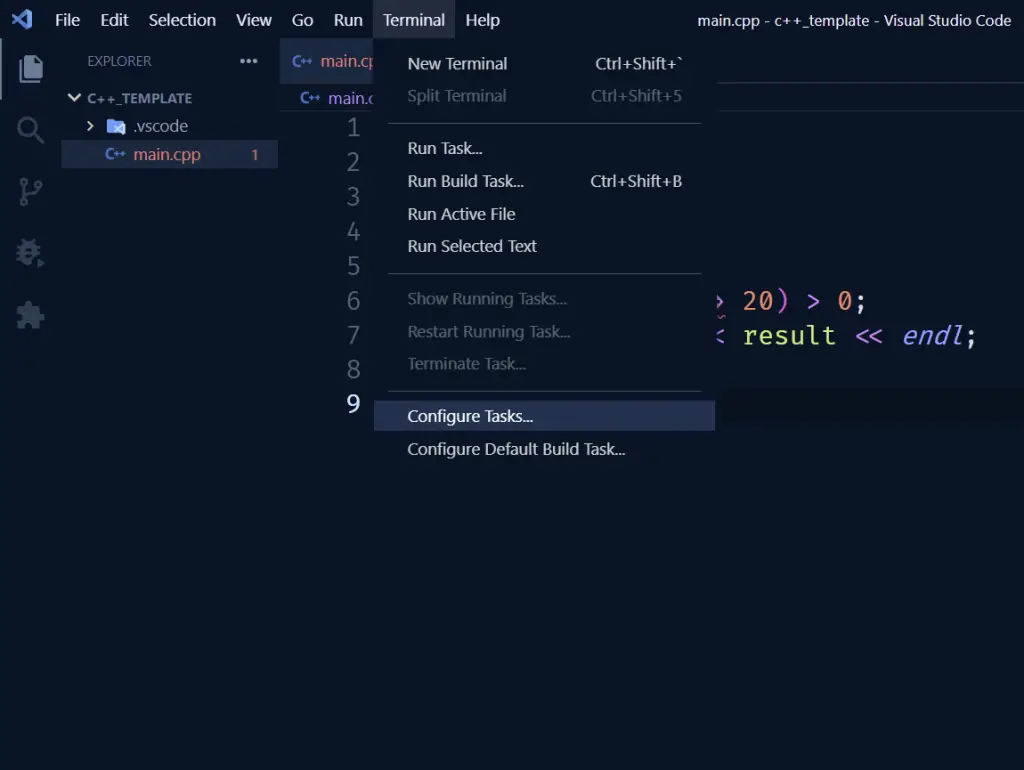
Once you click on Configure Tasks then VS Code will go ahead and find all the compilers we installed on our system.

You can see C/C++:g++.exe and C/C++:clang++.exe which are the two compilers we installed with the Mingw project.
So we want to configure these two compilers to make VS Code use them to compile our C++ program.
Click on the C/C++:g++.exe compiler first and a Tasks.json file will be created in your project.
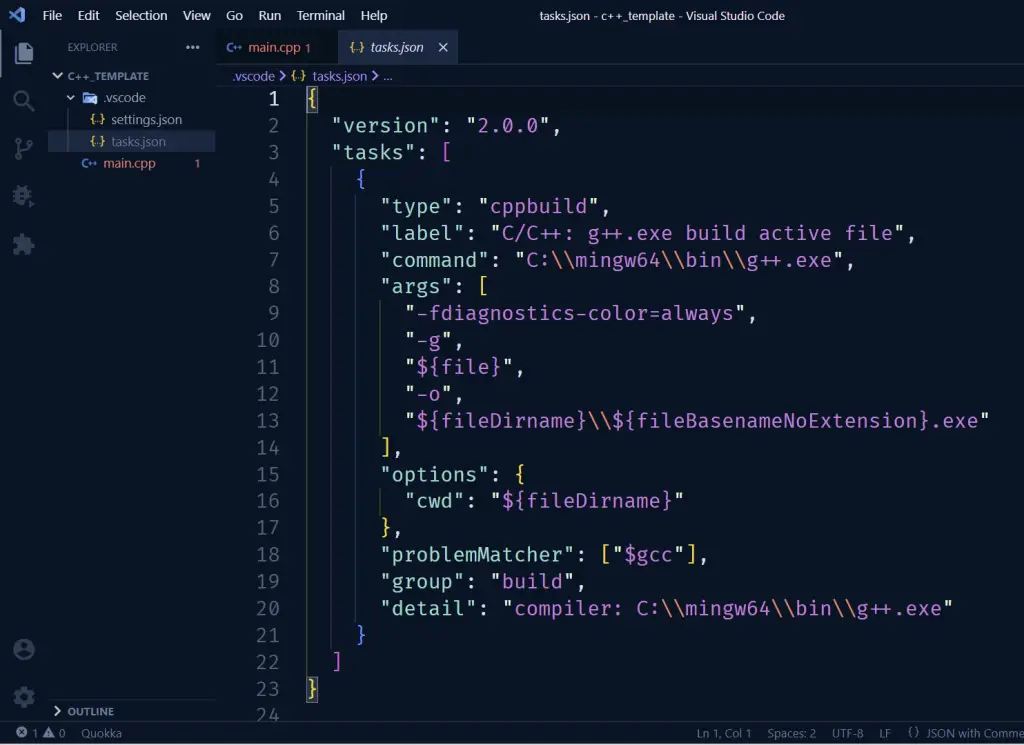
Since the main.cpp program is using C++20 we need to configure our compiler to also use C++20.
Now we need to select the main.cpp file and click on Terminal from the VS Code menu then click on Run Task.
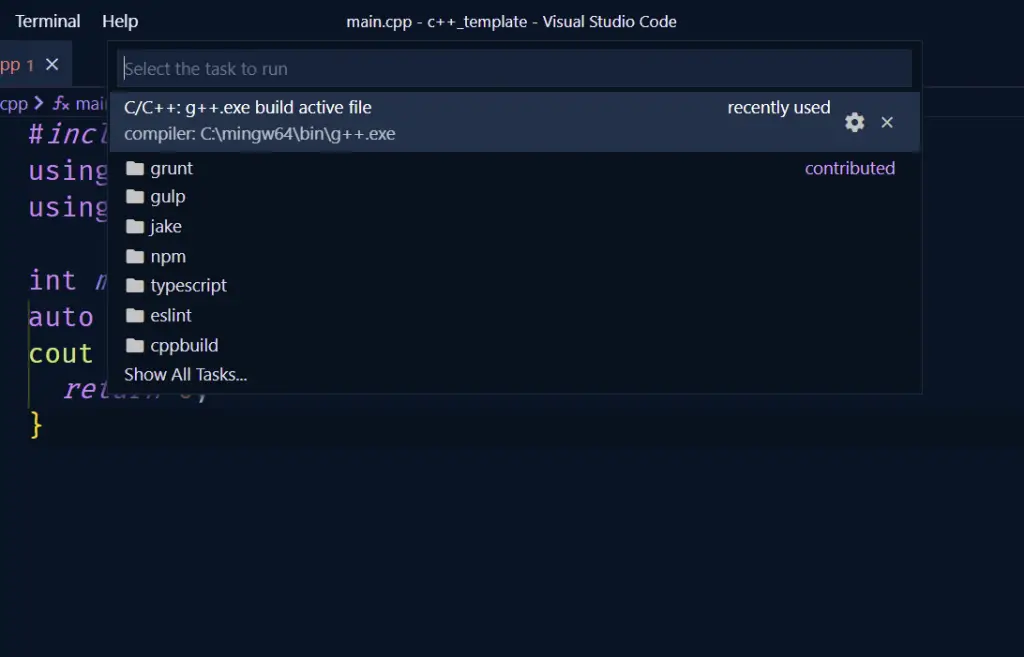
A popup will display with the C/C++:g++.exe compiler we configured. Click on the g++ compiler to compile our main.cpp file and a new terminal will open showing the build result.
After the build has been completed successfully, a new main.exe file will be created in the project.
Open a new terminal and run this command: .\main.exe to execute the binary file and you should see the result: 0 which is a good indication that we have our Visual Studio Code editor connected to our compiler.
How to Configure the Clang++ Compiler in VS Code
Now it is time to also configure the Clang++ compiler so click on Terminal and then click on Configure Tasks.
Look for C/C++:Clang++.exe and click on it and this will add an entry in the Tasks.json file.
Here are the full Tasks.json file configurations you can copy and paste into your Tasks.json file.
Change the versions in the labels to match the version of g++ and clang++ you are using.
{
  "version": "2.0.0",
  "tasks": [
    {
      "type": "cppbuild",
      "label": "Build with GCC 11.2.0",
      "command": "C:\\mingw64\\bin\\g++.exe",
      "args": [
        "-fdiagnostics-color=always",
        "-g",
        "-std=c++20",
        "${workspaceFolder}\\*.cpp",
        "-o",
        "${fileDirname}\\${fileBasenameNoExtension}.exe"
      ],
      "options": {
        "cwd": "${fileDirname}"
      },
      "problemMatcher": ["$gcc"],
      "group": "build",
      "detail": "compiler: C:\\mingw64\\bin\\g++.exe"
    },
    {
      "type": "cppbuild",
      "label": "Build with Clang 13.0.0",
      "command": "C:\\mingw64\\bin\\clang++.exe",
      "args": [
        "-fdiagnostics-color=always",
        "-g",
        "-std=c++20",
        "${workspaceFolder}\\*.cpp",
        "-o",
        "${fileDirname}\\${fileBasenameNoExtension}.exe"
      ],
      "options": {
        "cwd": "${fileDirname}"
      },
      "problemMatcher": ["$gcc"],
      "group": "build",
      "detail": "compiler: C:\\mingw64\\bin\\clang++.exe"
    }
  ]
}
Let’s test if our Clang++.exe compiler has been connected correctly with VS Code.
Click on Terminal again then click on Run Task and from the available tasks runners click on the Clang compiler we just configured.
A new terminal we open to show the build process and result. After the build has been completed, open a new terminal and run .\main.exe to execute our binary executable file.
You should still see the result: 0 which is what we expected, if you have some kind of error then please contact me or leave a comment below and I will help you fix it.
Now we have our two compilers working, the last compiler we need to configure is the Msvc compiler which is from Microsoft.
How to Configure the MSVC Compiler from Microsoft
Now we need to configure the C/C++ VS Code extension to help it know we want to use C++20 so that it can give us C++20 IntelliSense.
In VS Code use the shortcut (Ctrl + Shift + P) to open the command palette then search for C/C++: Edit Configurations (UI) and click on it.
Once you click on it a new c_cpp_properties.json file will be created in the .vscode configuration.
Scroll down to the section where we have the C++ standard then change it to c++20 and close the configuration tab.
If you go back to the C++20 code we wrote in the main.cpp file you’ll see that the code is no longer flagged as a programming error.
Next, open the Windows menu then search for Developer PowerShell and click on the Developer PowerShell that matches the right community version.
Run the command cl.exe and you should see some information about the Msvc compiler by Microsoft.
What we are going to do is to set up a terminal like this and use this terminal to start up Visual Studio Code.
This will make VS Code start in a mode where it can find the Msvc compiler by Microsoft.
Open the File Explorer then navigate to the project folder and copy the path to the project.
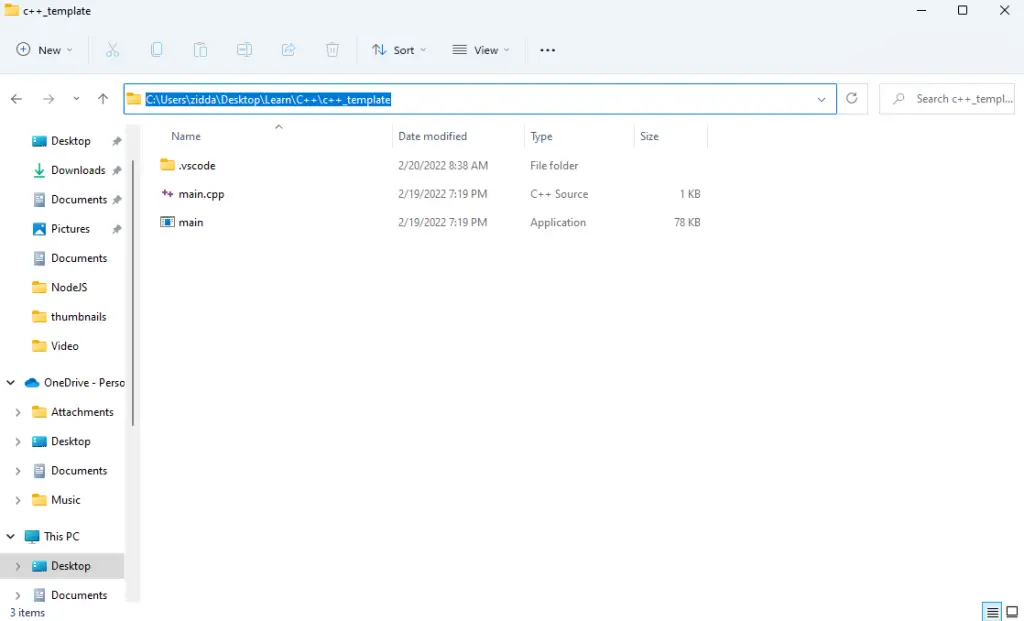
Go back to the Developer PowerShell and change the directory to the C++ template path we copied.
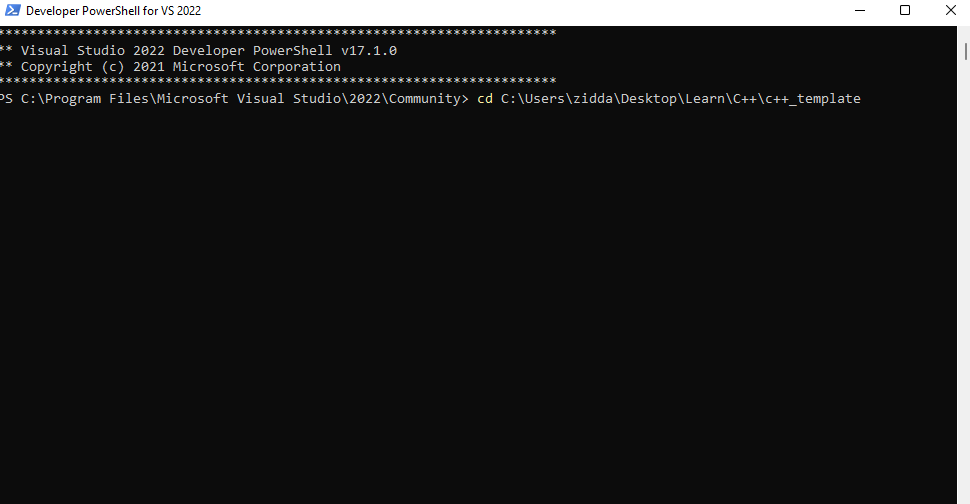
Run this VS Code command code . to start VS Code in the current folder.
The good thing about starting VS Code this way is it’s going to know about the compiler from Microsoft.
Open your terminal and run cl.exe and you should see some information about the compiler from Microsoft.
Now let’s configure VS Code to use the MSVC compiler, navigate to Terminal then click on Configure Tasks.
Please make sure you’ve selected the main.cpp file else you won’t see all the compilers.
Look for the Microsoft compiler C/C++: cl.exe then click on it and a new configuration entry will be added to the tasks.json file.
Here are the full configurations of the three compilers in the tasks.json file:
{
  "version": "2.0.0",
  "tasks": [
    {
      "type": "cppbuild",
      "label": "Build with GCC 11.2.0",
      "command": "C:\\mingw64\\bin\\g++.exe",
      "args": [
        "-fdiagnostics-color=always",
        "-g",
        "-std=c++20",
        "${workspaceFolder}\\*.cpp",
        "-o",
        "${fileDirname}\\${fileBasenameNoExtension}.exe"
      ],
      "options": {
        "cwd": "${fileDirname}"
      },
      "problemMatcher": ["$gcc"],
      "group": "build",
      "detail": "compiler: C:\\mingw64\\bin\\g++.exe"
    },
    {
      "type": "cppbuild",
      "label": "Build with Clang 13.0.0",
      "command": "C:\\mingw64\\bin\\clang++.exe",
      "args": [
        "-fdiagnostics-color=always",
        "-g",
        "-std=c++20",
        "${workspaceFolder}\\*.cpp",
        "-o",
        "${fileDirname}\\${fileBasenameNoExtension}.exe"
      ],
      "options": {
        "cwd": "${fileDirname}"
      },
      "problemMatcher": ["$gcc"],
      "group": "build",
      "detail": "compiler: C:\\mingw64\\bin\\clang++.exe"
    },
    {
      "type": "cppbuild",
      "label": "Build with MSVC",
      "command": "cl.exe",
      "args": [
        "/Zi",
        "/std:c++latest",
        "/EHsc",
        "/Fe:",
        "${fileDirname}\\${fileBasenameNoExtension}.exe",
        "${workspaceFolder}\\*.cpp"
      ],
      "options": {
        "cwd": "${fileDirname}"
      },
      "problemMatcher": ["$msCompile"],
      "group": "build",
      "detail": "compiler: cl.exe"
    }
  ]
}
Now let’s compile our main.exe program with the MSVC compiler to see if it supports C++20.
Click on the Terminal menu then select Run Task and click on the MSVC compiler.
Once you click on it, the compiler should compile your main.exe program to a binary executable file and it will also create some additional files in your project.
After the build is complete, open a new terminal then run the main.exe binary file and you should see the result: 0 which is what we expected.
Next, delete all the junk files that were created by the MSVC compiler and also include the binary file.
Now we have a starting template we can use to write C and C++ applications.
Whenever you want to write a C++ project, you can copy and paste the configuration files in the C++ template into your new project.
This will ensure that you don’t have to configure VS Code and the compilers anytime you want to write C++ programs.
Conclusion
In this article, I showed you how to set up VS Code for C++ development step by step from installing three different compilers to configuring them so that VS Code can use them to build our programs into a binary executable file.