Speech Recognition is an essential feature included in many applications to identify words and phrases in spoken languages and convert them to textual format.
This article aims to provide an introduction on how to convert audio and video to text in Python using the AssemblyAI Speech-To-Text API.

Finding the best Speech-to-Text API for your application or product can be tedious and difficult because a lot of Speech-to-Text APIs are been created and released into the market.
Also, learn: 15 Most Useful Python Modules
Popular Free Speech-to-Text APIs
Google Speech-to-Text
Google Speech-to-Text uses a speech transcription API powered by Google’s AI technologies to transcribe your audio file or microphone input sound.
Google Speech-to-Text is a popular speech transcription API that supports over 63 languages and has good accuracy.
Google gives users $300 free credits for Google Cloud hosting with 60 minutes of free transcription.
AssemblyAI
AssembyAI is also a Speech-to-Text API that is new in the market but it’s getting a lot of recognition due to its user-friendly UI, great accuracy and other features like Topic Detection, Paragraph Detection, Automated Punctuation, and many more.
AssembyAI offers three free transcription hours for audio or video files per month before going for the paid tier if needed.
At the time of writing this article, AssembyAI only supports English transcription but their API supports every audio and video file format out-of-the-box.
AWS Transcribe
Unlike Google Speech-to-Text API, AWS Transcribe has lower accuracy and only supports transcribing files stored in an Amazon S3 bucket.
AWS Transcribe offers 60 minutes of free transcription per month for the first 12 months of use.
Popular Open Source Speech-to-Text Engines
Speech-to-Text Transcription Engines are an alternative to Speech-to-Text APIs, they are open source and completely free.
DeepSpeech
DeepSpeech is an open-source embedded Speech-to-Text library that uses end-to-end model architecture to run in real-time on a variety of devices.
Wav2Letter
Wav2Letter is an open-source library written in C++ and uses the ArrayFire tensor library. It’s Facebook AI Research’s Automatic Speech Recognition Toolkit.
SpeechBrain
SpeechBrain is a Pytorch-based toolkit for Speech-to-Text transcription.
Speech-to-Text Data Privacy
When working with Speech-to-Text APIs, you may have questions like what happens to the files you upload for transcription?
When selecting a speech-to-Text API it is highly recommended to put your data privacy as a top priority before thinking of accuracy.
Some companies use the data you upload to train their models to be more accurate and also use them for their own research.
I wouldn’t recommend you to upload video or audio files that may contain sensitive information or personal data like credit card numbers, phone numbers, medical history, social security numbers and more.
Prerequisite
You’ll need an API key from AssemblyAI before you can use AssemblyAI’s Speech-to-Text API.
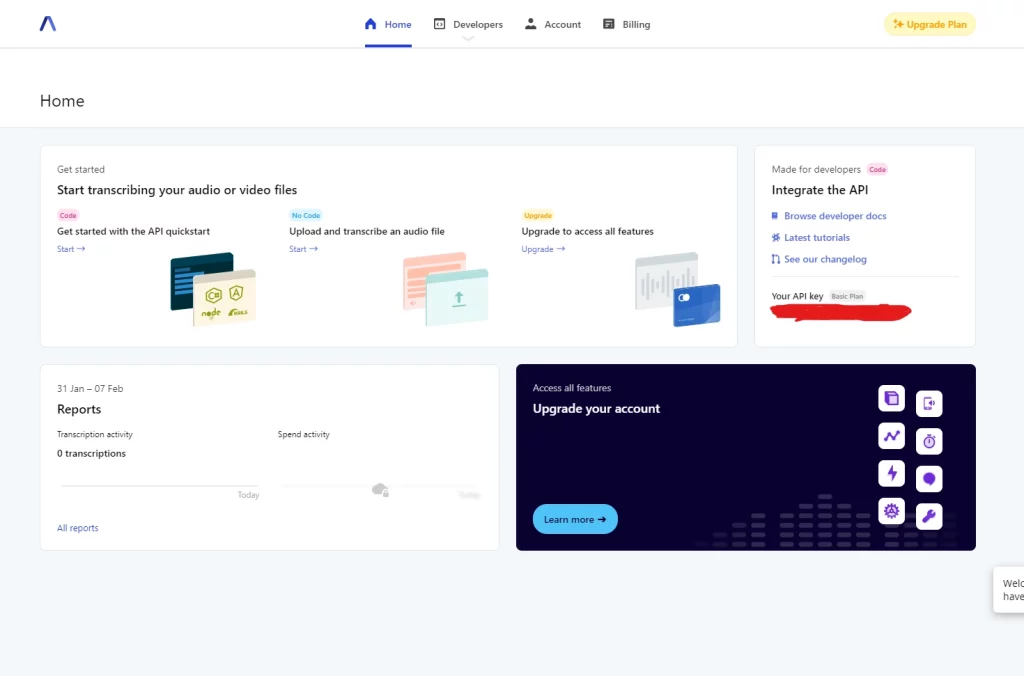
Start by creating an account on AssemblyAI then you would be brought to a dashboard like this.

To find your API key move to the Made for developers section then copy the API key and store it as an environment variable or a variable in a different configuration file.
How to Convert an MP3 File to Text
Nowadays, Artificial Intelligence Speech-to-Text recognition transcription accuracy has improved with a high accuracy approaching human accuracy levels.
Most of the best Speech-to-Text APIs have deep learning teams working continuously to improve the accuracy and usability of their API.
When working with the AssemblyAI Speech-to-Text API, the process is pretty much simple.
AssemblyAI API allows us to use a locally stored file or a URL pointing to the mp3 stored on a server, Google Cloud bucket, Amazon S3 bucket or anywhere on the internet.
The transcription process can be divided into 3 simple steps:
- Upload the mp3 file to the AssembyAI API
- The API will start transcribing our audio to text
- We get the result of the transcription
Now, create a new folder on your desktop, give it any name of your choice and open it with a text editor (VS Code).
Create two files in the root directory and name them config.py and main.py respectively.
Next download the audio we will transcribe to text into the project directory from this audio link.
In the config.py file, create a variable called api_key and store the API key you copied from AssemblyAI. The API_KEY serves as an authentication method for us to access the Speech-to-Text API.
Working with Local MP3 Files
There are two ways of uploading the audio to the API, we can either upload the audio from our local computer or from an audio URL.
We are going to talk about how to transcribe a local audio file to text before going for the URL method.
We’ll need to import our API key from the config.py file into the main.py file and assign it to an api_key variable.
from config import *
api_key = api_key
Next, we need to define the headers we’ll include in our API calls to AssemblyAI API, the headers will contain the content type and the API key we stored in the api_key variable.
headers = {
  "authorization": api_key,
  "content_type": "application/json"
}
It’s now time to also define the upload endpoint of AssemblyAI we are going to make a POST request with the headers we defined earlier and the data we are going to generate very soon with a generator function.
endpoint = "https://api.assemblyai.com/v2/upload"
Let’s define a generator function that will read our mp3 file we downloaded earlier as bytes and store the result into a data variable.
def read_file(filename):
   with open(filename, 'rb') as _file:
       while True:
           data = _file.read(5242880)
           if not data:
               break
           yield data
Now it’s time to make a POST request to the upload endpoint with the defined headers and the data.
We need to call the read_file(‘<path to the audio file >’) and assign the return data to the data variable.
response = requests.post(endpoint, headers=headers, data=read_file('audio.mp3'))
The requests.post() method is going to return a JSON response so we need to assign it to a response variable.
The JSON response will contain an upload_url property pointing to the file we uploaded to the AssemblyAI API.
Note: the upload_url is only understood by the AssemblyAI servers, you won’t be able to access the upload URL in the browser.
We need to access the upload_url key in the JSON response and assign it to an audio_url variable.
audio_url= response.json()['upload_url']
Next, we need to make a POST request to AssembyAI API to transcribe our audio to text.
let’s define the transcribe_request which will be a JSON of an ‘audio_url’ pointing to the audio_url variable we defined earlier. Also, we need to define the transcription endpoint.
transcript_request = {'audio_url': audio_url}
request_endpoint = "https://api.assemblyai.com/v2/transcript"
Now let’s make a POST request to the transcription endpoint to inform the AssemblyAI to convert our mp3 file to text. The AssemblyAI is going to return a JSON response containing a status key, an id key and more.
transcript_response = requests.post(request_endpoint, json=transcript_request, headers=headers)
audio_id = transcript_response.json()['id']
When we submit our audio_url for processing, the “status” key will go from “queued” to “processing” to “completed”.
Also, we need the id included in the JSON response to make a repeated GET request to check the status of the transcription process.
Once the status of the transcription process is completed then the JSON response returned will contain the transcribed text.
Now let’s make a GET request to check the status of our transcription.
audio_id = transcript_response.json()['id']
status_endpoint = "https://api.assemblyai.com/v2/transcript/" + audio_id
polling_response = requests.get(status_endpoint, headers=headers)
Let’s also write some if-else statements to print the status of the transcription process if the status is not completed so that can be sure no error occurred.
status_endpoint = "https://api.assemblyai.com/v2/transcript/" + audio_id
polling_response = requests.get(status_endpoint, headers=headers)
if polling_response.json()['status'] != 'completed':
   print(polling_response.json())
else:
   with open(audio_id + '.txt', 'w') as f:
       f.write(polling_response.json()['text'])
   print('Transcript saved to', audio_id, '.txt')
The moment the status is equal to completed, we want to save the text to a file and print a text of “Transcript saved to” text in the terminal.
The summarised version of the 3 steps on how to Convert Audio and Video To Text
Submitting the audio to the AssemblyAI server
from config import *
api_key = api_key

import requests

endpoint = "https://api.assemblyai.com/v2/upload"


headers = {
  "authorization": api_key,
  "content_type": "application/json"
}

def read_file(filename):
   with open(filename, 'rb') as _file:
       while True:
           data = _file.read(5242880)
           if not data:
               break
           yield data


response = requests.post(endpoint, headers=headers, data=read_file('audio.mp3'))
audio_url= response.json()['upload_url']
Sending a POST request to tell the AssemblyAI API to start the transcription process
transcript_request = {'audio_url': audio_url}
request_endpoint = "https://api.assemblyai.com/v2/transcript"
transcript_response = requests.post(request_endpoint, json=transcript_request, headers=headers)
audio_id = transcript_response.json()['id']
Make a GET request to poll the status of the transcription process or get the text if the status is completed.
status_endpoint = "https://api.assemblyai.com/v2/transcript/" + audio_id
polling_response = requests.get(status_endpoint, headers=headers)

if polling_response.json()['status'] != 'completed':
   print(polling_response.json())
else:
   with open(audio_id + '.txt', 'w') as f:
       f.write(polling_response.json()['text'])
   print('Transcript saved to', audio_id, '.txt')
Working with MP3 Files from a URL
To work with an audio URL stored on the internet, you need to follow the same process but you need to omit the upload step. Below is a sample code.
Make a POST request to AssemblyAI to process the audio to text.
from config import *
api_key = api_key
import requests
request_endpoint = "https://api.assemblyai.com/v2/transcript"
json= {
  "audio_url": "https://github.com/wpcodevo/1-speech-to-text/blob/master/audio.mp3"
}
headers = {
  "authorization": api_key,
  "content_type": "application/json"
}
transcript_response = requests.post(request_endpoint, json=json, headers=headers)
audio_id = transcript_response.json()['id']
Make a GET request to get the status of the transcription process and save the text to a file if the status is completed.
from config import *
api_key = api_key
import requests
request_endpoint = "https://api.assemblyai.com/v2/transcript"
json= {
  "audio_url": "https://github.com/wpcodevo/1-speech-to-text/blob/master/audio.mp3"
}
headers = {
  "authorization": api_key,
  "content_type": "application/json"
}
status_endpoint = "https://api.assemblyai.com/v2/transcript/" + "Put the audio ID Here"
polling_response = requests.get(status_endpoint, headers=headers)
if polling_response.json()['status'] != 'completed':
   print(polling_response.json())
else:
   with open("Put the audio ID Here" + '.txt', 'w') as f:
       f.write(polling_response.json()['text'])
   print('Transcript saved to', "Put the audio ID Here", '.txt')
Note: All the processes above can be done for a video file, you can upload a video file instead of an audio file.
Conclusion
In this day and age, any developer can transcribe speech to text easily by using Speech-to-Text APIs or Transcription Engines online.
You can also read about all the essential Python string methods you can use in your projects.
Please if you face any problem with your code, you can leave a comment below or contact me so that I can help you.

