In this article, you’ll learn how to implement CRUD operations on a PostgreSQL database using Django REST Framework. By the end, you’ll have an API that enables you to create, read, update, and delete feedback entries in the database.
We’ll begin from scratch, setting up a PostgreSQL server with Docker (though you can also opt for a cloud-hosted PostgreSQL), and walk through connecting Django to the PostgreSQL server. You’ll then create the necessary API views, set up routes for the views, and configure CORS on the server.
More practice:
- Build a CRUD Django REST API using Django REST Framework
- CRUD RESTful API Server with Python, FastAPI, and MongoDB
- Build a CRUD App with FastAPI and SQLAlchemy
- Build a CRUD App with FastAPI and PyMongo
- Node.js, Express, TypeORM, PostgreSQL: CRUD Rest API
- Build CRUD RESTful API Server with Golang, Gin, and MongoDB
- Next.js Full-Stack App with React Query, and GraphQL-CodeGen
- Build Full-Stack tRPC CRUD Application with Node.js, and React.js
- GraphQL CRUD API with Next.js, MongoDB, and TypeGraphQL

Run and Test the Django API on Your Computer
To test the CRUD functionalities of the Django API locally, we first need to set up the final source code on your machine. Follow the steps below to get everything up and running:
- Install the latest version of Python from https://www.python.org/downloads/.
- Download or clone the PostgreSQL Django REST API source code from GitHub at https://github.com/wpcodevo/django-postgres-crud-rest-api, and open the project in your IDE or text editor of choice.
- In the integrated terminal of your IDE or text editor, run the following command to set up a virtual environment in the project’s root directory.
- Windows OS –
python -m venv venv - Mac or Linux OS –
python3 -m venv venv
- Windows OS –
- Once the virtual environment is created, your IDE or code editor might prompt you to activate it for the workspace. Choose ‘Yes’ to continue.

Note: To activate the virtual environment, close any previously open terminal in your IDE and launch a new one.
If your IDE or text editor didn’t prompt you to activate it, you can manually do so by running the command below from the root directory in the terminal.- Windows OS (Command Prompt ) –
venv\Scripts\activate.bat. - Windows OS (Git Bash) –
venv/Scripts/activate.bat. - Mac or Linux OS –
source venv/bin/activate
- Windows OS (Command Prompt ) –
- Use
pip install -r requirements.txtto install all necessary dependencies. - Start the PostgreSQL and pgAdmin servers in their Docker containers by running
docker-compose up -d. Ensure Docker is running on your machine for this command to work. If Docker is not installed, you can download it from the official Docker website. - Next, apply the database migrations to the PostgreSQL database by running
python manage.py migrate. - Launch the Django development server by executing
python manage.py runserver. - Once the Django server is running, you can test the API endpoints using tools like Postman or the Thunder Client extension in VS Code.
Set Up PostgreSQL and pgAdmin
Let’s start by setting up a PostgreSQL database using Docker. If you already have a PostgreSQL server running on your machine, you can skip this section, but make sure to include the necessary PostgreSQL credentials in a .env file at the root level of your project.
Create a docker-compose.yml file in the root directory and add the following code:
docker-compose.yml
services:
  postgres:
    image: postgres:latest
    container_name: postgres
    ports:
      - '6500:5432'
    volumes:
      - progresDB:/var/lib/postgresql/data
    env_file:
      - ./.env
  pgAdmin:
    image: dpage/pgadmin4
    container_name: pgAdmin
    env_file:
      - ./.env
    ports:
      - '5050:80'
volumes:
  progresDB:
You may have noticed that instead of directly including the environment variables for building the PostgreSQL and pgAdmin images in the Docker Compose configuration, we referenced an .env file. This file will store the required environment variables.
To make these variables accessible to Docker Compose, create an .env file and add the following environment variables:
app.env
POSTGRES_HOST=127.0.0.1
POSTGRES_USER=postgres
POSTGRES_PASSWORD=password123
POSTGRES_DB=django_crud
POSTGRES_PORT=6500

PGADMIN_DEFAULT_EMAIL=admin@admin.com
PGADMIN_DEFAULT_PASSWORD=password123
After setting the environment variables, run the command docker-compose up -d to start both the PostgreSQL and pgAdmin servers.
Connect the Django Project to the PostgreSQL Server
Now that the PostgreSQL server is up and running, let’s configure the project to connect to it. To do this, we need to install two packages. You can install them by running the command below:
pip install psycopg2-binary python-dotenv
psycopg2-binary– is a Python library that provides a PostgreSQL adapter, allowing Python applications to interact with PostgreSQL databases.python-dotenv– is a Python library that loads environment variables from a.envfile, making them easily accessible for use in our Django application.
Once the packages are installed, open the feedback/settings.py file and add the following modules at the top:
import os
from dotenv import load_dotenv
While still inside the feedback/settings.py file, scroll to the database settings section and replace the SQLite connection settings with the following PostgreSQL configuration:
# Database
# https://docs.djangoproject.com/en/5.1/ref/settings/#databases

load_dotenv()

DATABASES = {
    'default': {
        'ENGINE': 'django.db.backends.postgresql',
        'NAME': os.getenv('POSTGRES_DB'),
        'USER': os.getenv('POSTGRES_USER'),
        'PASSWORD': os.getenv('POSTGRES_PASSWORD'),
        'HOST': os.getenv('POSTGRES_HOST', 'localhost'),
        'PORT': os.getenv('POSTGRES_PORT', '5432'),
    }
}
And that’s it! Our Django project should now be able to connect to and interact with the PostgreSQL database.
Set Up the Django Project
First, create a new directory to initialize as a Django project. Go to the location where you store your Django code, open a terminal, and run the following command to create a folder named django-postgres-crud-rest-api. Then, open the project in VS Code or any other IDE or text editor of your choice.
mkdir django-postgres-crud-rest-api
cd django-postgres-crud-rest-api && code .
Next, let’s create a virtual environment to manage the project dependencies. Open the integrated terminal in your IDE and run the following command to set it up.
- Windows OS –
python -m venv venv - Mac or Linux OS –
python3 -m venv venv
Next, run the command below to activate the virtual environment in your current workspace.
- Windows OS (Command Prompt ) –
venv\Scripts\activate.bat. - Windows OS (Git Bash) –
venv/Scripts/activate.bat. - Mac or Linux OS –
source venv/bin/activate
To install Django and Django REST Framework in the virtual environment, run the following command in the root directory console.
pip install django djangorestframework
django– A powerful Python framework built for fast and efficient web application development, emphasizing clean design.djangorestframework– A powerful toolkit for building Web APIs in Django, providing easy-to-use tools for authentication, serialization, and more.
We’re now ready to initialize Django in our project using the django-admin CLI tool. In the terminal, run the command below to create a Django project named “feedback“, which will serve as the foundation for our feedback application’s REST API.
django-admin startproject feedback .
Once the project is created, execute the following command to apply the initial database migrations for Django’s built-in apps, such as authentication and sessions.
python manage.py migrate
This command will apply the pre-generated migrations from the Django project setup to the PostgreSQL database schema.
Now that our PostgreSQL database is in sync with the migrations, let’s start the development server to ensure everything is configured correctly. Run the following command to launch the Django development server.
python manage.py runserver
This will start the HTTP server at http://127.0.0.1:8000/. Open this URL in a new tab, and if you see the Django welcome page, it means we’re on the right track.
Let’s begin working on the feedback API.
One of Django’s main goals is to help developers organize their code into reusable apps, promoting a modular project structure. As a result, we’ll create a dedicated app for the feedback API. Run the following command to generate a new Django app called feedback_api:
django-admin startapp feedback_api
Next, register the rest_framework and feedback_api apps by adding them to the INSTALLED_APPS list in the feedback/settings.py file.
feedback/settings.py
INSTALLED_APPS = [
    'django.contrib.admin',
    'django.contrib.auth',
    'django.contrib.contenttypes',
    'django.contrib.sessions',
    'django.contrib.messages',
    'django.contrib.staticfiles',
    'feedback_api',
    'rest_framework'
]
Create the Database and Serializer Models
At this point, we’re ready to create the feedback table in the PostgreSQL database. First, we’ll define a Django model that corresponds to the table. Then, we’ll use Django Admin to generate the migration file and apply it to the database to create the table.
Django Database Model
In Django, a model is a built-in feature that Django uses to generate the corresponding database tables, define their columns, establish relationships, and apply various constraints.
To get started, create a models.py file within the feedback_api app and add the following model definitions:
feedback_api/models.py
import uuid
from django.db import models

class FeedbackModel(models.Model):
    id = models.UUIDField(primary_key=True, default=uuid.uuid4, editable=False)
    name = models.CharField(max_length=255)
    email = models.CharField(max_length=255)
    feedback = models.CharField(max_length=255, unique=True)
    status = models.CharField(max_length=255)
    rating = models.FloatField()
    createdAt = models.DateTimeField(auto_now_add=True)
    updatedAt = models.DateTimeField(auto_now=True)

    class Meta:
        db_table = "feedback"
        ordering = ['-createdAt']

    def __str__(self) -> str:
        return self.name
The models.UUIDField() attribute instructs Django to generate a UUID for the id field using the uuid4() function.
We chose UUIDs as the primary key to enhance the security of our API and prevent attackers from scanning the table using a range of integers.
Additionally, we’ve applied a unique constraint to the feedback field to ensure that no two records contain the same feedback.
The db_table property in the Meta options tells Django to rename the table to the specified value. The ordering property ensures that objects are ordered in descending order by the createdAt timestamp.
Django Serializer Model
In Django REST Framework (DRF), serializers handle the conversion of data between complex types and native Python data types, making it easy to expose model data through APIs. They also perform validation to ensure the data meets the required format and constraints before saving it to the database.
While DRF provides several built-in serializers, we’ll focus on the ModelSerializer in this tutorial. The ModelSerializer offers a convenient way to create serializers where the fields directly map to the corresponding model fields.
In the feedback_api app directory, create a serializers.py file and add the following serializer:
feedback_api/serializers.py
from rest_framework import serializers
from feedback_api.models import FeedbackModel

class FeedbackSerializer(serializers.ModelSerializer):
    class Meta:
        model = FeedbackModel
        fields = '__all__'
Inheriting the ModelSerializer class will:
- Automatically generate a set of fields for the FeedbackSerializer
- Automatically generate validators for the serializer
- Create default implementations of
.create()and.update()methods
Generate and Apply the Database Migrations
With the feedback model defined, the next step is to generate migration files. These files will enable us to create the feedback table in the database and roll back changes if necessary.
Run the following command to generate the migrations:
python manage.py makemigrations
Push the migrations to the database by running the command below:
python manage.py migrate
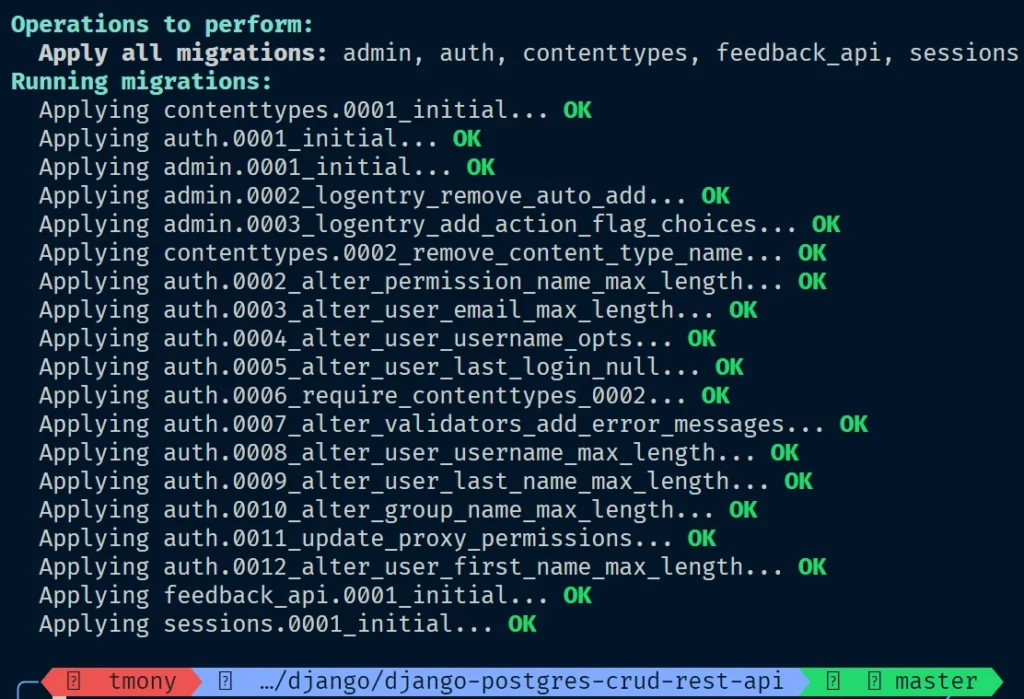
After all migrations have been successfully applied, your terminal should resemble the screenshot below, showing each migration with an “OK” status to confirm completion.
Let’s manually confirm that all migrations have been applied to our database using pgAdmin, which we have running in Docker. To access pgAdmin, open a new browser tab and go to http://localhost:5050. You should be redirected to the sign-in page.
On the sign-in page, enter the email and password specified in the .env file and click the Login button.
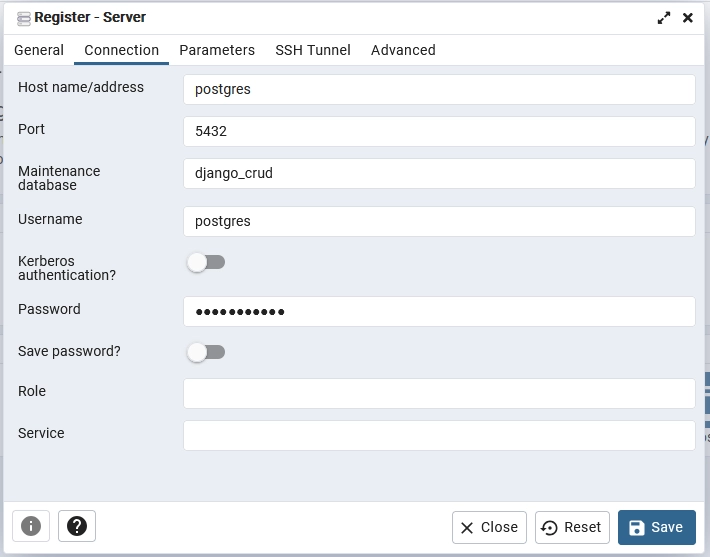
Once signed in, you must add your PostgreSQL server to pgAdmin. Click on Add New Server and enter the required details, which you can find in the .env file. After filling in the information, click Save to register the PostgreSQL server.
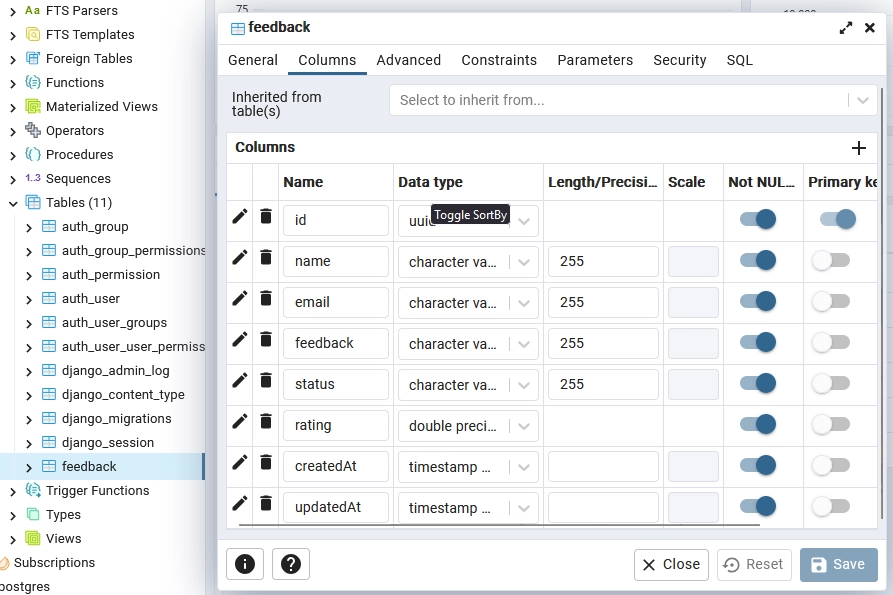
Once the PostgreSQL server is added to pgAdmin, navigate to the Tables section. You should see all the tables created by Django. Right-click on the feedback table and select Properties. Under the Columns tab, you will see all the fields defined in the Django model for the Feedback class.
Create the CRUD API Views
We are now ready to implement the CRUD API views. If a views.py file doesn’t already exist in the feedback_api directory, create one and add the following module imports:
feedback_api/views.py
from rest_framework.response import Response
from rest_framework import status, generics
from feedback_api.models import FeedbackModel
from feedback_api.serializers import FeedbackSerializer
import math
from datetime import datetime
For improved readability and maintainability, we will use a class-based view, specifically the GenericAPIView class. This class includes methods for handling HTTP requests (such as get, post, put, delete, etc.) and automatically provides useful methods for querying, filtering, and paginating data.
Implement the Create and Get API Views
Let’s begin with the Create and Read operations in our CRUD setup. On the Django server, the Create operation will be implemented using the post method, while the Read operation will use the get method. Both methods are available to us through the GenericAPIView class, which we will inherit.
To get started, create a views.py file in the feedback_api directory if it doesn’t already exist. Then, add the following code:
feedback_api/views.py
class Feedback(generics.GenericAPIView):
    serializer_class = FeedbackSerializer
    queryset = FeedbackModel.objects.all()

    def get(self, request):
        page_num = int(request.GET.get("page", 1))
        limit_num = int(request.GET.get("limit", 10))
        start_num = (page_num - 1) * limit_num
        end_num = limit_num * page_num
        search_param = request.GET.get("search")
        feedback = FeedbackModel.objects.all()
        total_feedback = feedback.count()
        if search_param:
            feedback = feedback.filter(title__icontains=search_param)
        serializer = self.serializer_class(
            feedback[start_num:end_num], many=True)
        return Response({
            "status": "success",
            "total": total_feedback,
            "page": page_num,
            "last_page": math.ceil(total_feedback / limit_num),
            "feedbacks": serializer.data
        })

    def post(self, request):
        serializer = self.serializer_class(data=request.data)
        if serializer.is_valid():
            serializer.save()
            return Response({"status": "success", "data": {"feedback": serializer.data}}, status=status.HTTP_201_CREATED)
        else:
            return Response({"status": "fail", "message": serializer.errors}, status=status.HTTP_400_BAD_REQUEST)
There’s quite a lot going on in the code above. Here’s a breakdown:
- Class Definition: We start by creating a class called
Feedbackthat inherits fromGenericAPIView. This inheritance gives us access to helpful methods and features fromGenericAPIViewthat simplify API creation. - GET Request (Read Operation): In the
getmethod, we handle the retrieval of multiple feedback entries. First, we extract thelimitandpageparameters from the request to define pagination. We then useFeedbackModel.objects.all()to fetch all feedback records in the database, apply pagination, and return the results as a JSON object. - POST Request (Create Operation): The
postmethod handles adding new feedback entries. We extract the data from the request and attempt to save it to the database. If a feedback entry with similar data already exists, a409 Conflicterror is returned. Otherwise, a copy of the newly added feedback is included in the JSON response.
Implement the Read, Update, and Delete API Views
Now let’s complete the remaining CRUD operations with three methods, each focusing on finding and manipulating feedback by its ID. Here’s an overview of each:
get– This method queries the database for a feedback entry that matches the ID in the request parameter. If found, it returns the feedback as a JSON object; otherwise, a 404 error is returned.patch– This method retrieves the specified feedback entry and updates its fields based on the data provided in the request body. Once updated, the modified feedback is returned in the JSON response.delete– This method finds the feedback entry by ID and deletes it from the database.
Below is the implementation of these methods:
feedback_api/views.py
class FeedbackDetail(generics.GenericAPIView):
    queryset = FeedbackModel.objects.all()
    serializer_class = FeedbackSerializer

    def get_feedback(self, pk):
        try:
            return FeedbackModel.objects.get(pk=pk)
        except:
            return None

    def get(self, request, pk):
        feedback = self.get_feedback(pk=pk)
        if feedback == None:
            return Response({"status": "fail", "message": f"Feedback with Id: {pk} not found"}, status=status.HTTP_404_NOT_FOUND)

        serializer = self.serializer_class(feedback)
        return Response({"status": "success", "data": {"feedback": serializer.data}})

    def patch(self, request, pk):
        feedback = self.get_feedback(pk)
        if feedback == None:
            return Response({"status": "fail", "message": f"Feedback with Id: {pk} not found"}, status=status.HTTP_404_NOT_FOUND)

        serializer = self.serializer_class(
            feedback, data=request.data, partial=True)
        if serializer.is_valid():
            serializer.save(updatedAt=datetime.now())
            return Response({"status": "success", "data": {"feedback": serializer.data}})
        return Response({"status": "fail", "message": serializer.errors}, status=status.HTTP_400_BAD_REQUEST)

    def delete(self, request, pk):
        feedback = self.get_feedback(pk)
        if feedback == None:
            return Response({"status": "fail", "message": f"Feedback with Id: {pk} not found"}, status=status.HTTP_404_NOT_FOUND)

        feedback.delete()
        return Response(status=status.HTTP_204_NO_CONTENT)
Create Routes for the API Views
With the API views now defined, we need to create routes to map them so they can be invoked when requests reach our server. First, navigate to the feedback_api directory and create a new file named urls.py if it doesn’t already exist. Then, add the following code to the file:
feedback_api/urls.py
from django.urls import path
from feedback_api.views import Feedback, FeedbackDetail

urlpatterns = [
    path('', Feedback.as_view()),
    path('<str:pk>', FeedbackDetail.as_view())
]
Next, we need to add a base URL to the feedback project that maps to the feedback_api.urls file. Navigate to the feedback project directory and update the urls.py file with the following code:
feedback/urls.py
from django.contrib import admin
from django.urls import path, include

urlpatterns = [
    path('admin/', admin.site.urls),
    path('api/feedbacks/', include('feedback_api.urls'))
]
Set Up CORS on the Django Server
At this point, we have successfully implemented the CRUD functionality for our API. The next step is to enable Cross-Origin Resource Sharing (CORS) on the Django server. By adding CORS middleware, we can allow the server to handle requests from specified cross-origin domains.
Begin by installing the django-cors-headers library with the following command:
pip install django-cors-headers
Include the corsheaders package in the INSTALLED_APPS list.
feedback/settings.py
INSTALLED_APPS = [
    ...
    'corsheaders',
    ...
]
Next, include the required CORS middleware in the middleware stack, ensuring that CorsMiddleware is placed before any middleware responsible for generating responses.
feedback/settings.py
MIDDLEWARE = [
    ...,
    'corsheaders.middleware.CorsMiddleware',
    'django.middleware.common.CommonMiddleware',
    ...,
]
The next step is to configure the CORS middleware settings, where we will define the allowed origins and enable credentials by setting CORS_ALLOWED_ORIGINS and CORS_ALLOW_CREDENTIALS to True.
feedback/settings.py
CORS_ALLOWED_ORIGINS = [
    "http://localhost:3000"
]
CORS_ALLOW_CREDENTIALS = True
Your feedback/settings.py file should now appear as follows:
feedback/settings.py
"""
Django settings for feedback project.

Generated by 'django-admin startproject' using Django 5.1.3.

For more information on this file, see
https://docs.djangoproject.com/en/5.1/topics/settings/

For the full list of settings and their values, see
https://docs.djangoproject.com/en/5.1/ref/settings/
"""

from pathlib import Path
import os
from dotenv import load_dotenv

# Build paths inside the project like this: BASE_DIR / 'subdir'.
BASE_DIR = Path(__file__).resolve().parent.parent


# Quick-start development settings - unsuitable for production
# See https://docs.djangoproject.com/en/5.1/howto/deployment/checklist/

# SECURITY WARNING: keep the secret key used in production secret!
SECRET_KEY = 'django-insecure-r#k+$x+n2s#87)^%^(*&wu^@k(_tm%(%x&vg_jnkcwim0f&n7q'

# SECURITY WARNING: don't run with debug turned on in production!
DEBUG = True

ALLOWED_HOSTS = []
CORS_ALLOWED_ORIGINS = [
    "http://localhost:3000"
]
CORS_ALLOW_CREDENTIALS = True


# Application definition

INSTALLED_APPS = [
    'django.contrib.admin',
    'django.contrib.auth',
    'django.contrib.contenttypes',
    'django.contrib.sessions',
    'django.contrib.messages',
    'django.contrib.staticfiles',
    'corsheaders',
    'feedback_api',
    'rest_framework',
]


MIDDLEWARE = [
    'django.middleware.security.SecurityMiddleware',
    'django.contrib.sessions.middleware.SessionMiddleware',
    'django.middleware.common.CommonMiddleware',
    'django.middleware.csrf.CsrfViewMiddleware',
    'django.contrib.auth.middleware.AuthenticationMiddleware',
    'django.contrib.messages.middleware.MessageMiddleware',
    'django.middleware.clickjacking.XFrameOptionsMiddleware',
    'corsheaders.middleware.CorsMiddleware',
    'django.middleware.common.CommonMiddleware',
]

ROOT_URLCONF = 'feedback.urls'

TEMPLATES = [
    {
        'BACKEND': 'django.template.backends.django.DjangoTemplates',
        'DIRS': [],
        'APP_DIRS': True,
        'OPTIONS': {
            'context_processors': [
                'django.template.context_processors.debug',
                'django.template.context_processors.request',
                'django.contrib.auth.context_processors.auth',
                'django.contrib.messages.context_processors.messages',
            ],
        },
    },
]

WSGI_APPLICATION = 'feedback.wsgi.application'


# Database
# https://docs.djangoproject.com/en/5.1/ref/settings/#databases

load_dotenv()

DATABASES = {
    'default': {
        'ENGINE': 'django.db.backends.postgresql',
        'NAME': os.getenv('POSTGRES_DB'),
        'USER': os.getenv('POSTGRES_USER'),
        'PASSWORD': os.getenv('POSTGRES_PASSWORD'),
        'HOST': os.getenv('POSTGRES_HOST', 'localhost'),
        'PORT': os.getenv('POSTGRES_PORT', '5432'),
    }
}


# Password validation
# https://docs.djangoproject.com/en/5.1/ref/settings/#auth-password-validators

AUTH_PASSWORD_VALIDATORS = [
    {
        'NAME': 'django.contrib.auth.password_validation.UserAttributeSimilarityValidator',
    },
    {
        'NAME': 'django.contrib.auth.password_validation.MinimumLengthValidator',
    },
    {
        'NAME': 'django.contrib.auth.password_validation.CommonPasswordValidator',
    },
    {
        'NAME': 'django.contrib.auth.password_validation.NumericPasswordValidator',
    },
]


# Internationalization
# https://docs.djangoproject.com/en/5.1/topics/i18n/

LANGUAGE_CODE = 'en-us'

TIME_ZONE = 'UTC'

USE_I18N = True

USE_TZ = True


# Static files (CSS, JavaScript, Images)
# https://docs.djangoproject.com/en/5.1/howto/static-files/

STATIC_URL = 'static/'

# Default primary key field type
# https://docs.djangoproject.com/en/5.1/ref/settings/#default-auto-field

DEFAULT_AUTO_FIELD = 'django.db.models.BigAutoField'
With CORS configured, we can now proceed to test the CRUD API. However, if the server isn’t already running, you can start it by executing the command python manage.py runserver.
Test the CRUD Functionalities
To simplify the testing process, I’ve included a Postman collection in the source code, which you can download from https://github.com/wpcodevo/django-postgres-crud-rest-api. This collection contains predefined URLs, HTTP methods, request body data, and more, making it easier to test the CRUD API.
Perform the Create Operation
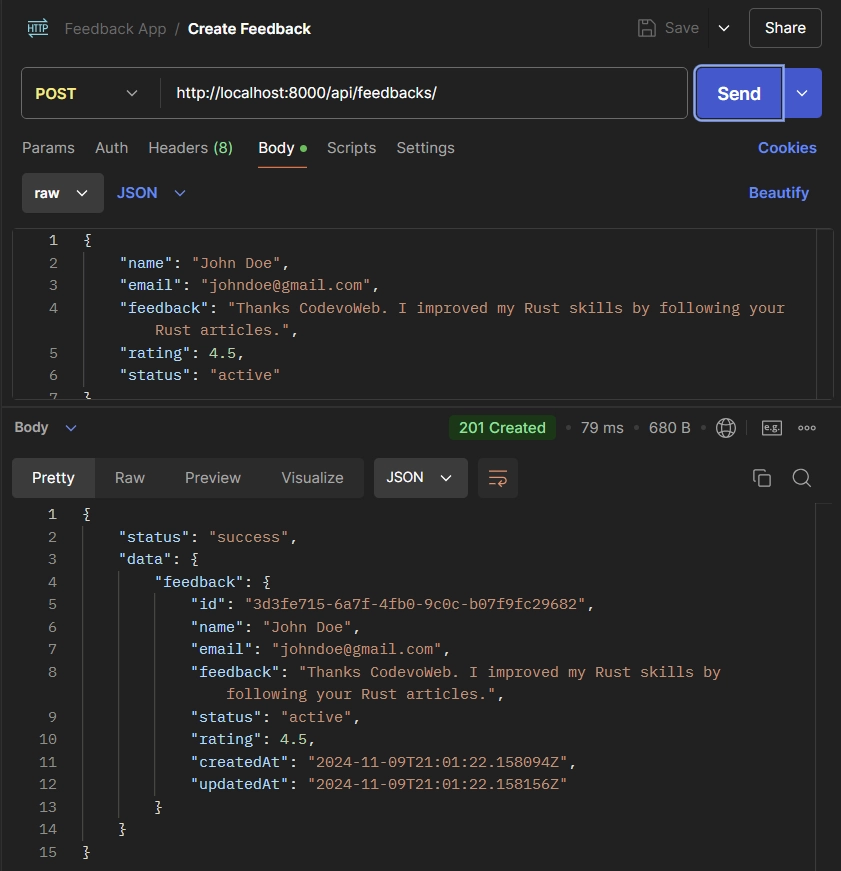
Let’s begin by creating new feedback. To do so, add the following JSON to the request body in your API client and send a POST request to the http://localhost:8000/api/feedbacks/ endpoint.
{
    "name": "John Doe",
    "email": "johndoe@gmail.com",
    "feedback": "Thanks CodevoWeb. I improved my Rust skills by following your Rust articles.",
    "rating": 4.5,
    "status": "active"
}
Perform the Update Operation
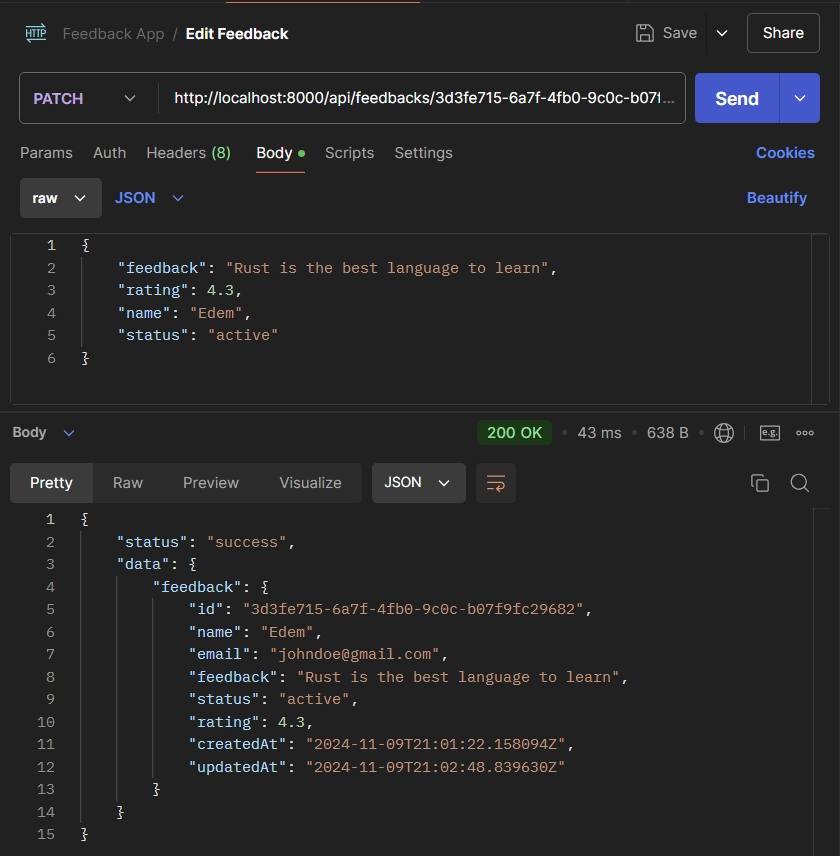
Next, let’s update an existing feedback record in the database. To do this, make the necessary changes in the request body of your API client, then send a PATCH request to http://localhost:8000/api/feedbacks/{feedback_id}.
{
    "feedback": "Rust is the best language to learn",
    "rating": 4.3,
    "name": "Edem",
    "status": "active"
}
Perform the Read Operation
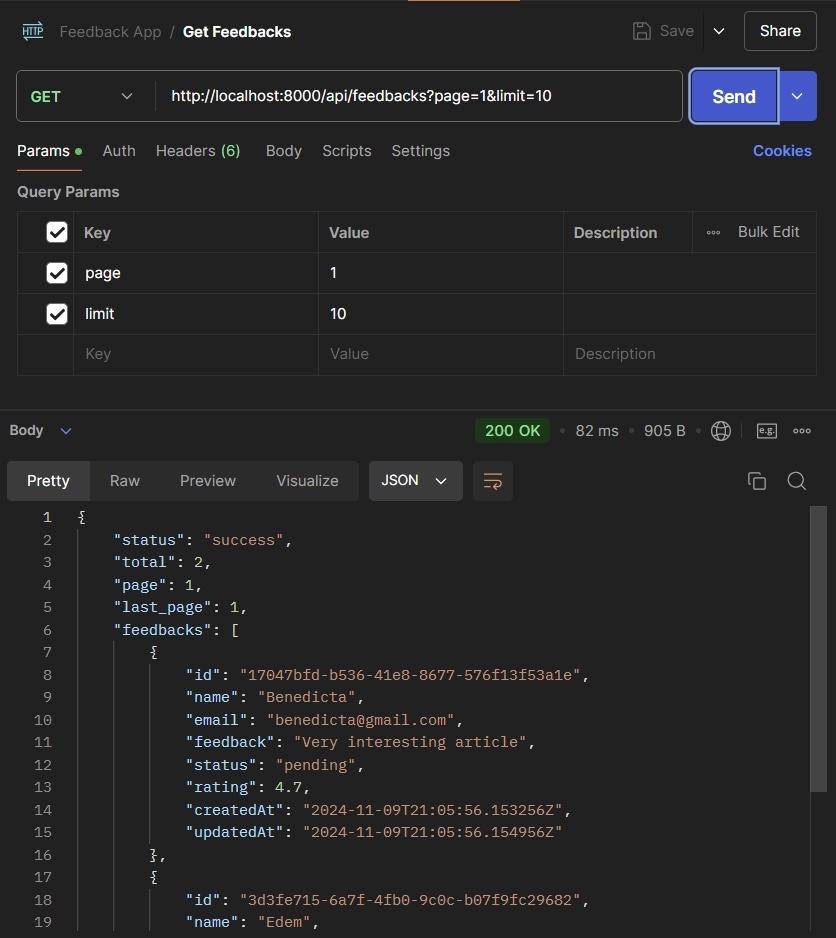
Now that you know how to add feedback, feel free to add as many entries as you’d like. Once you have a few feedback entries in the database, let’s retrieve them.
To do so, send a GET request to http://localhost:8000/api/feedbacks. By default, you’ll receive only 10 feedback records in the response, but if you need more, you can paginate the request using the page and limit query parameters.
Perform the Delete Operation
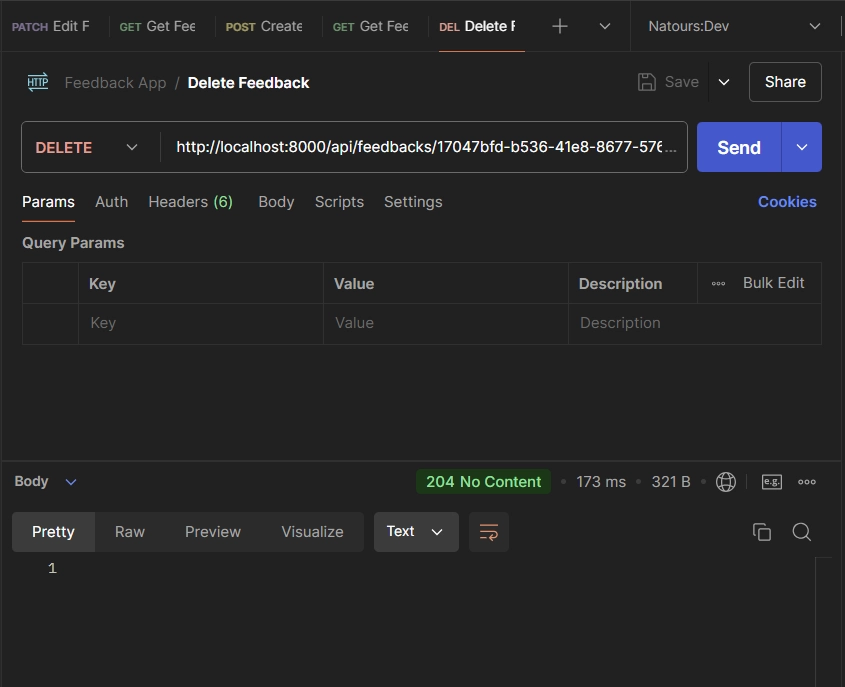
To delete a feedback entry from the database, send a DELETE request to http://localhost:8000/api/feedbacks/{feedback_id}.
Conclusion
And that’s a wrap! Congratulations on making it this far. In this article, you’ve learned how to build a CRUD API using the Django REST framework. To further reinforce the concepts covered in this tutorial, I recommend adding more features to the API.
I hope you found this guide both helpful and enjoyable. If you have any questions or feedback, don’t hesitate to leave them in the comments section below. Thank you for reading!

