

Have you been wanting to build a simple API in Golang, but don’t know where to start? Look no further than this tutorial, where I’ll guide you through the process step by step.
Why choose Fiber framework? Fiber is a highly performant, flexible, and user-friendly Golang web framework that has been gaining popularity. Its interface is similar to that of Express.js, a popular Node.js web framework, so if you have experience working with Express, you’ll feel right at home with Fiber.
What is GORM? GORM is a powerful ORM library for Golang that supports various databases, such as SQLite, MySQL, PostgreSQL, and SQL Server. With GORM, developers can enjoy a fluent API, support for complex queries, database migrations, associations, and validations.
By combining Fiber and GORM, you’ll have all the necessary tools to build a robust API in Golang that can handle your CRUD operations. Additionally, I’ll demonstrate how to use a SQLite database to store your data, allowing you to get started with minimal setup.
Whether you’re a seasoned developer looking to expand your skill set or a newcomer to Golang, this tutorial is the perfect starting point for building your own API. So, let’s dive in and get started!
More practice:
- Golang CRUD API Example with GORM and MySQL
- Golang CRUD RESTful API with SQLC and PostgreSQL
- Create CRUD API in Golang using Fiber and GORM
- Build a Simple API with Rust and Rocket
- Build a CRUD API with Rust and MongoDB
- Build a Simple API with Rust and Actix Web
- Build a CRUD API with Node.js and Sequelize
Run the Golang API on your Computer
To run the Golang SQLite API project on your local machine, follow these simple steps:
- Start by downloading or cloning the Golang SQLite CRUD project from the GitHub repository at https://github.com/wpcodevo/golang-fiber-sqlite. Once you have the project, open it in your preferred IDE or text editor.
- Next, go to your terminal and execute the
go run main.gocommand. This will install all the necessary packages, migrate the GORM schema to the SQLite database, and start the Fiber HTTP server. - To test the CRUD endpoints, you can use Postman to make HTTP requests to the Fiber server by importing the
Note App.postman_collection.jsonfile. Alternatively, you can follow the instructions below if you prefer to interact with the API using a frontend application.
Run the Golang API with a Frontend App
If you’re looking for a more detailed guide on how to build a React.js CRUD app, you can check out the post titled “Build a React.js CRUD App using a RESTful API“. However, if you want to get started without having to write any code, follow the steps below:
- First, ensure that you have Node.js and Yarn installed on your machine. If not, you can download and install them from the official websites.
- Next, obtain the source code for the React CRUD project by either cloning the repository or downloading it from https://github.com/wpcodevo/reactjs-crud-note-app, and then open it in your preferred IDE or text editor.
- In the console, navigate to the root directory of the project and execute the command
yarnoryarn installto install all of the necessary dependencies. - Once the dependencies have been installed, run the command
yarn devto start the Vite development server. - To test the CRUD functionalities, open the app in your browser by navigating to
http://localhost:3000/. Keep in mind that accessing the React app at http://127.0.0.1:3000 might result in a “site can’t be reached” error or CORS errors. Therefore, it’s best to usehttp://localhost:3000/.
Setup the Golang Project
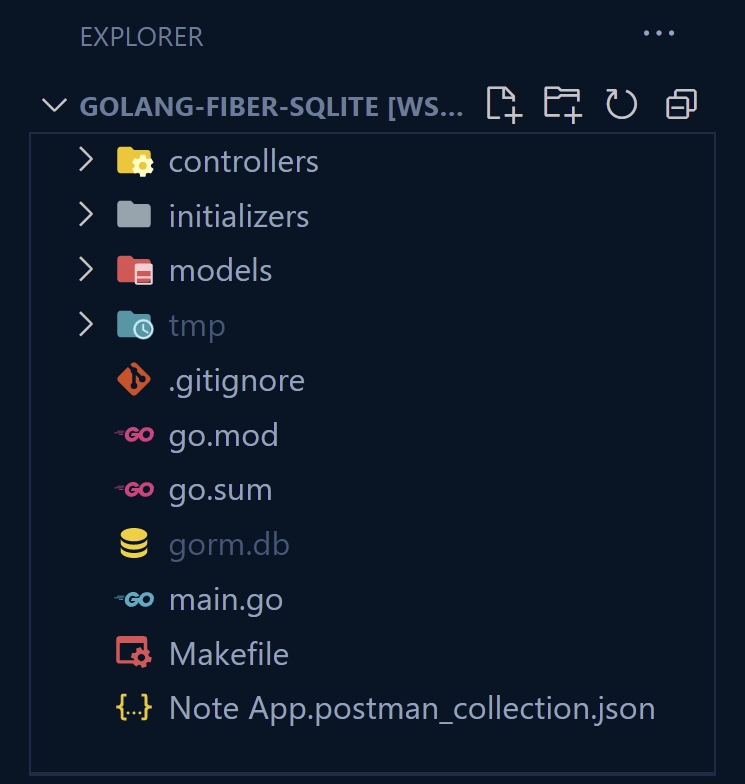
Before we begin with the project setup, take a moment to preview the expected folder and file structure in the screenshot below. This will give you a better understanding of the tutorial’s end goal.
To begin, choose a directory on your computer where you’d like the project files to be stored, and open a terminal there. Then, type or copy/paste the following commands into the terminal to create a new folder called golang-fiber-sqlite and set up a Golang project within that folder.
mkdir golang-fiber-sqlite
cd golang-fiber-sqlite
go mod init github.com/wpcodevo/golang-fiber-sqlite
After initializing the Golang project, open it in your favorite IDE or text editor. Once you have the project open, you can access the integrated terminal within your IDE. In the terminal, run the following commands to install the necessary dependencies for the project.
go get github.com/gofiber/fiber/v2
go get github.com/google/uuid
go get github.com/go-playground/validator/v10
go get -u gorm.io/gorm
go get gorm.io/driver/sqlite
go install github.com/cosmtrek/air@latest
fiber: A fast and flexible web framework for Golang that supports middleware, routing, error handling, and many other common web features.uuid: A library for generating and parsing UUIDs in Golang.validator: A library for validating Go structs, values, and variables.gorm: A popular ORM library for Golang that supports automatic database schema generation, association handling, and query building.sqlite: A SQLite driver forgorm.air: A library that automatically rebuilds and restarts your application for faster development.
With all the necessary dependencies installed, we can now create a basic Fiber server to get started. Our server will have a single endpoint – a health checker – which will return a JSON object containing a message. To do this, we need to create a main.go file in the root directory and add the following code.
main.go
package main

import (
	"log"

	"github.com/gofiber/fiber/v2"
)

func main() {
	app := fiber.New()

	app.Get("/api/healthchecker", func(c *fiber.Ctx) error {
		return c.Status(200).JSON(fiber.Map{
			"status":  "success",
			"message": "Welcome to Golang, Fiber, SQLite, and GORM",
		})
	})

	log.Fatal(app.Listen(":8000"))
}
To save time from manually restarting the server every time we modify the code, we’ll leverage air, a tool that monitors the source code and automatically triggers the rebuild process when necessary. Since we’ve already installed the air binary, just run the air command in your terminal to start the Fiber HTTP server.
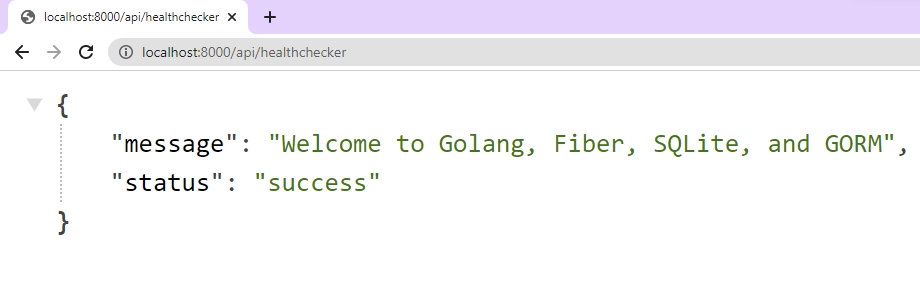
Once the server is running, you can test it by sending a GET request to http://localhost:8000/api/healthchecker and inspecting the returned JSON object.
Create the GORM Database Model
Let’s move on to creating the GORM model, which will allow us to generate a corresponding SQL table in our SQLite database. To keep things simple, we will only have one GORM model.
GORM models are straightforward to declare, as they are just regular Golang structs with basic types, pointers/aliases of those types, or custom types implementing the Scanner and Valuer interfaces.
However, since SQLite does not have a built-in UUID type, we will utilize GORM’s BeforeCreate hook along with the github.com/google/uuid package to generate a UUID for each record before it is inserted into the database. The BeforeCreate hook is executed before GORM executes the INSERT query to insert the data into the database. You can learn more about the various hooks at https://gorm.io/docs/hooks.html.
To accomplish this, create a ‘models‘ folder in the root directory, then within the ‘models‘ folder, create a note.model.go file and add the following code.
models/note.model.go
package models

import (
	"time"

	"github.com/go-playground/validator/v10"
	"github.com/google/uuid"
	"gorm.io/gorm"
)

type Note struct {
	ID        string    `gorm:"type:char(36);primary_key" json:"id,omitempty"`
	Title     string    `gorm:"type:varchar(255);uniqueIndex:idx_notes_title,LENGTH(255);not null" json:"title,omitempty"`
	Content   string    `gorm:"not null" json:"content,omitempty"`
	Category  string    `gorm:"varchar(100)" json:"category,omitempty"`
	Published bool      `gorm:"default:false;not null" json:"published"`
	CreatedAt time.Time `gorm:"not null;default:'1970-01-01 00:00:01'" json:"createdAt,omitempty"`
	UpdatedAt time.Time `gorm:"not null;default:'1970-01-01 00:00:01';ON UPDATE CURRENT_TIMESTAMP" json:"updatedAt,omitempty"`
}

func (note *Note) BeforeCreate(tx *gorm.DB) (err error) {
	note.ID = uuid.New().String()
	return nil
}

var validate = validator.New()

type ErrorResponse struct {
	Field string `json:"field"`
	Tag   string `json:"tag"`
	Value string `json:"value,omitempty"`
}

func ValidateStruct[T any](payload T) []*ErrorResponse {
	var errors []*ErrorResponse
	err := validate.Struct(payload)
	if err != nil {
		for _, err := range err.(validator.ValidationErrors) {
			var element ErrorResponse
			element.Field = err.StructNamespace()
			element.Tag = err.Tag()
			element.Value = err.Param()
			errors = append(errors, &element)
		}
	}
	return errors
}

type CreateNoteSchema struct {
	Title     string `json:"title" validate:"required"`
	Content   string `json:"content" validate:"required"`
	Category  string `json:"category,omitempty"`
	Published bool   `json:"published,omitempty"`
}

type UpdateNoteSchema struct {
	Title     string `json:"title,omitempty"`
	Content   string `json:"content,omitempty"`
	Category  string `json:"category,omitempty"`
	Published *bool  `json:"published,omitempty"`
}
While reviewing the note.model.go file, you may have noticed that it contains not only the GORM model, but also other pieces of code such as the ValidateStruct function, as well as the CreateNoteSchema and UpdateNoteSchema structs.
Although it’s generally good practice to separate these components into different files for better organization, we’ve decided to keep them in the same file to keep the project simple and avoid having too many moving parts.
These additional components are important for ensuring that requests to create or update notes are properly validated before they’re saved to the database. The CreateNoteSchema and UpdateNoteSchema contain the required fields and validation rules for creating and updating notes respectively. The ValidateStruct function utilizes these schemas to validate the request bodies and provide relevant error messages in case of any validation failures.
So while they may add a bit of extra code to the note.model.go file, they are critical for the proper functioning of the project.
Connect to the SQLite Database
To connect the Fiber server to the SQLite database, we need to create a utility function that initializes the database. This function generates the SQLite database file if it doesn’t exist and then executes the AutoMigrate function to create the SQL table. To create the ConnectDB function, create a new file named db.go in the ‘initializers‘ folder located in the project’s root directory, and add the following code:
initializers/db.go
package initializers

import (
	"log"
	"os"

	"github.com/wpcodevo/golang-fiber-mysql/models"
	"gorm.io/driver/sqlite"
	"gorm.io/gorm"
	"gorm.io/gorm/logger"
)

var DB *gorm.DB

func ConnectDB() {
	var err error

	DB, err = gorm.Open(sqlite.Open("gorm.db"), &gorm.Config{})
	if err != nil {
		log.Fatal("Failed to connect to the Database! \n", err.Error())
		os.Exit(1)
	}

	DB.Logger = logger.Default.LogMode(logger.Info)

	log.Println("Running Migrations")
	DB.AutoMigrate(&models.Note{})

	log.Println("🚀 Connected Successfully to the Database")
}
This function will connect to the SQLite database and then run the necessary migrations to ensure that the database is up to date with the latest schema.
With the ConnectDB function ready to use, you can now create an init function in main.go file and call it. When init is called, ConnectDB will run, connecting the Fiber app to the SQLite database.
main.go
package main

import (
	"log"

	"github.com/gofiber/fiber/v2"
	"github.com/wpcodevo/golang-fiber-mysql/initializers"
)

func init() {
	initializers.ConnectDB()
}

func main() {
	app := fiber.New()

	app.Get("/api/healthchecker", func(c *fiber.Ctx) error {
		return c.Status(200).JSON(fiber.Map{
			"status":  "success",
			"message": "Welcome to Golang, Fiber, SQLite, and GORM",
		})
	})

	log.Fatal(app.Listen(":8000"))
}
Now that everything is set up, it’s time to start the Fiber HTTP server again. As it starts up, you can observe GORM executing a series of queries in the terminal. These queries are responsible for generating the SQLite database, creating the SQL table, and performing other necessary tasks. Additionally, you should be able to locate the SQLite database file in the root directory.
Implement the CRUD Fiber Functions
At this point, we’ve successfully defined the GORM database model, established a connection to the SQLite database, and synchronized the GORM model with the database schema. With these foundational steps in place, it’s time to move on to implementing the core functionality of our application: CRUD operations.
To achieve this, we will create route handlers with Fiber that act as higher-level CRUD functions. These handlers will utilize the lower-level CRUD functions provided by GORM to interact with the SQLite database.
Route Controller to Add New Records
This route handler is responsible for the CREATE operation of CRUD. When a POST request is made to the /api/notes endpoint, it will be invoked to add a new note to the SQLite database.
Upon invocation, the request body will be parsed into the models.CreateNoteSchema struct, and the models.ValidateStruct() function will be used to validate the request payload. If any errors are found, a BadRequest response with the error messages will be sent back to the client.
controllers/note.controller.go
func CreateNoteHandler(c *fiber.Ctx) error {
	var payload *models.CreateNoteSchema

	if err := c.BodyParser(&payload); err != nil {
		return c.Status(fiber.StatusBadRequest).JSON(fiber.Map{"status": "fail", "message": err.Error()})
	}

	errors := models.ValidateStruct(payload)
	if errors != nil {
		return c.Status(fiber.StatusBadRequest).JSON(errors)

	}

	now := time.Now()
	newNote := models.Note{
		Title:     payload.Title,
		Content:   payload.Content,
		Category:  payload.Category,
		Published: payload.Published,
		CreatedAt: now,
		UpdatedAt: now,
	}

	result := initializers.DB.Create(&newNote)

	if result.Error != nil && strings.Contains(result.Error.Error(), "Duplicate entry") {
		return c.Status(fiber.StatusConflict).JSON(fiber.Map{"status": "fail", "message": "Title already exist, please use another title"})
	} else if result.Error != nil {
		return c.Status(fiber.StatusBadGateway).JSON(fiber.Map{"status": "error", "message": result.Error.Error()})
	}

	return c.Status(fiber.StatusCreated).JSON(fiber.Map{"status": "success", "data": fiber.Map{"note": newNote}})
}
The function will then create a new Note instance using the data from the parsed request payload and set the CreatedAt and UpdatedAt fields to the current time.
Subsequently, the Create method of the DB instance from the ‘initializers‘ package will be used to insert the new Note into the database. If a note with that title already exists in the database, a Conflict error will be returned.
However, if the operation is successful, the newly-inserted note will be returned in the response body as a success status along with the newly created note data in a data field.
Route Controller to Fetch All Records
To implement the READ operation of CRUD, we’ll create a route handler that retrieves a list of notes from the SQLite database and returns them as a JSON response when a GET request is made to the /api/notes?page=1&limit=10 endpoint.
Upon invocation, the handler function will first read the page and limit query parameters from the incoming GET request, which will determine the number of results to be returned and the page to start the pagination. If these parameters are not provided in the request, default values of 1 for page and 10 for limit will be used.
Next, the function will convert the page and limit query parameter values from strings to integers using the strconv.Atoi() function. Based on these values, it will calculate the offset value that specifies the starting point of the query results.
controllers/note.controller.go
func FindNotes(c *fiber.Ctx) error {
var page = c.Query("page", "1")
var limit = c.Query("limit", "10")
intPage, _ := strconv.Atoi(page)
intLimit, _ := strconv.Atoi(limit)
offset := (intPage - 1) * intLimit
var notes []models.Note
results := initializers.DB.Limit(intLimit).Offset(offset).Find(¬es)
if results.Error != nil {
return c.Status(fiber.StatusBadGateway).JSON(fiber.Map{"status": "error", "message": results.Error})
}
return c.Status(fiber.StatusOK).JSON(fiber.Map{"status": "success", "results": len(notes), "notes": notes})
}
The function will then use the Find() method of the DB instance from the initializers package to retrieve a list of notes from the database. This method uses the provided limit and offset values to limit the number of results returned and paginate through the records.
If an error occurs during this process, the function returns a Bad Gateway response with the error message. Otherwise, a successful response is returned with the list of notes in the response body, along with the total number of notes returned.
Route Controller to Update a Records
This route function is responsible for updating an existing note in the SQLite database when a PATCH request is sent to the /api/notes/:noteId endpoint.
The function will begin by reading the noteId parameter from the request and parsing the request body into the models.UpdateNoteSchema struct. If parsing fails, the function will respond with a Bad Request message.
Next, the function will use the First() method of the DB instance to retrieve the note with the given ID from the database. If the note does not exist, the function will respond with a Not Found message. If there is an error during retrieval, the function will respond with a Bad Gateway message.
controllers/note.controller.go
func UpdateNote(c *fiber.Ctx) error {
noteId := c.Params("noteId")
var payload *models.UpdateNoteSchema
if err := c.BodyParser(&payload); err != nil {
return c.Status(fiber.StatusBadRequest).JSON(fiber.Map{"status": "fail", "message": err.Error()})
}
var note models.Note
result := initializers.DB.First(¬e, "id = ?", noteId)
if err := result.Error; err != nil {
if err == gorm.ErrRecordNotFound {
return c.Status(fiber.StatusNotFound).JSON(fiber.Map{"status": "fail", "message": "No note with that Id exists"})
}
return c.Status(fiber.StatusBadGateway).JSON(fiber.Map{"status": "fail", "message": err.Error()})
}
updates := make(map[string]interface{})
if payload.Title != "" {
updates["title"] = payload.Title
}
if payload.Category != "" {
updates["category"] = payload.Category
}
if payload.Content != "" {
updates["content"] = payload.Content
}
if payload.Published != nil {
updates["published"] = payload.Published
}
updates["updated_at"] = time.Now()
initializers.DB.Model(¬e).Updates(updates)
return c.Status(fiber.StatusOK).JSON(fiber.Map{"status": "success", "data": fiber.Map{"note": note}})
}
To allow the user or client to update any field in the note, rather than providing all the fields, the function will create a map of the fields that need to be updated in the note based on the fields in the parsed request payload. The function will also set the UpdatedAt field of the note to the current time.
Finally, the Updates() method of the DB instance will be called to update the note in the database with the provided updates. If the operation is successful, the updated note will be returned in the response body.
Route Controller to Retrieve a Record
Now, we’ll implement a function that retrieves a single record from the database and returns it in a JSON response. This function will handle GET requests made to the /api/notes/:noteId endpoint.
To retrieve the note, the function will first extract the noteId parameter from the request and pass it to the DB.First function. If the note with the given ID doesn’t exist, the function will return a 404 (Not Found) error.
Otherwise, the function will return the found note in a JSON response with a success status code.
controllers/note.controller.go
func FindNoteById(c *fiber.Ctx) error {
noteId := c.Params("noteId")
var note models.Note
result := initializers.DB.First(¬e, "id = ?", noteId)
if err := result.Error; err != nil {
if err == gorm.ErrRecordNotFound {
return c.Status(fiber.StatusNotFound).JSON(fiber.Map{"status": "fail", "message": "No note with that Id exists"})
}
return c.Status(fiber.StatusBadGateway).JSON(fiber.Map{"status": "fail", "message": err.Error()})
}
return c.Status(fiber.StatusOK).JSON(fiber.Map{"status": "success", "data": fiber.Map{"note": note}})
}
Route Controller to Delete a Records
As a last step, we’ll implement a route handler for deleting notes from the database. This function will be triggered when a DELETE request is made to the /api/notes/:noteId endpoint.
To begin, the function will extract the ID of the note to be deleted from the request parameter. Then, the DB.Delete() function will be called to remove the note that matches the query from the database.
If no records were deleted, it means that there was no note with that ID in the database, so a 404 (Not Found) error will be returned to the client. On the other hand, if a note was deleted, a 204 (No Content) response will be sent to the client.
controllers/note.controller.go
func DeleteNote(c *fiber.Ctx) error {
	noteId := c.Params("noteId")

	result := initializers.DB.Delete(&models.Note{}, "id = ?", noteId)

	if result.RowsAffected == 0 {
		return c.Status(fiber.StatusNotFound).JSON(fiber.Map{"status": "fail", "message": "No note with that Id exists"})
	} else if result.Error != nil {
		return c.Status(fiber.StatusBadGateway).JSON(fiber.Map{"status": "error", "message": result.Error})
	}

	return c.SendStatus(fiber.StatusNoContent)
}
The Complete Code of the Fiber Route Controllers
controllers/note.controller.go
package controllers
import (
"strconv"
"strings"
"time"
"github.com/gofiber/fiber/v2"
"github.com/wpcodevo/golang-fiber-mysql/initializers"
"github.com/wpcodevo/golang-fiber-mysql/models"
"gorm.io/gorm"
)
func CreateNoteHandler(c *fiber.Ctx) error {
var payload *models.CreateNoteSchema
if err := c.BodyParser(&payload); err != nil {
return c.Status(fiber.StatusBadRequest).JSON(fiber.Map{"status": "fail", "message": err.Error()})
}
errors := models.ValidateStruct(payload)
if errors != nil {
return c.Status(fiber.StatusBadRequest).JSON(errors)
}
now := time.Now()
newNote := models.Note{
Title: payload.Title,
Content: payload.Content,
Category: payload.Category,
Published: payload.Published,
CreatedAt: now,
UpdatedAt: now,
}
result := initializers.DB.Create(&newNote)
if result.Error != nil && strings.Contains(result.Error.Error(), "Duplicate entry") {
return c.Status(fiber.StatusConflict).JSON(fiber.Map{"status": "fail", "message": "Title already exist, please use another title"})
} else if result.Error != nil {
return c.Status(fiber.StatusBadGateway).JSON(fiber.Map{"status": "error", "message": result.Error.Error()})
}
return c.Status(fiber.StatusCreated).JSON(fiber.Map{"status": "success", "data": fiber.Map{"note": newNote}})
}
func FindNotes(c *fiber.Ctx) error {
var page = c.Query("page", "1")
var limit = c.Query("limit", "10")
intPage, _ := strconv.Atoi(page)
intLimit, _ := strconv.Atoi(limit)
offset := (intPage - 1) * intLimit
var notes []models.Note
results := initializers.DB.Limit(intLimit).Offset(offset).Find(¬es)
if results.Error != nil {
return c.Status(fiber.StatusBadGateway).JSON(fiber.Map{"status": "error", "message": results.Error})
}
return c.Status(fiber.StatusOK).JSON(fiber.Map{"status": "success", "results": len(notes), "notes": notes})
}
func UpdateNote(c *fiber.Ctx) error {
noteId := c.Params("noteId")
var payload *models.UpdateNoteSchema
if err := c.BodyParser(&payload); err != nil {
return c.Status(fiber.StatusBadRequest).JSON(fiber.Map{"status": "fail", "message": err.Error()})
}
var note models.Note
result := initializers.DB.First(¬e, "id = ?", noteId)
if err := result.Error; err != nil {
if err == gorm.ErrRecordNotFound {
return c.Status(fiber.StatusNotFound).JSON(fiber.Map{"status": "fail", "message": "No note with that Id exists"})
}
return c.Status(fiber.StatusBadGateway).JSON(fiber.Map{"status": "fail", "message": err.Error()})
}
updates := make(map[string]interface{})
if payload.Title != "" {
updates["title"] = payload.Title
}
if payload.Category != "" {
updates["category"] = payload.Category
}
if payload.Content != "" {
updates["content"] = payload.Content
}
if payload.Published != nil {
updates["published"] = payload.Published
}
updates["updated_at"] = time.Now()
initializers.DB.Model(¬e).Updates(updates)
return c.Status(fiber.StatusOK).JSON(fiber.Map{"status": "success", "data": fiber.Map{"note": note}})
}
func FindNoteById(c *fiber.Ctx) error {
noteId := c.Params("noteId")
var note models.Note
result := initializers.DB.First(¬e, "id = ?", noteId)
if err := result.Error; err != nil {
if err == gorm.ErrRecordNotFound {
return c.Status(fiber.StatusNotFound).JSON(fiber.Map{"status": "fail", "message": "No note with that Id exists"})
}
return c.Status(fiber.StatusBadGateway).JSON(fiber.Map{"status": "fail", "message": err.Error()})
}
return c.Status(fiber.StatusOK).JSON(fiber.Map{"status": "success", "data": fiber.Map{"note": note}})
}
func DeleteNote(c *fiber.Ctx) error {
noteId := c.Params("noteId")
result := initializers.DB.Delete(&models.Note{}, "id = ?", noteId)
if result.RowsAffected == 0 {
return c.Status(fiber.StatusNotFound).JSON(fiber.Map{"status": "fail", "message": "No note with that Id exists"})
} else if result.Error != nil {
return c.Status(fiber.StatusBadGateway).JSON(fiber.Map{"status": "error", "message": result.Error})
}
return c.SendStatus(fiber.StatusNoContent)
}
Setup CORS and Create the Fiber Routes
To complete our application, we need to register our route handlers with Fiber so that it can use them to handle incoming requests and perform CRUD operations on our database.
Additionally, we need to configure CORS to allow requests from specified origins. Failure to configure CORS can lead to errors when trying to make requests from a frontend application running on a different origin or port.
To accomplish this, we can replace the contents of the main.go file with the following code.
main.go
package main

import (
	"log"

	"github.com/gofiber/fiber/v2"
	"github.com/gofiber/fiber/v2/middleware/cors"
	"github.com/gofiber/fiber/v2/middleware/logger"
	"github.com/wpcodevo/golang-fiber-mysql/controllers"
	"github.com/wpcodevo/golang-fiber-mysql/initializers"
)

func init() {
	initializers.ConnectDB()
}

func main() {
	app := fiber.New()
	micro := fiber.New()

	app.Mount("/api", micro)
	app.Use(logger.New())
	app.Use(cors.New(cors.Config{
		AllowOrigins:     "http://localhost:3000",
		AllowHeaders:     "Origin, Content-Type, Accept",
		AllowMethods:     "GET, POST, PATCH, DELETE",
		AllowCredentials: true,
	}))

	micro.Route("/notes", func(router fiber.Router) {
		router.Post("/", controllers.CreateNoteHandler)
		router.Get("", controllers.FindNotes)
	})
	micro.Route("/notes/:noteId", func(router fiber.Router) {
		router.Delete("", controllers.DeleteNote)
		router.Get("", controllers.FindNoteById)
		router.Patch("", controllers.UpdateNote)
	})
	micro.Get("/healthchecker", func(c *fiber.Ctx) error {
		return c.Status(200).JSON(fiber.Map{
			"status":  "success",
			"message": "Welcome to Golang, Fiber, SQLite, and GORM",
		})
	})

	log.Fatal(app.Listen(":8000"))
}
Now that you have completed building the CRUD functionality for the note-taking app using Fiber, you can start the HTTP server by running either go run main.go or air.
To test the API’s CRUD endpoints, you can download or clone the project from https://github.com/wpcodevo/golang-fiber-sqlite and import the Note App.postman_collection.json file into Postman. This will give you access to a collection of preconfigured requests that you can use to test the endpoints.
If you prefer to use a frontend application to interact with the API, follow the instructions in the “Run the Golang API with a Frontend App” section. This will help you to quickly spin up a frontend app that can communicate with the API and test its functionality.
Conclusion
Throughout this article, you have learned how to build a basic API in Golang with CRUD functionality. Although the API we have built is functional, there are other features we could add to enhance its usability and security, such as JWT-based authentication and access control.
I encourage you to take this opportunity as a challenge and build upon what you’ve learned in this tutorial to implement additional functionality.
If you have any feedback or questions, please don’t hesitate to leave a comment below. I hope you found this article helpful!