

In this article, you’ll learn how to implement JSON Web Token authentication with access and refresh tokens using the Web Cryptography API provided in Deno. The Web Crypto API is a low-level interface for performing cryptographic operations such as hashing, signature generation and verification, encryption, and decryption.
At the end of this comprehensive guide, you’ll learn how to perform the following operations:
- Generate private and public keys using an asymmetric encryption algorithm.
- Export/import the generated RSA key pairs using a secure method.
- Sign and verify JSON Web Tokens (JWTs) with an asymmetric algorithm (RS256).
- Implement a simple JSON Web Token authentication flow in Deno
To summarise, we’ll build an API that runs on an Oak middleware server and stores data in memory. After that, we’ll secure the API with JSON Web Tokens and create an authentication guard to protect private routes.
Implementing stateless authentication with JSON Web Tokens comes at a cost since the only way the JWTs can be invalidated is when they’ve expired. So, in the next article in this series, we’ll implement a complete authentication flow where we’ll validate the request body with Zod, store the data in a database and use Redis as an extra layer of security.
More Practice:
- How to Setup and Use MongoDB with Deno
- How to Set up Deno RESTful CRUD Project with MongoDB
- Authentication with Bcrypt, JWT, and Cookies in Deno
- Complete Deno CRUD RESTful API with MongoDB

Prerequisites
This tutorial will accommodate beginner developers, but these are some prerequisites required to make your life earlier.
- You should have the latest version of Deno installed. If you already have it installed, run
deno upgradeto upgrade to the newest version. - You should have some basic knowledge of how to build and interact with APIs in any language.
Run the Deno JWT Project Locally
- Download or clone the Deno project from https://github.com/wpcodevo/deno-rs256-jwt and open it with an IDE.
- Open Postman, click on the “Import” button, under the file tab, click on the “Choose Files” button, navigate to the Deno_MongoDB.postman_collection.json file in the root directory of the Deno project and click on it. After that, click on the “Import” button under the “Import Elements” tab in Postman to add the collection.
- Alternatively, install the Thunder Client extension in VS Code. At the left sidebar of VS Code, click on the Thunder Client icon, under the collection tab, click on the hamburger icon adjacent to the search bar and select “Import“. After that, navigate to the Deno_MongoDB.postman_collection.json file in the root folder and click on it to add the collection.
- Run
deno run -A src/server.tsto start the Oak HTTP server on port 8000 - Open Postman or Thunder Client and test the JWT authentication flow by making HTTP requests to the Deno API.
Setup Deno
At the end of the tutorial, you’ll have a folder structure that looks like this:
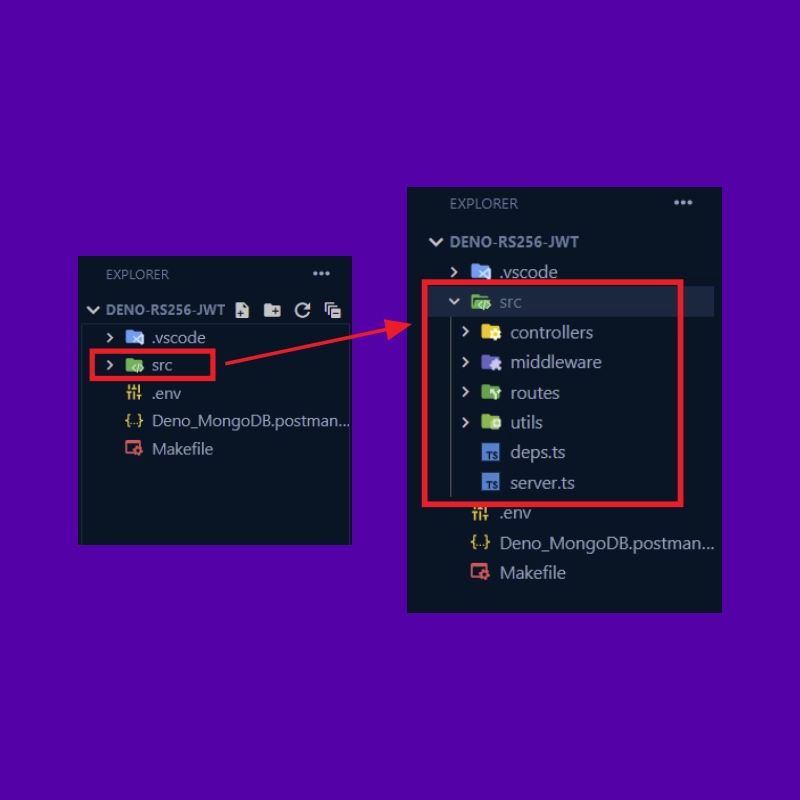
First and foremost, navigate to a location on your machine and create a project folder named deno-rs256-jwt. After that, open the project folder in an IDE or text editor. In my case, I’ll be using Visual Studio Code.
In VS Code, open the extension market, install the Deno VS Code extension, create a .vscode/settings.json file and add the following configurations.
{
  "deno.enable": true,
  "deno.unstable": true
}
This will tell VS Code to prepare Deno’s development environment for the current workspace.
Now create a src/deps.ts file to contain the URL imports for the project’s dependencies. This will allow us to manage all the dependencies from a centralized location.
src/deps.ts
export {
  Application,
  helpers,
  Router,
} from "https://deno.land/x/oak@v11.1.0/mod.ts";
export type {
  Context,
  RouterContext,
} from "https://deno.land/x/oak@v11.1.0/mod.ts";
export * as logger from "https://deno.land/x/oak_logger@1.0.0/mod.ts";
export {
  create,
  getNumericDate,
  verify,
} from "https://deno.land/x/djwt@v2.7/mod.ts";
export type { Header, Payload } from "https://deno.land/x/djwt@v2.7/mod.ts";
export { config as dotenvConfig } from "https://deno.land/x/dotenv@v3.2.0/mod.ts";
oak– A web middleware framework for Denooak_logger– HTTP request logger middleware for Deno oak. It’s similar to Morgan in Node.js.djwt– Create and verify JSON Web Tokens in Denodotenv– Load environment variables from a.envfile.
With that out of the way, let’s write some code to set up the Oak HTTP server. To do that, create a src/server.ts file and add the code below.
src/server.ts
import { Application, Router, logger } from "./deps.ts";
import type { RouterContext } from "./deps.ts";

const app = new Application();
const router = new Router();

// Middleware Logger
app.use(logger.default.logger);
app.use(logger.default.responseTime);

// Health checker
router.get<string>("/api/healthchecker", (ctx: RouterContext<string>) => {
  ctx.response.status = 200;
  ctx.response.body = {
    status: "success",
    message:
      "Welcome to JWT Authentication in Deno with Asymmetric Cryptography",
  };
});

app.use(router.routes());
app.use(router.allowedMethods());

app.addEventListener("listen", ({ port, secure }) => {
  console.info(
    `🚀 Server started on ${secure ? "https://" : "http://"}localhost:${port}`
  );
});

const port = 8000;
app.listen({ port });
We imported the required dependencies from the src/deps.ts file, created an instance of the Application class and assigned it to an app variable.
Then, we created a new router from the Router class, added the HTTP logger middleware to the middleware stack, created a /api/healthchecker route to return a simple JSON object, registered the router in the application and evoked the app.listen() method to start the HTTP server.
We are now ready to start the Deno Oak HTTP server. Before that, install the Denon package globally to help us hot-reload the Deno server upon every file change.
deno install -qAf --unstable https://deno.land/x/denon/denon.ts
After the installation, run this command to start the HTTP server on port 8000:
denon run --allow-net --allow-read --allow-write --allow-env src/server.ts
Once the server is ready and listening on port 8000, open a new tab in the browser and visit http://localhost:8000/api/healthchecker to see the JSON response.

Generate the Private and Public Keys
In this section, you’ll use the Web Cryptography API to create the PEM certificates, generate RSA keys from the PEM certificates, and export them with a secure method.
To do that, create a src/utils/generateCryptoKeys.ts file and add the code below.
src/utils/generateCryptoKeys.ts
function arrayBufferToBase64(arrayBuffer: ArrayBuffer): string {
  const byteArray = new Uint8Array(arrayBuffer);
  let byteString = "";
  byteArray.forEach((byte) => {
    byteString += String.fromCharCode(byte);
  });
  return btoa(byteString);
}

function breakPemIntoMultipleLines(pem: string): string {
  const charsPerLine = 64;
  let pemContents = "";
  while (pem.length > 0) {
    pemContents += `${pem.substring(0, charsPerLine)}\n`;
    pem = pem.substring(64);
  }
  return pemContents;
}

const generatedKeyPair: CryptoKeyPair = await crypto.subtle.generateKey(
  {
    name: "RSASSA-PKCS1-v1_5",
    modulusLength: 4096,
    publicExponent: new Uint8Array([1, 0, 1]),
    hash: "SHA-256",
  },
  true,
  ["sign", "verify"]
);

function toPem(key: ArrayBuffer, type: "private" | "public"): string {
  const pemContents = breakPemIntoMultipleLines(arrayBufferToBase64(key));
  return `-----BEGIN ${type.toUpperCase()} KEY-----\n${pemContents}-----END ${type.toUpperCase()} KEY-----`;
}

// Let’s use the new toPem function to create PEM format strings for the privateKey and publicKey
const privateKeyBuffer: ArrayBuffer = await crypto.subtle.exportKey(
  "pkcs8",
  generatedKeyPair.privateKey
);

const exportedPublicKey: ArrayBuffer = await crypto.subtle.exportKey(
  "spki",
  generatedKeyPair.publicKey
);
const privateKeyPem = toPem(privateKeyBuffer, "private");
const publicKeyPem = toPem(exportedPublicKey, "public");
console.log("\n");
console.log(btoa(privateKeyPem), "\n\n");
console.log(btoa(publicKeyPem));
Oops, quite a lot is going on in the above code, let’s break it down:
- First, we created two helper functions:
arrayBufferToBase64andbreakPemIntoMultipleLines. - Then, we evoked the
crypto.subtle.generateKey()method provided by the Web Cryptography API to generate an RSA key pair with a 4k modulus that is suitable for signing data and verifying existing signatures. - We then took the RSA key pair available on the
generatedKeyPairvariable, converted them to PEM certificates, and exported them as pkcs#8 (private) and spki (public). The exported PEM format strings (private and public keys) can be stored on the filesystem and used by tools likesshandopenssl. - Finally, we used the
btoamethod available in Deno to convert both the private and public keys into base64 format before printing them in the terminal.
We converted the PEM strings into base64 format before storing them in the
.envfile in order to avoid getting unnecessary warnings in the terminal when you are building a Docker container that reads environment variables from the same.envfile.
With that explanation, create a .env file in the root directory and add the following environment variables.
.env
ACCESS_TOKEN_PRIVATE_KEY=
ACCESS_TOKEN_PUBLIC_KEY=

REFRESH_TOKEN_PRIVATE_KEY=
REFRESH_TOKEN_PUBLIC_KEY=
At this point, we are now ready to generate the private and public keys. Open your terminal and run this command.
deno run src/utils/generateCryptoKeys.ts
Once the asymmetric keys (private and public keys) have been generated in the terminal, copy the long base64 PEM string and add it to the .env file as ACCESS_TOKEN_PRIVATE_KEY. Then, copy the short base64 PEM string and add it to the .env file as ACCESS_TOKEN_PUBLIC_KEY.
After that, run the deno run src/utils/generateCryptoKeys.ts command again and then copy the long PEM string and add it to the .env file as REFRESH_TOKEN_PRIVATE_KEY. Also, copy the short PEM string and add it to the .env file as REFRESH_TOKEN_PUBLIC_KEY.
If you followed the above instructions correctly, you should end up with a .env file that looks like this:
.env
ACCESS_TOKEN_PRIVATE_KEY=LS0tLS1CRUdJTiBQUklWQVRFIEtFWS0tLS0tCk1JSUpRd0lCQURBTkJna3Foa2lHOXcwQkFRRUZBQVNDQ1Mwd2dna3BBZ0VBQW9JQ0FRRGtUbkFoSEFCYUJNanQKTmtuWWVVVUk3U1BEK2kvRDVMaWpSd25oRHpDaXg5R1hocDR5RHVsTi9MUGxhakw4YUZpaFZ3d3NiK0ZwME5SbwpJc3NGOHoyUFcydkRxdWtndTZOeHR4ak5pU2JiSTE5QXJiT290NFBxeDc2TkdnTE5Wd3BhY1RpV0dqYi9NZHZaCk9UWXc4dVY2YkhQSVdlM25PdnNsNzhZM0JXWmFhQlZXTUhQVkZ1eEVwaGJEQXpRR0xCZGlsNkJKTUNCbUhRZEsKZ3RRdDlURjZzRVUvL2xFcVhuZ1JZMWFRd2hPNml3a0x4eG5MU05DV09PbEJMSXpTT2x5YVhXWGF3N1NUdFRObApIOUZWUHpld2xYQVVERFN2Q1Voc256OGxvdG1PdmhsSjBlaW0zZG85VTZaQW8yeldRTEpQUHptRk9iakNkMWZqClhTK3l2OXQvRkZld0ZWTnBJYjlFOWR4cUFlRDFBY055Y2J3ZnpuM2F1c1hzVi9Fek9kVm5Wem5qV2VoRkNIeFcKSWhBRStnSkdjOHN3bDEyOFRwb3FEWHNtTXdCUE1PZU9YMENRN3k0OVpkeWRtSTVwUkdLd25ybkNqb3Y3VmtxLwpCNUtxOUtETjNNdjlKa3FhVXBnYkx1SmxHT3N0eEVhZXpiYXg3emw3NnhVakRVL1JUYUt0WjRTeFFQbTJjaEY1Cmg4bEtZT0tYKzJrZjJScW9LdHpjMUhxQ3NRUGRleFlwUDZUSjc2YUwxU0ZXMzMzc0dGemlEUWJQb1ZvdHUwbDgKK1I0d0RWWFl1NXIzNW5GZ1RCa2xMQjdmbnpWcFVhTDBWaEtyNldwUHZlMWRkc0FyOWdZbndSb05KL0Y5TlhtYgppOHUyazliOS93em9TL0ltTGV1d1BlVWdsakhDRVFJREFRQUJBb0lDQVFDVmNwTUwyVnlSa0poR1QwYy9vUUtECnVWZTBMYzJlbWRZVGE2a1gzZTJrWU5EZU00elNqOWhBNks2SitsNnR3MUJoTEs0WFdKVmh3d1dIdFY3WTRrVGwKMXA1UVUweVAxTVJFNStvZ2dTc2lQNkZXb1YzOWowT1hLSEdmdytzWnAyUnJsN25HNkJvZ0t1OFMzdFNPYmpHeApWZFRrelpsaHg4WW5LekhCU3BPWmtwQ0UvdXFVRHBGU3pyWVBxY1VnVlRScG9YK1c2UjRNT2V4UDVod21pVjUrClJXelBXeGFlZVlCM1FXT2xGcVg3Y28vVldkdVVxbkdBSkhqcjVORzV1K0pxV2NFVzF3MFpzMytWTHFMRS9zRGgKb3JEZkxxNDk5Z0dtdVFlSkIzVUtiMzMyU0tYV3RWcnEwaHIrTFB4TnM4UUZCQW9QSDUzR0RvRkZuL1pkT0NIaApiTnpzUEIwVmVNZDhPcmZkd3pad3k0aHBCdlVucWlaQkZkNWJzeEtXbjNnb3BxbmVWTzBwZWVSbU5IQnNOYzRVCmN5YmZlMmt1K1J5ZVNtd01BaE5yT1FSN1ZMSFlmditaWEVBTTdsRThmaWNxYm4rMGtsbkZrRlZ2M3pUalNmVzQKL2RkTEtzSEl0YURnQUY0R09UaUE4bDlSb3V2S0VBOHgxVUY4bHNQRWRiNTRQOWVFWE1EeWFQZkhjVnkyd0tDaAplZGJWcmxYL2JFU1AzYmxXZWFYZWRNK0NPbzRncVkzWXpDM1lha0l0ZU0rbStZYnFieTc5U2ZYOHc3b0t2SWNYCm41cWVPMVpTK3VkOG5sblNxK09xdmN6WUdBVVhXVnZtSzQ5cEtwK3Z4VytVUTFVTFNXTE9Dc1l4SGNEZGIyblAKcGdHYTZ0NlZPdkh3U1E3WkFXQ24wUUtDQVFFQTVMdnIzQ05XeVR1Mi9lZUxxdlIwNitRYmNGOFFnSUJNeFoyOApkaGU3cUtuYVF6TUFnMEZQTFA5aWp3UDR5bGtScktZZlZVSDBrdGZSa3N6N201VzcxVDVzSm1Xd0ZmcnppeDhmCkhwYXhVRk5kdWVBcUhrUUJ0aHI2R3lxWTRCVHVZTFVkRUlta0pxRSttbG5EU2Y0YXpOWkQ5TnhvOERuNm9EZ2cKa3pvbnEwZzJlemczdmZQQzVuZmFsOGkyMlliRUhoMVdiT0ZBNmltWENMcUJUMkswcjJJZ3JMUE9uT1dRRFBaOAo5WjRpVXFpQVh6L0dVSzRNS0ZnbnBaODJ1NTNTazU0SmZCaktHU0lJU0kwNUI3WGM2L1F6M25GNit1YVUwQUtuCkpvSEsxNmVTUWlwc21vaTVpRndDcmttSnh0UlNVbGNEREZ0RCtCbzNNNGp0WWwxQ1J3S0NBUUVBLzRWM1F4WHkKOGtCYkl5amdrSjEzN3lZaUkyTnEwd2NDNnRNbmwwcWZQK3o5RHBIVEJTMUNiNjZ4NFhGTVNVaDVRSVpxVFRRdgpONzFXSzJ0MTZTd3lhK3JrV0cxaHlVZGlhc0tZVmpqZGpTa2ZpbkdOMUFxaGp3ZkpZaG94akE0RCs5WkhUdVErCmJaaUxMWXg3dzg5OHBMU3JVbERjM2tvVitQN0FCZGFVakdaZER3R2VhWklSOFk2dnFjY0FvTWlLV3duY3VlVzYKK1NuaEU3V1N3S0RBd2JDeWoxdlptUHlZYk5PNVlQMis5eWZLckczMHJld0F4WXpmMUpiVUk1Mng4OWYraWh6cwpVQkpCV2J0cWpNUlRFKzZqbXAxK3dXSEVTaGRlR29oRDB2ZysxUks1T0FvZ0Z1RTdYbkNFTllvUVZWRWpFVVlQCm4reElab1o4QU1OczV3S0NBUUFjZWVUSU9FSVN0WE4zc3I3cG5wdDd6cDgzNHkzcndZMU5RUEQ0aHNYZkhwNUUKcFhIWDVXYVZCSXBob2EzMGl4Z3ZOVk5MU3ZYRzNrV0NFREQyMHJKYXZ2VzU1Z2tCQTRnVWR1QnA3M3JOdEVORAo0OHQ2ang3amJBSmRKWFY0MkVKQkdlc3ZadU5meDgxQ2JCQnJBczZWVjh1SURYU25DNkRQRjQyK3BvdlB3Q0xBClBtUjZLb0hHTFgreVM5T3Z5eDVaWFcrb0NIY0xiL2dVcHh0NEphSzIvdkZ3YnNZM05FRTF5KzRNcWc0OTJpcDUKTVRoZ1RQcklmd2tZam5UQzhNZ0pockJKbWRCM1JveGZjKzE0cjBSOHY1OUJmMEUvUVR1ZmxlVDNYMHRBZytVcQpoWnVWdFpYYml4RHVYOHRlVElxZkk2UUdnc280ZGhNUFFHbkZTRFQ3QW9JQkFRRDY3YSswRXM3MWRadktpRzhYCnRYdzlQMTZSRUNXc3ZScnhUcEYzc3BGM0xwMUlmSTRWYkYvczIwcldVUFFRbDNwemtreThLbjRnSi9DQ1RWS0sKdkp0N2ZUM25WT3VOeFd0eDJrM05ocVNUNW9tUjVIZmFmdUl2V3Y4Nk51em5WREEzVlRQTDFyc3oxM1QrTXhLcgp0WXY3RjIyVE5kUGcvREpkeHBiK1pMNldya08rNCtFVVhaei9jaGN5RERxaXFxMnNQNkFpY3VkTm53SG80QXdRCjNRek9hVjdCQi90RmtQR0RGZHpiMGZTQ05QS0VxS3A3VGVOb0hUTUdTMlJpNFk4TEh0ZFovSk5aQXNSb2dYTmUKYjhJQ05mMDJibW8zTUhLYUxCNSt3Y2lSV3JZaGV2U25ndElHaGdOT2VBSnRyWHJpdmY1SkRWdDB1bzVUR01pWAoyMUtMQW9JQkFEaTR5NndmQmpydkd2N2lObUxUNytZbi8yd3lMcDJaNVlRdHkzMjA2WDlDMmtDenRIaWNLV0hUCktUVk1kSVhUdlpRUE9NTG5OWEo2cnA4a3FrVzIwMUtmNTBFbUZ4bjVhNzhFbjZ4bi9iMWVYTmhXb25RRi81LzUKSERwTWVHMEttVjk3Zk53SWl5K3M1dCtKSGxJeWc1K0ViZE1GeDVOVzNWb2puN0p1T0hsdERrcDY5cm54aFBidgpNa2l6NHJPaHhVb2tkZmRTOFFUT21tN1BhRmxqUTdwM3dhR0M4RmZOb1o0N3FsdEkraUNvMVc0VGU4VExzanlHCjRia0pCUE9NNGJLR1lGeGlpVVhBN1dPa3hOYjNnMjlXUEp0eU5zV2VsdEQ1UWZYUUVTSnMxNzZnRzI3aGlMTWYKeExkaGtyODFFVlEvOHJJREMxVTZCSlZ4akk1eVdRQT0KLS0tLS1FTkQgUFJJVkFURSBLRVktLS0tLQ==
ACCESS_TOKEN_PUBLIC_KEY=LS0tLS1CRUdJTiBQVUJMSUMgS0VZLS0tLS0KTUlJQ0lqQU5CZ2txaGtpRzl3MEJBUUVGQUFPQ0FnOEFNSUlDQ2dLQ0FnRUE1RTV3SVJ3QVdnVEk3VFpKMkhsRgpDTzBqdy9vdncrUzRvMGNKNFE4d29zZlJsNGFlTWc3cFRmeXo1V295L0doWW9WY01MRy9oYWREVWFDTExCZk05CmoxdHJ3NnJwSUx1amNiY1l6WWttMnlOZlFLMnpxTGVENnNlK2pSb0N6VmNLV25FNGxobzIvekhiMlRrMk1QTGwKZW14enlGbnQ1enI3SmUvR053Vm1XbWdWVmpCejFSYnNSS1lXd3dNMEJpd1hZcGVnU1RBZ1poMEhTb0xVTGZVeAplckJGUC81UktsNTRFV05Xa01JVHVvc0pDOGNaeTBqUWxqanBRU3lNMGpwY21sMWwyc08wazdVelpSL1JWVDgzCnNKVndGQXcwcndsSWJKOC9KYUxaanI0WlNkSG9wdDNhUFZPbVFLTnMxa0N5VHo4NWhUbTR3bmRYNDEwdnNyL2IKZnhSWHNCVlRhU0cvUlBYY2FnSGc5UUhEY25HOEg4NTkycnJGN0ZmeE16blZaMWM1NDFub1JRaDhWaUlRQlBvQwpSblBMTUpkZHZFNmFLZzE3SmpNQVR6RG5qbDlBa084dVBXWGNuWmlPYVVSaXNKNjV3bzZMKzFaS3Z3ZVNxdlNnCnpkekwvU1pLbWxLWUd5N2laUmpyTGNSR25zMjJzZTg1ZStzVkl3MVAwVTJpcldlRXNVRDV0bklSZVlmSlNtRGkKbC90cEg5a2FxQ3JjM05SNmdyRUQzWHNXS1Qra3llK21pOVVoVnQ5OTdCaGM0ZzBHejZGYUxidEpmUGtlTUExVgoyTHVhOStaeFlFd1pKU3dlMzU4MWFWR2k5RllTcStscVQ3M3RYWGJBSy9ZR0o4RWFEU2Z4ZlRWNW00dkx0cFBXCi9mOE02RXZ5SmkzcnNEM2xJSll4d2hFQ0F3RUFBUT09Ci0tLS0tRU5EIFBVQkxJQyBLRVktLS0tLQ==

REFRESH_TOKEN_PRIVATE_KEY=LS0tLS1CRUdJTiBQUklWQVRFIEtFWS0tLS0tCk1JSUpRUUlCQURBTkJna3Foa2lHOXcwQkFRRUZBQVNDQ1Nzd2dna25BZ0VBQW9JQ0FRQzRPN2NIS1huYzkxZ0EKdFRkZXJwWnpCSzY3QVBEc1NxVmFzaHRNRWJwd1J2VFR1RVpkNVA1eGpZTWdQRGZFbXRuZWJFQVF6b29CRzN3VwpjU1Q4bTgvSnVFVy93aDQ3V3I0akJqam9MNk5Fd0dVek5IcWVLdkd5RTROcGdZZlNtYmQ4ejNaZjlIOWQ3OGZQCndPU2ZwZy8renM5eWwzUHJ4b2xNZW9GMGtTUmszZlI0ZEJaZXdYeTRJRSthdFptOWZGbzE1TER0eGJFREtsMUYKaFlpV0JWc1I4SWpuUTlzYlRDSVBUbE1YM2wyN0tMSy9ockNOMmZIWm45WDhLanU3dERFbjN6VitNbyttQnJTZQpwcmFQSUtEeTRTNStiVmxCUGlpMjh3cG5aSndDRGdjLzh3QlV5RlBjQzFiWDcvWk5VU3B3YWJKaXNPUHlZOForClVybjR0NzBVTXg0amlZQk9xaGFMdWlmL1FxclpOVng2NE10ZnJseEZGUEY1UjhvTDhSODNHU2NsdWRDamNIL1QKeUwvS3VyWmc4T0NTb0Q2N2dBWnNiT05QSEVhZ2V4d2dpcHJ1QzNRaFdha3ZHbkxVckU4eHlxc2lyS2NhenV2ZgpaZDVORVc4aUlmb2R3dlh1NzdBbXRRTVNsY2JDWTR3YVFUUVpWd1ViOCtuWDR3cTJYc1ZHYi9sNklSazBXRWxWCmppRHlMdnZDK2cyV0g0UkhiQnJHaW9kK2FiRlorMTFGZ08vOURFZ0E5YTFFVmRobU1rSDk0eVdDb0VtSjNBbmQKeGtJaFlvY3B2VnM3dzlMTDF5cVpVOGdOTGZBWVpwbkdBeVg5eDNUYmk5YnJDYThGMHFEU2gvRnFLTTRoTFlBRQpjVmFiRjhUTTlqV3RwOXhBMm1pTmNrMkxjY1QrWFFJREFRQUJBb0lDQUhmMDZjZVFDZmtHVkJhaDU5dU9jZ2VTCkZQTk9PWkNoU2Vrejd2SW8yT3dpUjJkVHBQMmVETTZEQmM0SFo0aHNDMC8zeS84bGZGWWNQeitkakNldWpDMGIKL3M1TTVzSmU0MDZLenFMZjRiN3lSdktBU1JhVGY2d2phSDFhQ2NYbXNNSmprd0FIZ3FiM2FYS3NkakE5UUV6NAorN254UTFsUmZEUi96NnJHbHB2V3FVZUV6c3dEeitGVHFJRmpuU2J6d1FrMlRyMkM2eTdVZHNhOW02R1MreWxECkpPRHdIY280V0RUL0dydC8zaWZ1NS9RdER1aE44RnR5NXpHNWpnczUySWZObmxiOU5PczFrb1Y2cDRPcUN5SVoKM053VTl2aTBNRzV1OFdkQTZ4T3JicTBFM0VKWDdjSm8zN0xhVzlVYjlEWWRuRGtHVkdXTzhiOXV2Z2hrR29maApoYmtpQmQyVmkranhuU0cwMmdMOEZSNG1VZlltcE5zZUVDK1paU2t0UUZiZDRjS2tKM3RKUXByMUNVbTNaRnRRCkxTd21kZWl6OEgzcmxXTmkvTmYvMjZZM0xJREhxekk0eGxlWXBWRFZKOTFTY2RZVmFRcFFLalJ2Nko0QUR1NlUKN24weER1cjkwczNIQ1NJYmY2aFpLMFpxWlJjWWFWOVQ3MFVVWWprYmdRMlcrWFpGTGwyWU0yQnNETXlDdmppUQpCbVNPbU1iY0g0WFRmWmNvWmhrMlJESC9UaGlFTDFCQWRPMloybTY1c3MxWm1Xc0JCRE0wSXZaci9YY1dqeUlaCjZsUkdIZ1VWcUUrRFExbks2aGpoSEtjMk40QytnTmxqdDQ1UXR4ZldYWHh1a0JkMkhwSm1XYUtnbkFWZXRsYTcKOEkwc2l2SEVPenpOMnIreWVETkJBb0lCQVFEZzBVVzdrdE1PVmNBZjhmNzZRdGRWRk1NWDNGK0h6SGFmUTJKZApKUk9nQklyd2tOTi9pZEYwK2hjT1oxSUxzczBtQmxKSHZFZVE1dE5aVDg0TFFGWVQxa1VqOHJ0MVpYVTVaTmhFCm1rOGwwWHUvUWpSTU5KblFZWWJSdFdFZkt5Z0s3MWlpUllEU0hTZTNDdDZuVzZ5cXpPdEZvRmZxakYzTWVrMlQKVkdMMEhpbmpvZjJFRXNlZDErbU1VSlB1TDdVbU02b2dxdE5KS0JLNjkrQVMrb1FGSFdQb1pXQk0yUHJjLzBDcwp4SW1UUTZOQlh5Z1JzMTRJdWJsR0RDVFFCWW53b0hBNnZpYzNrWEdhNW0wYjB0TXlPZTBMcm1uYW5laElDbGlMCm4yZHFEcjhHZ0J0QzFlR0QvNWZBa1hqQ243M2VwcHRsdzR1b0hLZjN2Q08vL3plWEFvSUJBUURSeVdVWjNEVVYKc21mN1VIbFAwckx2K1R2ODNNaTJ4QU50ZEFmaWpZaVNnc3QyRi85elZDcDZuNGhlWFJZWmtueTZZeitPV0xQKwp0dDBuejArVkdrbEZkcFVlOEF0K2QrbHdSUUpHcG5SNUFDVFpUeWU3N2RtaHlmVmN5dDJ3SmZEYUczV09iVU1oCjZDbnZoNlpxenVPb3NmQ09keno1cXMxV0dDTWFNLzA3cDFoTThvWWYxRFRTNmdidlpxSlB0UEwySUEvRTQzL3AKNUpTWXV6cXEwTzlURmVLSTVSVUJ6M2NUWG94Q09lcm1BL21jRWlnWnhpUE85T1FBejcydERzVkcyUXJKOUd0OQpEdWJEem9xVWNWVkRhVXpuS0Nkc05NZDNoKzI2Tm9uaDNoVDRHc2x3RDIwNkZWZ1diZkR1TE9XMUlLRmt5Nk83ClNoRUF0c0pTNDVnckFvSUJBQUNyUHJ6ZkkvZWY4N0Zrby9DVXNGVlZlWHNoc2JzU3RhdWxwSzVJUlBXdDdjZm4KZG1tanZGYlB3Ni9NU09jMkFmeEIrbzZ5RmJodHAyVlZvblJRSGJGemFzTS9ucVVyeHh5RG0wMGc5R2xWWlR2ZApjNUJpZTY2dUM1dW1JWUxaT3daRlRnczFqN3VRVUtUdnlGZlJJd05qRnJRZlZRT2lwVWpOZUZ1ZTNhaUNTbmVkCjdNWXUxQjg1SEQzSm81Y0sxMHdrelRYSnJGVkVaRUhnS08rRmhVMEttRmlCckxhdDBwbER2U3FHYnk1Yi9pbGMKb2g3alhMMUQ2RFE0SndmamJGU2w5WStITDFDd0F4bUY0Lzg0TWw2czQzS3NjeTR1V0JtV3hrcXNENysyQ1lWNApiaHhWekpUNjlyV2crUzRERWFxTzdsbHdLb00yaXAxbkZ1Z2tWME1DZ2dFQUZlUlZWNUNDUGFSamMzZGZZWFFVClZqU0ZEUXNoS3VsamppMTRrU3pCM3NBbGFVcHh6dUF1bXFOQlFNK24rYjB1cE9pc2ZqZEZlVVF0NmZTWlVtN3UKekgvbWFkY1U2L3FwY3B6UTh2eDExUmF0d2J1ZjR0MmNRMlRtNU9zS25WSW9ReXB3WncrQjNPejBTMW0xaFJuWAo2Z2UvbWE1WnY1Z1NXM1NqWFIybHhHN2ZLUkI1N0tKaGJNMGRNaWhjc2NLcFJBUHVnVlpZUjlraHBKcU5NYndoCjdXS3dSQ2JidlZlZ0RuWmtYcGphcVd3cXhSMmo3NlNjb2dFdU5lTjM0TEpVNWVMS1hHN1VOTFcwWVNTUms1SU0KR3IvSFZhdjhDUytzelExelFtWmtseHhzeGNOTjJCTFVEQ2FrRFpzbGRFVmRKenlqZXZoQk9zOHMzUTAxVkI4SwpCd0tDQVFCQ2k3WlBpcW9aK08ySkNpTWoydnVMVS9PbzVzK08vWFBFRzRlblB3R0tjdW5nQnJvRzgzT1ovdWJPCnpnTkRINGJ6VWd2dS83YVFDZ2hDL0s5TjZ1cTI4MDlJc1Y4c24yZjRJZnIvaVdiQmNkMHN1cjNweU41Z1dxV28KVk42STdKMWNRcWZhTXliQ1ZUaDM4UzVaYitWRndzUjV4eFloeThsdjJiNFNkbXdoaTNKRDBNNVhFKzZUVTkvYwpkNnhuTGF3RElBZHpicUcvUkI4MTdwSWlvQktpcldiK3pvM0VBck1KcnpVb3VzWVhtbVhMZ0hCcDl5YlZBWExzCmFtYUx4L2V4NUs0bDVxWndJU2U2WEpMZ2F5dEhIeE1Yb1hNVmNwRDBOVWtkYitWZ1pSRXJOaVlzNXVVcW80VW4KY3U2Z0UwV1BhaU5FZDBLTEwzdCtvVEp4aDJxTgotLS0tLUVORCBQUklWQVRFIEtFWS0tLS0t
REFRESH_TOKEN_PUBLIC_KEY=LS0tLS1CRUdJTiBQVUJMSUMgS0VZLS0tLS0KTUlJQ0lqQU5CZ2txaGtpRzl3MEJBUUVGQUFPQ0FnOEFNSUlDQ2dLQ0FnRUF1RHUzQnlsNTNQZFlBTFUzWHE2Vwpjd1N1dXdEdzdFcWxXckliVEJHNmNFYjAwN2hHWGVUK2NZMkRJRHczeEpyWjNteEFFTTZLQVJ0OEZuRWsvSnZQCnliaEZ2OEllTzFxK0l3WTQ2QytqUk1CbE16UjZuaXJ4c2hPRGFZR0gwcG0zZk05MlgvUi9YZS9IejhEa242WVAKL3M3UGNwZHo2OGFKVEhxQmRKRWtaTjMwZUhRV1hzRjh1Q0JQbXJXWnZYeGFOZVN3N2NXeEF5cGRSWVdJbGdWYgpFZkNJNTBQYkcwd2lEMDVURjk1ZHV5aXl2NGF3amRueDJaL1YvQ283dTdReEo5ODFmaktQcGdhMG5xYTJqeUNnCjh1RXVmbTFaUVQ0b3R2TUtaMlNjQWc0SFAvTUFWTWhUM0F0VzErLzJUVkVxY0dteVlyRGo4bVBHZmxLNStMZTkKRkRNZUk0bUFUcW9XaTdvbi8wS3EyVFZjZXVETFg2NWNSUlR4ZVVmS0MvRWZOeGtuSmJuUW8zQi8wOGkveXJxMgpZUERna3FBK3U0QUdiR3pqVHh4R29Ic2NJSXFhN2d0MElWbXBMeHB5MUt4UE1jcXJJcXluR3M3cjMyWGVUUkZ2CklpSDZIY0wxN3Urd0pyVURFcFhHd21PTUdrRTBHVmNGRy9QcDErTUt0bDdGUm0vNWVpRVpORmhKVlk0ZzhpNzcKd3ZvTmxoK0VSMndheG9xSGZtbXhXZnRkUllEdi9ReElBUFd0UkZYWVpqSkIvZU1sZ3FCSmlkd0ozY1pDSVdLSApLYjFiTzhQU3k5Y3FtVlBJRFMzd0dHYVp4Z01sL2NkMDI0dlc2d212QmRLZzBvZnhhaWpPSVMyQUJIRldteGZFCnpQWTFyYWZjUU5wb2pYSk5pM0hFL2wwQ0F3RUFBUT09Ci0tLS0tRU5EIFBVQkxJQyBLRVktLS0tLQ==
Convert the Keys to CryptoKeys
Since we exported the PEM certificates and stored them as base64 encoded strings in the .env file, let’s create a function that will take the exported PEM certificate as input and return a CryptoKey object.
src/utils/convertCryptoKey.ts
function removeLines(str: string) {
  return str.replace("\n", "");
}

function base64ToArrayBuffer(b64: string) {
  const byteString = atob(b64);
  const byteArray = new Uint8Array(byteString.length);
  for (let i = 0; i < byteString.length; i++) {
    byteArray[i] = byteString.charCodeAt(i);
  }
  return byteArray;
}

function pemToArrayBuffer(pemKey: string, type: "PUBLIC" | "PRIVATE") {
  const b64Lines = removeLines(pemKey);
  const b64Prefix = b64Lines.replace(`-----BEGIN ${type} KEY-----`, "");
  const b64Final = b64Prefix.replace(`-----END ${type} KEY-----`, "");

  return base64ToArrayBuffer(b64Final);
}
export function convertToCryptoKey({
  pemKey,
  type,
}: {
  pemKey: string;
  type: "PUBLIC" | "PRIVATE";
}) {
  if (type === "PRIVATE") {
    return crypto.subtle.importKey(
      "pkcs8",
      pemToArrayBuffer(pemKey, type),
      {
        name: "RSASSA-PKCS1-v1_5",
        hash: { name: "SHA-256" },
      },
      false,
      ["sign"]
    );
  } else if (type === "PUBLIC") {
    return crypto.subtle.importKey(
      "spki",
      pemToArrayBuffer(pemKey, type),
      {
        name: "RSASSA-PKCS1-v1_5",
        hash: { name: "SHA-256" },
      },
      false,
      ["verify"]
    );
  }
}
If you’re wondering why we did the above conversions then I think this explanation might help you.
- If you quite remember, we converted the exported PEM certificates into base64 format before adding them to the
.envfile. So, when we read the base64 encoded keys from the.envfile, we need to convert them back to PEM keys before using them. - Also, before we can store the PEM keys on the filesystem, we had to use the
crypto.subtle.exportKey()method to export the generated crypto keys in PKCS#8 and spki formats. So, we had to convert the keys from string to CryptoKey format before we can use them to generate the access and refresh tokens.
Sign and Verify the JSON Web Tokens
In this section, you’ll create a utility function to sign the JWT access and refresh tokens with the private keys. In addition to that, you’ll create a function to verify the JSON Web Tokens with the public keys.
To begin, create a src/utils/jwt.ts file and add the following imports. The dotenvConfig() function will load the environment variables from the .env file and make them available in the src/utils/jwt.ts file.
src/utils/jwt.ts
import { getNumericDate, create, verify, dotenvConfig } from "../deps.ts";
import type { Payload, Header } from "../deps.ts";
import { convertToCryptoKey } from "./convertCryptoKey.ts";
dotenvConfig({ export: true, path: ".env", safe: true });
Sign the JWT with the RS256 Algorithm
Let’s create a function to sign the JSON Web Tokens with the CryptoKey objects. This function will accept parameters as input, convert the base64 encoded private key to a CryptoKey object, sign the JWT with a payload, and return the generated token.
src/utils/jwt.ts
export const signJwt = async ({
  user_id,
  issuer,
  privateKeyPem,
  expiresIn,
}: {
  user_id: string;
  issuer: string;
  privateKeyPem: "ACCESS_TOKEN_PRIVATE_KEY" | "REFRESH_TOKEN_PRIVATE_KEY";
  expiresIn: Date;
}) => {
  const header: Header = {
    alg: "RS256",
    typ: "JWT",
  };

  const nowInSeconds = Math.floor(Date.now() / 1000);
  const tokenExpiresIn = getNumericDate(expiresIn);

  const payload: Payload = {
    iss: issuer,
    iat: nowInSeconds,
    exp: tokenExpiresIn,
    sub: user_id,
  };

  const crytoPrivateKey = await convertToCryptoKey({
    pemKey: atob(Deno.env.get(privateKeyPem) as unknown as string),
    type: "PRIVATE",
  });

  const token = await create(header, payload, crytoPrivateKey!);

  return { token };
};
Verify the JWT with Asymmetric Keys
This function will also accept some arguments, convert the base64 encoded public key into a CryptoKey object, and verify the token against the provided CryptoKey.
src/utils/jwt.ts
export const verifyJwt = async <T>({
  token,
  publicKeyPem,
}: {
  token: string;
  publicKeyPem: "ACCESS_TOKEN_PUBLIC_KEY" | "REFRESH_TOKEN_PUBLIC_KEY";
}): Promise<T | null> => {
  try {
    const crytoPublicKey = await convertToCryptoKey({
      pemKey: atob(Deno.env.get(publicKeyPem) as unknown as string),
      type: "PUBLIC",
    });

    return (await verify(token, crytoPublicKey!)) as T;
  } catch (error) {
    console.log(error);
    return null;
  }
};
Create Authentication Route Handlers
Now that we’ve defined the utility functions responsible for signing and verifying the JSON Web Tokens (JWTs), let’s create route handlers to implement the JWT authentication flow.
To begin, create a src/controllers/auth.controller.ts file and add the following code.
src/controllers/auth.controller.ts
import { RouterContext } from "../deps.ts";
import { signJwt, verifyJwt } from "../utils/jwt.ts";

export type IUser = {
  id: string;
  name: string;
  email: string;
  createdAt: Date;
  updatedAt: Date;
};

export const users: IUser[] = [];

const ACCESS_TOKEN_EXPIRES_IN = 15;
const REFRESH_TOKEN_EXPIRES_IN = 60;
We imported the JWT utility functions, defined an IUser type to describe the fields required in a user object, and created a “users” array to serve as our in-memory database.
I didn’t use a real database like MongoDB or PostgreSQL in this tutorial because I didn’t want to overcomplicate the process.
Register User Controller
This route handler or middleware will be evoked by Oak to register a new user when a POST request is made to the /api/auth/register endpoint.
src/controllers/auth.controller.ts
// [...] signup user controller
const signUpUserController = async ({
  request,
  response,
}: RouterContext<string>) => {
  try {
    const {
      name,
      email,
      password,
    }: { name: string; email: string; password: string } = await request.body()
      .value;

   const userExists = users.find((user) => user.email === email);
    if (userExists) {
      response.status = 409;
      response.body = {
        status: "fail",
        message: "User with that email already exists",
      };
      return;
    }

    const createdAt = new Date();
    const updatedAt = createdAt;
    const user = {
      id: crypto.randomUUID(),
      name,
      email,
      createdAt,
      updatedAt,
    };

    users.push(user);

    response.status = 201;
    response.body = {
      status: "success",
      user,
    };
  } catch (error) {
    response.status = 500;
    response.body = { status: "error", message: error.message };
    return;
  }
};
First, we extracted the data stored in the request body by evoking the request.body() method and queried our in-memory database which is the “users” array to check if a user with that email already exists.
Next, we generated a random UUID for the user by calling the .randomUUID() method available on the crypto module and pushed the user to the “users” array before returning the newly-created user to the client.
Login User Controller
This route controller or middleware will be evoked by Oak to sign the user into the API when a POST request is made to the /api/auth/login endpoint.
src/controllers/auth.controller.ts
// [...] signup user controller

// [...] login user controller
const loginUserController = async ({
  request,
  response,
  cookies,
}: RouterContext<string>) => {
  try {
    const { email, password }: { email: string; password: string } =
      await request.body().value;

    const user = users.find((user) => user.email === email);

    if (!user) {
      response.status = 401;
      response.body = {
        status: "fail",
        message: "Invalid email or password",
      };
      return;
    }

    const accessTokenExpiresIn = new Date(
      Date.now() + ACCESS_TOKEN_EXPIRES_IN * 60 * 1000
    );
    const refreshTokenExpiresIn = new Date(
      Date.now() + REFRESH_TOKEN_EXPIRES_IN * 60 * 1000
    );

    const { token: access_token } = await signJwt({
      user_id: user.id,
      privateKeyPem: "ACCESS_TOKEN_PRIVATE_KEY",
      expiresIn: accessTokenExpiresIn,
      issuer: "website.com",
    });
    const { token: refresh_token } = await signJwt({
      user_id: user.id,
      privateKeyPem: "REFRESH_TOKEN_PRIVATE_KEY",
      expiresIn: refreshTokenExpiresIn,
      issuer: "website.com",
    });

    cookies.set("access_token", access_token, {
      expires: accessTokenExpiresIn,
      maxAge: ACCESS_TOKEN_EXPIRES_IN * 60,
      httpOnly: true,
      secure: false,
    });
    cookies.set("refresh_token", refresh_token, {
      expires: refreshTokenExpiresIn,
      maxAge: REFRESH_TOKEN_EXPIRES_IN * 60,
      httpOnly: true,
      secure: false,
    });

    response.status = 200;
    response.body = { status: "success", access_token };
  } catch (error) {
    response.status = 500;
    response.body = { status: "error", message: error.message };
    return;
  }
};
We called the request.body() method to extract the payload from the request and checked the “users” array to see if a user with that email exists.
After that, we evoked the signJwt() utility function to generate both the access and refresh tokens.
Next, we added the generated tokens to the response Cookies object and returned only the access token in the JSON object. This way the user can copy the access token, and add it to the Authorization header as Bearer before making subsequent requests to the protected routes.
Refresh Token Controller
This route handler or middleware will be evoked by Oak to refresh the access token when a GET request is made to the /api/auth/refresh endpoint.
src/controllers/auth.controller.ts
// [...] signup user controller

// [...] login user controller

// [...] refresh access token controller
const refreshAccessTokenController = async ({
  response,
  cookies,
}: RouterContext<string>) => {
  try {
    const refresh_token = await cookies.get("refresh_token");

    const message = "Could not refresh access token";

    if (!refresh_token) {
      response.status = 403;
      response.body = {
        status: "fail",
        message,
      };
      return;
    }

    const decoded = await verifyJwt<{ sub: string }>({
      token: refresh_token,
      publicKeyPem: "REFRESH_TOKEN_PUBLIC_KEY",
    });

    if (!decoded) {
      response.status = 403;
      response.body = {
        status: "fail",
        message,
      };
      return;
    }

    const accessTokenExpiresIn = new Date(
      Date.now() + ACCESS_TOKEN_EXPIRES_IN * 60 * 1000
    );

    const { token: access_token } = await signJwt({
      user_id: decoded.sub,
      issuer: "website.com",
      privateKeyPem: "ACCESS_TOKEN_PRIVATE_KEY",
      expiresIn: accessTokenExpiresIn,
    });

    cookies.set("access_token", access_token, {
      expires: accessTokenExpiresIn,
      maxAge: ACCESS_TOKEN_EXPIRES_IN * 60,
      httpOnly: true,
      secure: false,
    });

    response.status = 200;
    response.body = { status: "success", access_token };
  } catch (error) {
    response.status = 500;
    response.body = { status: "error", message: error.message };
    return;
  }
};
We extracted the refresh token from the request Cookies object and called the verifyJwt() utility function to verify the token against the public CryptoKey.
Next, we generated a new access token with the signJwt() method, added it to the response Cookies object, and returned it to the client in the JSON response.
Logout User Controller
This route handler will be evoked by Oak to sign the user out of the API. To do that, we’ll send expired cookies to delete the existing cookies that match the same names from the user’s client or browser.
src/controllers/auth.controller.ts
// [...] signup user controller

// [...] login user controller

// [...] refresh access token controller

// [...] logout user controller
const logoutController = ({ response, cookies }: RouterContext<string>) => {
  cookies.set("access_token", "", {
    httpOnly: true,
    secure: false,
    maxAge: -1,
  });
  cookies.set("refresh_token", "", {
    httpOnly: true,
    secure: false,
    maxAge: -1,
  });

  response.status = 200;
  response.body = { status: "success" };
};
Complete Auth Controllers
src/controllers/auth.controller.ts
import { RouterContext } from "../deps.ts";
import { signJwt, verifyJwt } from "../utils/jwt.ts";

export type IUser = {
  id: string;
  name: string;
  email: string;
  createdAt: Date;
  updatedAt: Date;
};

export const users: IUser[] = [];

const ACCESS_TOKEN_EXPIRES_IN = 15;
const REFRESH_TOKEN_EXPIRES_IN = 60;

const signUpUserController = async ({
  request,
  response,
}: RouterContext<string>) => {
  try {
    const {
      name,
      email,
      password,
    }: { name: string; email: string; password: string } = await request.body()
      .value;

   const userExists = users.find((user) => user.email === email);
    if (userExists) {
      response.status = 409;
      response.body = {
        status: "fail",
        message: "User with that email already exists",
      };
      return;
    }

    const createdAt = new Date();
    const updatedAt = createdAt;
    const user = {
      id: crypto.randomUUID(),
      name,
      email,
      createdAt,
      updatedAt,
    };

    users.push(user);

    response.status = 201;
    response.body = {
      status: "success",
      user,
    };
  } catch (error) {
    response.status = 500;
    response.body = { status: "error", message: error.message };
    return;
  }
};

const loginUserController = async ({
  request,
  response,
  cookies,
}: RouterContext<string>) => {
  try {
    const { email, password }: { email: string; password: string } =
      await request.body().value;

    const user = users.find((user) => user.email === email);

    if (!user) {
      response.status = 401;
      response.body = {
        status: "fail",
        message: "Invalid email or password",
      };
      return;
    }

    const accessTokenExpiresIn = new Date(
      Date.now() + ACCESS_TOKEN_EXPIRES_IN * 60 * 1000
    );
    const refreshTokenExpiresIn = new Date(
      Date.now() + REFRESH_TOKEN_EXPIRES_IN * 60 * 1000
    );

    const { token: access_token } = await signJwt({
      user_id: user.id,
      privateKeyPem: "ACCESS_TOKEN_PRIVATE_KEY",
      expiresIn: accessTokenExpiresIn,
      issuer: "website.com",
    });
    const { token: refresh_token } = await signJwt({
      user_id: user.id,
      privateKeyPem: "REFRESH_TOKEN_PRIVATE_KEY",
      expiresIn: refreshTokenExpiresIn,
      issuer: "website.com",
    });

    cookies.set("access_token", access_token, {
      expires: accessTokenExpiresIn,
      maxAge: ACCESS_TOKEN_EXPIRES_IN * 60,
      httpOnly: true,
      secure: false,
    });
    cookies.set("refresh_token", refresh_token, {
      expires: refreshTokenExpiresIn,
      maxAge: REFRESH_TOKEN_EXPIRES_IN * 60,
      httpOnly: true,
      secure: false,
    });

    response.status = 200;
    response.body = { status: "success", access_token };
  } catch (error) {
    response.status = 500;
    response.body = { status: "error", message: error.message };
    return;
  }
};

const refreshAccessTokenController = async ({
  response,
  cookies,
}: RouterContext<string>) => {
  try {
    const refresh_token = await cookies.get("refresh_token");

    const message = "Could not refresh access token";

    if (!refresh_token) {
      response.status = 403;
      response.body = {
        status: "fail",
        message,
      };
      return;
    }

    const decoded = await verifyJwt<{ sub: string }>({
      token: refresh_token,
      publicKeyPem: "REFRESH_TOKEN_PUBLIC_KEY",
    });

    if (!decoded) {
      response.status = 403;
      response.body = {
        status: "fail",
        message,
      };
      return;
    }

    const accessTokenExpiresIn = new Date(
      Date.now() + ACCESS_TOKEN_EXPIRES_IN * 60 * 1000
    );

    const { token: access_token } = await signJwt({
      user_id: decoded.sub,
      issuer: "website.com",
      privateKeyPem: "ACCESS_TOKEN_PRIVATE_KEY",
      expiresIn: accessTokenExpiresIn,
    });

    cookies.set("access_token", access_token, {
      expires: accessTokenExpiresIn,
      maxAge: ACCESS_TOKEN_EXPIRES_IN * 60,
      httpOnly: true,
      secure: false,
    });

    response.status = 200;
    response.body = { status: "success", access_token };
  } catch (error) {
    response.status = 500;
    response.body = { status: "error", message: error.message };
    return;
  }
};

const logoutController = ({ response, cookies }: RouterContext<string>) => {
  cookies.set("access_token", "", {
    httpOnly: true,
    secure: false,
    maxAge: -1,
  });
  cookies.set("refresh_token", "", {
    httpOnly: true,
    secure: false,
    maxAge: -1,
  });

  response.status = 200;
  response.body = { status: "success" };
};
export default {
  signUpUserController,
  loginUserController,
  logoutController,
  refreshAccessTokenController,
};
Create a GetMe Router Handler
This route handler will be protected by the authentication middleware guard and it will be evoked by Oak to return the authenticated user’s credentials.
src/controllers/user.controller.ts
import type { RouterContext } from "../deps.ts";
import { users } from "./auth.controller.ts";

const getMeController = ({ state, response }: RouterContext<string>) => {
  try {
    const user = users.find((user) => user.id === state.user_id);

    response.status = 200;
    response.body = {
      status: "success",
      user,
    };
  } catch (error) {
    response.status = 500;
    response.body = {
      status: "success",
      message: error.message,
    };
    return;
  }
};

export default { getMeController };
We extracted the user’s ID from the Oak state object, queried the in-memory database which is the “users” array to obtain the user that matches the ID, and returned the found user to the client.
Create an Authentication Guard
Now that we have all our route handlers defined, let’s create an authentication middleware guard to protect private routes.
This middleware will extract the JWT from the Authorization header or the Cookies object, verify the token by evoking the verifyJwt() utility function, check if the user still exists in our in-memory database, and add the user’s ID to the request state object before calling the next middleware in the middleware stack.
So, create src/middleware/requireUser.ts file and add these code snippets.
src/middleware/requireUser.ts
import { users } from "../controllers/auth.controller.ts";
import type { Context } from "../deps.ts";
import { verifyJwt } from "../utils/jwt.ts";

const requireUser = async (ctx: Context, next: () => Promise<unknown>) => {
  try {
    const headers: Headers = ctx.request.headers;
    const authorization = headers.get("Authorization");
    const cookieToken = await ctx.cookies.get("access_token");
    let access_token;

    if (authorization) {
      access_token = authorization.split(" ")[1];
    } else if (cookieToken) {
      access_token = cookieToken;
    }

    if (!access_token) {
      ctx.response.status = 401;
      ctx.response.body = {
        status: "fail",
        message: "You are not logged in",
      };
      return;
    }

    const decoded = await verifyJwt<{ sub: string }>({
      token: access_token,
      publicKeyPem: "ACCESS_TOKEN_PUBLIC_KEY",
    });

    const message = "Token is invalid or session has expired";

    if (!decoded) {
      ctx.response.status = 401;
      ctx.response.body = {
        status: "fail",
        message,
      };
      return;
    }

    const user = users.find((user) => user.id === decoded.sub);
    if (!user) {
      ctx.response.status = 401;
      ctx.response.body = {
        status: "fail",
        message,
      };
      return;
    }

    ctx.state["user_id"] = user.id;
    await next();
    delete ctx.state.user_id;
  } catch (error) {
    ctx.response.status = 500;
    ctx.response.body = {
      status: "fail",
      message: error.message,
    };
  }
};

export default requireUser;
Create the API Routes
It’s time to add the authentication route controllers to the router middleware stack. To do this, create src/routes/auth.routes.ts file and add this code.
src/routes/auth.routes.ts
import { Router } from "../deps.ts";
import authController from "../controllers/auth.controller.ts";
import requireUser from "../middleware/requireUser.ts";

const router = new Router();

router.post<string>("/register", authController.signUpUserController);
router.post<string>("/login", authController.loginUserController);

router.get<string>("/logout", requireUser, authController.logoutController);

router.get<string>("/refresh", authController.refreshAccessTokenController);

export default router;
In the above code, we created an instance of the Router class, appended the authentication routes to the middleware pipeline, and evoked the corresponding route handlers. Also, we added the requireUser authentication guard to the protected routes.
Next, create a src/routes/user.routes.ts file and add the following code. In this file, we’ll create a new router and add a /me route to the middleware pipeline. The “/me” route will be evoked to return the authenticated user’s credentials.
src/routes/user.routes.ts
import { Router } from "../deps.ts";
import userController from "../controllers/user.controller.ts";
import requireUser from "../middleware/requireUser.ts";

const router = new Router();

router.get<string>("/me", requireUser, userController.getMeController);

export default router;
Finally, create a src/routes/index.ts file to export the routers.
src/routes/index.ts
import { Application } from "../deps.ts";
import authRouter from "./auth.routes.ts";
import userRouter from "./user.routes.ts";

function init(app: Application) {
  app.use(authRouter.prefix("/api/auth/").routes());
  app.use(userRouter.prefix("/api/users/").routes());
}

export default {
  init,
};
Add the API Router to the App
Now let’s import the init() function we exported from the src/routes/index.ts file and evoke it to register the routers in the app. To do that, open the src/server.ts file and replace its content with the following.
src/server.ts
import { Application, Router, logger } from "./deps.ts";
import type { RouterContext } from "./deps.ts";
import appRouter from "./routes/index.ts";

const app = new Application();
const router = new Router();

// Middleware Logger
app.use(logger.default.logger);
app.use(logger.default.responseTime);

// Health checker
router.get<string>("/api/healthchecker", (ctx: RouterContext<string>) => {
  ctx.response.status = 200;
  ctx.response.body = {
    status: "success",
    message:
      "Welcome to JWT Authentication in Deno with Asymmetric Cryptography",
  };
});

appRouter.init(app);
app.use(router.routes());
app.use(router.allowedMethods());

app.addEventListener("listen", ({ port, secure }) => {
  console.info(
    `🚀 Server started on ${secure ? "https://" : "http://"}localhost:${port}`
  );
});

const port = 8000;
app.listen({ port });
After adding the routers to the Deno app, open your terminal and run this command to start the Deno HTTP server.
denon run --allow-net --allow-read --allow-write --allow-env src/server.ts
Testing the JWT Authentication Flow in Postman
Now that the Deno HTTP server is listening on port 8000, let’s make HTTP requests to test the authentication flow. To have access to the Postman collection used in testing the API, clone the Deno JWT project, open Postman and follow the steps below.
- Click on the “Import” button in Postman
- Under the “File” tab, click on the “Choose Files” button to open the file explorer window and navigate to the Deno JWT project directory.
- In the Deno JWT project folder, select the Deno_MongoDB.postman_collection.json file and click the Import button under the “Import Elements” tab in Postman to add the new collection.
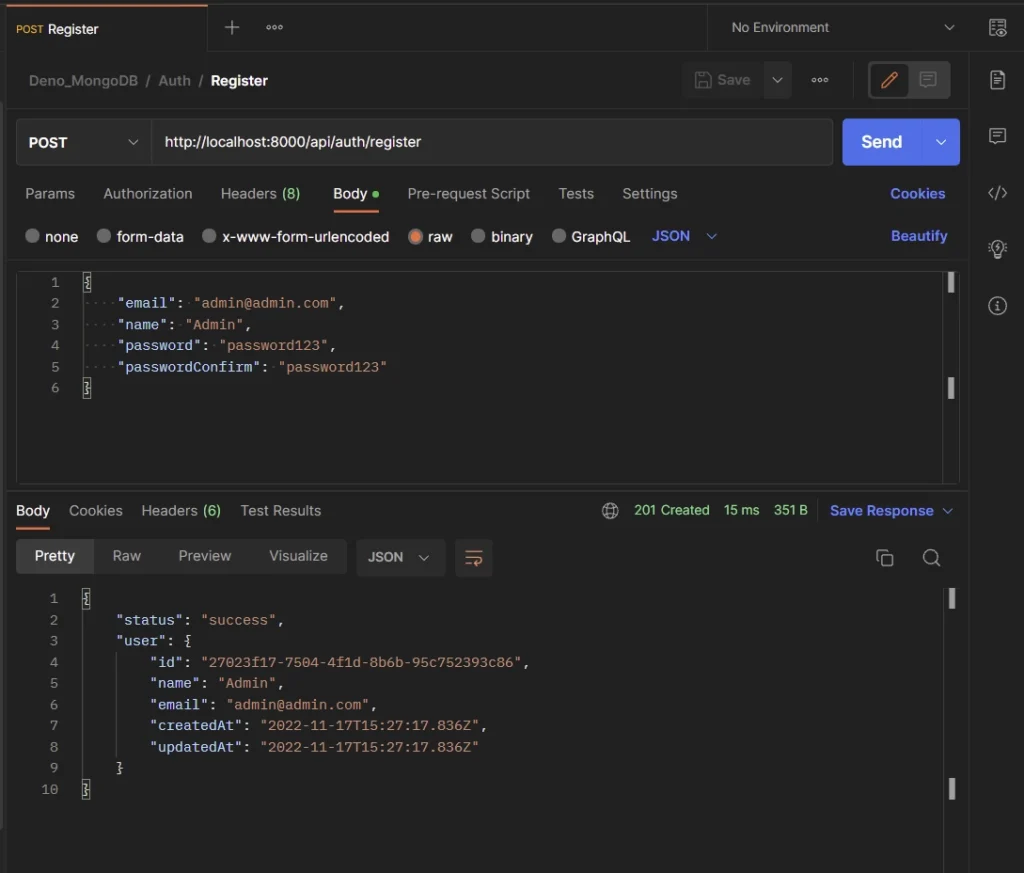
Register User
To register a new user, add the credentials to the JSON object, and make a POST request to the /api/auth/register endpoint.
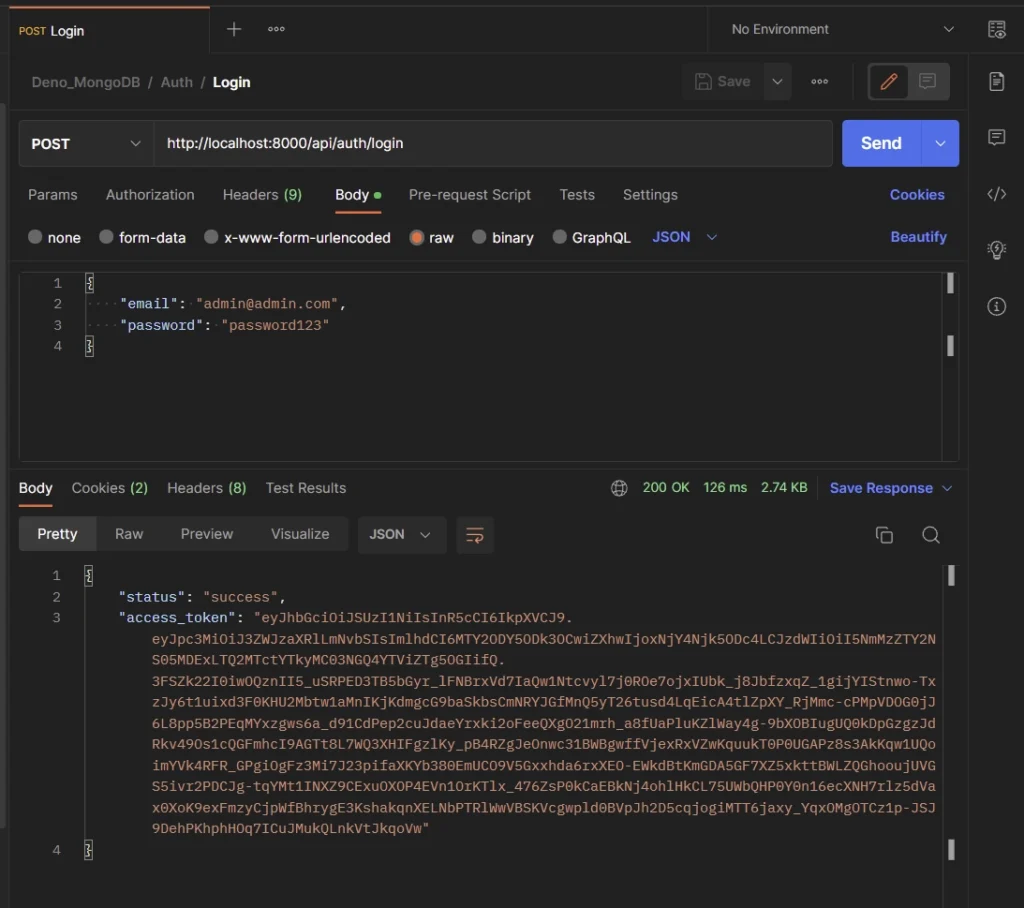
Login User
To sign into the API, add the credentials used in registering the account to the JSON object, and make a POST request to the /api/auth/login endpoint.
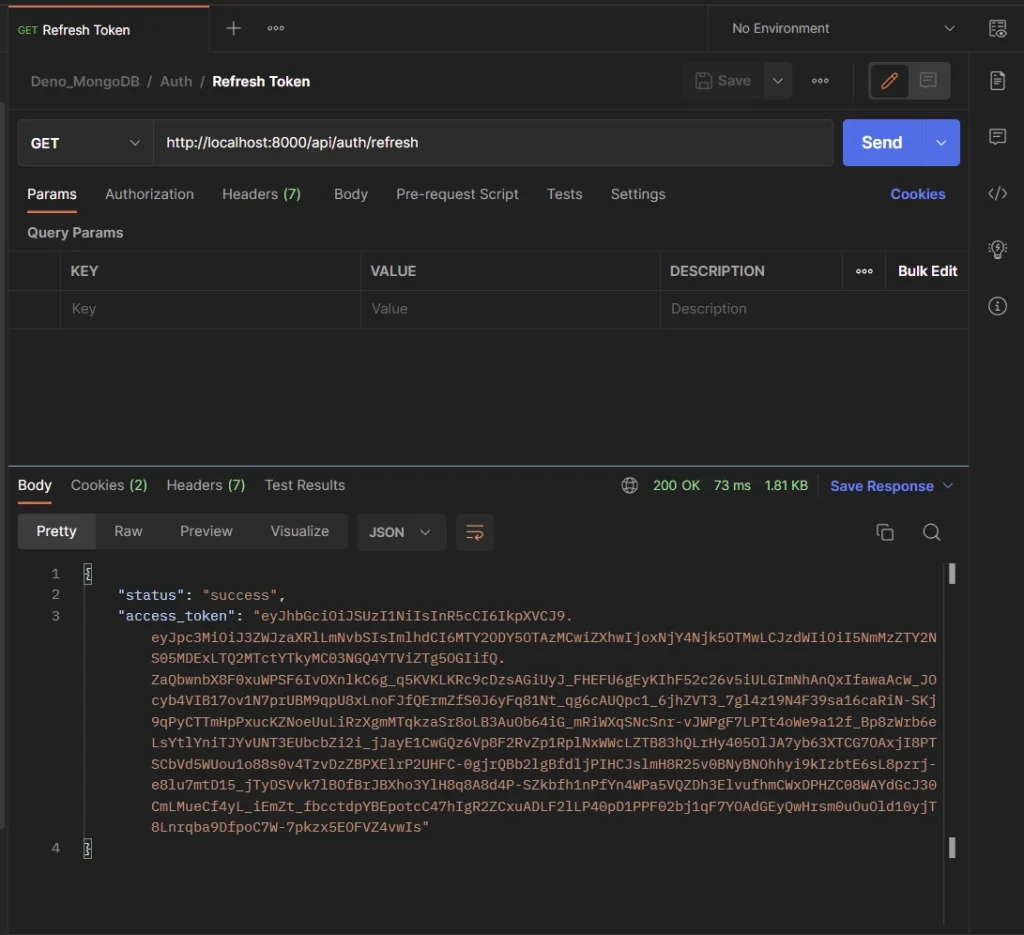
Refresh Access Token
To obtain a new access token, make sure you have a refresh token in the Cookies object, and make a GET request to the /api/auth/refresh endpoint.
Postman will automatically send the refresh token cookie along with the request if it’s available.
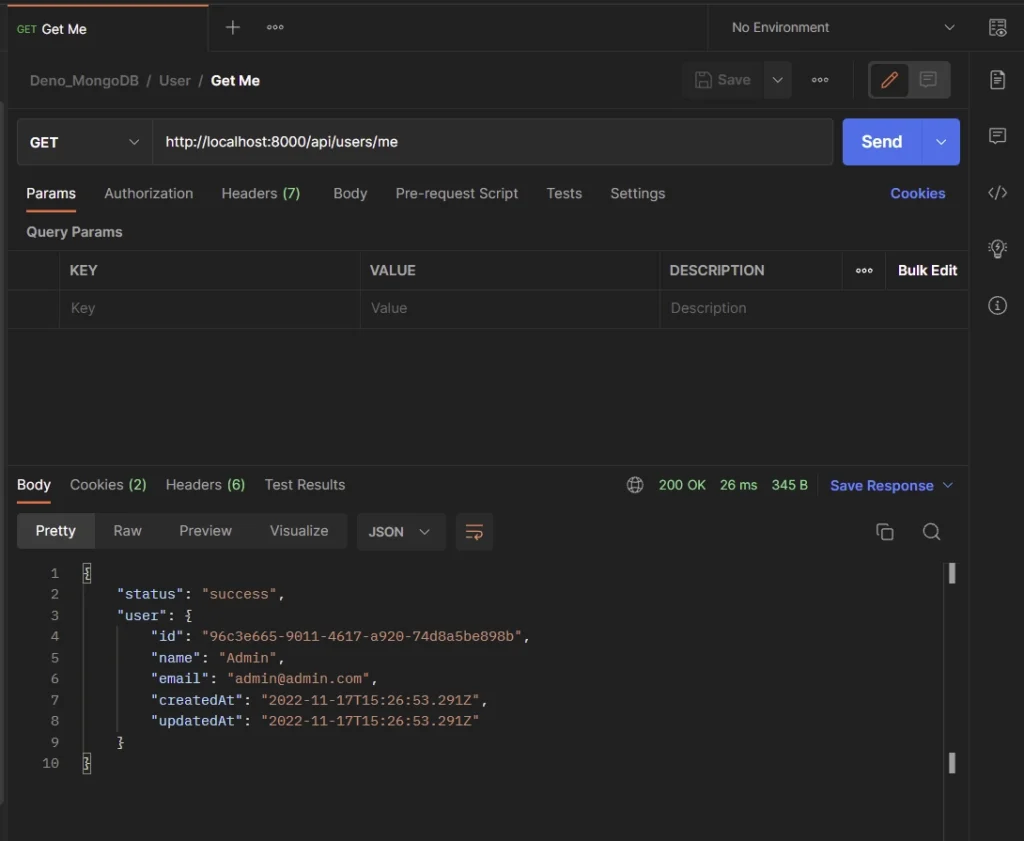
Get Authentication User
To retrieve the authenticated user’s credentials, make sure you have an access token in the Cookies object, and make a GET request to the /api/users/me endpoint.
Postman will automatically send the access token cookie along with the request if it’s available.
Alternatively, you can add the access token to the Authorization header as Bearer before making the request to the API.
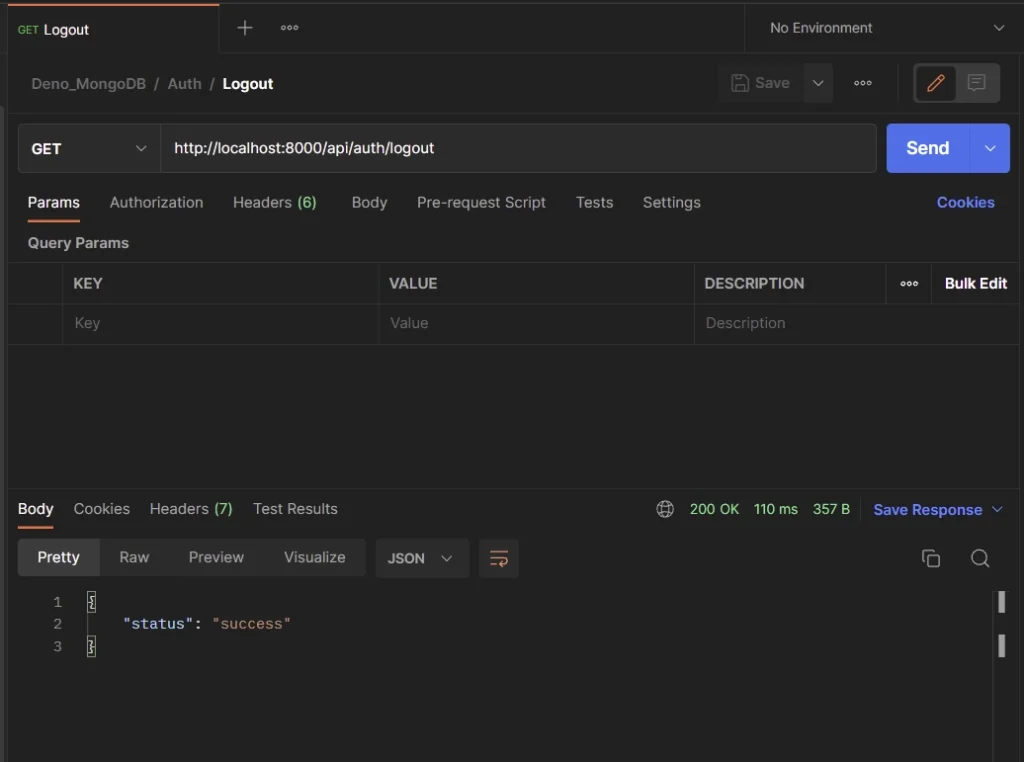
Logout User
To log out of the API, make sure you have an access token in the Cookies object, and make a GET request to the /api/auth/logout endpoint. When the request is successful, the existing cookies will be deleted from Postman.
Conclusion
If you made it this far, am proud of you. In this article, you learned how to implement JSON Web Token authentication using an asymmetric algorithm (private and public keys) in Deno. Don’t hesitate to leave a comment, if you found the above JWT implementation helpful.
You can find the complete source code of the Deno JWT project on GitHub.
Wow, so good
Thank you for your kind words! I’m glad you enjoyed my article.