
Google Remote Procedure Call, also commonly referred to as gRPC is a modern, open-source, high-performance remote procedure call (RPC) framework that is frequently used in microservice architectures to connect small independent services in and across data centers efficiently.
gRPC is a modern open source high performance Remote Procedure Call (RPC) framework that can run in any environment. It can efficiently connect services in and across data centers with pluggable support for load balancing, tracing, health checking and authentication. It is also applicable in last mile of distributed computing to connect devices, mobile applications and browsers to backend services. https://www.grpc.io/
What is an RPC (Remote Procedure Call) framework? RPC is a distributed computing technique that a program can use to execute a piece of code running on the same or a remote machine. The procedure call is commonly referred to as a function call or a subroutine call.
In this guide, you will learn how to build a complete CRUD gRPC API server and client with TypeScript in a Node.js environment that runs on an Expressjs framework and uses a Prisma database ORM. We’ll create five RPC services on the gRPC server that are going to be evoked by the gRPC client to perform the basic CRUD (Create, Read, Update, and Delete) operations.
To do this, we will create three .proto files that will hold the Protobuf definitions to create a new record, update the existing record, and the RPC response.
Next, we’ll create the services.proto file to define the RPC methods or services that will be evoked by the gRPC client.
- Build a Node.js gRPC Server and Client: Register and Login User
- Build Node.js gRPC API Server and Client: Send HTML Emails
- Build a Complete gRPC CRUD API with Node.js and Express
More practice:
- Build Golang gRPC Server and Client: SignUp User & Verify Email
- Build Golang gRPC Server and Client: Access & Refresh Tokens
- Build CRUD gRPC Server API & Client with Golang and MongoDB
Prerequisites
Before you begin this tutorial:
Software
- Have a working Node.js development environment. Visit the official Node.js website to download the latest or the LTS (Long Term Support) version.
- A basic understanding of Prisma, and how to use a PostgreSQL GUI client will be beneficial.
- Have the latest version of Docker installed on your system.
VS Code Extensions
- DotENV – This extension provides syntax highlighting for the configuration files ending with
.envextension. - Proto3 – This extension uses the Protobuf compiler under the hood to provide syntax highlighting, syntax validation, line and block comments, compilation, code snippets, code completion, and code formatting for all files ending with
.protoextension.
You can download and install the right Protocol buffer compiler binary executable for your operating system from the gRPC website. - MySQL – This VS Code database client will enable you to access and mutate the data stored in any supported database including PostgreSQL.
By default, the Protobuf compiler searches for the .proto files in the root directory so we need to manually tell it the location of the proto files.
To do this, press CTRL + , to open the settings page and search for Proto3. Then, click on the Edit in settings.json link and add this option to the Protoc configuration.
{
"protoc": {
  "options": ["--proto_path=proto"]
  }
}
Node.js gRPC Server and Client Overview
Here, we will use an API testing tool to make HTTP requests to the Node.js Express server. The request will then be delegated to the right controller which will in tend call the appropriate gRPC client method.
The gRPC client will then go ahead and evoke the right RPC service on the Node.js gRPC API and return the result to the Express controller. Finally, the Express server will return the result in JSON format to the user or client.
To have access to the same Postman collection used in testing the Node.js gRPC API, click on the Postman Collection link, and copy the JSON document.
Next, click on the import button in your Postman software, choose the “Raw text” option, and paste the JSON document.
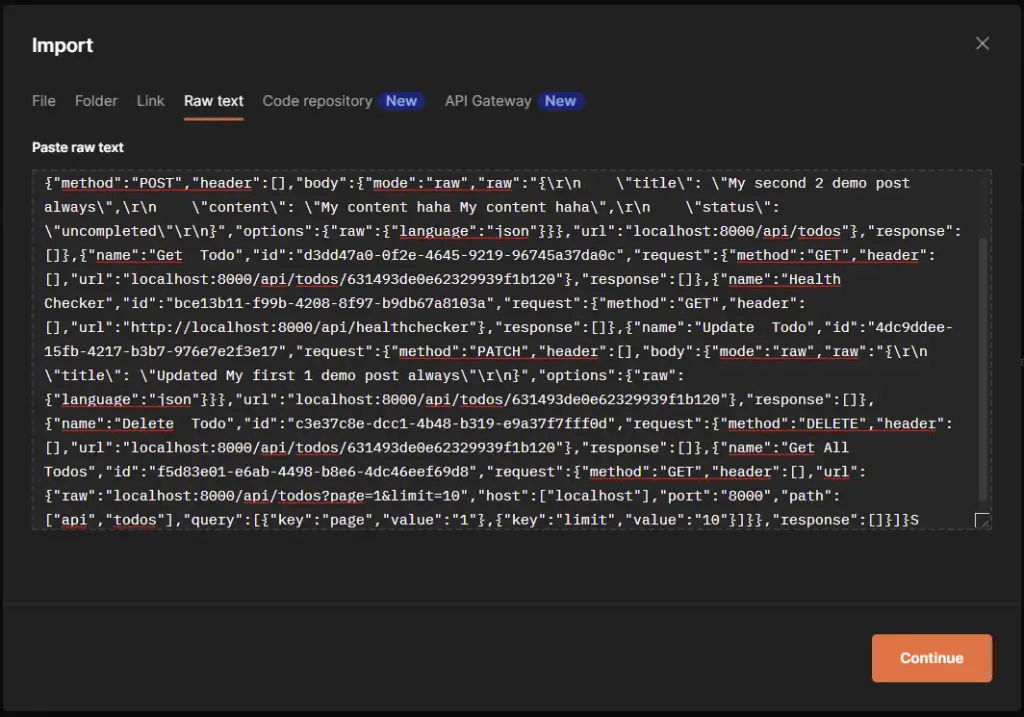
Then, click on the Continue button to move to the next screen before clicking the Import button to add the collection.
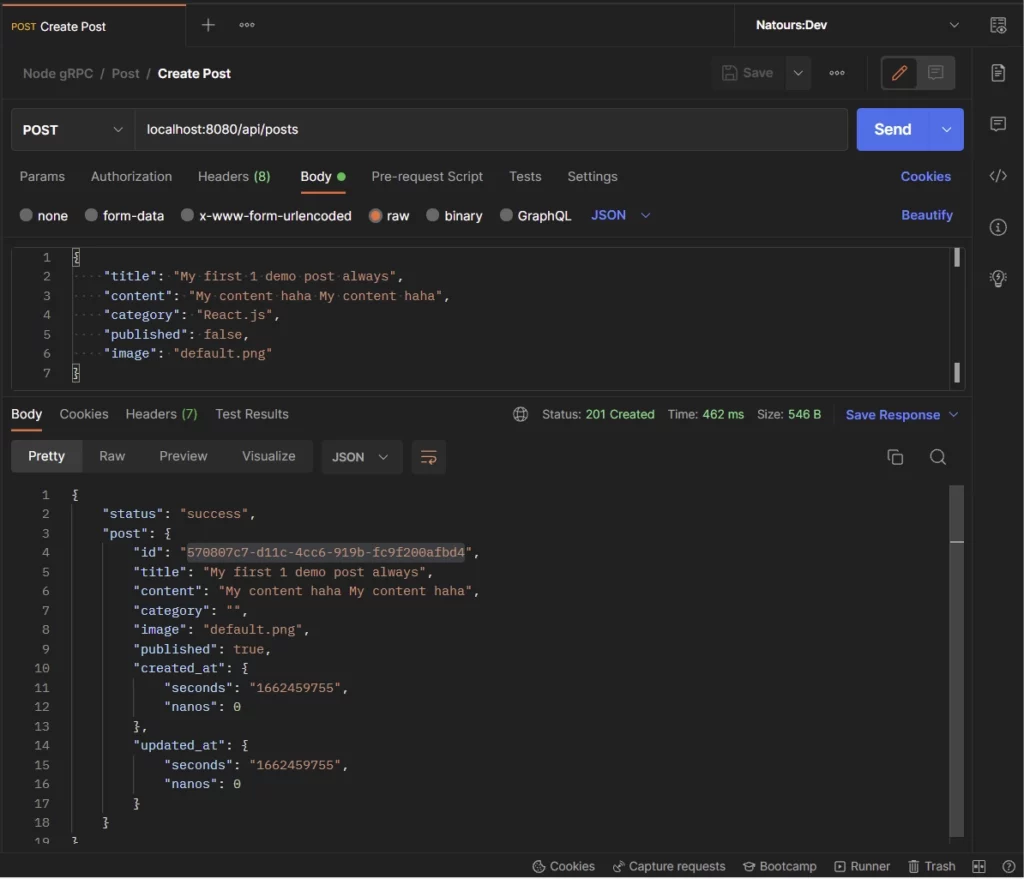
Calling the Create Record RPC Service
To add a new record to the database, the client or user will make a POST request to the localhost:8080/api/posts endpoint on the Node.js express server. The Express server will then route the request to the right controller where the gRPC client will evoke the CreatePost RPC service on the gRPC server to add the new record to the database.
Next, the newly-created record returned to the gRPC client will be sent to the user or the client in JSON format.
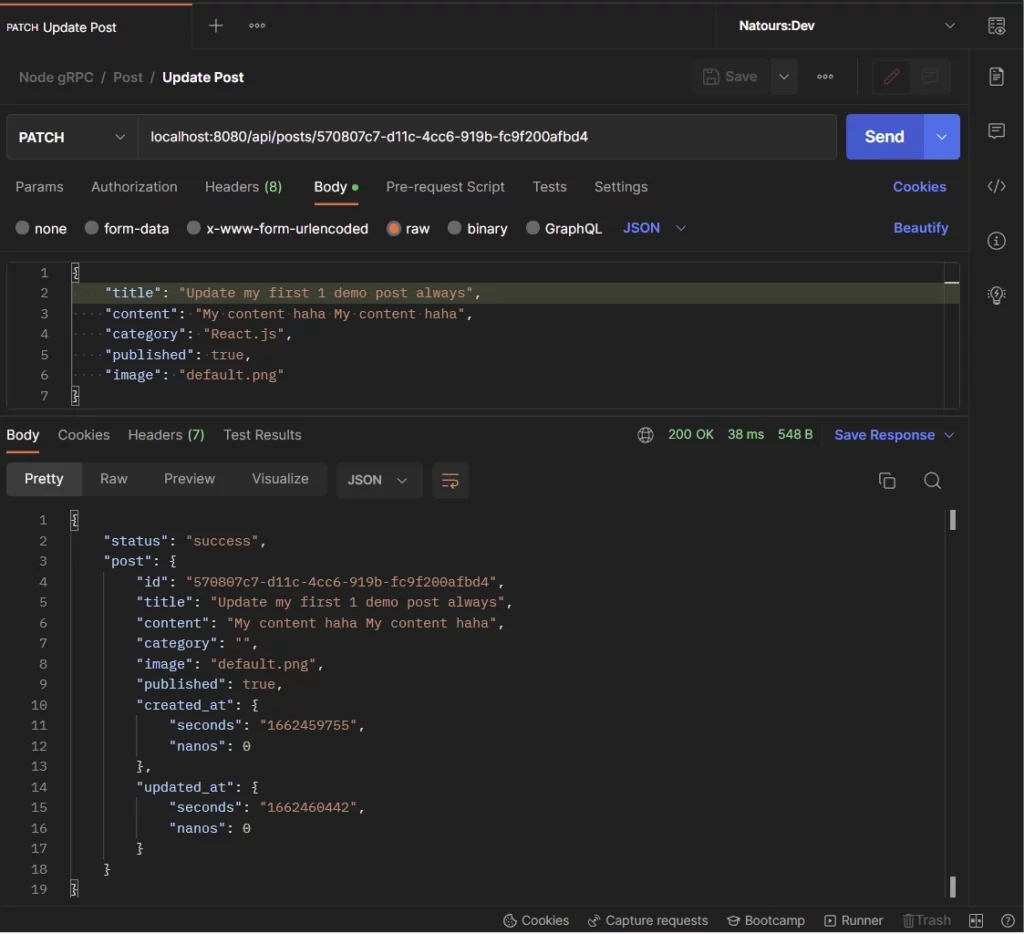
Calling the Update Record RPC Service
To update an existing record in the database, a PATCH request will be made to the localhost:8080/api/posts/:postId endpoint with the payload in the request body. The gRPC client will then evoke the UpdatePost RPC method on the gRPC server to edit the record in the database.
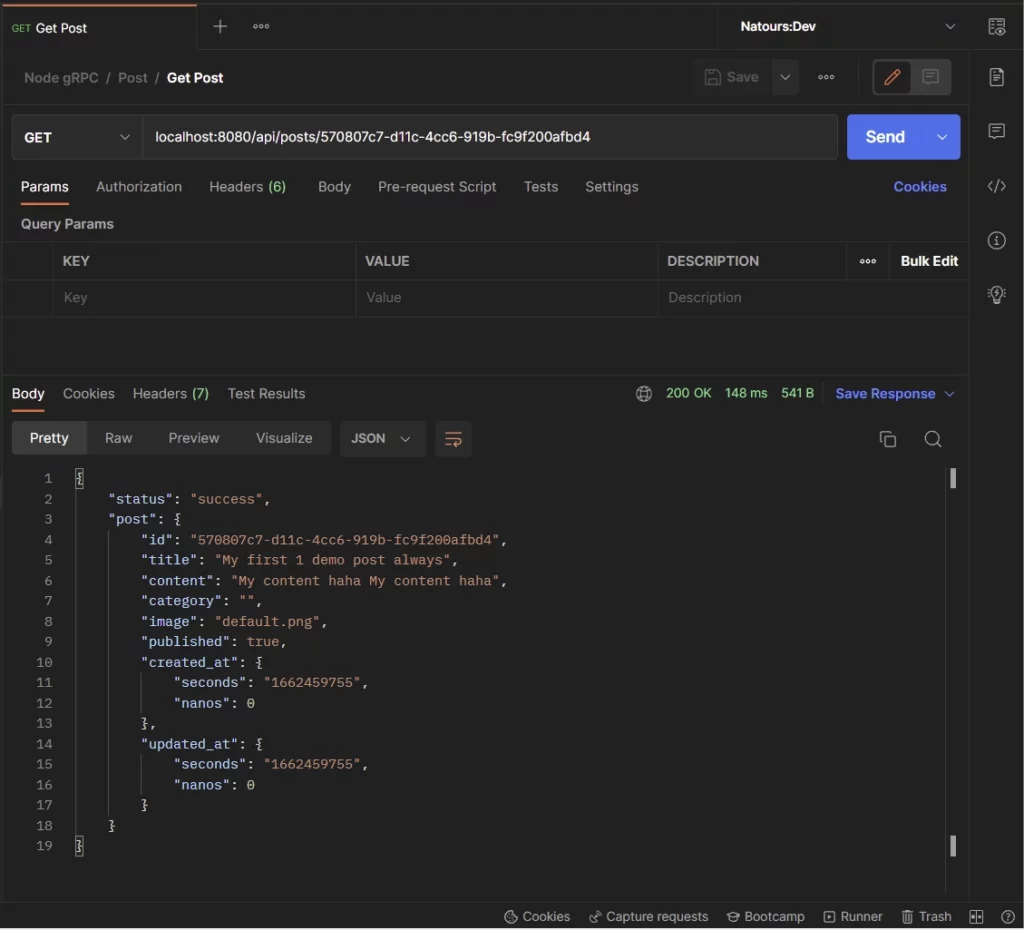
Calling the Get Single Record RPC Service
Similar to the update operation, a GET request will be made to the localhost:8080/api/posts/:postId endpoint with the ID of the record included in the request URL.
The Express server will then route the request to the right handler where the gRPC client will evoke the GetPost RPC method to return the record that matches the query.
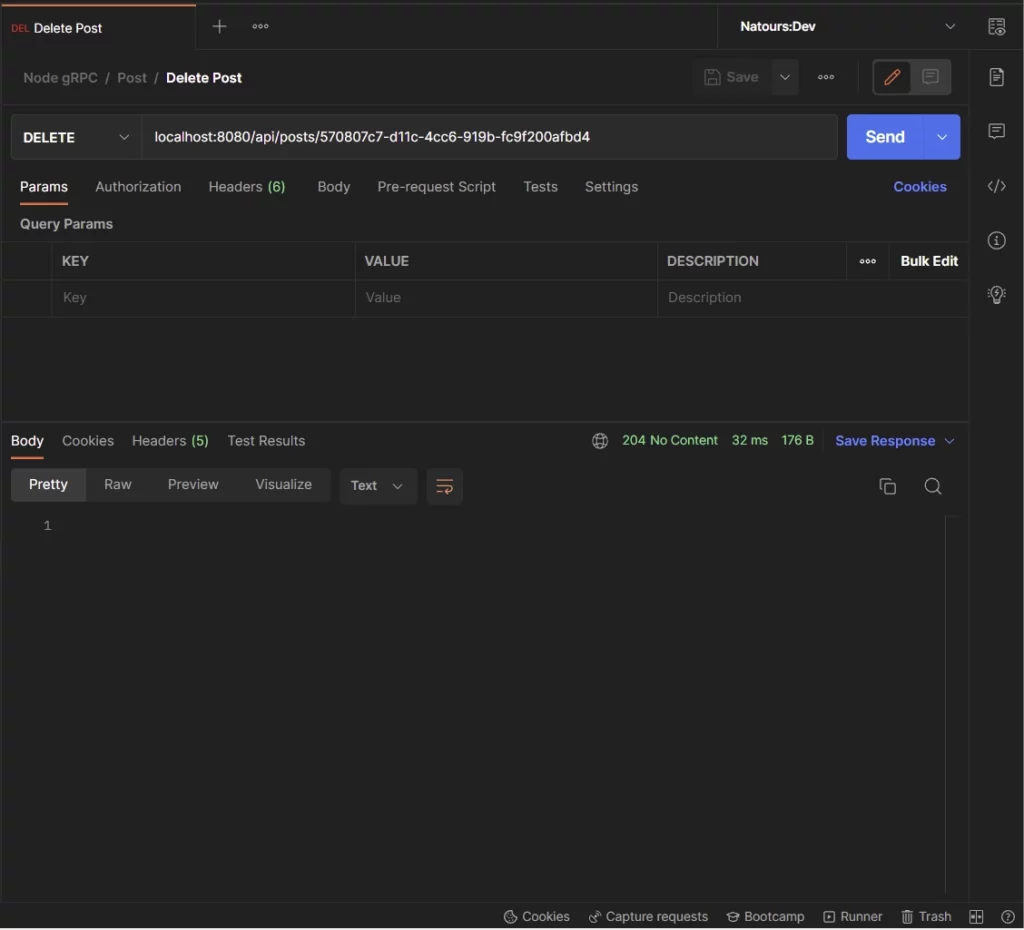
Calling the Delete Record RPC Service
Here, a DELETE request will be made to the localhost:8080/api/posts/:postId endpoint to remove the record that matches the provided ID from the database.
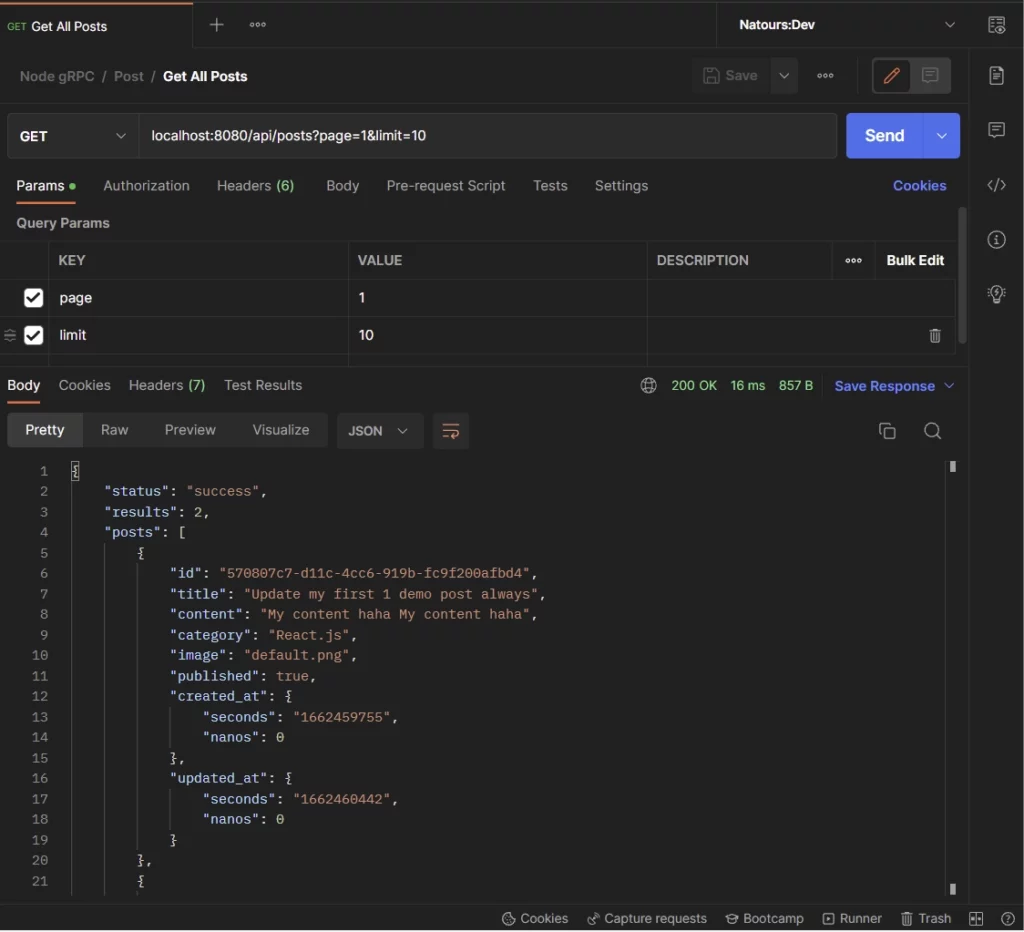
Calling the Get All Records RPC Service
All the above operations fall under Unary RPC. To retrieve a list of records from the database, we’ll use the server-side streaming RPC method instead of Unary RPC.
So a GET request will be made to the localhost:8080/api/posts endpoint where the GetPosts RPC service will be evoked to stream the records to the gRPC client.
Next, we will then listen to the “data” event emitted by the gRPC client and push the returned documents into an array before returning it to the client in JSON format.
Step 1: Setup and Installation
To begin, create a new folder and open it with your preferred IDE or text editor. You can name it grpc-node-prisma .
mkdir grpc-node-prisma && cd grpc-node-prisma && code .Next, initialize the Node.js TypeScript project with the following commands:
yarn init -y && yarn add -D typescript && yarn tsc --init
# or
npx init -y && npx install -D typescript && npx tsc --init
This gRPC API example is based on a PostgreSQL database, however, you can use any database server supported by Prisma.
Now to set up the Postgres database, we will use Docker because it’s easier to set up and maintain. To do that, create a docker-compose.yml file in the root directory and add the following code.
docker-compose.yml
version: '3'
services:
  postgres:
    image: postgres
    container_name: postgres
    ports:
      - '6500:5432'
    restart: always
    env_file:
      - ./.env
    volumes:
      - postgres-db:/var/lib/postgresql/data
volumes:
  postgres-db:
The above configuration will pull the latest Postgres image from Docker Hub, build the image, run the Postgres server in a Docker container, and map port 6500 to the default Postgres port.
Since we used placeholders for the Postgres credentials in the docker-compose.yml file, create a .env file in the root directory and add the following environment variables.
.env
DATABASE_PORT=6500
POSTGRES_PASSWORD=password123
POSTGRES_USER=postgres
POSTGRES_DB=grpc-node-prisma
POSTGRES_HOST=postgres
POSTGRES_HOSTNAME=127.0.0.1
Now run this command to start the Postgres Docker container:
docker-compose up -d
Stop the Docker container with this command:
docker-compose down
Step 2: Create the Protobuf Messages
Before we can generate the TypeScript files with the Protobuf compiler, we first need to create the Protobuf messages and RPC services using the protocol buffer language.
One recommendation is to put all the Protobuf files in one folder. This will enable us to generate the gRPC server and client interfaces easily.
To do that, create a proto folder in the root directory to hold all the Protocol buffer files.
Next, create a proto/post.proto file and add the following Protobuf messages:
proto/post.proto
syntax = "proto3";

import "google/protobuf/timestamp.proto";

message Post {
  string id = 1;
  string title = 2;
  string content = 3;
  string category = 4;
  string image = 5;
  bool published = 6;
  google.protobuf.Timestamp created_at = 7;
  google.protobuf.Timestamp updated_at = 8;
}

message PostResponse { Post post = 1; }
Quite a lot happening in the above, let’s break it down. First, we specified the version of the Protobuf language on the first line of the file – in this case, we used proto3.
Since the Timestamp type is not included in the built-in Protobuf types, we imported it from the Google standard library. This library contains popular data types not included in the Porotobuf built-in types.
To define a Protobuf field, we specified the data type followed by the field name and a unique identifier. The gRPC framework will use the unique identifier under the hood to identify the fields in the message binary format.
The unique identifier or number can range from 1 to 2047. The number between 1 and 15 will take one byte to encode, whereas the numbers ranging from 16 to 2047 will take two bytes to encode.
So it’s recommended to use field numbers between 1 to 15 if possible. This will reduce the size of the Protobuf message.
Visit the Protocol Buffer Encoding website to learn more.
With that out of the way, let’s create the Protobuf message to contain the fields required to add a new record to the database.
proto/rpc_create_post.proto
syntax = "proto3";

package post;

message CreatePostRequest {
  string title = 1;
  string content = 2;
  string category = 3;
  string image = 4;
  bool published = 5;
}
In the above, we used the package keyword provided by proto3 to define a package name for the Protobuf message.
proto/rpc_update_post.proto
syntax = "proto3";

package post;

message UpdatePostRequest {
  string id = 1;
  optional string title = 2;
  optional string content = 3;
  optional string category = 4;
  optional string image = 5;
  optional bool published = 6;
}
The above Protobuf message is similar to the CreatePostRequest message except that we used the optional keyword on the optional fields.
Step 3: Create the gRPC Services
Now that we have the Protobuf messages defined, let’s create a proto/services.proto file to contain the RPC definitions.
Since we have some of the Protobuf messages defined in other files, we will use the import keyword to include those files.
Here, we will create four Unary gRPC services and a Server streaming RPC service. The Server streaming gRPC method will allow us to stream the list of records retrieved from the database to the gRPC client.
Alternatively, we can use the repeated keyword on the field specified in the Protobuf response message to indicate that it’s an array of records. This approach will work but it’s considered bad practice.
proto/services.proto
syntax = "proto3";

import "post.proto";
import "rpc_create_post.proto";
import "rpc_update_post.proto";

// Post Service
service PostService {
  rpc CreatePost(CreatePostRequest) returns (PostResponse) {}
  rpc GetPost(PostRequest) returns (PostResponse) {}
  rpc GetPosts(GetPostsRequest) returns (stream Post) {}
  rpc UpdatePost(UpdatePostRequest) returns (PostResponse) {}
  rpc DeletePost(PostRequest) returns (DeletePostResponse) {}
}

message GetPostsRequest {
  int64 page = 1;
  int64 limit = 2;
}

message PostRequest { string id = 1; }

message DeletePostResponse { bool success = 1; }
CreatePost– This Unary RPC method will be evoked to add a new record to the database.GetPost– This Unary RPC service will be evoked to return a single record from the database.GetPosts– This Server streaming RPC service will be evoked to return a stream of the found records.UpdatePost– This Unary RPC service will be evoked to update a record in the database.DeletePost– This Unary RPC method will be evoked to remove a record from the database.
Before we can use gRPC in Node.js, we need to install these two dependencies to help us load the Protobuf files and set up the gRPC server and client.
yarn add @grpc/grpc-js @grpc/proto-loader
@grpc/grpc-js– This library contains the gRPC implementation for Nodejs.@grpc/proto-loader– This library contains helper functions for loading .proto files.
Next, let’s create a bash script to help us generate the TypeScript files from the defined Protobuf files.
proto-gen.sh
#!/bin/bash

rm -rf pb/
yarn proto-loader-gen-types --longs=String --enums=String --defaults --keepCase --oneofs --grpcLib=@grpc/grpc-js --outDir=pb/ proto/*.proto
If by any chance the TypeScript files are not being generated then run the individual commands directly in the terminal.
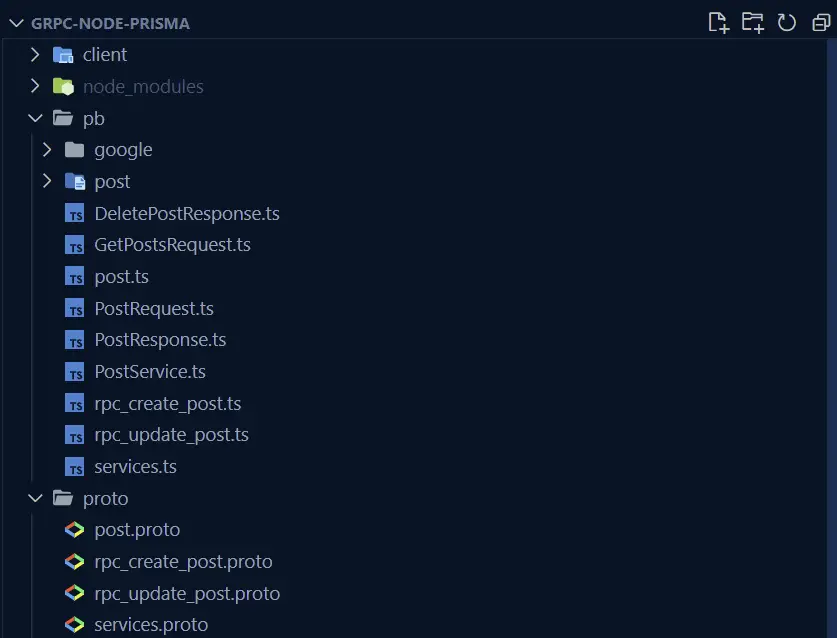
When you run the above script, the @grpc/proto-loader package will generate the TypeScript files and output the results into a pb/ folder.
Now run the bash script to generate the TypeScript files with this command:
./proto-gen.sh
Step 4: Model the API Data with Prisma
Prisma is basically an ORM for TypeScript and Node.js. The code in this project can be adapted to work with any database server supported by Prisma.
First things first, let’s install the Prisma CLI and the Client:
yarn add -D prisma && yarn add @prisma/client
# or
npm install -D prisma && npm install @prisma/client
Now let’s run the Prisma init command with the --datasource-provider flag to generate the schema file.
mkdir server && cd server && yarn prisma init --datasource-provider postgresql
# or
mkdir server && cd server && npx prisma init --datasource-provider postgresql
The above command will generate prisma/schema.prisma , .gitignore , and .env files in the server folder.
Now delete the .gitignore , and .env files from the server folder.
Next, add the PostgreSQL connection URL to the .env file in the root directory. The DATABASE_URL will be used by Prisma behind the scene to create connection pools between the Node.js app and the Postgres server.
DATABASE_PORT=6500
POSTGRES_PASSWORD=password123
POSTGRES_USER=postgres
POSTGRES_DB=grpc-node-prisma
POSTGRES_HOST=postgres
POSTGRES_HOSTNAME=127.0.0.1

DATABASE_URL="postgresql://postgres:password123@localhost:6500/grpc-node-prisma?schema=public"
Now let’s define the API data structure with Prisma. Open the server/prisma/schema.prisma file and add the following schema definition.
generator client {
provider = "prisma-client-js"
}
datasource db {
provider = "postgresql"
url = env("DATABASE_URL")
}
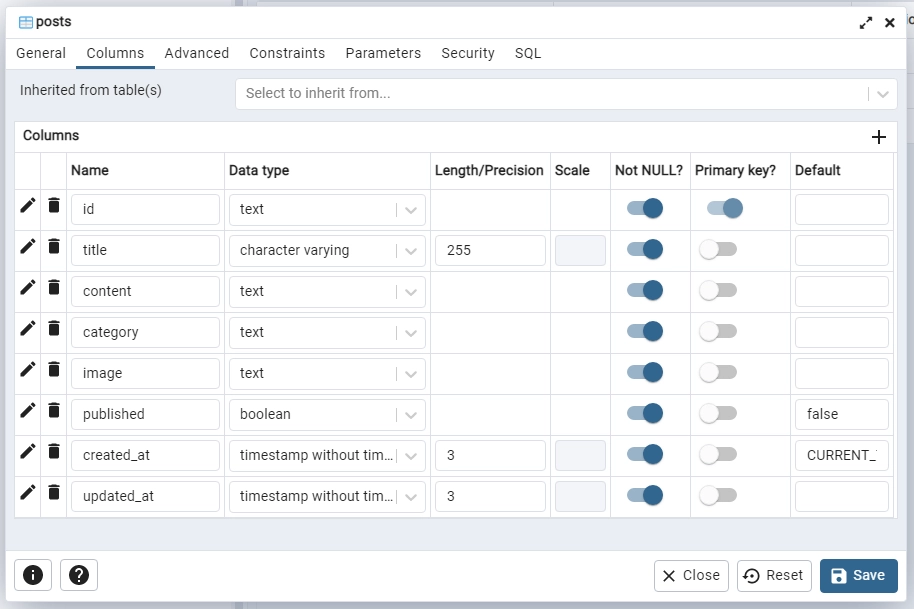
model Post {
id String @id @default(uuid())
title String @unique @db.VarChar(255)
content String
category String
image String
published Boolean @default(false)
created_at DateTime @default(now())
updated_at DateTime @updatedAt
@@map(name: "posts")
}
In the above, we defined a Post model which will be transformed by the Prisma engine into an SQL table.
Add the following scripts to the package.json file:
{
"scripts": {
    "db:migrate": "npx prisma migrate dev --name post-entity --create-only --schema ./server/prisma/schema.prisma",
    "db:generate": " npx prisma generate --schema ./server/prisma/schema.prisma",
    "db:push": "npx prisma db push --schema ./server/prisma/schema.prisma"
  },
}
db:migrate– This command will create the database migration file without applying it.db:generate– This command will generate the Prisma client.db:push– This command will push the migration file to the database and keep the Prisma schema in sync with the database schema.
With that said, run this command to create the migration file and push the changes to the database.
Make sure the PostgreSQL Docker container is running
yarn db:migrate && yarn db:generate && yarn db:push
# or
npm run db:migrate && npm run db:generate && npm run db:push
Open any Postgres client and sign in with the credentials provided in the .env file to see the SQL table added by the Prisma CLI.
Next, let’s create a utility function to create a connection pool between the Node.js server and the PostgreSQL server. This function will also export the Prisma Client to be used in the RPC controllers.
Create a server/utils/prisma.ts file and add the following code:
server/utils/prisma.ts
import { PrismaClient } from '@prisma/client';

declare global {
  var prisma: PrismaClient | undefined;
}

export const prisma = global.prisma || new PrismaClient();

if (process.env.NODE_ENV !== 'production') {
  global.prisma = prisma;
}

async function connectDB() {
  try {
    await prisma.$connect();
    console.log('? Database connected successfully');
  } catch (error) {
    console.log(error);
    process.exit(1);
  } finally {
    await prisma.$disconnect();
  }
}

export default connectDB;
In every API architecture, it’s always recommended to create services to access and mutate the database instead of doing that directly in the controllers.
To do this, create a server/services/post.service.ts file and add the following service definitions:
server/services/post.service.ts
import { Prisma, Post } from '@prisma/client';
import { prisma } from '../utils/prisma';

export const createPost = async (input: Prisma.PostCreateInput) => {
  return (await prisma.post.create({
    data: input,
  })) as Post;
};

export const findPost = async (
  where: Partial<Prisma.PostWhereInput>,
  select?: Prisma.PostSelect
) => {
  return (await prisma.post.findFirst({
    where,
    select,
  })) as Post;
};

export const findUniquePost = async (
  where: Prisma.PostWhereUniqueInput,
  select?: Prisma.PostSelect
) => {
  return (await prisma.post.findUnique({
    where,
    select,
  })) as Post;
};

export const findAllPosts = async (
  {page, limit, select}:
 { page: number,
  limit: number,
  select?: Prisma.PostSelect},
) => {
  const take = limit || 10;
  const skip = (page - 1 ) * limit
  return (await prisma.post.findMany({
    select,
    skip,
    take,
  })) as Post[];
};


export const updatePost = async (
  where: Partial<Prisma.PostWhereUniqueInput>,
  data: Prisma.PostUpdateInput,
  select?: Prisma.PostSelect
) => {
  return (await prisma.post.update({ where, data, select })) as Post;
};

export const deletePost = async (where: Prisma.PostWhereUniqueInput)=> {
  return await prisma.post.delete({where})
}
Step 5: Create the RPC Handlers
In this section, we will create five RPC handlers that will be evoked to:
createPostHandler– This RPC handler will be evoked to insert a new record.UpdatePostHandler– This RPC handler will be evoked to update an existing record.findPostHandler– This RPC handler will be evoked to retrieve a single record.findAllPostsHandler– This RPC handler will be evoked to retrieve a paginated list of records.deletePostHandler– This RPC handler will be evoked to delete a record.
But before we start creating the RPC handlers, create a server/controllers/post.controller.ts file and add the following imports.
server/controllers/post.controller.ts
import * as grpc from '@grpc/grpc-js';
import { DeletePostResponse } from '../../pb/DeletePostResponse';
import { GetPostsRequest__Output } from '../../pb/GetPostsRequest';
import { Post } from '../../pb/Post';
import { CreatePostRequest__Output } from '../../pb/post/CreatePostRequest';
import { UpdatePostRequest__Output } from '../../pb/post/UpdatePostRequest';
import { PostRequest__Output } from '../../pb/PostRequest';
import { PostResponse } from '../../pb/PostResponse';
import { createPost, deletePost, findAllPosts, findPost, findUniquePost, updatePost } from '../services/post.service';
Create a New Record RPC Handler
This RPC handler will call the createPost service we defined above to add the new entity to the database. Since we added a unique constraint on the title field, a duplicate error will be returned by Prisma if a record with that title already exists.
server/controllers/post.controller.ts
// [...] imports

// [...] Create a New Record RPC Handler
export const createPostHandler = async (
  req: grpc.ServerUnaryCall<CreatePostRequest__Output, PostResponse>,
  res: grpc.sendUnaryData<PostResponse>
) => {
  try {
   const post = await createPost({
    title: req.request.title,
    content: req.request.content,
    image: req.request.image,
    category: req.request.category,
    published: true,
   })

   res(null, {
    post: {
      id: post.id,
      title: post.title,
      content: post.content,
      image: post.image,
      published: post.published,
      created_at: {
          seconds: post.created_at.getTime() / 1000,
        },
        updated_at: {
          seconds: post.updated_at.getTime() / 1000,
        },
    }
   })
  } catch (err: any) {
    if (err.code === 'P2002') {
      res({
        code: grpc.status.ALREADY_EXISTS,
        message: 'Post with that title already exists',
      });
    }
    res({
      code: grpc.status.INTERNAL,
      message: err.message,
    });
  }
};
Update Record RPC Handler
Here, we will extract the ID parameter from the request and query the database to check if a record with that ID exists.
Next, we will call the updatePost service to update the record if it exists in the database.
server/controllers/post.controller.ts
// [...] imports

// [...] Create a New Record RPC Handler

// [...] Update Record RPC Handler
export const UpdatePostHandler = async (req: grpc.ServerUnaryCall<UpdatePostRequest__Output, PostResponse>, res: grpc.sendUnaryData<PostResponse>)=> {
try {
 const postExists =  await findPost({id: req.request.id})

  if (!postExists) {
      res({
        code: grpc.status.NOT_FOUND,
        message: 'No post with that ID exists',
      });
      return
    }
  const updatedPost = await updatePost({id: req.request.id},{
    title: req.request.title,
    content: req.request.content,
    category: req.request.category,
    image: req.request.image,
    published: req.request.published,
  })

  res(null, {
    post: {
      id: updatedPost.id,
      title: updatedPost.title,
      content: updatedPost.content,
      image: updatedPost.image,
      published: updatedPost.published,
      created_at: {
          seconds: updatedPost.created_at.getTime() / 1000,
        },
        updated_at: {
          seconds: updatedPost.updated_at.getTime() / 1000,
        },
    }
  })
} catch (err: any) {
  res({
      code: grpc.status.INTERNAL,
      message: err.message,
    });
}
}
Retrieve a Single Record RPC Handler
Similar to the previous handler, we will retrieve the ID of the record from the request and query the database to check if a record with that ID exists in the database.
server/controllers/post.controller.ts
// [...] imports

// [...] Create a New Record RPC Handler

// [...] Update Record RPC Handler

// [...] Retrieve a Single Record RPC Handler
export const findPostHandler = async (req: grpc.ServerUnaryCall<PostRequest__Output, PostResponse>, res: grpc.sendUnaryData<PostResponse>)=> {
try {
  const post = await findUniquePost({id: req.request.id})

  if (!post) {
      res({
        code: grpc.status.NOT_FOUND,
        message: 'No post with that ID exists',
      });
      return
    }

  res(null, {
    post: {
      id: post.id,
      title: post.title,
      content: post.content,
      image: post.image,
      published: post.published,
      created_at: {
          seconds: post.created_at.getTime() / 1000,
        },
        updated_at: {
          seconds: post.updated_at.getTime() / 1000,
        },
    }
  })
} catch (err: any) {
  res({
      code: grpc.status.INTERNAL,
      message: err.message,
    });
}
}
Delete a Record RPC Handler
This handler is the simplest of all. In this RPC handler, we will extract the ID from the request and query the database to remove the record with that ID from the database.
server/controllers/post.controller.ts
// [...] imports

// [...] Create a New Record RPC Handler

// [...] Update Record RPC Handler

// [...] Retrieve a Single Record RPC Handler

// [...] Delete a Record RPC Handler
export const deletePostHandler = async (req: grpc.ServerUnaryCall<PostRequest__Output, DeletePostResponse>, res: grpc.sendUnaryData<DeletePostResponse>)=> {
try {
  const postExists =  await findPost({id: req.request.id})

  if (!postExists) {
      res({
        code: grpc.status.NOT_FOUND,
        message: 'No post with that ID exists',
      });
      return
    }

  const post = await deletePost({id: req.request.id})

  if (!post) {
      res({
        code: grpc.status.NOT_FOUND,
        message: 'No post with that ID exists',
      });
      return
    }

  res(null, {
    success: true
  })
} catch (err: any) {
  res({
      code: grpc.status.INTERNAL,
      message: err.message,
    });
}
}
Retrieve all Records RPC Handler
This RPC handler is responsible for streaming the list of records to the gRPC client. First, we will call the findAllPosts service to return a paginated list of the records.
Next, we will loop through the results and evoke the call.write() method to write the data to a stream.
After all the found records have been written to the stream, we will evoke the call.end() method to close the stream.
server/controllers/post.controller.ts
// [...] imports

// [...] Create a New Record RPC Handler

// [...] Update Record RPC Handler

// [...] Retrieve a Single Record RPC Handler

// [...] Delete a Record RPC Handler

// [...] Retrieve all Records RPC Handler
export const findAllPostsHandler = async (call: grpc.ServerWritableStream<GetPostsRequest__Output, Post>)=>{
  try {
    const {page, limit} = call.request
    const posts = await findAllPosts({page: parseInt(page), limit: parseInt(limit)})

    for(let i= 0; i < posts.length; i++){
      const post = posts[i]
      call.write({
        id: post.id,
        title: post.title,
        content: post.content,
        category: post.category,
        image: post.image,
        published: post.published,
        created_at: {
          seconds: post.created_at.getTime() / 1000,
        },
        updated_at: {
          seconds: post.updated_at.getTime() / 1000,
        },

      })
    }
    call.end()

  } catch (error: any) {
    console.log(error)
  }
}
Step 6: Create the Node.js gRPC Server
Now that we have all the RPC handlers defined, we are now ready to create the gRPC server to listen to requests.
But before that, create a server/config/default.ts file and add the following code to load the environment variables from the .env file.
yarn add dotenv
server/config/default.ts
import path from 'path';
require('dotenv').config({ path: path.join(__dirname, '../../.env') });

const customConfig: {
  port: number;
  dbUri: string;
} = {
  port: 8000,
  dbUri: process.env.DATABASE_URL as string,
};

export default customConfig;
Next, create a server/app.ts file and add the following code to load the Protobuf file and set up the Node.js gRPC server.
server/app.ts
import path from 'path';
import * as grpc from '@grpc/grpc-js';
import * as protoLoader from '@grpc/proto-loader';
import { ProtoGrpcType } from '../pb/services';
import {PostServiceHandlers} from "../pb/PostService"
import customConfig from './config/default';
import connectDB from './utils/prisma';
import { createPostHandler, deletePostHandler, findAllPostsHandler, findPostHandler, UpdatePostHandler } from './controllers/post.controller';

const options: protoLoader.Options = {
  keepCase: true,
  longs: String,
  enums: String,
  defaults: true,
  oneofs: true,
};

const PORT = customConfig.port;
const PROTO_FILE = '../proto/services.proto';
const packageDef = protoLoader.loadSync(
  path.resolve(__dirname, PROTO_FILE),
  options
);

const proto = grpc.loadPackageDefinition(
  packageDef
) as unknown as ProtoGrpcType;

const server = new grpc.Server();

// Post Services
server.addService(proto.PostService.service, {
  CreatePost: (req, res)=> createPostHandler(req,res),
  UpdatePost: (req,res)=> UpdatePostHandler(req,res),
  DeletePost: (req,res)=> deletePostHandler(req,res),
  GetPost: (req, res)=> findPostHandler(req,res),
  GetPosts: (call)=> findAllPostsHandler(call)

} as PostServiceHandlers)
server.bindAsync(
  `0.0.0.0:${PORT}`,
  grpc.ServerCredentials.createInsecure(),
  (err, port) => {
    if (err) {
      console.error(err);
      return;
    }
    server.start();
    connectDB();
    console.log(`? Server listening on ${port}`);
  }
);
Quite a lot going on in the above, let’s break it down. First, we used the @grpc/proto-loader package to load the Protobuf file.
Next, we provided the returned package definition object to the loadPackageDefinition function provided by the @grpc/grpc-js library.
Next, we called the grpc.Server() method to initialize a new gRPC server after the gRPC object has been returned.
On the server, we called the addService() method to list all the RPC services and call their appropriate handlers.
Finally, we called the bindAsync() method to bind the server connection to a specified IP and port. Since gRPC works over HTTP/2, we had to create an insecure connection for it to work on our local host.
We are done with the Node.js gRPC server. Install this dependency to help us start and hot-reload the gRPC server.
yarn add -D ts-node-dev
# or
npm install -D ts-node-dev
Next, add the following scripts to the package.json file:
package.json
{
"scripts": {
    "start:server": "ts-node-dev --respawn --transpile-only server/app.ts",
    "start:client": "ts-node-dev --respawn --transpile-only client/app.ts",
    "db:migrate": "npx prisma migrate dev --name post-entity --create-only --schema ./server/prisma/schema.prisma",
    "db:generate": " npx prisma generate --schema ./server/prisma/schema.prisma",
    "db:push": "npx prisma db push --schema ./server/prisma/schema.prisma"
  }
}
Open the integrated terminal in your IDE and run yarn start:server to start the gRPC server on port 8000.
Now that we have the server up and running, we need to create the gRPC client that understands the Protobuf interface the server serves.
Step 7: Create the gRPC Client with Node.js
Now let’s build the application client, start by installing the following dependencies:
yarn add zod express && yarn add -D morgan @types/express @types/morgan
zod– TypeScript-first schema validation library.express– a Node.js web framework.morgan– This library will log the HTTP requests to the console.
Create the Validation Schema with Zod
Next, create the following Zod schemas that will be provided to the Express web framework to validate the incoming request body. This will ensure that the required fields are provided in the request payload.
client/schema/post.schema.ts
import { z } from 'zod';

export const createPostSchema = z.object({
  body: z.object({
    title: z.string({
      required_error: 'Title is required',
    }),
    content: z.string({
      required_error: 'Content is required',
    }),
    category: z.string({
      required_error: 'Category is required',
    }),
    published: z.boolean({
      required_error: 'Published is required',
    }),
    image: z.string({
      required_error: 'Image is required',
    }),
  }),
});

const params = {
  params: z.object({
    postId: z.string(),
  }),
};

export const getPostSchema = z.object({
  ...params,
});

export const updatePostSchema = z.object({
  ...params,
  body: z
    .object({
      title: z.string(),
      content: z.string(),
      category: z.string(),
      published: z.boolean(),
      image: z.string(),
    })
    .partial(),
});

export const deletePostSchema = z.object({
  ...params,
});

export type CreatePostInput = z.TypeOf<typeof createPostSchema>['body'];
export type GetPostInput = z.TypeOf<typeof getPostSchema>['params'];
export type UpdatePostInput = z.TypeOf<typeof updatePostSchema>;
export type DeletePostInput = z.TypeOf<typeof deletePostSchema>['params'];
Create a Middleware to Validate the Requests
Now create a client/middleware/validate.ts file and add the following Zod middleware that will accept the defined schema as an argument and validate the request before returning the appropriate validation error to the client.
client/middleware/validate.ts
import { z } from 'zod';
import {Request, Response, NextFunction} from "express"

const validate =
  (schema: z.AnyZodObject) =>
  async (req: Request,res: Response, next: NextFunction): Promise<any> => {
    try {
      schema.parse({
        params:req.params,
        query: req.query,
        body: req.body,
      });

      next();
    } catch (err: any) {
      if (err instanceof z.ZodError) {
        return res.status(400).json({
          status: "fail",
          message: err.errors
        })

      }
      return res.status(500).json({
          status: "error",
          message: err.message
        })
    }
  };
export default validate;
Set up and Export the gRPC Client
We are now ready to create the gRPC client that will handle the communication with the Node.js gRPC API.
Create a client/client.ts file and add the code snippets below:
client/client.ts
import path from 'path';
import * as grpc from '@grpc/grpc-js';
import * as protoLoader from '@grpc/proto-loader';
import { ProtoGrpcType } from '../pb/services';

const options: protoLoader.Options = {
  keepCase: true,
  longs: String,
  enums: String,
  defaults: true,
  oneofs: true,
};

const PROTO_FILE = '../proto/services.proto';
const packageDef = protoLoader.loadSync(
  path.resolve(__dirname, PROTO_FILE),
  options
);

export const proto = grpc.loadPackageDefinition(
  packageDef
) as unknown as ProtoGrpcType;
The above code snippets are similar to the server file server/app.ts because the same gRPC objects handle the client and server instances.
All we did is export the gRPC proto object to be used in other files.
Set up the Express Server
Now that we have the gRPC proto object, let’s create a new service over the same IP and port the server is running on.
To use this service contract, we need to create the Express server and add all the CRUD route handlers.
client/app.ts
import * as grpc from '@grpc/grpc-js';
import customConfig from '../server/config/default';
import { proto } from "./client";
import express, { Request, Response } from "express"
import morgan from 'morgan';
import validate from './middleware/validate';
import { CreatePostInput, createPostSchema, DeletePostInput, GetPostInput, UpdatePostInput, updatePostSchema } from './schema/post.schema';
import { Post } from '@prisma/client';

const client = new proto.PostService(
  `0.0.0.0:${customConfig.port}`,
  grpc.credentials.createInsecure()
);
const deadline = new Date();
deadline.setSeconds(deadline.getSeconds() + 1);
client.waitForReady(deadline, (err) => {
  if (err) {
    console.error(err);
    return;
  }
  onClientReady();
});

function onClientReady() {
  console.log("? gRPC Client is ready")
}

const app = express()
app.use(express.json())
app.use(morgan('dev'))
app.post("/api/posts", validate(createPostSchema), async (req: Request<{},{},CreatePostInput>, res: Response)=>{
const {title,image,category,content,published} = req.body
  client.CreatePost(
    {
      title,
      content,
      category,
      image,
      published
    },
    (err, data) => {
      if (err) {
        return res.status(400).json({
          status: "fail",
          message: err.message
        })
      }
      return res.status(201).json({
          status: "success",
          post: data?.post
        })
    }
  );
})

app.patch("/api/posts/:postId", validate(updatePostSchema), async (req: Request<UpdatePostInput['params'],{},UpdatePostInput['body']>, res: Response)=>{
const {title,image,category,content,published} = req.body
  client.UpdatePost(
    {
      id: req.params.postId,
      title,
      content,
      category,
      image,
      published
    },
    (err, data) => {
      if (err) {
        return res.status(400).json({
          status: "fail",
          message: err.message
        })
      }
      return res.status(200).json({
          status: "success",
          post: data?.post
        })
    }
  );
})

app.get("/api/posts/:postId", async (req: Request<GetPostInput>, res: Response)=>{
  client.GetPost(
    {
      id: req.params.postId,
    },
    (err, data) => {
      if (err) {
        return res.status(400).json({
          status: "fail",
          message: err.message
        })
      }
      return res.status(200).json({
          status: "success",
          post: data?.post
        })
    }
  );
})

app.delete("/api/posts/:postId", async (req: Request<DeletePostInput>, res: Response)=>{
  client.DeletePost(
    {
      id: req.params.postId,
    },
    (err, data) => {
      if (err) {
        return res.status(400).json({
          status: "fail",
          message: err.message
        })
      }
      return res.status(204).json({
          status: "success",
          data: null
        })
    }
  );
})

app.get("/api/posts", async (req: Request, res: Response)=>{
  const limit = parseInt(req.query.limit as string) || 10
  const page = parseInt(req.query.page as string) || 1
  const posts: Post[] = []

  const stream = client.GetPosts({page, limit})
  stream.on("data", (data: Post)=> {
    posts.push(data)
  })

  stream.on("end", ()=> {
    console.log("? Communication ended")
    res.status(200).json({
          status: "success",
          results: posts.length,
          posts

        })
  })

  stream.on("error", (err)=> {
    res.status(500).json({
          status: "error",
          message: err.message
        })
  })
})

const port = 8080
app.listen(port, ()=>{
  console.log("? Express client started successfully on port: "+ port)
})
In each HTTP CRUD controller, we evoked each of the actions provided by the interface contract to make the request to the server.
Since the gRPC server is already running on port 8000, we configured the Express server to run on port 8080.
Now split your terminal into two, run yarn start:server to start the gRPC server in one half and yarn start:client to start the gRPC client and Express server in the other half.
Make sure the PostgreSQL Docker container is running
Conclusion
In this article, you’ve learned how to build a gRPC server and client with TypeScript in a Node.js environment that uses a Postgres database. But there are a lot of things you can do with gRPC. You can follow the previous article Build a Node.js gRPC Server and Client: Register and Login User to add authentication to make the API safer.
You can find the complete source code on this GitHub Repository