

If you are a beginner in JavaScript, you may have heard of DOM (Document Object Model) Traversal. But what exactly is DOM Traversal?
The DOM can be graphically represented as a structured tree of objects called nodes with the document node at the root and the remaining nodes (including comments, texts, and elements) as the various branches.
Usually, when we traverse the DOM, it will be through an HTML element node. To be proficient in how to navigate up and down the DOM tree, it is necessary to have a good understanding of CSS Selectors and also HTML elements.

Having a good grasp of DOM Traversal and DOM Manipulation in JavaScript can make you stand out as a developer. Also, it helps take your JavaScript skills to the next level and makes it easy to build JavaScript scripts that are independent of Libraries, tools, and frameworks.
The previous tutorial in this series, How to manipulate the DOM, covers how to use built-in methods and properties on Nodes and Elements to manipulate the DOM.
It can be tedious to access each and every element in the DOM tree by referring to its class name or id. In this tutorial, we will look at some different DOM traversal methods, which give you the power to access DOM nodes.
Setup
Here is an overview of some of the methods we will cover in this article.
- getElementById()
- getElementsByClassName()
- getElementsByTagName()
- querySelector()
- querySelectorAll()
It is always recommended to learn by doing, meaning don’t follow this tutorial blindly. To better understand and retain the information you will get from this article, it is important to type and examine the examples we provide on your computer or laptop.
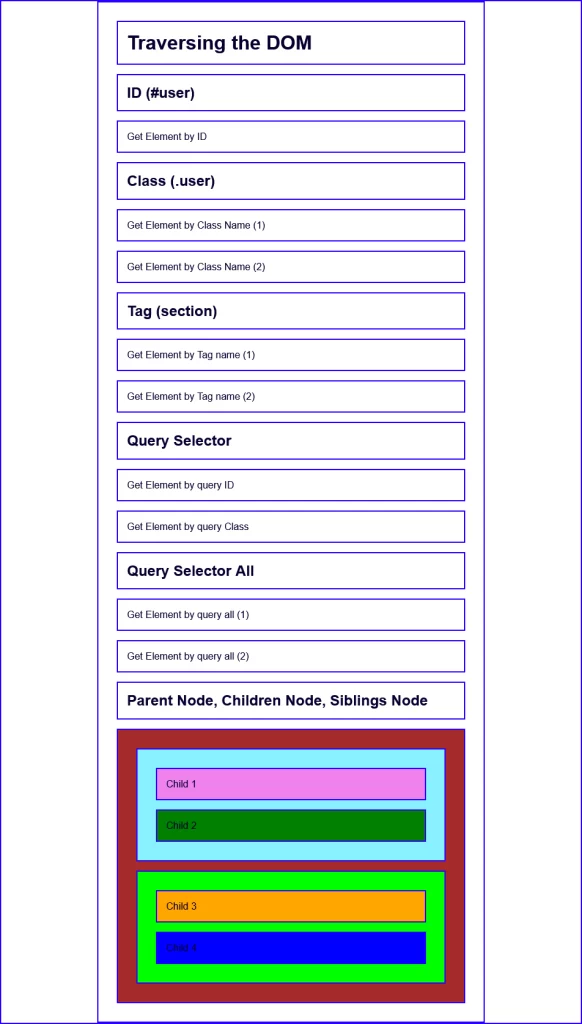
To begin, we will create a new HTML file called nodes.html and add the following HTML code.
<!DOCTYPE html>
<html lang="en">
<head>
  <meta charset="UTF-8">
  <meta http-equiv="X-UA-Compatible" content="IE=edge">
  <meta name="viewport" content="width=device-width, initial-scale=1.0">

  <title>DOM Traversal</title>

  <style>
    * { border: 2px solid #2600ff; padding: 15px; margin: 15px; background-color: #fff; }
    html { margin: 0; padding: 0; }
    body { max-width: 600px; margin: 0 auto; font-family: sans-serif; color: rgb(9, 1, 47); }
  </style>

</head>
<body>
  <h1>Traversing the DOM</h1>

  <h2>ID (#user)</h2>
  <div id="user">Get Element by ID</div>

  <h2>Class (.user)</h2>
  <div class="user">Get Element by Class Name (1)</div>
  <div class="user">Get Element by Class Name (2)</div>
  <div class="user">Get Element by Class Name (3)</div>

  <h2>Tag (section)</h2>
  <section>Get Element by Tag name (1)</section>
  <section>Get Element by Tag name (1)</section>
  <section>Get Element by Tag name (1)</section>

  <h2>Query Selector</h2>
  <div id="user-query">Get Element by query ID</div>
  <div class="user-query">Get Element by query Class</div>

  <h2>Query Selector All</h2>
  <div class="user-query-all">Get Element by query all (1)</div>
  <div class="user-query-all">Get Element by query all (2)</div>
  <div class="user-query-all">Get Element by query all (3)</div>

  <h2>Parent Node, Children Node, Siblings Node</h2>
  <div class="grandparent" id="grandparent">
    <div class="parent" id="parent-1">
      <!-- Child-1 and child-2 belong to parent-1  -->
      <div class="child" id="child-1"></div>
      <div class="child" id="child-2"></div>
    </div>
    <div class="parent" id="parent-2">
      <!-- Child-3 and child-4 belong to parent-2  -->
      <div class="child" id="child-3"></div>
      <div class="child" id="child-4"></div>
    </div>
  </div>
</body>
</html>
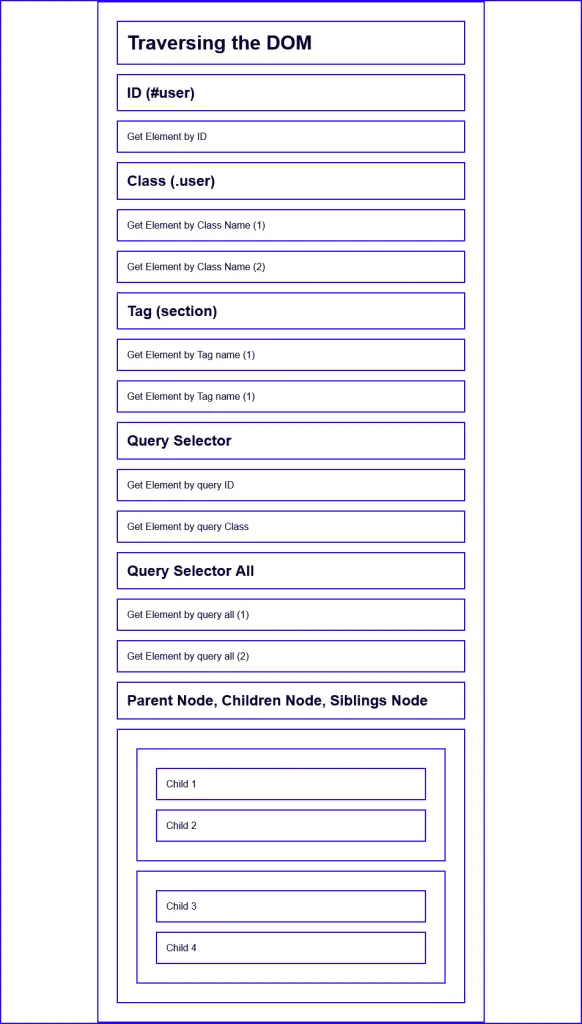
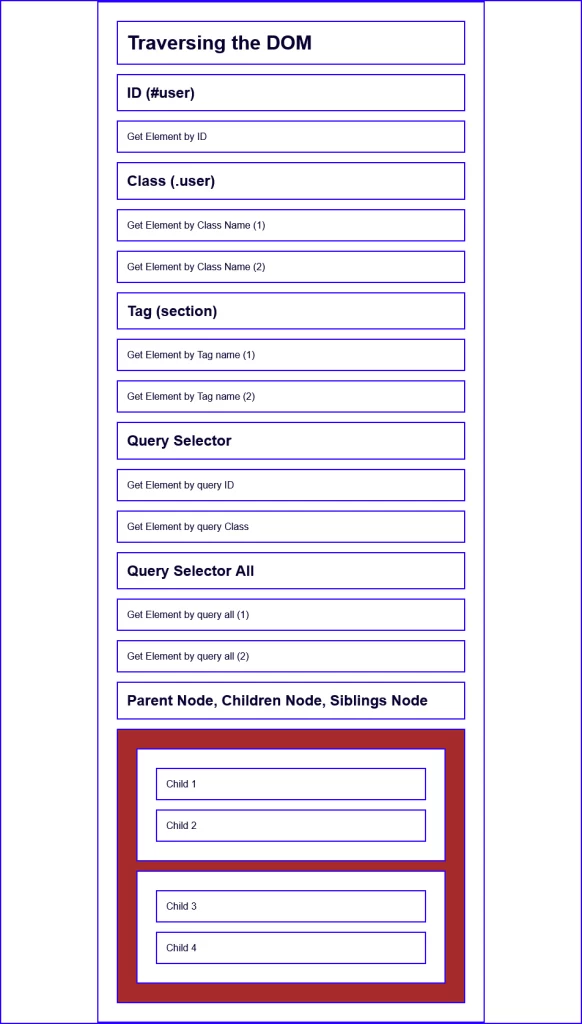
In the above HTML, we have many elements that we will be accessing with different document methods. When you preview the HTML in your browser, it should look similar to this:
We will be using the different methods the DOM API provides to access the available elements in the HTML file.
Accessing Elements by ID
The best and easiest way to select or access an element in the DOM is by its unique ID. The getElementById() method returns an Element object representing the element whose id property matches the specified string.
document.getElementById()
To get an element by its ID, the HTML element must have an id attribute and the string that will be passed as an argument to the document.getElementById() method must be equal to the value of the id attribute.
In our HTML, we have a div with an id attribute of user.
<div id="user">Get Element by ID</div>
In the Console, let’s get the element by its id and assign it to the userId variable.
const userId = document.getElementById(user)
Logging userId to the Console will return the HTML element belonging to that id
console.log(userId)
Output
<div id="user">Get Element by ID</div>
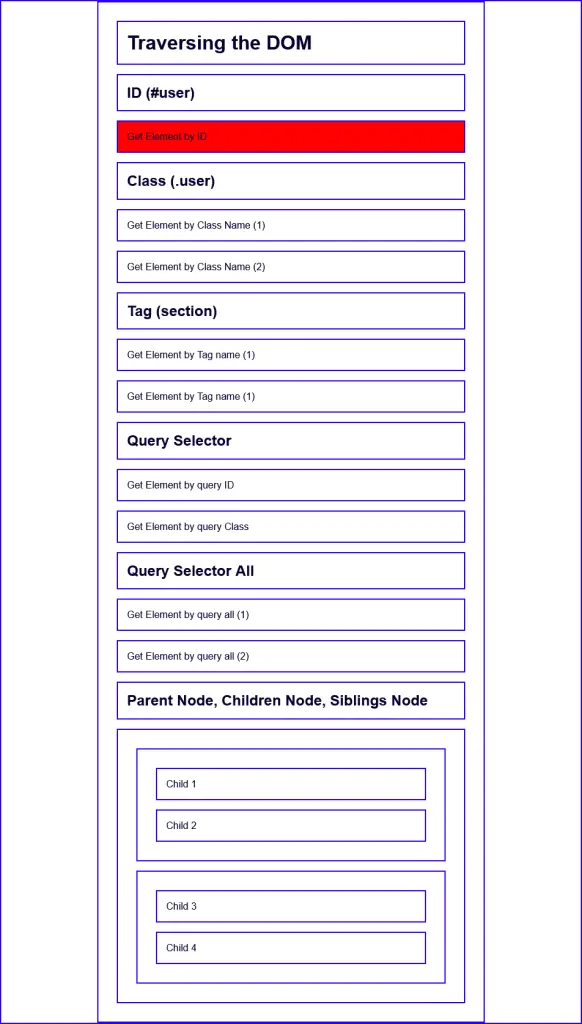
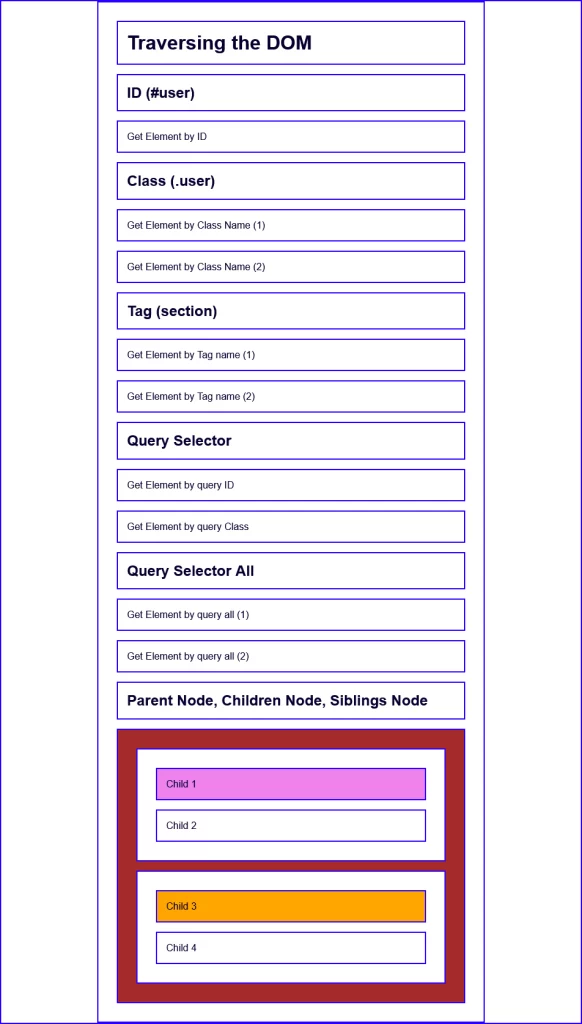
Let’s change the background color of the userId so that we can be sure we selected the right element.
const userId = document.getElementById('user');
userId.style.backgroundColor = 'red';
Once you do so, the rendered page will look like this:
Accessing an element by ID is an effective way since the ID is always unique to the page. However, it has a drawback; the getElementById() method is only available on the global document object, and not on element objects in the DOM.
Accessing Elements by Class
getElementsByClassName() method is another classic way to access multiple elements in the DOM by a class attribute.
document.getElementsByClassName()
Let’s say we want to access more than one element at once, and in our HTML we have two elements with a user class.
 <div class="user">Get Element by Class Name (1)</div>
 <div class="user">Get Element by Class Name (2)</div>
In the Console, let’s get the two elements and assign them to a userClass variable.
const userClass = document.getElementsByClassName('user')
The getElementsByClassName() returns an array-like object of the elements. We can convert the array-like object to an actual JavaScript array with the Array.from() method or the spread operator.
/* With the Spread Operator */
const userClass = [...document.getElementsByClassName('user')]
OR
/* With Array.from() */
const userClass = Array.from(document.getElementsByClassName('user'))
Both of these scenarios will convert the array-like object to an actual array so that we can use the available array method on it.
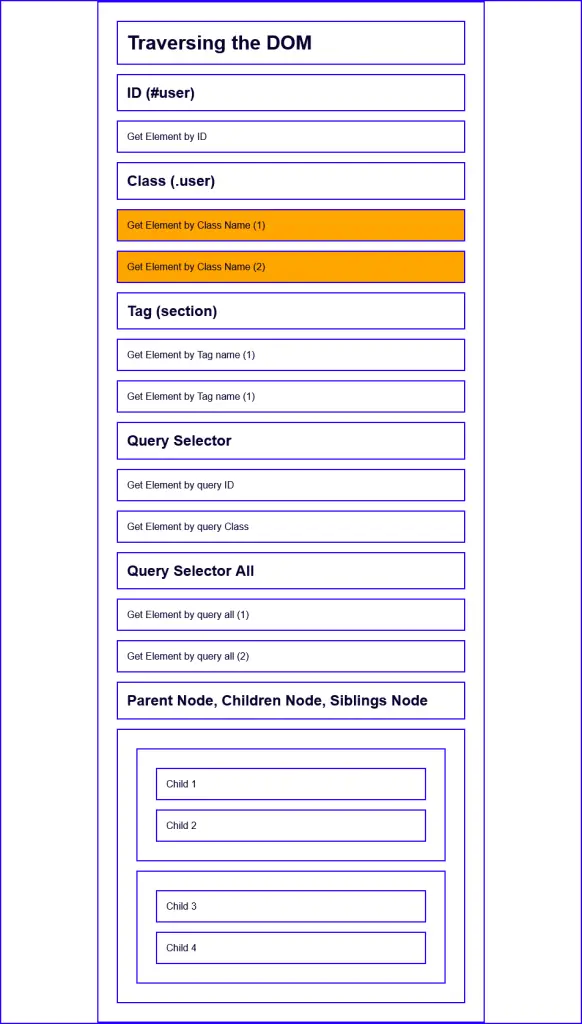
Let’s say we want to change the background color of the elements we accessed using document.getElementsByClassName() method.
To do that we need to loop through the userClass array and add the background color property as a style to each of the current items.
const userClass = Array.from(document.getElementsByClassName('user'));
userClass.forEach((el) => (el.style.backgroundColor = 'orange'));
When we run this code, the rendered page will look like this:
Note: the getElementsByClassName() method can be called on any element, not only the document.
Accessing Elements by Tag
The document.getElementsByTagName() method can be used to access multiple elements on the page by an HTML tag.
This method returns a live HTMLCollection of the elements that match the specified tag name.
document.getElementsByTagName()
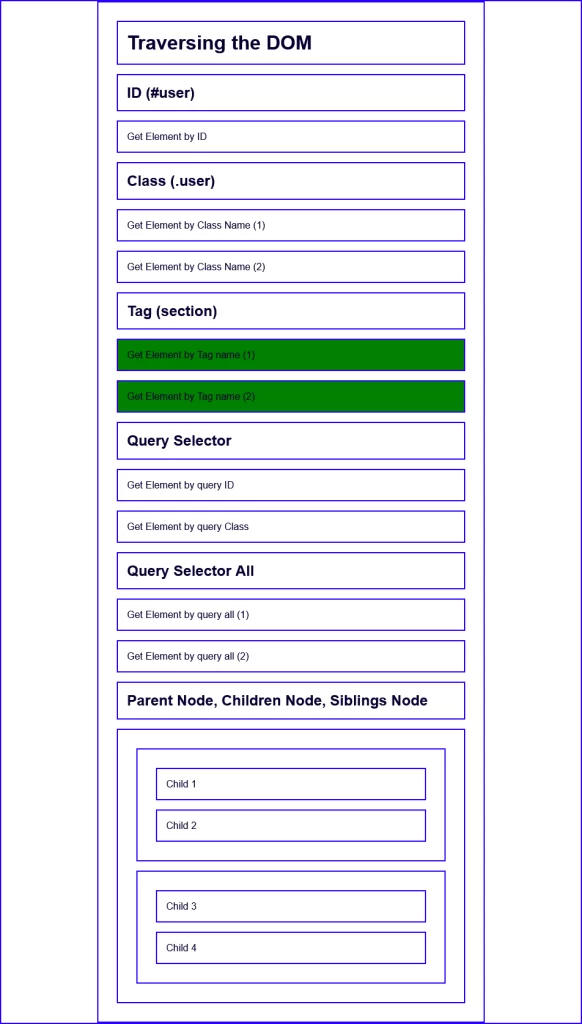
Let’s say we want to access the elements having the section tag name, in our HTML we have two elements with the section tag.
<section>Get Element by Tag name (1)</section>
<section>Get Element by Tag name (2)</section>
Just like getElementsByClassName() method, getElementsByTagName() will also return an array-like object of the elements. We can use for of loop to add a background color to each of the elements.
const sectionTag = document.getElementsByTagName('section');
for (section of sectionTag) {
  section.style.backgroundColor = 'green';
}
After running the code, you should see a rendered page like this:
Note: the getElementsByTagName() method can be called on any element, not only the document.
You can use “*” as the tagName to select every element on the page.
Query Selectors
querySelector()
The querySelector() is a classic method that can be used to select a single class or id element. If you are familiar with how to select elements with CSS then you can apply the same knowledge with both querySelector() and querySelectorAll().
document.querySelector()
To select a single element, we will use the querySelector() method. In our HTML file, we have a user-query id and class elements.
<div id="user-query">Get Element by query ID</div>
<div class="user-query">Get Element by query Class</div>
Now let’s select both the class and id user-query elements and give them purple & pink background colors.
document.querySelector('.user-query').style.backgroundColor = 'purple';
document.querySelector('#user-query').style.backgroundColor = 'pink';
The selector for an id attribute is the hash symbol (#) and that of a class attribute is the period symbol (.).
Note: querySelector() only returns the first element if multiple elements match the specified class or id.
querySelectorAll()
The querySelectorAll() method can be used to return all the elements that match the specified query.
In our HTML, we have two elements having the user-query-all class.
 <div class="user-query-all">Get Element by query all (1)</div>
 <div class="user-query-all">Get Element by query all (2)</div>
Now, let’s select both classes with querySelectorAll() and apply a background color of yellow to each element. This method returns a nodeList so we can convert it to an array using Array.from() or the Spread Operator(…).
const queryAll = document.querySelectorAll('.user-query-all');
Array.from(queryAll).forEach((el) => (el.style.backgroundColor = 'yellow'));
Here is the preview in the browser:

This example will return div elements within the document with a class user-query and id user-query.
document.querySelectorAll('div.user-query, div#user-query');
Using the query selectors is very useful because you can access any element or group of elements in the DOM with the knowledge you already have in selecting elements in CSS.
Node.parentElement
The parentElement property returns the node that is one level above it. This property returns null if the node has no parent.
In our HTML, we have an element with an id called “parent-1”.
<div class="parent" id="parent-1">
        <!-- Child-1 and child-2 belong to parent-1  -->
        <div class="child" id="child-1">Child 1</div>
        <div class="child" id="child-2">Child 2</div>
</div>
Let’s access the parent of the element with the id of parent-1 and assign it to a grandParent variable.
const parent1 = document.querySelector('#parent-1');
const grandParent = parent1.parentElement;
What we did was:
- We first selected the parent with the id “parent-1” with document.querySelector(“#parent-1”) and assigned it to the parent1 variable.
- We used the parentElement property on the parent1 Node to move one level above it in the DOM tree.
Let’s give the grandParent Node a background of brown to be sure we selected the right Node.
Note: the parentElement property will return null if the Node has no parent.
firstElementChild
The firstElementChild property returns the first node one level below the DOM tree. This property also returns null if the Node has no child elements.
In our HTML, we have two parent div elements each having two children.
<div class="parent" id="parent-1">
        <!-- Child-1 and child-2 belong to parent-1  -->
        <div class="child" id="child-1">Child 1</div>
        <div class="child" id="child-2">Child 2</div>
      </div>
      <div class="parent" id="parent-2">
        <!-- Child-3 and child-4 belong to parent-2  -->
        <div class="child" id="child-3">Child 3</div>
        <div class="child" id="child-4">Child 4</div>
      </div>
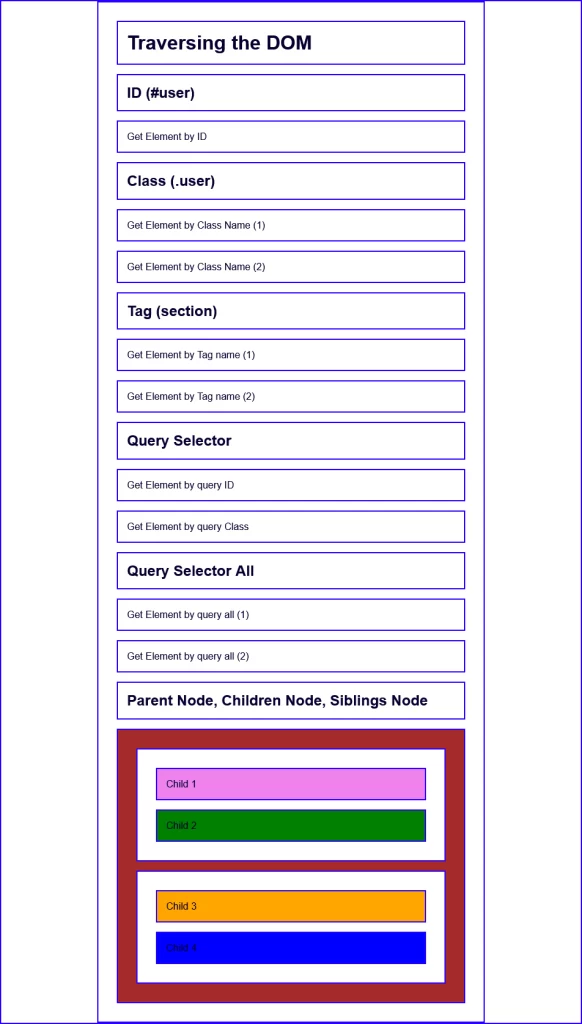
Let’s select the first child of the first parent div and give it a violet background color.
const parent1 = document.querySelector('#parent-1');
const firstChild = parent1.firstElementChild;
firstChild.style.backgroundColor = 'violet';
Also, let’s select the first child of the second parent div and give it an orange background color.
const parent2 = document.querySelector('#parent-2');
const firstChild = parent2.firstElementChild;
firstChild.style.backgroundColor = 'orange';
Here is the preview of the rendered HTML in the browser
lastElementChild
The firstElementChild property returns the first node one level below the DOM tree. This property also returns null if the Node has no child elements.
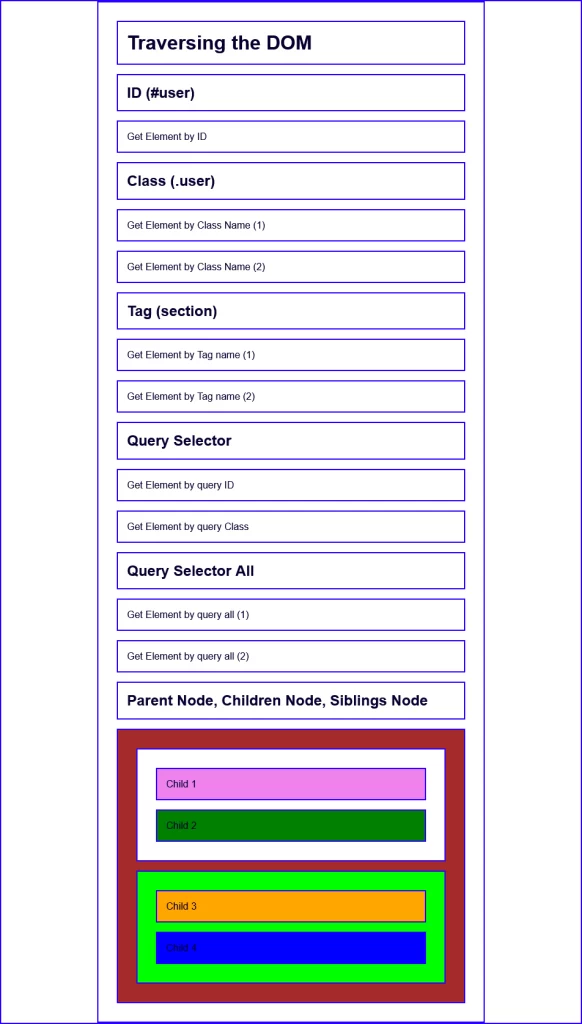
Using the HTML we used for the firstElementChild, let’s select the last element child of the first parent div and give it a green background color.
const parent1 = document.querySelector('#parent-1');
const lastChild = parent1.lastElementChild;
lastChild.style.backgroundColor = 'green';
Also, let’s select the first child element of the second parent and give it a blue background color.
const parent2 = document.querySelector('#parent-2');
const lastChild = parent2.lastElementChild;
lastChild.style.backgroundColor = 'blue';
Here is a preview in the browser:
nextElementSibling
The nextElementSibling property returns the element immediately following the specified one in its parent’s children list.
In our HTML, we have two parents having the same class names but different ids. Let’s select the first parent with querySelector() then use the nextElementSibling property to get the second parent.
Let’s give the second parent a background color of ‘#00FF00’ after selecting it.
const parent1 = document.querySelector('#parent-1');
const parent2 = parent1.nextElementSibling;
parent2.style.backgroundColor = '#00FF00';
Here is the rendered HTML in the browser:
previousElementSibling
The previousElementSibling property returns the node to the left in the DOM tree.
To demonstrate this, let’s select the second parent element with the id “#parent-2” and assign it to the parent2 variable.
Now, we need to call previousElementSibling on parent2 to get parent1.
const parent2 = document.querySelector('#parent-2');
const parent1 = parent2.previousElementSibling;
parent1.style.backgroundColor = '#89F1FF';
Here is the rendered HTML in the browser:
Video Tutorial on 9 Must Know DOM Traversal Methods
Conclusion
In this tutorial, we covered how to traverse the DOM with JavaScript built-in methods and properties.
With what you learned in How to Manipulate the DOM in JavaScript and this tutorial, you should be able to confidently select and manipulate any node in the DOM.
this article has been helpfull to me. get blessed.
Am glad you found the article helpful. Happy coding!
Very helpful article for JavaScript beginners.